

Tuesday, April 30, 2013
Card - Christmas Felt Ribbon
Monday, April 29, 2013
Card - SU Thank You

I started with a Certainly Celery card. I cut a piece of Lovely Lilac DSP to leave a small border. I cut a layer of white card stock which I treated the edges with the SU Eyelet Border punch. I created the side accents with the SU Round Tab punch and folded them in half and wrapped them over the DSP and white layer. This layer was glued to the card front. I stamped my greeting with the Sincere Salutations stamp set in Lovely Lilac to match DSP . I punched small SU 5 Petal punchies in white and placed them over the tabs and held them in place with tiny white brads.
Card - Textiles Experiment

Card - Just a Note Enclosure
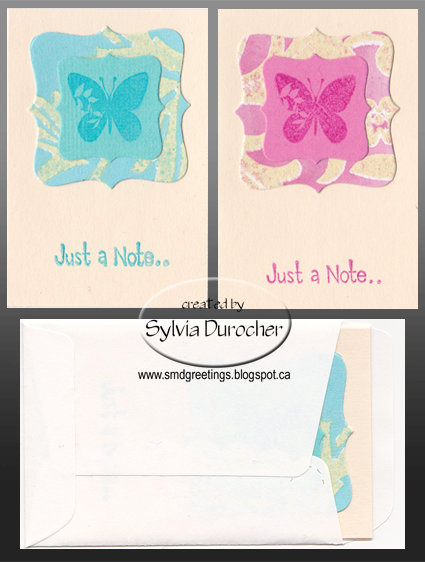
I used leftovers from a previous project. I cut the layers on top with Spell Binder Labels B Presto dies. The glitter paper with the larger one and the solid card stock with the medium one. I selected Tempting Turquoise and Pink Passion to stamp the butterfly and the sentiment. These are small clear stamps I bought at Michaels years ago. The envelope is cut with the Scallop Envelope Stampin' Up! Bigz Die from heavy text weight paper. It is glued to create an end opening instead of a top opening. See this project for my inspiration.
Saturday, April 27, 2013
Card - Yellow Daisies - Clean Up

With no stickers left in my stash I came up with a new idea for my trio. The card stock is Brilliant Blue and I punched 3 daisies in the same card stock. I mounted small yellow handmade paper daisies with blue eyelets. These were placed above the large greeting color printed on white. I then mounted this layer onto blue card.
Monday, April 22, 2013
Card - Good Job

I started with a Tempting Turquoise card with the 8.5x11 folding in half. I found a sheet in the Pink Flamingo DSP with just Summer Sun and Tempting Turquoise. I cut 9 squares at 1.5" and glued them to a square of white. This was laid onto a piece of Summer Sun. I trimmed the top of that piece with the scallop border from the SU Adorning Accents Edgelits. I then added another layer in white cut with the same Edgelit. I wrapped a piece of Turquoise 1/4" gross grain ribbon across the front and taped the end to the back. Added a short piece tied onto the long length. This layer was adhered to the card front. I added 3 white silk flowers above the scallops and punched small 5 petal punchies in Summer Sun and held those in place with tiny turquoise brads.
Earth Day - Cookie Cutter Shapes

For the card I printed a background poem onto white card. I then hot glued the leaf onto the card. I added a stem to the leaf with a marker. I used some chalk to added a bit of dimension to the leaf.
Here's a couple of links to get more information.
http://cutcardstock.blogspot.ca/2010/02/happy-recycling-paper-art-by-martha.html
http://davesgarden.com/community/forums/t/769893/
http://www.hillcitybride.com/2010/11/diy-from-pulp-art-plantable-paper/
Earth Day - Recycled Handmade Paper

Here's an idea to reuse printed bond paper and converting it into usable handmade paper for cards. This is a process of soaking paper, breaking down the paper in an old blender, adding interesting texture and color and making it into sheets. Used unsoiled napkins, tissue paper, gift wrap, computer paper can be saved from the garbage can and be turned into gorgeous paper.
Here are some helpful links
http://chemistry.about.com/od/chemistryactivities/a/howtomakepaper.htm
http://www.exploratorium.edu/exploring/paper/handmade.html
Friday, April 19, 2013
R2G Kits - Masculine Map HB

I started with a Handsome Hunter green card. I cut a piece of designer paper from Teresa Collins - World Traveler Maps just leaving a small border. I added a Kraft grosgrain ribbon across the DSP and I taped the ends to the back. This layer was adhered to the card front. I added a color printed greeting on Kraft punched with the SU Decorative Label. I added another label punchie to match the card. This was split in half lengthwise. I trimmed the pointy ends on the right and left ends. I glued these half just offset on the top and bottom. This accent was mounted over the ribbon with 3D foam tape. The kit has green, brown, rust, and blue cards.
 Here's a sample of the solid label being cut and applied the other way. For this cut the solid label crossways, trim off the pointy ends where you cut on both top and bottom. Then glue them to the ends as shown. I like the way the solid provides a break between the greeting and the ribbon.
Thursday, April 18, 2013
Card - Books

I started by finding small designer paper scraps in my bucket. A great scrap buster technique. I selected them in the brown tones. I cut them down to .75 but they needed to be trimmed some more. The sample I found indicated 5/8" which is closer to the right width. Length 4.75" before trimming the ends. The ends are cut with a circle punch. Check out the link above for details. I used my Chocolate Chip ink pad to color all the edges of the books before I glued them to a piece of scrap paper. I tied some thick crochet cotton around the stack of books and added 2 Cuttlebug die cut tags onto which I added my greetings. This was layered onto a piece of ivory which I used chalk to create a bit of a shadow and then adhered the stack. I mounted these layers to a dark brown card.
Saturday, April 13, 2013
Photo - Is Spring Coming?

Scrapbook Outlet - Opened this week

Check them out!
All Occasion Stack Class - Floral with Oval Greeting
 I expect to have a good class today despite the snow again today!!! We had a great class and everyone got all their cards made. Sweet.
I selected a pad of designer paper called Soft Serenity - Bitty Scrap Pads by Provocraft which provided nicely coordinated patterned paper for this split paper card. I cut the top piece of DP at 4.00x3.00 and the bottom is 4x2.25 inches. I made card kits in pink, lavender, olive green, and yellow. I die cut an oval ribbon slider in a coordinating color for the DP used with the Spell Binder oval ribbon slider die. I printed greetings in coordinating colors and cut the oval with my Creative Memories Oval cutter with #2 and red knife. I selected a ivory and gold organza ribbon. I taped the 2 pieces of DS paper together on the back and trimmed as needed to have even edges. I glued the greeting onto the centre of the ribbon slider. I pulled the ribbon through the slider as shown. I placed the ribbon over the join in the papers and taped the ends to the back. You can move the slider to where you want. You can add a bit of adhesive carefully to the back if you want it to be stationary. This layer is now glued to the card front. Several different greetings are provided for this set of cards in the stack. Below are a couple examples of the other colors and papers used.


All Occasion Stack Class - Daisy

 Here's a great card to have in your stash just waiting for the right time. I made these card kits in turquoise shown here, pink, purple, and bright green. I designed a script background which I color printed to match the card color. I then selected 1/4 inch gross grain ribbon in a matching color which I placed across the script layer and taped the ends to the back.This layer was glued to the card front. I assembled the accent by gluing the white circle in the centre of die cut label. It was cut with one of the framelits from the SU Apothecary set in the same card stock as the card. I punched a daisy in the same color which was glued in the centre of the white circle. I placed a rhinestone in the centre of the daisy. This accent was adhered over the ribbon with 2 pieces of 3D foam tape on either end.
All Occasion Stack Class - Scroll with Watercolor DP
 I started this card with the ivory scroll die cut. It's from a set of wedding DIY invitations I bought on sale at Michaels. The die cut was trimmed to leave even borders all around. I cut another layer of ivory from the invitation which I mounted to the card which just left a small border of the card color. I selected the card color based on the watercolor designer paper. I selected DP in warm yellow, purple, red, and blue. I glued the scroll die cut to the left side of the watercolor DP being careful not to put adhesive in the holes. I added a small button in the top right hand corner with a Zot which matches the card color.
All Occasion Stack Class - Book Birthday

Thursday, April 11, 2013
Card - Texture

I made this card 5.5x8.5 inches and chose a very bright magenta pink card stock for the base. I printed the greeting on a bright green layer which was trimmed to leave a small border. I then added a white layer embossed with a large Cuttlebug Large Polka Dots folder. The white layer was trimmed to create a background for the great pink silk flower. I added a silk leaf in the bottom right hand corner. I added a yellow felt center. The large white brad holds the center, flower, and other layers together.
Saturday, April 6, 2013
Card - Diecut Thanks

I selected a kraft card then I added a piece of this great Block Print designer paper. I cut the greeting letters with the Cuttlebug Red Tag dies in ivory card stock. I chalked them a bit with navy chalk. I wrapped the DP piece with navy seam binding and tied a short piece in a knot below the greeting.
Friday, April 5, 2013
Card - Epoxy Sticker - Happy Birthday

I started with a Baja Breeze card. I added a piece of gold glossy card stock which I embossed with the Cuttlebug Swiss Dots folder. I adhered it to the left hand side of the card. I cut flowers from white mulberry paper and I layered 2 of the large ones from Sizzix Flower Layers #2. I mounted an epoxy sticker in a coordinating color in the centre of the flower. I added a color printed greeting which was punched with the SU! Decorative Label.
Monday, April 1, 2013
Christmas Card Challenge - April - Coloring
The challenge for April was coloring. This could be watercolor, pencil crayon, markers, copics, acrylic, wax crayons and I've likely missed a few. Choose your favorite or challenge yourself with one you've had a hard time using and go for it! If you make a card let me a comment with a link to your card. I would love to see what you have made.

 Here's my card for April. I started with coloring some chip board coasters with Tim Holtz Distress Stain. See my previous posts for a sample. I chose the vintage colors for this card. I cut the letters from the Aged Mahogany chip board with my Sizzix Shadow Box Alphabet. I cut the SU! Apothecary die cut from Echo Park Paper - Tree Skirt from the Season's Greetings Collection by Lori Whitlock. I rubbed the edges of the diecut with the distress stain dauber. I glued the JOY letters to the Apothecary die cut with quick drying adhesive. I created my background layer with a piece of white card stock aged with the TH Antique Linen distress stain. I cut it down to leave a border. I found a piece of gross grain ribbon to match the letters and mounted it onto the back ground and taped the ends to the back. The background is adhered to a piece of coordinating green card stock. I glued the JOY letters to the Apothecary diecut with quick drying adhesive. The label diecut is adhered over the ribbon to the background with 3D foam tape.
Here's my card for April. I started with coloring some chip board coasters with Tim Holtz Distress Stain. See my previous posts for a sample. I chose the vintage colors for this card. I cut the letters from the Aged Mahogany chip board with my Sizzix Shadow Box Alphabet. I cut the SU! Apothecary die cut from Echo Park Paper - Tree Skirt from the Season's Greetings Collection by Lori Whitlock. I rubbed the edges of the diecut with the distress stain dauber. I glued the JOY letters to the Apothecary die cut with quick drying adhesive. I created my background layer with a piece of white card stock aged with the TH Antique Linen distress stain. I cut it down to leave a border. I found a piece of gross grain ribbon to match the letters and mounted it onto the back ground and taped the ends to the back. The background is adhered to a piece of coordinating green card stock. I glued the JOY letters to the Apothecary diecut with quick drying adhesive. The label diecut is adhered over the ribbon to the background with 3D foam tape.
Subscribe to:
Posts (Atom)