

Thursday, January 30, 2014
Card - No Greeting Crocus
Wednesday, January 29, 2014
Card - Victorian Stripes

Cards - Effiel Tower & Lake Scene

I started with a brown card onto which I adhered a Stampin Up! Top Note cut from graphic letter paper in caramel colors. I glued that to the card front. I found a Eiffel Tower image on-line at Call Me Victorian. Once printed, I cut it with my smooth oval Spellbinder Nestabilities. I mounted that onto the next size oval cut in deep red card stock. I added the grosgrain ribbon to the left top corner before I adhered the mail element with 3D foam tape.

This next card is same card kit in different colors. Here I used lake image from ReUsable Art. I color printed it and mounted it onto an ivory oval then raised with 3D foam tape.
Monday, January 27, 2014
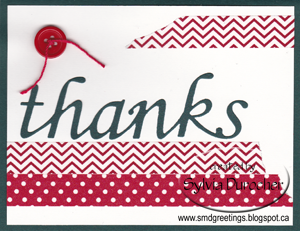
Card Club - My Thank You Card


I used this washi tape on my thank you card. I bought it at a wedding supply store which provided a different selection of tape than our regular craft store. I like the variety of color in this one. Here's the turquoise envelope I wrapped their cards in. I added a tag with turquoise bakers twine and stapled the it to the envelope and tied a bow.
Card Club - Incentive
Here's the cute cards I made for the girls at Card Club who paid for the full semester.

 I made note cards again. I color printed a sentiment with a line below on the card then applied washi tape below the line. It really helped to have the line to make sure my tape was straight. I chose a variety of sentiments to handle a collection of uses.


They received 6 cards - a combination of these 5 designs packaged in a great way. Check my next post for that pic.
I made note cards again. I color printed a sentiment with a line below on the card then applied washi tape below the line. It really helped to have the line to make sure my tape was straight. I chose a variety of sentiments to handle a collection of uses. They received 6 cards - a combination of these 5 designs packaged in a great way. Check my next post for that pic.
Card Club - Jan - Crocus Get Well

I did make some of these kits with sympathy greetings. I also chose deep purple and Kiwi Kiss green for some of the cards.
Card Club - Jan - DSP Split HB

I chose this butterfly/dragonfly paper which had stripes on the other side. I cut the designer paper to the regular 5.25"x 4.00" then cut from the top down to 3.24" leaving a 2" piece which I flipped over. These I taped together on the back so I could handle it again as a single piece. I glued it to a light pink card. I stamped the greeting in SU Garden Green with a clear stamp on a darker pink card stock strip. I placed this over the join in the DSP and trimmed as needed then adhered it. I added a couple of silk flowers on the left hand side of the greeting which are held in place with a yellow brad. Use a push pin to make a hole first.
I used a variety of designer paper and flowers. I colored printed the greetings for the actual card kits.
Card Club - Jan - Top Note HB

In all the kits the large oval provides a pop of color and the ribbon and brads coordinate.

Card Club - Jan - Wedding Hearts Trifold


I made some with cards with blue heart paper then I made some with double sided card stock with pink being one side. I folded it opposite of this one. I punched a heart and a Stampin Up Modern Label punchie with a Word Window punchie greeting. I chose Congratulations or Happy Heart Day which would work for Valentines or anniversary or wedding.
Thursday, January 23, 2014
Card - One Layer

Submitting it to Sparkles Christmas Card Challenges - One Layer.
Wednesday, January 22, 2014
Tea Cup Box


It would make a great favor for a Mother's Day tea, Spring tea in different colors of course. If giving a tea related gift it would very appropriate. I'm really happy how it's turned out.
How to fill it:
12 individually wrapped tea bags
a bag of loose tea with a tea ball
a gift card
oasis with a flower or two
a baby knitted item
Tuesday, January 21, 2014
Challenge - Dress Up a Die Cut

Sunday, January 19, 2014
Card - Washi Tape Tri-fold

I have sent them off for my monthly card exchange.
Thursday, January 16, 2014
Card - HB - Green Galore/Tempting Turquoise

Tuesday, January 14, 2014
Card - Ornament Trio

I started with an ivory card. The branches were created from a photo of an actual pine tree branch then placed at the top to anchor the ornaments. I created the speckled dot background which is color printed in green. I placed a trio of the ornaments on the card with the center one being a bit larger than the other two. This time the ornaments were filled with filigree pattern in 3 different colors. I added the string bow to each of them. I created a clear circle in the center into which I put the 3 words: Peace, Love and Joy. On the center one I printed Love again punched it out with a 1" punch and mounted over the center with 3D foam.
Card - Little Town of Bethlehem

Card - Holy Family Snow Globe

I started with a photo of a holy family porcelain art piece. I applied a filter to it to have only the edges highlighted in a dark green color, probably Always Artichoke. I cropped it into a circle. I created the base digitally and filled it with a rich jewel toned pattern. I color printed the greeting and wrapped it around the circle of the family. I cut a piece of acetate with my Spellbinder Circle Nestabilities which exactly matches the size of the snow globe. This suggests the glass part of the snow globe and it is held in place with a tiny brass star brad.
Card Display - Metal Wall Art
I changed up the way I display the cards I receive yesterday. I had a conversation with my sister recently about how she was going to do hers and it inspired to change mine. The picture on the left is a similar display I found on the internet because I forgot to take a picture before I filled it with my Christmas cards.


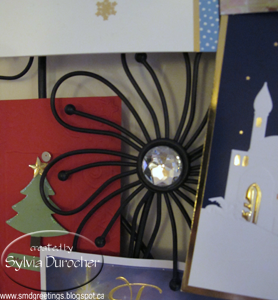 The stamens in each petal allows me to just tuck a card in without too much more to hold it in. I have added small magnets in some places to keep the card in place. I'm happy with it but my sense of order is a little troubled as I generally like things in a straight line, etc. but I think I will get used to it. The picture close up shows some of one flower and the magnet just above the star on the tree.
It will be pretty even if there are just a few cards but that is not bound to be often. Christmas is when I have the most.


It will be pretty even if there are just a few cards but that is not bound to be often. Christmas is when I have the most.
Monday, January 13, 2014
Christmas Thanks Yous

I glued the paper to bond paper to give it enough stiffness to cut with my Creative Memories oval cutter. I then cut the snowman out. I selected black card stock. I then embossed a piece of red card stock with the Cuttlebug Winter Snowflake large embossing folder. I trimmed it to leave a small border and added satin green ribbon. The ribbon was cut to allow the ends to be brought to the back and taped down. I then mounted the snowman oval over top with 3D foam tape.

On the card on the right I used caramel card stock with the same elements as the first. I moved the ribbon joint to the left hand side.
It's important to remember to say Thank You to those you remembered you this year, whatever form that takes. Do it!
Saturday, January 11, 2014
Challenge - Star Card

 I started with the tutorial on Splitcoast Stampers. The card was a bit harder than I expected because your measuring has to be right on. I started with a 8.5" equilateral triangle of designer paper. You then have to fold each point to the center at 4.25" of the opposite side. That was pretty easy. The next one is trickier because you want to fold just enough to have the fold join in the middle. It was about 1/3 of the remaining flap. I added a piece of white in the inside for my message. To decorate the front I cut a white scallop with my Spellbinder nestabilities then cut the corresponding smooth circle from an aqua paper. I mounted a green and then red Stampin Up! Five petal punchie with a small white five petal punchie. I put a aqua blue tiny brad in the center which holes all but the white layer. This was then adhered to the white layer. This accent was only adhered to one of the flaps to allow the card to still open.
Wednesday, January 8, 2014
Cards - Tiny Cards with Vellum Envys


Monday, January 6, 2014
Gift Card Holder - Black & White Hearts

 This is a wedding gift card holder. I started with a piece of 5.5" x 12" piece of card stock. I scored it at 3.5", 6", then 8.5" from each end. I placed the 2.5" mountain fold in the center which fills the middle of the card. This fold is glued together at the edges on the 3 open sides. This will hold the gift card so put adhesive only along the outer edges. I then used the Stampin Up! word window punch to create a slit along the fold. It takes almost 2 lengths of the punch to make the slit wide enough for a gift card which is usually 3.5" wide. I used the SU! Tab punch to create the part circle dip below the slit. This will allow the recipient to easily pull out the gift card. I placed 2 pieces of white bond measuring 5.25"x 2.87" on the front flap and back flap which give the giver a place to write their sentiments to the one receiving the gift. I used the SU! Slot punch to create the holes in the centre edge where the ribbon holding the holder closed is slipped through and knotted. A knot is better than a bow because I find most people will avoid a bow every time. The finished size is 5.5" tall by 3.5" wide and fits in a standard A2 envelope.
For the front: I cut a piece of black and white DP which says Congratulations over and over. I punched 2 hearts, one from pearl white and one from silver. I embossed the white a bit. I added piece of white 1/8" satin ribbon across the width of the designer paper then adhered it to the card front. I adhered the hearts to the card with 3D foam tape. I added an embossed SU! Modern label punchie in the pearl white also raised with 3D foam tape. I cut 3 lengths of satin ribbon - silver, white and black with silver edges, pulled them through both slots and knotted them.
Diecut - Sizzix Bigz Pro Die - Teapot Box

The normal go to adhesive would be the red super tacky tape but the tabs are not regular and some are small so cutting the tape without waste was not going well. I turned to my quick dry adhesive in a bottle. This worked great. I could cover the tab easily and completely right to the edge which is important. Small bull clips came in handy to keep the edges together for a few minutes. I did not read the instructions on line so this one I folded and glued the tabs at the top of the pot to the inside. This make the teapot shorter and lid not sit as well as it should.
Onto effort number 2.
Make sure you fold all the folds and press down with a bone folder before you start.
 This time the tabs were glued but not folded which left a border at the top of the teapot to match the edge of the cover. The fit is not as tight either which is better.
How big is it?
It is about 5" tall and the bottom is 3 1/8" square and the opening at the top is 1 3/4" square.
What does it hold?
It holds at least 10 individually wrapped tea bags.
It would hold probably 25-50 grams of loose tea if packaged in a flexible food grade bag with a twist tie.
It would hold quite a few unwrapped tea bags placed in a food grade bag with a twist tie.
I would suggest that some thought be put to how will the recipient remove the gift inside. A bag holding whatever it is would make getting it out easier.
How can I use it?
1) I think it is a great container to hold a tea related gift. I had hoped to use these for Christmas gifts but the die was delayed in shipping and the die cuts did not make it before Christmas.
2) A centre piece on a table for a spring tea holding a small gift appropriate for the event. The item could be given away at the end of the event. A Mother's day tea, also.
3) A wedding table center piece in ivory or white subtly patterned paper holding candy. Or maybe made of translucent paper with a flameless candle on the inside.
4) A hostess gift for someone hosting a Steeped Tea party with a favorite loose tea inside as a promotion.
5) Teacher gift for year end of school or Christmas holding tea bags.- My favorite tea is Joy put out by Starbucks only at Christmas time.
6) A gift container for a woman friend with sweets or bath products inside.
7) Filled with dunking cookies - biscotti, sugar cookies, or digestives. I'm there's a lot more options.
Well that is my 2 cents worth. I'm really happy with how they turned out!!!
Saturday, January 4, 2014
Card - Christmas TY - Washi Tape

These feature washi tape. On the left I placed a wide piece of washi tape across the bottom. I cut my greeting in black with the Memory Box thin die. I used snail adhesive to attach it to the card.
Friday, January 3, 2014
Letterhead - Digital - Christmas


I can start a library of these digital files which provides an alternative to what is commercially available. Of course they can be adapted to any color scheme one might like.
Christmas Card Challenge - January - Embossing
The challenge for January is a technique - embossing with all it`s variations. You can use embossing folders, heat/thermal embossing, letterpress, hand embossing, stencils with a stylus to mention a few. What comes to mind for you? This leaves the subject matter totally open. Give it a try and leave me a comment with a link to your card.
Here`s my card for this challenge.
 I chose an embossing folder by Cuttlebug which is called the Three Kings. I inked up the background side with navy ink so my sky would be colored. I ran the folder through the Big Shot with a piece of white card stock and then trimmed it down to fit it onto a navy card. I added the greeting with a small clear stamp in the bottom left hand corner. I added a bit of bling with an self adhesive rhinestone in the middle of the star.
 Here's my second attempt with a Stampin Up! Lovely Lilac die ink pad. Gives a different look and is messier. It took several tries to get one embossing I was happy with. I like the larger greeting on this one, which was done with a clear stamp. I was able to create some texture in the sky with this ink pad.
Here`s my card for this challenge.
I chose an embossing folder by Cuttlebug which is called the Three Kings. I inked up the background side with navy ink so my sky would be colored. I ran the folder through the Big Shot with a piece of white card stock and then trimmed it down to fit it onto a navy card. I added the greeting with a small clear stamp in the bottom left hand corner. I added a bit of bling with an self adhesive rhinestone in the middle of the star. Wednesday, January 1, 2014
2014 Christmas Card Challenge
I'm having a Christmas Card Challenge every month in 2014. I find that making cards every month brings me to December 1st with the cards I need and much less pressure. I will post the theme, options for that theme and my card the first of every month. You can decide how many to make each month to give the number you need. Join me in getting our Christmas cards done!
January Technique - Embossing
Embossing folders, thermal embossing, letterpress, hand embossing, stencils
February Christmas Animals
Reindeer, cardinal, polar bear, penguin, dove, camels, sheep, partridge, geese, chickadees
March Material - Vellum
Use vellum on your card.
April Tools - Punches
Shape, border, corner
May Christmas Buildings
Church, cottage, house, mansion, castle, igloo, stable, store
June Element - Banner
Use a banner on your card.
July Technique - Backgrounds
Brayer, sponged, stamped, watercolor, stenciled, spritzed, marbled, spattered, word
August Christmas Music
Carols, hymns, notes, carolers, drummer boy
September Material - Washi Tape
Use washi tape on your card.
October Tools - Dies
Cricut, SB Nestabilities, Framelits, Thinlits, Thick Dies, Sizzlets, Silhouette
November Christmas Light
Star, candles, moon, tree lights, bulbs, lamp post, lantern, fireplace,
December Element - Window
Use a window on your card.
2014 - Happy New Year!!

Subscribe to:
Posts (Atom)