Wednesday, February 10, 2016

Stampin Up Sale-a-bration Party

I had scheduled a Sale-a-bration Party for this evening.  Unfortunately, no one decided to attend so I cancelled it on Sunday.  Very disappointing but life is like that at times.

I called my demo, Gail and we agreed that we had this appointment on our calendars and we would honour it.  She came with the Mini Treat Framelits and we made a couple of samples.  She saw that I had ordered the Sunburst Thinlit Die and she had it so she brought it along to surprise me.  That was great!!

Here's the samples we made this afternoon.
This treat bag was made with vellum and we used mini glue dots to hold it together.  She brought the Rose Wonder stamp set and the Rose Garden Framelit set. We replaced one of the cutting plates with the Precision Base Plate in the Big Shot.  With that sandwich we cut the smaller rose from Cherry Cobbler card stock. We used the Big Shot Die Brush to release the die cut from the thinlit.  We got a very good cut.  We created a card to go inside which measures 3.5 x 5 inches folded.  We glued the rose in the bottom left hand corner with Fine Tip Glue Pen.  I stamped the frame and the greeting in Cherry Cobbler on Whisper White.  Then cut it with the corresponding framelit from the set.  It was adhered to the card from with Dimensionals.  I added some some shine to the rose with the Gold Wink of Stella Glitter Brush.  We applied some to the heart which we cut out of the lower treat bag. This photo does not do it justice.  It is very effective and easy to apply evenly. 

We used Real Red Envelope Paper for the bag.  We then used the heart framelit from the set to make a hole in the from of the bag before we assembled it.  We assembled it Multi Purpose Liquid Glue. I used a piece of non SU design paper which did not match the best but it gives me a sample. We created a card to go inside which measures 3.5 x 5 inches folded. Having placed the white card inside I was able to align my patterned paper heart very nicely. It was done with the Sweetheart Punch.  Isn't it nice when products are designed to work with each other.  We cut the bow, the word Enjoy from the same patterned paper and the banner from white with the other framelits in the set.
This is the third card we made with the Sunburst Thinlit.  It cuts all the rays for you.  We used on of the sheets from the Cherry on Top DSP 6" pad. The die is larger than the A2 card so once it is adhered to the card front you just trim off the rays to the card edge.  Quick and easy!!  We adhered the Crushed Curry yellow die cut to a Whisper White A2 card. We selected the greeting from the Sunburst Saying stamp set in Basic Black.  Placing the greeting is very easy.  There are so many possibilities for the greeting on this die.  It can be round, a heart, or a label.  It can be layered or not.  The accent can be adhered with 3D foam tape.
We enjoyed a cup of tea and a good visit following our card making.   Thanks Gail for going the extra mile.  I appreciate it.

Tuesday, February 9, 2016

Mosaic Monday - This Week


Left: The large rose is a nod to the coming Valentine's Day.  It is placed in a clear glass vase and photographed in front of a neutral background. 
Top Right: A ceramic glazed tile of tulips in blues and yellows - I wonder how it was brought to my house!! The colors were perfect so with a 30% discount at the thrift store it was in my bag. It currently has a brown frame so that will have to be replaced.  I now have a sunflower and tulips.  The sunflower needs finishing but I would not have thought of a wood frame so now I'm on the hunt for square wood frames. 
Top Middle:  A white heart ornament in a bowl of red balls.  Isn't great with stuff can serve for several holidays.  This heart is in a Christmas collection.
Top Bottom: The crepes served at the shower for the new baby girl in our extended family.

Sunday, February 7, 2016

Friday's Hunt 1.6

Submitting these to Friday's Hunt hosted by Teresa at Eden Hills.  The prompts are F, Favorite and Negative Space.  Looks like I missed the deadline for the link up. Enjoy the pics.

I chose this photo for Fence.  I like the dark fence in the foreground with the low sun in the sky putting the trees in silhouette.  It's a nice warm toned image.

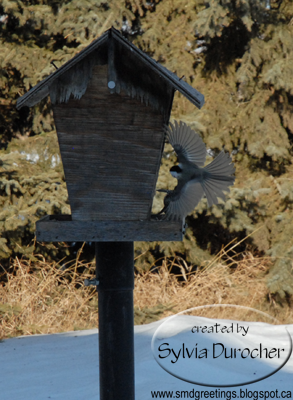
I loved this image of a chickadee at the bird feeder just ready to alight.  Wings and tail feathers spread wide.  I stood in snow up to my shins in gale force winds for about 15 minutes at least till my hands were so cold I just had to quit.  I had to stand still so the birds would some around to the feeder again after I arrived.  I usually take them from the front room window but with the larger camera I don't have the same distance in the zoom of the lens so I had to get physically closer.  Of course, I didn't know what shots I had before I brought them to the computer.  This is my favorite of those taken on Saturday.


I'm using this one for negative space. This is a cloud which had the sun dog shining in it or through it a few minutes earlier.  I had to stop the car, take out the camera and focus and thus missed the rainbow colors in the cloud. 

Shower - Baby Girl Shadow Box Frame

I attended a baby shower for my nephew's daughter today.
I designed the personalized square in the center with all the pertinent details for placing into a black shadow box frame.  The information was color printed on 8.5 x 8.5 inch piece of Stampin Up Whisper White.  I chose Pretty in Pink, Regal Rose, and Rose Red as my colors as well as a bit of Basic Grey.  I added a length of Pretty in Pink 1/4″ Stitched Grosgrain in the space I had allowed on the left and adhered the ends to the back.  I punched 3 Sweetheart hearts in Pretty in Pink textured card stock.  I added 3 large buttons and 3 small buttons in the same color held in place with Zots.  The hearts were adhered with 3 D foam tape.  The 8.5 inch printed square was adhered to a piece of pink paper from the Petals & Paisley double sided designer paper set which was trimmed to 10.5 inches square.  This was then adhered to a piece of 12x12 Pretty in Pink card stock. It was mounted inside the shadow box the the back put in place. I added a length of the same ribbon to the back hangers and knotted it to hang the frame on the wall.

The mother requested books instead of cards so I chose the Velveteen Rabbit with a nice pink cover. This is one of my favorite children's book.

Friday, February 5, 2016

Christmas Squares

It's been months since I worked on challenge cards.  I had a bit of time today so I did it.
I started with a Stampin Up Old Olive card which I put in the landscape orientation.  I have selected Letters to Santa DSP which was trimmed to leave a small border. I wrapped a piece of Whisper White grosgrain ribbon over the join of 2 pieces of DSP. The ends are taped to the back.  I stamped the greeting and distressed the edges with Old Olive on WW. The greeting is from Good Greetings. I adhered it across the bottom third of the card.  I cut a piece of Early Espresso with the QuicKutz Square Window die.  I adhered a piece of WW behind it and stamped a snowflake from the Delightful Decorations stamp set with Old Olive in each square.  It was adhered to the card front with 3D foam tape.

Submitting this card to the following challenges:
Stampin Celebration - Sketch - 121

Holly Jolly Christmas Challenge - Frame It

Crafty Hazelnut's Christmas Challenge - Anything Goes

Thursday, February 4, 2016

Share Your Cup - Work Out

I've been walking inside for a while because the winter weather just does not make easy to do outside.  It's time well spent to keep me healthy and active.  I find it starts my day on a good note.  I'm looking forward to being outside again.

I have several DVDs I rotate to keep it interesting.  I found this one yesterday and it is completely customizable.  I choose the warm up, how many miles I want to walk from several options and then a cool down.  It offers me the flexibility I've been looking for in an exercise video. 

I start with a large glass of room temperature water which I am fortunate in that I can just guzzle it down.  On with the shoes, set up the work out, add some stretchy band for toning and another big glass of water at the end.  I've had 2 of my 8 glasses of water for the day and I head to the shower.

I'm very happy!!!

Sharing at Sharing Your Cup hosted by Carol at Art & Sand.


Tuesday, February 2, 2016

Mosaic Monday - Hearts & Green

Valentine's Day is just around the corner so I thought I would include a heart photo. I set up a glass heart dish I received from my parents upon graduation from college.  I placed a couple of paper heart doilies inside and a circle doily on the blue placemat.  The bird is a stuffed wool bird made by my niece as a Christmas Ornament but it adds just the repetition of red I wanted.


Did the ground hog see his shadow?  It's an early spring they say!!! Either way spring is coming.  I decided to add some green living thing to my collage today.  It's a devils ivy that my sister started for me and it's still alive after at least 6 months which is a good record for me.  I placed the yellow pot on a doily, glass plate and one of my large yellow chargers.  The colors coordinate very well.

A collage of stones and shells.  I have a small collection from travels to Florida and Nova Scotia.  Remembrances of warmer weather which will soon return here.

Sharing at Mosaic Monday hosted my Judith at Lavender Cottage.

Blog Give Away Winners

I had a few comments left on my feature post leaving their favorite tea.

Margie - Earl Grey Tea - Ontario

Linda L - Green Tea from China - Alberta

Jyl B - Christmas Cookies Roobois - Ontario

The calendars in magnetic pocket frames are on their way to the above ladies.  Enjoy it throughout the year.  Keep an eye out for the tea photo calendar for 2017.

I included this note card in with the calendars.


Monday, February 1, 2016

Christmas Card Challenge - Feb - Blue / Snow

Here's the card for my blog Christmas Card Challenge.  For February the prompts are Navy Blue and Snow.

I ended up with a warm dark blue so it may be teal instead of navy.  I wanted to create a night sky with snow falling.  I chose the Sizzix Softly Falling embossing folder which I inked up with TH Distress Stain in denim blue but as you can see it's not anymore.  More about that here. I chose a card that coordinated and I adhered it to the card front.  I ripped a snow bank from white card stock. I cut a white triangle tree which I embossed with a Tim Holtz Alterations Star folder then I adhered it to the card front aligning the bottom of the tree to the bottom of the snowbank.  I added a silver star sequin at the top held with a Bling Zot.  I added a few silver rhinestones.  Then 3 small pearly snowflakes held in place with tiny white brads. 

Submitting to Anything Goes Challenge at Weekly Christmas Card Challenges.

Sunday, January 31, 2016

January Birthday Cards - Belated

I'm getting caught up on my January birthday cards as they are late!!

The winter photo card is for my brother who's birthday is in early January.  This photo was taken near my Mom & Dad's place.  There was a bright sun and frost on the trees.  I love the shadows.  I cut it down from 4x6 to 4x5.25 inches. I mounted it to a black card.  I added the greeting made up of a blue Stampin Up Modern Label punch and a greeting punched with the Word Window.  I layered these together and adhered them to the card front with double sided tape.


This card is for my sister who celebrated her day this week.  I chose a yellow card.  I adhered a Happy Birthday embossed layer created with the Cuttlebug folder. This was adhered to the card front. I punched a large daisy from the same card stock.  I punched a black one to layer behind.  I punched a 1/2 inch black circle to provide a background for my yellow brad.  I added a bee to the flower.  The bee was a button from which I removed the shank with my cutting pliers.  I held it in place with a Bling Zot.

Saturday, January 30, 2016

Share Your Cup - Light Furniture

This chair arrived today.  I purchased it several weeks ago while visiting my sister but it would not fit in my car for the ride home so I needed it delivered.  My sister and my brother in law brought it to my house today for the price of lunch. Thanks so much!  It's made of light colored wood  (maple? pine?) which matches the rest of the furniture in the living room which I have collected over the last 20 years. I have passed up several glider chairs in the last several months and I am glad I waited. The covers are removable and my sister had washed them once.  Someone in the past had washed the cushions without removing the covers which requires removing the buttons and putting them back once the covers are back on the cushions. The buttons were covered with the same fabric as the covers but the backs were metal.  Since the cushions were left wet for a while I suspect, the backs rusted and stained the fabric around the buttons.  These stains did not come out when they were washed the first time. I made a mixture of water and bleach half & half and sprayed it on the stains a couple of times making sure to rinse the fabric right away.  Success!!! I gave the wood of the chair a complete wash from top to bottom while the covers were in the dryer. Once the covers were dry,  I decided to replace the buttons with some from my Mom's collection (check out the small pics in the bottom corner).  I chose some ivory pearly ones with shank backs. With a long needle I threaded them to the back and tied them to pearl buttons with 2 holes.  This will allow me to easily remove them when I wash the covers.  Did you see the color of the fabric? They will need regular washing.

The cabinet on the left is a multi purpose cabinet. My TV lives on the top. Inside, it holds audio and video media, candle & wax, and other miscellaneous stuff. This is one of the original pieces of pine wood furniture I purchased from IKEA years ago.  The train on the floor in front of the cabinet was made by my Dad.  Not sure what the wood is but it fits right in!

The secretary desk on the right I purchased earlier this year.  It's pine. I bought it second hand because I could not find a real wood piece to match the furniture I bought a long time ago.  My niece even noted when she helped deliver it that "Auntie, it matches the rest of the furniture!" Exactly!  I store my table linens, cream and sugar set, vases, coasters and such in there.  These are close at hand when I want to change the look of the table.  I've put my mercury glass tree and the similar candle holder with a yellow candle. In the center is an angel tea light holder.  Above is my card holder which still holds Christmas cards.  The dining room table and sofa end tables are also pine from IKEA.
Sharing this post with Sharing Your Cup #182 hosted by Carol at Art & Sand. 

Friday, January 29, 2016

Friday's Hunt 1.5

I'm joining Friday's Hunt 1.5 where the prompts are start with the letter E, Favorite, Sky.

I chose Egg for the letter E.  Eggs are smooth, oval and perfect.  I nestled it in some brown rice in a small rectangular china dish. I imagine it's designed for condiments or sauces.  I used my sunflower hot spot as a background.  You can check out another egg photo I took a while ago.


Favorite: Grapefruit is one of my favorite fruit.  They are in season and reasonably priced these days.

I repeated the circular theme by surrounding the fruit with lavender loose leaf tea onto a white round ironstone plate.  The white plate was on a gold charger plate but I ended up cropping that.

I love this shot in late fall.  The sky is so animated with a storm rolling in.  The sun was setting and putting light on the far hills.  In the foreground, there are birds on the water as they prepare to migrate.  Unfortunately, power lines are pretty much unavoidable but are quite subtle in this shot.

Submitting to Friday's Hunt 1.5 hosted by Teresa at Eden Hills.

Monday, January 25, 2016

Mosaic Monday - Tea, Stills & Exercise

Today when I opened my treat box there was still a couple pieces of chocolate!!! Hard to believe but true.

I got the table ready for a cup of tea but I am just getting around to it very late in the day.

This wood stand is something my Dad made on a lathe years ago.  I was really happy to see that my cake stand top fits over it nicely.  I placed doily between the two and added a yellow candle on top.  The wood stand has great color and various woods.  I'm trying to work out how best to see it's beauty.

I have returned to my exercise after being sidetracked with bronchitis a couple of weeks ago.  To quote one of the senior ladies in my card class today. "Use it or lose it." Her comment on how some seniors in her residence prefer to just sit around and not do much.  She is in her eighties and she cuts an d glues with the best of us.

Submitting to Mosaic Monday hosted by Judith at Lavender Cottage.

Card Club - Incentive - Thank You Card

Here's my thank you card for the ladies.  I started with the felt owls.  They were stuck to wooden clothes pins.  With the steam on the iron I was able to soften the glue without harming the felt and the owls were easily removed from the pins.  I chose a 12x12 inch sheet of metallic turquoise designer paper by g.c.d. studios - Cosette Collection - Kaleidoscope. This is the back side.  I cut it to 5.5 W x 2.5 T and ripped the top and bottom edges.  The greeting was color printed onto vellum and clear embossed.  It was cut to 1.70" tall.  I placed the adhesive on vellum where it would be hidden by the owl.  The felt owl was adhered to the card front with hot glue.  The metallic paper repeats the color of the wing which works great.  I'm clearing stashes of supplies as I have used these before on this project.   Really like this card.

Card Club - Incentive


When the ladies in card club sign up for the whole semester they get a small gift.  These are the cards I made this session.
They are made with Stampin Up Blossoms Abound stamp set.  I selected several of the flowers and sentiments which I just mixed and matched.   There was the square, the wreath and the rectangle.  These were done on white card stock and the colors are Smoky Slate, Daffodil Delight, Strawberry Slush, and Wild Wasabi.  They are great cards to have on hand so when one needs a quick card they are ready to go.


I thought there should be at least one male oriented card in the set so I chose the Wetlands stamp set. I did it in Soft Suede.  The goose and the greeting are both from this set. I love the sketchy feel to the graphics in this set.

Card Club - Jan - Doily Heart

This is my nod to those in the group who might wanted a Valentine's card.  It would do as an Anniversary card and maybe even a wedding card. 
I selected the DSP from Prima - Zephyr Collection - Zanella.  I added it to a warm green card.  I added the white heart doily to the right hand side.  I cut a warm pink heart with the Sizzix Tipsy Hearts die which I glued to the center of the doily.  I cut LOVE from pearl card stock with the Cricut and the Sentimentals cartridge at .75 inches.  It had enough width in the letters to easily glue to the card front. 

Card Club - Jan - Felt Buttons

This is a cute and playful card.
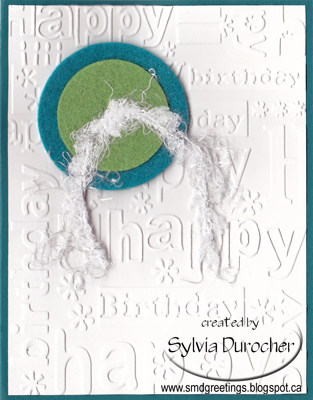
I selected 2 felt buttons in 2 sizes, the large in teal and smaller in green.  I tied them together with white shimmery fiber.  I then added a Zot in the back.  I selected a dark teal card.  I cut my white layer to 4.00" x 5.25" and then embossed it with the Cuttlebug A2 Happy Birthday folder.  I glued the greeting embossed layer to the card front then adhered the felt button accent in the top left hand corner.


Some kits have the pink and purple version of buttons as well as the Cuttlebug A2 Thanks Words folder.


Card Club - Jan - Plaid HB

This is a card for a guy.  I chose a bold navy and cream plaid DSP by Graphic45 - A Proper Gentleman Collection - Cultured Reserve.  I added a cream seam binding across the DSP and adhered it to the card front leave a bit of slack.  I then tied a short length to it in knot on the left.  I color printed the greeting on cream card stock and cut it with the Stampin Up Window Frame Framelits. I added a 2 3/8" square of navy card stock behind it.  This layer was then adhered to the card front with 3D foam tape.

Card Club - Jan - Prima Flowers

We start another session of Card Club.  I selected several dark card stocks - black, navy, burgundy and purple.  I placed a length of 7/8" wide gold glittered organza ribbon across the card front and taped the ends to the inside of the card.  I layered 2 Prima flowers one gold and one silver together then added a flower sequin in the center.  Using a push pin to make a hole through all layers I held all the layers in place with a tiny brad.  For the kits I used textured card bases which added a little something to the cards elegance.

Sunday, January 24, 2016

Friday Hunt 1.4

This is a dictionary I brought home from my parent's house this weekend.  It's time to clear things from their home and my sister and I have decided to divide this very old book.  I do not do this lightly as I consider books very special.  I thought I would at least try to document it a little.  I will do more research and update once I have more.  It is the photo for my "D" word.


I took this photo of a church on my drive home.  It is my favorite shot this week.  and could count for the sky as well as it was not bright at all.
The third prompt this week was Beautiful.  Sorry!

Submitting this post to Friday Hunt 1.4 hosted by Teresa at Eden Hills.
Prompts are:
D
Favorite
Sky Beautiful

Update: What I have found is that the dictionary dates from 1945 that makes it over 70 years old.