Thursday, August 31, 2017

Sympathy - Cat

I made this card for my sister who had to put her cat of many years down this week.

This has been a season of loss for her because her husband's sister just lost her husband.  That makes 2 losses in a couple of weeks.

He was a well behaved cat. I know because I am not a cat person and he did not bother me when I visited her house. 

I am sure she will miss him a lot.


Sympathy - Blue Green Tones

This is the card I made for my brother in law whose sister lost her husband. 

A similar design to the last one.  I like this layout for a 4" square of designer paper.  

I ripped the square in 2 then ripped again towards me to remove the white edge.

I adhered them to the front of a deep warm green card where I shifted one down and the other up.  I stamped the sentiment from Stampendous on white card stock with Evergreen VersaColor ink and clear embossed it.  I ripped the top and bottom and adhered it in the center of the card. 

I punched a Martha Stewart butterfly punch from deep green card stock and adhered it above and to the left of the sentiment.

Sympathy & Card Set

I made this card for a friend who lost her husband recently.  They had recently moved to BC after his retirement and he passed very suddenly.

I used some designer paper from Michaels called Teal Paisley.  I love the watercolor effect of this paper with the colors ranging from turquoise to green.   I cut the paper into 4" squares. Here I have ripped it in half and shifted the piece up and down.
I stamped the sentiment from Stampendous in Green Tea Versamark and embossed it in clear powder.  I ripped the to and bottom of the greeting and adhered it in the center of the card.
I punched a butterfly with a Martha Stewart punch from warm green card stock and adhered it above and to the left of the sentiment.

I made a set of cards that coordinates for her to use as she needs during this difficult time.  The butterfly die in white was cut with the Sizzix Winged Beauties die.


The memorial service is today and my brother in law will be by his sister's side.  I have spent many a Christmas Eve with this couple unwrapping "Treasures".  He will be missed.

Wednesday, August 30, 2017

Photo Card Gift Box

I have put together a box set of photo cards for a prize at an upcoming charity event.

I chose 3 rural images which have been cut to 3.5 x 4.75 inches leaving a generous border.  They have been adhered to a heavyweight white A2 card.

The first is three heads of barley against a stormy sky.


Second, is a field which has been combined leaving windrows of straw behind.  Again, the sky is very expressive.


Third, a field of bales on rolling hills with a wonderful blue of water in the background.


I have packaged 12 cards (4 of 3 designs) in a 6x6 clear box with an information card stock insert.


Tuesday, August 29, 2017

Garden Flower Mosaic


A walk to the community garden yielded many flowers. Geraniums, poppies, Echinacea purpurea or cone flower, gladiolas, straw flowers and sweet peas.

The season is coming to an end and the flowers are giving their best to finish in wonderful color.

Sharing with Mersad who hosts Through My Lens Nr 109.

Tuesday, August 22, 2017

Glittered Thanks Card Set

I colored a several of these Spectrum Noir colorista card making sets with colorable glitter.  I had my eye on these for quite a while but they were to pricey.  These I found on sale for just over a dollar for 6 cards so I bought 3 sets.
 
Most of the flowers are glittered but I chose to only color the daisy looking ones and not the tulips ones. 

I used Stampin Up Watercolor Wonder Crayons and a couple other sets of watercolor to provide a variety of looks and colors.  I applied the color with a round brush.

This one to the left is quite soft in color and subdued in tone.

You will see from the ones below some pop with great color and some are monochromatic so I stuck with various shades of the same color.

I am not sure where they will be donated yet.

Monday, August 21, 2017

Recent Snapshots


Here is a few flowers I captured on my walk this morning.  The left is a nice yellow speckled flower. Is it a lily?   The pink center one is a Cosmos.  There was a full bed of them it was great to pick out a few for photos. The right is a nice purple color but again I do not know it's name.

I took a trip to the country to celebrate my aunt's birthday.  We spent some time on Saturday at a local fair which is so much different that city events.
My aunt's husband was driving this truck in the parade with one of the many local celebrities.  We watched the parade go by and the kids caught a lot of candy.


We visited the local museum.  I captured this old camera used in the 1920's by a local person and it was donated by his family.

It is a Kodak as indicated on the metal support which locks the camera closed when put away.

It features leather, metal and wood resulting in a quality product.


The blue jay was having a great time in the bird bath.  As you can see the water splashing a lot.  I love how I captured the water drops.

He came out with a spiky hair do!


Sharing with
Through My Lens #108 hosted by Mersad at Mersad Photography.

Perky Poppies - Card Exchange

Today, I made some cards for my monthly card exchange.

I chose a piece of decorative paper from my stash featuring yellow, orange and blue.  This is acrylic paint on white card stock with sponging using stencils to provide some texture and interest.

I cut it to 3.75 x 5 inches. 

I then cut my flowers with the Memory Box Perky Poppies die from navy card stock.  I trimmed the die cut down to fit onto the decorative paper.  I adhered it with tape behind the band at the bottom and a bit of quick dry adhesive behind the poppies.

This was layered onto a navy piece of card stock which matched the flowers.  I then adhered it to a golden yellow card base.


My second card was a navy and orange combination.  I chose the same decorative paper and the navy poppy die cut.

I cut my die cut too short so it did not meet the bottom of the navy layer but since they are both the same color it works. 

On this card I chose a tangerine colored card base which works well with the decorative paper.


These cards are off to my card exchange buddies today.

Friday, August 18, 2017

Perky Poppies - Happy Birthday

I made a card for my aunt who is celebrating a birthday this week.

I started with the Memory Box Perky Poppies die and cut them from heavy white card stock.  You can leave a space at the bottom for a greeting which I did.

I selected a piece of my decorative paper in greens and purples to which I adhered the flowers.

I stamped the greeting onto a scrap piece of the same paper and trimmed it to leave a border and adhered it with 3D foam tape.   I used SU Marina Mist ink.

I then added a white layer leaving a small border then adhered that to a purple card.


Wednesday, August 16, 2017

Stainless Set - Jasmine Tea

After seeing my sister's stainless steel teapot I was inspired to consider something similar. 


I saw this one at the thrift shop and thought I would give it a try.  It has a built in infuser which makes things easier.  I put Jasmine Green in it this morning and placed it on my sunflower hot spot.

The quality of the teapot is not great and the challenges of photography are considerable with all the reflections.


I am using my IKEA 353+ Cobalt Blue dishes for breakfast.

Still eating raspberries from the freezer to make room for a new crop.  A dollop of yogurt and a bit of cream will top of the healthy dish.

I added a banana and a bran muffin.

Here's the whole set I have collected over the last few weeks. 


Sharing with Bernideen's Tea Time
Ruth at  Tuesday Cuppa Tea hosted by Ruth

I would have love to get right into National Afternoon Tea Week but there are too many pressing matters with my parent's upcoming move.

Monday, August 14, 2017

Recent Snapshots

I jumped into the growing stuff this year as someone was offering small yellow pear tomato plants for a good price.  My mom grows hers I thought I could too.
It involved a big pot, a lot of soil, sticks to brace the plants and water every day.  I bought these plants on May 29th.  It's been 2.5 months and I have yet to eat a tomato.  I'm not sure I will.  I probably have 20 little ones on the 2 plants but they seem to be at a stand still.
I understand from gardeners my problem is that I don't have enough sunlight on my balcony to grow almost anything.  I was hoping to have cutting flowers for vases next year for my table but not enough light.  Does anyone know of cutting flowers I can grow with east light please leave me a comment.

I picked chokecherries early last  week but it was too soon.  I had to pick around the red ones and only choose the ripe ones. Not great time. Good thing I only pick a little bit.

I will have to try again soon.


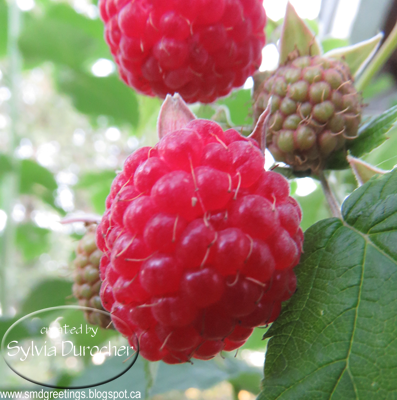
I spent 3 days with Mom and Dad last week.  I was there to take them to medical appointments but I picked raspberries too and did a bit of packing.

My Mom has a wonderful raspberry patch.  The raspberries are big and luscious.  It's easy to pick because Mom always has managed her patch in the off season to tie up the canes, get rid of the extra canes to keep the patch no too crowded.

Unfortunately, this year is the last year for picking raspberries in that patch as they are moving to town someone else will own the patch next year.  SAD!!


This is the best shot I got of the hummingbird at Mom's feeder.  They move so fast.

It was getting late and the light was fading which did not help.

They have a feeder in the yard as well where I have captured some good photos over the years.


I took this photo of a key for a challenge on one of my Flickr groups. The challenge was high key which I did not know much about.  I managed to learn a bit about it through the group then took this shot.  The objective is white background, well lit object and no shadow if possible. I am happy with this one.  You can find my photo stream here.
 This is the end result of a visit to hospital emergency at the end of July. I was out taking photos of my tomatoes around 9:00 pm.  Shortly thereafter I noticed a burning sensation and a swelling finger.  It is my ring finger on my right hand.  I soaked it in cold water and tried the butter solution to try and get the ring off.  No luck!  At 10:10 pm I made the decision that I needed to go to the hospital. 
After waiting hours, I finally saw a doctor in the wee hours of the morning.  They tried several tricks to get the ring off with no success so I made the decision to have the ring cut off.  This is my college grad ring which has been the best. I bought the hard metal option and it has not misshapen over the 25 years I have worn it.  The hospital staff used the standard cutting tools to try and remove it. After 45 minutes of trying to cut it with the standard tool and making some progress the nurse headed off to find a better option. I don't know what it was but it was very effective. We cut it right down the center at bottom of the base but we could not spread the ring at all.  So it took 2 more cuts leaving the ring in three pieces but my finger is alright.
I'm not sure what bit me but did it have to be the ring finger?

I have to say I don't know what the lesson is but I am a minimalist in jewelry and only wear a few good pieces all the time.  I'm not sure where I am going from here but I miss my ring.

Sharing at Through My Lens #107 hosted by Mersad.
Share Your Cup #260 hosted by Jann at Daily Cup with Mrs. Olson


Monday, August 7, 2017

Recent Snapshots - Zoo

I took a visit to our local zoo to see if I could supplement my collection of bird photos.  Last time I was there the exhibit was being worked on. 

I managed a decent photo of the Kooburra despite the narrowness of the bars of it's cage.  They did not laugh while I was there but posed quite nicely.


The exhibit is called Arctic Shores and houses 2 type of seals - Harbors Seals and Northern Fur Seals.

They were swimming and have a great time with those of us looking in.  

I love the color of the water and the bubbles they create with their rapid movements.


This is a Barred Owl.  There were a couple in the enclosure and they sat quiet as we the humans admired them from a distance.

I can imagine in his native environment he would be very hard to spot.  Nature is a wonderful thing.


It had rained most of the morning which delayed my plans for a visit.  As you can see the sun did appear occasionally between a very cloudy sky. 

The rain held off for which I was grateful.


This is the one winged bald eagle named Zeus who lives at the zoo.  Of course, it could not be released.

I love it's eyes which are quite piercing. 

I did not watch it feeding but I heard comments from others around who did.


I got a great photo of Lucy the Elephant as she was taking her walkabout the grounds. 

Of course, she had 2 attendants who accompanied her but I was glad not to have them or the row of people taking photo across from me. 

They had just given her a drink and a bit of a spray down from the water hose.   

Nice to see her out and about instead of on concrete.

This Brown Hawker Dragonfly was very cooperative.  It sat there for quite a while so I just kept taking photos from different angles.  Maybe it was having a nap.

I had not see a brown one before.

Excellent opportunity.


Here is a mosaic of three of the animals I photographed at the Zoo. 

The top right hand is a Red Tailed Hawk.  I missed the shot which had him with his wings spread and the red tail very visible.

Sharing with
Through my Lens #106 hosted by Mersad.


Friday, August 4, 2017

Photo Cards - 4x4 to gallery

I've nearly sold all those I sent to the gallery so I needed to replenish my supply at the gallery.

This is a beautiful blue morph butterfly I took at the Butterfly Conservatory in Niagara Falls a few years ago. 

I printed the layer on white with blue accents.

This was layered onto a turquoise card.


This wonderful red Ladybug on this silver and green leaf was taken at the Muttart Conservatory.

I printed the layer on white with grey/silver accents.

This was layered onto a green card.


Photo Cards to Gallery

I've decided to bring some of my photo cards to the gallery to see how they sell.

The photo is 3.5 x 4.75 inches on an A2 card. I have chosen thick white card which is 110lb card stock.


This is a Wilson Snipe taken at the wetlands at Big Lake.  I was very fortunate that he just posed for several minutes for me.


This card features Allium Purple Sensation.


This is a Red Dahlia I took at the park.


This is a Swallow on a brace a the Big Lake wetlands.


You can purchase these photo cards. Check my R2Give Cards page.

Decorative Paper Cards

I'm delivering another set of card to the gallery. 

This is a wedding card featuring some of my own decorative paper.

I selected a dusty purple card.

I embossed a background white layer with the D'Vine folder and trimmed it to leave a small border.
I cut the decorative paper with one of the Stampin Up Apothecary framelits.  I added iridescent flower sequins on each point held in place with a pale purple tiny brad. I wrapped metallic thread around each of them and tied the ends in the middle and left the ends hand in the center of the card. 
I punched hearts with the Stampin Up Sweetheart punch from white card.  I embossed the left one with the Cuttlebug Script folder and the right with the Swiss Dots folder. These were adhered to the center of the card with tape on the left and 3D foam tape on the right. This card includes bilingual greetings.
 
I started with the teal and brown decorative paper. I selected a warm brown card. 

I punched the Martha Stewart Arches Lattice border from teal card stock. I taped 2 of them together,then added a brown layer and then a strip of the decorative paper. The accent was adhered to the bottom of the decorative layer.

I punched a butterfly with the Sizzix Winged Beauties thinlit set. I used a marker to darken the body adn then adhered it to the card front with 3D foam tape.


I selected a piece of decorative paper featuring several greens and some golden yellow.

I chose a dark green textured olive card.

I ripped a piece of textured yellow card stock by Bazzill - Mexican Poppy on both top and bottom edges.  I wrapped a piece of olive grosgrain ribbon and taped the ends to the back.  I adhered that to the bottom part of the card.

I added 5 small golden yellow handmade paper flowers across the ribbon.  These are held in place with mini brads in olive.


I chose a very bright decorative paper which included yellow, pink, and teal.

I paired it with a golden yellow card.

I punched a piece of card stock same as the card with the Fiskars Ribbon Threader punch and ripped the bottom edge.

I ran a bright pink ribbon through it and taped the edges to the back.  This was adhered to the card front toward the bottom of the decorative paper.

I created a flower accent in the top left hand corner with 3 flower punches with the 3 colors.

I have offered this card with bilingual greetings should the person want them.