Showing posts with label patterned. Show all posts

Thursday, March 5, 2026

Sewing Project - Fabric Vase Wrap -The Blues


On this vase wrap I used blue printed fabric scraps.  For a change I sewed them on the diagonal to my flannel foundation fabric using the Quilt As You Go method.  This takes more fabric so I had to find longer strips of fabric. 

I trimmed the piece to 8.5" T x 11"W to allow more of a flap extending from the body of the wrap.  I added a teal cotton poly fabric as the lining which is visible behind the lace.  I sewed the collage piece and the lining right sides together leaving an opening, trimmed the corners and turned it right side out. I then used a curvy decorative stitch to top stitch all around the edge closing the opening at the same time.

Then, it was time to consider how to embellish this piece. I stitched a piece of lace on the lining edge folding the ends top and bottom and used the same curvy decorative stitch.  I then place the wrap around the bottle vase, pinned it and then stitched it closed.

Monday, September 29, 2025

Sewing Project - Card Wallets

I am way behind on my product for the Christmas Store.  I found these card wallets which I thought worked really well.  The wallet has 2 secure pockets as well the center pocket which is just open.  I love the contrast between the print and the solid fabric which creates a petal pattern in the middle of the wallet.  Sew on snaps keep the front and back pockets closed. 

You can carry all kinds of cards in this wallet. Loyalty cards, library card, business cards, and maybe even credit cards.  I prefer to carry those cards protected with RFID. 

It starts with a circle measuring about 11.50 inches in diameter.  I added an extra layer in the middle center to stiffen the wallet a bit.  It was sewn to the back lining before I sewed the circles together.  Once stitched I turned the right side out and ironed fold in half along the stitch lines of the bit of extra fabric. I top stitched all the way around to finish off the circle and close the slit.

I ironed the circle in half with the patterned right side up. I measured 4 inches from the fold and sewed a seam creating the petals. I then opened the petals and aligned that seam with the fold in the middle of the circle. Ironed that very well.

I folded the piece in half backwards keeping the petals on the front and now on the back.   I marked the top of the petals and marked the place on left and right edges. I sewed the edges closed.  I hand stitched the snaps on the front and back pockets.  And that was it

Here's the second one I made with feather fabric and red solid fabric.

I paid better attention to the sewing of the circle and I think it turned out well. 


Thursday, March 30, 2023

Sewing Project - Frame Bag

I am so grateful to be bringing art to the gallery again.

But with my other frame bags are packed so I decided to make another one. 

I had this piece of blue pattern fabric which was just about the right size.  I decided to pair it with some of the left over navy microfiber fabric.  I cut the navy about 3 inches bigger than the patterned.  I hemmed the patterned piece all the way around. I then sewed hems to the back and front ends of the navy. I stitched the patterned to the navy.

The fleece piece are an old pair of fleece pants that had worn out spots.  I used the bottom of the legs and quilted the pieces together, then cut it to fit in the navy piece.

I folded the navy piece right side together then layered the fleece layer on top.  Pinned the right and left hand edges very well and sewed a narrow seam.  I turned right side out and topped stitched the side seams to enclosed the raw fabric edges.

The finished bag measures 20.5 inches wide by 17 inches tall with the fleece divider sandwiched in the middle.  The divider is just a bit shorter than the front and is only captured in the sides seams and loose at the folded bottom.

The handles are white 1" wide grosgrain ribbon and extend about 8 inches above the top edge of the bag.  Enough room to put it over your arm comfortably.

They are well secured to both layers of fabric with double stitched rectangles in 2 places.


By placing the frames facing the fleece divider the glass is protected from hits from the sides of the bag.

The frames are protected from dings and scratches as they are completed enclosed in fabric.

I really like to enclose my seams which finishes the seams nice on the inside as well.

I am only considering 11x14 frames at the moment for art at the gallery so this works really well.


Saturday, March 11, 2023

Sewing Project - ReUsable Bags - Pillowcases

I bought a couple more of those $1 pillowcases the other day at the thrift store.

I liked the pattern on this one with the warm green and the brown polka dots.

I found a roll of fabric tape at the ReUse Ctr last time I was there and it seems it was bias tape.  Well imagine my luck. It was brown which is what I needed for this bag. It does need to be ironed and folded but I guess that is the cost of getting it.  I understand there is a thing a ma jig that will fold it for you as you iron along.

This was a standard pillowcase with no header band. Polyester fabric.

Measurements: 25 inches T overall, 19 inches W and the bag is 18 inches deep.

Brown bias tape, brown button and black elastic.

Nice to have a bit of variety in the colors and patterns.


This bag was made with a King size pillowcase of good quality micro fiber.  I did cut off a decent amount (about 8 inches) off the top to keep the fold bottom. Nice weight to the fabric in this bag. 

It was a nice purply blue so I paired it with a leaf green bias tape.

Measurements: 25 inches T overall, 20 inches W and the bag is 18 inches deep.


I found a nice button to match the blue color. 

This fabric came from a pillow sham type piece. I like the pattern so I bought it.  It was polyester though so static was quite a problem.

I had to sew all the seams on this one and I got the sides seams wrong.  To make enclosed seams you have to make your first seam right sides out which is counter intuitive. Well, I was saved by the serger!  Yeh Yeh!  I just serged the seams on the inside of the bag just like they would have been inside a pillow case. 

The back is black and had been a fold closure so I had to sew those 2 piece together to get a full back for the bag. 

This bag is quite squat so it is wider than the others I made.  It ended up wider because of the serging of the seams instead of enclosing them. 

Measurements: 25 inches T overall, 23 inches W and 17.5 inches deep for the bag itself.

I paired it with black bias tape, black elastic and a purple button.  I needed a bit more bias tape because of the extra width but I had enough in the 3 yard package.

I love the zebra print on this bag. 

It takes a bit of extra attention when folding at it is that bit wider.

I am bored with  making these so I am taking a break and moving onto other sewing projects.

Lessons Learned:
- Microfiber is very nice for these bags but I have not found any that was patterned.  
- Bias Tape to buy new would make this project not cost effective for selling.
- Polyester fabric was mostly patterned but very easy to ravel. 
- Pillowcases are by far make these a breeze to make because the side and bottom are already done. If you can get them for a good price it is the way to go.
- If you don't have a collection of buttons choose clear button which will go with any color and pattern.
- I am really happy with how the grey thread seems to work well with the colors and patterns.
- The pattern from Fabric Patch worked really well. 

Monday, December 27, 2021

Gift - Table Runner Trivet

A table runner trivet is a quilted piece one can place in the center of a table or other serving area to protect the surface from hot dishes.  It replaces the use of several trivets and looks pretty.  Upon doing some on-line research I found a place that recommended layers of terry cloth as good insulation.

I wanted to make this runner reversible so I took my fabric to my sisters a while back and we checked out her collection of fabric and found several pieces that would compliment the fabrics I had chosen.  In the end, I rejected some of the ones I had selected so that both side would work together.

I had just purchased the printed sunshine yellow piece of fabric.

The solid fabric was a left over from a quilt I made a couple of years ago.  The color name I would use is Soft Suede which is a green brown color.  

The cork fabric and the circle fabric came from my sister.  I have now swapped her some from my stash.  

All the fabric is 100% cotton.  

The layers involved are
  • cotton quilted layer
  • terry towel fabric
  • 100% cotton quilted batting piece
  • terry towel fabric
  • cotton quilted layer

I chose to put the quilted piece in the center of the trivet, the terry cloth goes the full width of the runner.

The front and back pretty quilted layers were stitched to the terry cloth layers.  The front and back are different designs and therefore quilted differently.  I needed to come up with a way to hold the quilted piece to the center of the runner. 

The final measurements of the piece is 14x40 inches and the center is 12 x 37.5 inches. 

The seam in the yellow is the one which goes through all the layers and holds the center batting piece in place. Each side had a yellow in this space.  The sunshine yellow piece on the cork side and a more lemony yellow on the circle side.  Allowed me to have yellow thread in the top and bobbin of the machine.

It would have been really nice to have my walking foot fo rthis project but the order is still on hold awaiting a shipment from over seas.

I decided based on my fabric to make the warm sunshine yellow side in a ladder pattern.  I cut strips of varying heights and 10 inches wide.  The Soft Suede, the cork fabric, some solid burgundy make up the pattern on this side.  

The other side features the circle fabric and this piece was larger and I did not want to cut it up into smaller pieces.  It was also getting late in the day and I wanted to get the project finished. I added some teal from my scrap stash which worked out well. 

I wanted Soft Suede to be on the edges of both side so they would make it the same color no matter which side was showing.

I stitched all the way around with the good sides together leaving an opening then turned the trivet runner inside out.  I top stitched very close to the edge where there was only the terry towel layers.  

The last seam was the one in the yellow that holds it all together.

I hope my niece likes it and it comes in handy for serving from the kitchen island or the middle of her dining room table. 

Friday, June 28, 2019

Sewing Project - Quilt 2 - Teal Turquoise Leaves

I have finished another quilt.  I wanted to improve the sashing process and cut down on the about of stitching to make it softer.

I chose this blue ivory leaf patterned fabric.  I paired it with an aqua and teal solids.  These are cotton polyester fibers and seem thinner than 100% cotton.  As these were large pieces I just could not cut it into small pieces.

I cut 9.5 inch squares with my quilting ruler from the blue leaves patterned and the aqua solids.  I cut 10 from each for a total of 20 squares which were placed in a grid of 4 across and 5 rows.

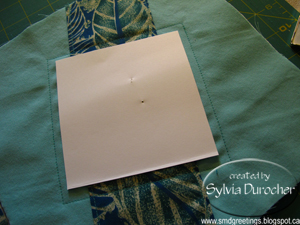
I needed to decorate the squares somehow. I decided to add a contrasting strip which will be top stiched to the square.  I cut a strip of fabric at 4" wide and the length of the fabric. Using a 3" card stock (pink) template I ironed the .5 inch sides over.

I laid the strip across the square leaving 1" margin at the top and bottom so it would not interfere wit the corners. 

I pinned and trimmed to the square edge.  The angle was right for the next square so it was very efficient use of the strips.  I put the aqua solid on the patterned and the opposite for the other squares.

It was top stitched very near edges.  I was able to sew all 10 square in a chain process then just cut them apart.  Another efficient process.


The 20 back squares are dark teal and cut again with the same 9.5 inch square quilting ruler.

I used a white cotton flannelette sheet for the "batting" in this quilt.  These 20 were cut to 9.5 inches square.

I needed a pattern to hold the 3 layers together.  I decided to cut a 4" square of card stock and then pin it to the square sandwich aligned along the decorative strip.  I just followed the edge with my sewing machine foot.  Repeated for all 20 squares.

In hindsight I could have quilted the squares when top stitching the decorative strip.  Remember that for next time.

The sashing between the squares is also dark teal.  I found this video produced by Teresa from Down Under. Quilt as You Go with Narrow Sashing. I followed the instructions and the quilt worked out really well.   The sashing between the squares was cut to 10 inches in length then trimmed once assembled.  She suggested hand stitching the back sashing but that was not going to work for me.  I selected a decorative stitch with thread that matched the teal really well to close the back sashing.

The sashing between the rows was cut to 40 inches in length.  The process for putting the rows into the quilt was the same as the assembling of the squares into rows but just wider.


That left the binding.  Again it is in the dark teal fabric.  I needed 170.5 inches of binding.  I cut strips of 3" until I had what I needed.  You can check this video The Ultimate Quilt Binding Tutorial with Jenny Doan of Missouri Star which gave me all the information I needed.  Even how to finish your binding so there is no sign of where you ended.  Worked perfectly.  I used the same decorative stitch to machine bind the edge of the quilt.

I am really happy with the overall look of the quilt, the weight is lighter, and the assembly really came together really well.