Wednesday, October 31, 2018

Photo Christmas Card - 5x7 - Pebble Art Nativity

I created my own art for this card.

I discovered Pebble Art this summer.  I was inspired and started collecting small rocks with flat one side. 

This fall I put together this Nativity and photographed it.  I added the sentiment and had it printed.

This is a 5x7 card.

There will be several of this one on my sales table as well.

Photo Christmas Card - 5x7 - WC Nativity

I photographed my little Nativity with a wonderful painted triptych background I found this summer.  I loved it because it has a real watercolor feel to it but it is painted on wood so it has to some sort of acrylic.

I hung the ceramic star that belongs to the Nativity in the sky and I think that really finishes it off.

I have several packages of these gold tri fold greeting cards so I just slipped the 4x6 photo inside. 

Works really well and I a very happy with the results.

I have several of these for my sale on the weekend.

Happy Halloween!

Wishing you a 

Happy Halloween day!


I hope you enjoy my natural ghost photo.  I found this leaf about mid September on my walk in the morning so I have been sitting on it for a while.  I was so excited when I saw it and knew exactly how I would use it.

This is the way I found it.  I don't know what created it.  I have cropped the image, converted it to black & white and increased the contrast a bit.

Halloween is not a typical day I would indulge but I just could not not share this super image.


Sharing this image with

Thru My Lens #167 hosted by Mersad


Tuesday, October 30, 2018

Trio of Prism Trees

Shopping at the dollar store can be ineffective.  I was attracted by these shiny reflection pieces several years ago and have struggled on how to use them.

I was inspired yesterday to create this composition.  I am happy with the star tops and the black stems. 

I added silver sequins with Bling Zots. 

I ripped a snow bank and added an extra from my class on Tuesday that I have not blogged yet.


 Here's my first sample.  The snowflakes don't really work for toppers for size or color. 

The iridescent sequins are OK but not the best.

The snowbank and greeting works really well.


Christmas Cards - Extras

There's sometimes extras left after I am done putting together my card kits.  This is an extra from the Bethlehem Stack kit.

This is a white card with a black layer leaving as small border.

I created the blue background and cut it with the Tim Holtz Arch Frame die.  I cut the Bethlehem with the Taylored Expressions Border die which about 6 inches long.  This the other end than the one I used for the kit.

I punched the Stampin Up Modern Label punch from the same sheet to ensure it matched.  I added a greeting from another set I created this week. It is adhered with 3 D foam tape.

The Creative Memories star is attached with a tiny copper star brad.  This element was then adhered to the card front.


This is my first sample for the Christmas Stack kit but decided that an ivory addition on the right would work better.

A commercial card was cut to capture the essential element.  I added a silver strip on the right but since the silver foil elements look black it does not work so well.

I added 3 iridescent sequins with Bling Zots.

These are going into my Christmas Card box.

Monday, October 29, 2018

R2Go Christmas Stack - Turquoise Dove & Copper Ribbon

I started with the Turquoise Dove Die cuts created with the Stampin Up Deco Label thinlits.

I added a metallic copper circle behind the diecut.  Two pieces of 3D foam tape was added to the back.

The decorative black copper layer was created with Antique Copper Mist by Maya Mist applied with a toothbrush rubbed across a metal butter knife. It was left to dry over night.

Lay the copper ribbon across the decorative layer and determine the placement of the turquoise cord.  Tie the turquoise cord onto the copper ribbon then tape the ends to the back layer.  Adhere the layer to the front of the white card base.

Remove the release paper from the 3D foam tape and adhere the dove element over the ribbon on the right hand side of the card.

Pull the star & Bling Zot from the release paper and adhere to the card front as per the sample.

R2Go Christmas Stack - Soft Sky Dove & Holy Family

I started with a beautiful dove glittered large card. I cut it down to leave me with this dove glitter image with warm blues, cool purples and glittered snowflakes.

I chose a soft sky card base onto which this layer was adhered in the tall or portrait orientation.

I printed the greeting in deep purple blue and punched it out with the Stampin Up Modern Label punch.  It was adhered to the card front with 3D foam tape.
 
I added 3 iridescent sequins with Bling Zots.

I added a quarter sheet insert for the sentiment inside.


This card is a similar sketch with the wide or landscape orientation.

I had just enough of these to complete the kit.

I cut down the card and added a strip to the right hand side to complete the card layer leaving a small border.

I added a silver foil SU Modern Label punch with a SU Word Window punchie adhered to the card front with 3D foam tape.

This time 3 silver stars were adhered to the card front.

Sunday, October 28, 2018

R2Go Christmas Stack - Bethlehem

I first created decorative backgrounds with liquid ink and photo paper.  I inks I used are Rotring Blue Violet, FW Rowney Blue and Maya Mist Antique Copper.  I got some blue, some purple and some with the colors mixed.

I selected a white card base with a black layer leaving a small border to ensure the focal element would shine.  I cut the decorative paper with the Tim Holtz Arch Frame.  I cut the Bethlehem from 3.25 x 1.5 inch piece of copper card stock with the Taylored Expressions Bethlehem Border.  This was adhered to the decorative frame.  I cut the window frame with the Tim Holtz Arch Frame die with the large Sized Arches Mover Shaper die inside of it.  It was adhered over the copper diecut and aligned to the frame.

The star was created with the Creative Memories Sparkle punch from the same copper card stock.  It is held in place with a tiny copper star brad.  The focal element was then adhered to the card front. 

The greeting was printed black and punched with the Stampin Up Word Window punch. It was adhered to a Modern Label punchied from the same decorative paper that the Arch Frame was cut from.  This ensured color matching.   It was adhered to the card front with 3D foam tape.


Saturday, October 27, 2018

R2Go Christmas Stack Kit - Dove & Joyful Watercolor

This card has portrait / tall orientation.

The Joyful layer was cut from a piece of printed card stock.  I used the Stampin Up Window Frame thin lits to cut the gold foil word with it's watercolor background in red and greens.  I then cut a layer of warm green card stock with one of the Sizzix Square thinlits which allows a nice border around the square on the watercolor diecut.  These are adhered together. 

I chose a warm red card base onto which I adhered a length of gold metallic ribbon across the front and taped the ends to the inside of the card.  This repeats the gold in the accent.

The Joyful watercolor accent is adhered over the ribbon to the card front with 4 squares 3D foam tape.  I aligned it a bit to the left of center.

This is the same sketch but placed in the landscape or wide orientation.

I chose a white card base onto which I adhered a length of white satin ribbon with turquoise writing "Peace" printed at regular intervals. I taped the ends to the inside of the card.

The gold moire square was adhered behind the turquoise and gold dove Window Frame diecut.  This accent was adhered to the card front over the ribbon with 4 pieces of 3D foam tape.  I aligned it to allow me to see 2 full words.

Thank You cards

I used left overs from my recent Ready 2 Go Cmas Stack kit to create some thank you cards. 

I chose a black card base.

I used the cut pine cone square element and added a layer of white card stock. 

I then cut a strip of left over from the back of a black and red plaid card stock.  I cut it to 4.25 inches and adhered it across the card. 

I punched a Stampin Up Modern Label punchie from the plaid leftover and ensured red on both ends.   I added a SU Word Window punch in the center. That was adhered in the top left hand corner.

I adhered the square pinecone element with 3D foam tape to the card front leave even borders on the left bottom and right hand sides.


I started with a black card. 

I added the strip of snowflake designer paper by Terese Collins on the left hand side.

I added a 1 inch strip of gold moire paper in the center of the card overlapping the snowflake layer. 

I created an accent with a square of black card stock, a 1 inch circle of gold paper, a white dove brad and a SU word window punchie.  This was adhered to the card front with 3D foam tape.

Added these to the Thank You box.

R2Go Christmas Stack kit - Pinecones & Reindeer

I cut the pine cone element with a Sizzix Squares Thinlits at about  3 inches square.  I then cut with the paper cutter a white layer at 3.25 inches. These are adhered together.

I cut black and white snowflake designer card stock into pieces 4.25 inches by 2.5 inches. The paper is by Teresa Collins - Christmas Home - Cmas Damask. This is the reverse side. I adhered the piece on the left side aligned to the edge of a black card.

I then cut a length of 6.5 inch red crimped ribbon and placed in the center of the wide card and taped the ends to the inside.

I added 3D foam tape to the four corners of the pinecone accent and adhered it to the right side leaving even border on the top, right and bottom edges.

This is the same sketch but in the portrait orientation.

The Reindeer element was cut to 3 inches and an ivory layer was cut to 3.25 inches. These are adhered together. I chose ivory to coordinate with the striped ribbon.

The striped light and dark green designer paper is by Graphics 45 from the Twas the Night Before Christmas collection. It was cut to 2.5 inches tall and 4.25 inches wide and adhered to the bottom of the green card.

The striped ribbon was cut to 6.5 inches, placed in the center of the card and the ends were taped to the inside of the card.

The reindeer element was adhered with 3D foam tape placed in the 4 corners.  It was aligned to leave an even border on left top and right hand sides.

Friday, October 26, 2018

Thank You Cards - Donation

I have another set of thank you cards ready to drop off to Compassion House today.

I worked up some single card kits I had in stock and decided to make them useful.

Pink and feminine always comes to mind for me for this organization but I expect they have folks of the male persuasion who they need to thank as well so I included some cards which would be appropriate.  The jalopy and geometric designs work well for male recipients.


I have my class samples ready for the next class. Yeah!

Wednesday, October 24, 2018

Apron - Gathered Half Reversible - Soft Leaf

Another gathered half apron featuring soft leaf print 100% cotton fabric with a moss green textured cotton fabric.

I placed two 6 inch patch pockets on the print side. 

This is a reversible apron.
 
It has a 24 inch waistband with 26 inch ties.

The ties easily create a knot or bow in the back.

Reinforced stress points.

I love the solid textured side of this apron.

I need to move onto other art for my sale on November 2 & 3rd.


Tuesday, October 23, 2018

Apron - Reversible Gathered Half Apron

This time it is a reversible gathered half apron. 

I chose a colorful print I bought at the SEESA Sale on Saturday and an aqua solid100% cotton to make this half apron. 

I placed a 6 inch patch pocket on the print side in the aqua fabric. I`m still have problems with my right and left reversed so the pocket is on the left hand side. I hope it works for the new owner.

Thirty inch ties are great to knot this apron in the back.  Long enough to accommodate various sized middles.

The edge has been top stitched on the sides and bottom.


The waist band is 24 inches wide by 2 inches tall.  The ties are 2 in tall by 30 inches long.  They fit into the ends of  the waist band then the skirt is inserted into it and the inside this tacked down with the top stitching.

The skirt is 29 inches wide by 17 inches tall plus the 2 inch waistband for an overall height of 19 inches.  This provides 5 inches of easement which I think is quite adequate and easily accommodated with the double front design.

All the edges are finished in this apron. 

I love this one.


Grey Flannel Cover Up

All this sewing has been a learning experience for me.

This is a beautiful soft flannel garment.  It was a Wosley XL short sleeved men`s shirt.

The result of a solid color and short sleeve is a toned down look and no ties.  The sleeves went into the pockets.

I chose black bias tape.

I was out to quilting group today and I brought my earlier apron to show the leader of the group.  She tried it on.

I have a challenge of needing  someone try them on and see how it fits and adjusts.

Someone there who has worked with seniors suggested that these could be used as cover ups while eating.   This maybe more accepted by some than an adult bib. I never even thought of that.

I am loving my progress!


Monday, October 22, 2018

Grey Pinstripe Smock Apron with Red accents

I started with a Ralph Lauren grey pinstripe 16.5/36 L men`s shirt.

I decided on red bias tape around the neckline and the arm holes.

I used one of the long sleeves for the patch pockets onto which I added red bias tape on the slant edge.

I used the other long sleeve for the waist ties. I cut the stripe 2 1/4 inches wide and 80 inches long. I ironed the sides into the center then ironed it in half.  I top stitched the ties with red thread and created square ends.  This fabric would have been too heavy to turn a tied inside out.


It includes my standard features of a hanging loop at the back, tacked tied to allow them to adjust as needed, reinforced stress points on the patch pockets and the ties long enough to tie in front.

Red Denim Snug Half Apron

I started with an extra large red denim men`s shirt.  I paired it with a small amount of red and white small print 100% cotton fabric.

I cut the shirt straight across under the arm holes. 
I measured 6.5 inches from the side seam and trimmed the buttonhole and button pieces off the shirt. I hemmed the sides of the apron with a wide hem.

I created a waist band from the denim and sewed that onto the top edge of the apron leaving about .5 inch beyond the side seam.

I created a pocket which was 9 inches tall and 10 inches wide. With a snug apron the pocket needs to have some fullness in order for one to get their hand inside.   I hemmed the top edge and created 2 small pleats in the bottom edge of the pocket making it a square pocket. I sewed it onto the right hand side of the apron with top stitch.

From the print fabric I cut three stripes 3 inches wide and 35 inches long.  These when sewn together created a strip 105 inches long.  I wanted them long so they could wrap around and tie in front. I pointed the ends and sewed the strip closed leaving a space in order to turn it inside out.

I sewed the ties by aligning the center of the ties with the center of the apron. I stitched it to the waist band of the apron top and bottom.  This closed the space left to turn it over and adhered it securely to the apron.

This apron will work well for a slim person.

Sunday, October 21, 2018

Burgundy with Floral Accents Apron

This apron started with a Joseph & Fiess 100% cotton (17.5/33) men`s shirt.  I had not really thought about how it being a solid color would affect my process but the price was good so I brought it home.

Well it did.  I just could not put solid bias tape on this one.  I hit the SEESA Rummage Sale today and found the exact fabric I needed to finish this apron.

It is a floral with a grey background, white, dusty pink and burgundy flowers with gold accents.  The down side is I had to make my own bias tape so there was not savings on time with this apron but it was worth it.

I used the handmade bias tape for the round neck and arm holes.  I used the same fabric for the patch pockets. I just hemmed the open edge of the pocket. The ties were created on the straight edge of the fabric.  They were just tacked to the back of the apron so they can adjust as needed to the wearer.

The ties started out at 3 inches wide then iron flat with the seam in the center. I put a line of stitching in the center which offers a bit of structure to the ties.

Reinforced stress points on the pockets and hanging loop.

This is an XL large apron in my opinion.


Friday, October 19, 2018

Apron - Purple Plaid

Another apron for my sale in November.   This one is made from a large ENYCE men`s 100 cotton shirt in purple plaid.

I added purple bias tape around the neck opening, arm holes and the slant on the patch pockets.

As always I have reinforced the stress points on the pockets.

The ties have been tacked to the middle back of the apron which allows them to adjust as needed when tied in front.

I added a hanging loop at the back. 

Thursday, October 18, 2018

Recent Photos

We had our fellowship group meeting today.  Our hostess was a recent retiree. I was on snack so I prepared Orange Bran Muffins with my sisters recipe.  It made 24 muffins and we were expecting 14 ladies.  They must have been good because I only brought 4 home.

I put together a Tupperware fruit tray including strawberries, cantaloupe, oranges and pomegranate.

Rounded out the selection with a variety of yogurt.


We collected yarn for a couple who does knitting for our Christmas Mitten Tree.

We had such a good time.


These books by Grace Livingston Hill have been on my bedside table recently.

Nice light romances in the early 1900s.  I enjoyed the novels by Hill but the one by her aunt Aldon was not as great for me.

We have had an injection of new books for the WtomyKitchen library so I will clear some of these at our Mission Possible Sale at the beginning of November.


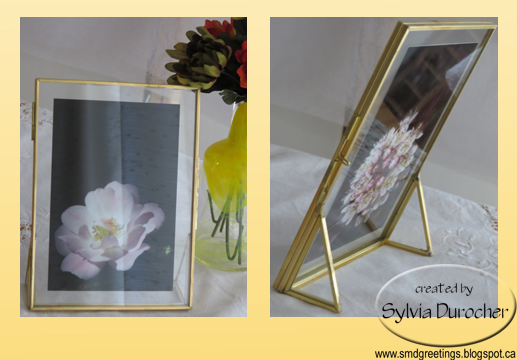
I found this float frame at the ReUse Center on the weekend as my niece visited.

I think there are wonderful photography possibilities for this object.

I have placed a couple of my 4x6 photos in for now.

Love the angles of the stand on the back side.


I picked up this puzzle at the same center.  My niece spent an hour trying to solve it.  She came really close.

I picked it up because of the clear pieces which will surely be nice for photography.

I did find a solution on-line so I could assemble it and it would be awesome in photos.


The sunset was wonderful tonight.  I headed out a little late but I am happy with this shot.

Share Your Cup #311 hosted by Jann at Daily Cup with Mrs Olson.

Son in Law Card Order

I had a friend ask for a birthday card for her son in law.

I recycled a landscape element from a commercial card.  I trimmed it close to the border.

I printed a custom greeting layer on a piece of textured card stock.  I chose a green color to match the textured card base.

These were layered then adhered to the card front.

I added a gold star sequin in the bottom left hand corner held in place with a gold tiny brad.

Wednesday, October 17, 2018

Christmas Card Gift Set

I have prepared a set of Christmas Cards for a friend who moved away and loves to give handmade cards. 

I recycled a note card front into this card.

I added a blue green layer behind the tree image. 

I punched a couple of holes in the top and ran a length of gold metallic ribbon through and knotted it in the front.


The Rejoice is a digital image I designed years ago. It was color printed onto white card stock.  I added a gold sparkle star brad above the `j`.  The image was spattered with silver ink.   It was mounted onto a green card base.


A recycled card front mounted onto a purple card to pick up on the holographic image.  Love the silver frame. 

I was able to keep the greeting which was great.

This card features my Bethlehem digital.  I printed it in dark brown onto a white card. 

The star was printed on vellum and embossed with silver powder.

The edges were ripped and then it was folded over the edges of the card then adhered to the inside.


Another recycle card front with a white dove placed on a red card base.  The greeting was printed in the top left hand corner.


Monday, October 15, 2018

All Occasion Stack Class

I held my All Occasion Stack Class tonight. 

I made a set of cards while the other 3 participants made their cards.

This card came from a full of Thank You cards.  The gold scallop is sticker paper. The gold foil greeting was trimmed and holes were placed on the left and right with the Stampin Up slot punch.  I ran the gold organza ribbon through the holes and knotted on the right hand side.

We had a great time and then a cup of tea and a bit of cake.