Showing posts with label Chocolate Chip. Show all posts

Wednesday, October 29, 2025

Cardmaking

These are cards for my family members who contributed to my house warming gift.

This green card stock is quite heavy and came from my sister when she would visit the USA many years ago. I call it my PeaGreen card stock.

I paired it with kraft card stock with gold foil dots on it.  That was placed at the top of the card.  

I added a length of kraft and metallic gold ribbon placed below the dots layer. 

I added a green silk flower with a gold sequin and held with a gold mini brad.

White quarter sheet insert and envelope.

Same cards design but in the tall or portrait orientation.

If it works it works and why change it.


I started with a book page that I crunched up a couple of times then flattened.   I rubbed the high points with a copper ink pad.  I let that dry completely.

I chose dark brown card base in SU Chocolate Chip.

Then a layer of brown kraft paper.

Then my book page with a silk flower accent (2 silk flowers, a copper sequin)  held in place with a copper mini brad.

I added leaves with a fine black Sharpie marker.

A quarter sheet insert in white and a white envelope.

Again, the same ingredients put into a portrait card.

This time I gave the flower a long stem and long leaves as well with the black marker.

The flower layer has a mustard velvety silk flower, then an orange one then a bright yellow handmade paper flowr with a copper mini brad.


I recycled a commercial card front.

I cut the butterfly into a 3 inch square.

I added a purple layer to a SU Gumball Green card base.

The greeting is stamped in black, punched with SU Oval then punched the scallop over from the card leftover so it matches well.  It is mounted with 3D tape.

I added stitching around the square with the fine black Sharpie marker.

We are always making cards for IWin so when they need cards we are ready.

Friday, October 17, 2025

Cards - Donation - Friends

Once I discontinued my on line card exchange I started giving my cards away without having someone else's card to handle.

I was going to see a friend at the funeral so I made up some cards for her.  She has been battling cancer so not sure card making has been a priority.

The card base is Chocolate Chip with white embossed layer.  The folder is a floral one from Cuttlebug. I added a sentiment created from a CC Scallop Circle and a 1 inch cirle color printed punchie. It was mounted to the card front with 3 D foam tape.


This card features Stampin Up Designer Paper from the "Oh So Ombre" 6x6" set which I bought at the thrift store unopened for just over $2.

The colors in the set are Bermuda Bay, Blackberry Bliss, Granny Apple Green, Rococo Rose and Whisper White.

Again, a Chocolate Chip card base, with the green DSP from the above set. I used pencial crayon to put 2 brown lines across the top of the card.

The greeting is a CC scallop circle, a coordinating green circle then a 1" Just for you punchie.  

A quarter sheet insert and white envelope.

This card features the ombre DSP in the Bermuda Bay color.  The card base is the same color.  

I cut a SU Window Frame die cut from Whisper White with a framelit. I cut a left over of the DSP to about 2" square and adhere it to the die cut. 

I added 2 Five Petal Flowers one large one small layered and held in place with a coordinating mini brad.

This layer was adhered to the left of center on a landscape card.


This card base is Bermuda Bay with a coordinating DSP in the same color. 

I cut a strip of Whisper White the width of the card and adhered with double sided tape.

I cut a piece of card stock to 2 inches square and added a Martha Stewart butterfly punchie in white held in place with a tiny white brad. The square was adhered to the white strip.

Some of these cards are greeting less so they can be used for multiple occasions.


This bright blue card stock is from Michaels. 

I cut a book page down to fit the front of the card then used a couple of inkpads to add color and soften the text.  Blue and grey ink pads.

I took a scrap of silver card stock and cut a strip and a star die cut. I mounted the strip across the card.

The accent is a black SU Deco Label punchie, with a 1.25 inch circle light grey, 1 inch dark grey circle and the star I cut earlier.  It was adhered to the card front with double sided tape.

Nice to have a masculine card on hand.


Again, Pretty in Pink card base.  

I added a panel of Whisper White embossed with the Swiss Dots folder.

I mounted some Prima Handmade Paper flowers onto the panel with tiny white brads and irridescent flower sequins.  I placed them from dark at top to lighter below along teh left hand side of the panel. It was then adhered to the card base.


I am sure my friend will enjoy the cards.

Tuesday, September 9, 2025

Back to Card Making - Card Sets

I need a few cards for upcoming events so I spent a couple of days in the craft room.

I am working with the Stampin Up "Friends and Flowers" simply scrapping kit.

I chose Whisper White card bases in the A2 size. I chose one of the designer papers in the kit which is Tempting Turquoise with white flowers. I added some white seam binding across the width of the cards and tied in a knot in front.  The left card has a daisy accent created with my large daisy punch with a circle center all held with a tiny white brad.  The right hand card has a button accent with white thread through the holes placed in the bottom right hand corners.

This set of cards is working with the same scrapping set. I chose the striped designer paper. 

On the card on left I chose some sticker from the set to cover the raspberry stripes. I used one of the square stickers and topped it with a square of designer paper. I added a greeting in the turquoise strip - Thinking of You from the Teeny Wishes set stamped in Chocolate Chip. The right hand card highlighted the raspberry color and I chose the square sticker in that color, added a square of turquoise floral DSP, a flower sticker along with a leaf sticker. The center of the flower is another of the stickers. 

Friday, September 20, 2024

Cards - Christmas SC Botanical

I thought I would use my SU Window Frame thinlits.  I was able to use the largest one!

A piece of Soft Sky as background with a strip of Chocolate Chip just off center.

The WeR Wildflower - Botanical DSP was cut and adhered with points instead of square. I added a Chocolate Chip smaller one with a gold square on that.  

The central element is from the SU Keepsake Ornaments digital set which I colored with Chocolate Chip and Soft Sky. It was color printed onto ivory card stock then punched out with the 2" circle punch. Adhered with 3D foam tape.

White insert and dstape with carrier on the flap.

I got carried away on this one.
The Botanical DSP as the background, then the largest Window Frame from Soft Sky card stock, then a gold square measuring 3 inches adhered with 3D foam tape.

Then I cut a green frame by placing 2 dies on my magnetic mat and adhered that to the gold.

Then another square this time in Soft Sky adhered with 3D foam tape then finally the 2" focal element adhered to the square with double sided tape.

A white insert and a ds tape with carrier on the flap.


The botanical DSP as a background again.

I cut the Chocolate Chip with the TH Vintage Cabinet die and adhered it to the DSP.

I cut the Soft Sky with the TH Mini Cabinet Card which I wrapped with Chocolate Chip ribbon onto which I had sewn a Soft Sky button.  It was adhered with 3D foam tape

I added an Old Olive paper clip with bow onto the right hand side.

White insert and ds tape with carrier on the flap.


Sunday, November 5, 2023

Simple Sentiments - Photo - Set 4

I chose a Stampin Up Chocolate Chip A2 card base.

I cut a piece of Summer Sun with the Tim Holtz Cabinet die.  I used the Stampin Up Slot punch to make two slots in the round end of the die. 

I adhered the photo to the die cut then pulled the ribbon through then around the card front and back to the front.  This is a Pumpkin Pie colored ribbon.  

I then adhered the die cut layer to the card front. I pulled the ribbon taut making sure it was not twisted on the inside of the card. I knotted the ribbon and trimmed the ends. An insert and an envelope.

These photos are from my Gentle Glow Calendar. Love the bokeh backgrounds.

Here is a House Finch in the late fall with no leaves on the trees.  I chose Sahara Sand for the Cabinet diecut.  

The card base is Cajun Craze and the ribbon matched so well. It is a beautiful soft ribbon. I just had a short length so I don't know where it came from.  I am down to my last couple sheets of this great color.

Again, slots punched, ribbon threaded through, knots made and the diecut layer adhered to the front.  Quarter sheet insert and envelope.

This is a photo of the top of a metal bistro table taken at the Muttart Conservatory.  Turned out wonderful.  I love the texture and the highlighted edges of by being used over and over by customers.

I used a Brilliant Blue card base and a piece of Smoky Slate card stock for the Cabinet die cut. The ribbon is Night of Navy seam binding.

A quarter sheet insert and white A2 envelope.


Some sweet Common Conecap mushrooms taken at the park down the street.

I chose a Creamy Caramel card stock for the card base.  A Garden Green piece for the Cabinet die cut.  A piece of beige seam binding found in my box.

The assembly as previously described and it was done.  These were fiddly to assemble but I think it was worth it.

A quarter sheet insert and a white envelope.

Saturday, September 30, 2023

Exchange Cards - September - Yellow Flowers

My Exchange Cards for September feature autumn colored flowers.

This first one is a sunflower.  The 4x4 inch photograph is from one of my annual photo calendars.  Trimmed the numbers off and it was ready to go.

I chose a Stampin Up Summer Sun card base.  I cut a 2" strip of black card stock which I punched with the SU Banner Triple Punch.  

It is very versatile as it easily centers the V on several widths of banners. Allow allows you to make any length.

Once that was adhered I installed 3 golden yellow caplets by making holes with the Crop-a-dile and then inserting the caps and choosing the right settings to press these into place.

A full half sheet white insert make this a card which can be used for any fall occasion.

This card features the same Summer Sun card base. This time I chose a Chocolate Chip piece of card stock which I aligned closer to the top of the landscape oriented card.

I adhered the 4x4 inch photo of a dahlia aligned on the left.  

Then, I chose a metal postage stamp brad in a golden yellow color.  I marked the spot for the prongs on the back and used a push pin to create a hole for them.  Press the prongs apart on the inside.

A full half sheet insert and this card is ready to be mailed on Monday.

Wednesday, February 1, 2023

Card Exchange - Feb - Red Raffia

Used this beautiful screen printed designer paper on this set of cards.

I used a Cherry Cobbler card base for card number 1. 

Cut the DSP to 4.00 x 5.25 inches and adhered to card front.

I chose 2 pieces of left over card stock in greens and used the SU Eyelet Border Punch on the bottom edge of both of them. 

Layered them together and punched 2 one eight inch holes evenly spaced from the center.

I pulled the Cherry Cobbler Raffia through and knotted it on the front.  This layer was adhered to the card front about 1.5 inches down from the top edge. 

It was adhered with 3D foam tape. I unraveled the raffia to have the ties spread out.


For this card I used a Chocolate Chip brown card base.

I added a decorative paper layer leaving a small border. 

I used the light green card stock and punched both edges with the Eyelet Border punch.  

I wrapped a length of Early Espresson Taffeta Ribbon across the front and taped the ends to the back. 

Place 2 one eight inch holes evenly spaced from the center, pulled the raffia through and knotted it to the front.   This layer was adhered to the card front with 3D foam tape.  White blank inserts and white A2 envelopes. 

Sunday, April 17, 2022

Exchange Cards - April

We are starting a new session of card exchange.  I've decided to get my cards ready ahead of time so I will not disappoint folks when I am busy moving.

I had these silver chrome metal earrings in my stash so I off the hanger and mounted them with brads.

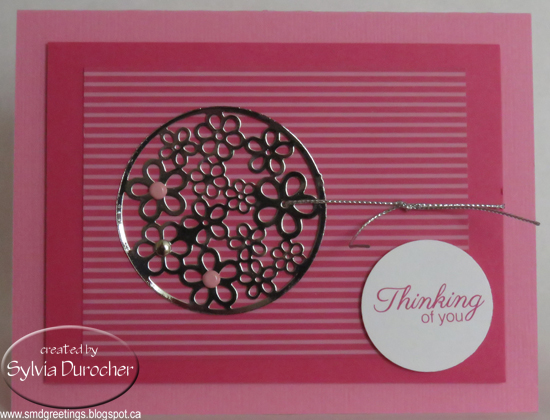
I chose Striped designer paper by SU in Rose Red and cut it to about 4x3 inches. I adhered it to a piece of sold Rose Red card stock measuring 4.75 x 3.5 inches. I placed pink and silver brads into the holes in the larger flowers in the metal accent.  

I strung a piece of silver cord through one of the flowers and wrapped around this layer and knotted it on the right. This layer was then adhered to the front of a Pretty in Pink card with 3D foam tape.  I added the round greeting in the bottom right hand side again with 3D foam tape.

On this card it the same layout with different colors.  The card base is Chocolate Chip.  The designer paper seems to have pink and brown lines so I chose those colors for the brads in the metal accent.

I cut the designer paper larger this time to 4.00 x 5.5 inches.  Attached the silver cord in the same way.

The greeting is punched with the Modern Label Punch in color printed in Chocolate Chip with an offset of solid card stock same as the card base. It was adhered with 3D foam tape.

Sunday, July 26, 2020

Starry Happy Birthday

I created  a birthday card for my niece's husband.

I started with a dark brown card.

I added a layer of wood grain designer paper in the landscape orientation.

I add a lots of star sequins with Bling Zots. 

I wrapped a length of gold metallic ribbon around the card front and placed the join under the greeting.

A Decorative Label punchie greeting which has been chalked with Chocolate Chip. Adhered with 3D foam tape and added a large star sequin on the corner. 

Sunday, January 28, 2018

Card Gift Set - Bridal Shower

I made a set of cards for the bride to be as the shower is this week. They will make great thank you cards.

I chose a Stampin Up simply scrappin' kit named Love Sparkles which had the right theme for this set.  The colors in the set are Whisper White, So Saffron, Regal Rose and Chocolate Chip.  The kit had the card stock, the designer paper and the embellishments so making 16 cards took about 1.5 hours. Excellent!

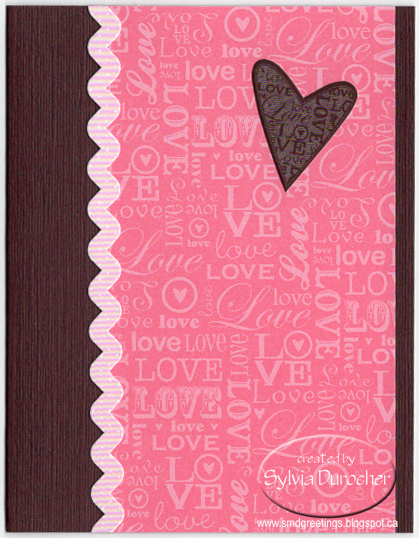
I made 4 cards in each color.  I chose this Regal Rose Love Words designer paper and cut it to 5.5 x 3 inches.  I adhered it to the right side of the card leaving a small border of card stock color.  I added a strip embellishment which is adhesive and well as a Pretty in Pink heart die cut.

 I followed a sketch from a card challenge at Fab Friday.


Fab Friday mostly features Stampin Up products offers regular card challenges.

This is the sketch FabFri129 for this week. 


This kit features textured card stock, adhesive die cut embellishments, and various adhesive strips. With most of the kit used in these cards it means a bit more stuff out the door.

On the Chocolate Chip one I used the same Regal Rose Love Words designer paper and added a Pretty in Pink zigzag strip with a words heart.

On the Regal Rose one again the same Love Words DSP with a pretty polka dot border and circle heart die cut.

On the So Saffron cards I chose the striped designer paper with a narrow border in Chocolate Chip with a Regal Rose heart die cut.

Friday, January 27, 2017

Sympathy - Large Butterfly

I made this card for a friend who lost her dad in mid January. 

I started with the designer paper with large blossoms in warm tones.  I chose a green card to match the leaves in the paper.  I ripped the paper on an angle and adhered it to the card front.

I stamped the sentiment in the bottom right hand corner with SU Chocolate Chip ink with the stamp from Simply Sketched stamp set.

I cut a butterfly in blue with the Sizzix Winged Beauties thinlit set. I adhered it along the angle and used the corresponding marker to add some brown to match the sentiment.

Sharing with the challenge at Case This Sketch CTS #206 this week.

Friday, January 16, 2015

HB - Windows Frame & Prima Flowers

I made this card for a friend celebrating a birthday today.

I started with a Stampin Up! So Saffron card base.  I cut a piece of striped Really Rust DSP with the Window Frames Collection Framelits.  I then cut a 3" square of copper metallic card stock which I placed behind the die cut aligning the corners.  I adhered these two the card front. I chose the Chocolate Chip marker and ink the birthday stamp in the Sincere Salutations set and stamped it in the bottom right hand corner.  I then used the fine end of the marker to add stitching around the copper square. I then, selected 2 Prima Flowers - a large light yellow and a smaller orange.  I then added a smaller rust and a smaller still handmade paper yellow one.  These were layered onto each other from smallest to largest.  They were placed in the center of the die cut and held in place with a dark brown brad.

Monday, September 29, 2014

SU Book Party - Christmas Tags

  
I made 3 Christmas Tags for my Stampin Up Book Party today!  Isn't the Holiday Mini full of great stuff?  I think so.  I chose the Stampin Up Ski Slope Designer paper for this project.  It contains Whisper White, Old Olive, Chocolate Chip, Real Red and Baja Breeze.   I designed a large digital tag with the same outline as the Tag Punch.  I put borders on them in Chocolate Chipr, Baja Breeze, and Real Red.

I chose Dasher for the Chocolate Chip tag. Stamped in CC on white die cut with a Spellbinder Deckle Rectangle as I had nothing in my SU that would do the trick.  I cut the next layer in the DSP.  I added the greeting from the Joy to the World stamp set.  I added a CC .25 grosgrain ribbon held in placed with a tiny white brad.

I chose one of the Keepsake Ornaments for the Baja Breeze tag.  I cut a piece of DSP then ripped in half and placed each piece with the rip toward the centre as shown.  I printed the ornament and cut it with the coordinating framelit.  I added French Blue .25 grosgrain ribbon which matched pretty well the Baja Breeze. 

I chose the Owl from the Punch a Bunch Stamp Set for the Real Red Tag.  I printed the owl on white and punched him out.  I punched his vest in the DSP as well as the 2.25 inch circle behind him.  I added the heart on his vest. I added googlie eyes.  The blue greeting is from the Joy to the World stamp set.  I added a French Blue .25 inch ribbon held in place with a tiny white brad.