Showing posts with label cream. Show all posts

Wednesday, April 8, 2020

Sympathy Card - Ivory Poppies

I made this card for a friend who lost her husband in late March.  He had been sick for several years and contracted pneumonia.

I started with a warm green card base.

I added a brighter green layer cut to leave a small border.  I added a layer of designer paper next.

I cut the Memory Box Perky Poppies from another piece of the bright green card stock.  I then cut the poppies from cream pearl card stock.  I adhered these over the green ones.

I adhered the poppies to the card front with quick dry adhesive behind the poppies and the base.

I ripped a strip of the same brigth green card stock and adhered it along the card bottom. 

I added a Word Window sentiment on the right side.

Friday, November 2, 2018

Thank You Cards - Pink Heart

This is a recycled card.  I cut the main element from the original and reused it.

I layered it onto a piece of purple and then punched small daisy flowers from the cutoffs.  I placed them below the main element and held them in place with pink brads.

The purple layer was adhered to the card front of a pink card.  The insert inside is blank.


Another card with the same heart element.

I ripped right edge and mounted it on a brown card stock layer.  It was adhered to the front of a pink card aligned to the right hand side. 

I added some stitching in brown thread on the left hand side.  Placed a pink handmade paper flower in the wide opening held in place with a pink brad.

These are headed to my Thank You Card box.

Wednesday, August 16, 2017

Stainless Set - Jasmine Tea

After seeing my sister's stainless steel teapot I was inspired to consider something similar. 


I saw this one at the thrift shop and thought I would give it a try.  It has a built in infuser which makes things easier.  I put Jasmine Green in it this morning and placed it on my sunflower hot spot.

The quality of the teapot is not great and the challenges of photography are considerable with all the reflections.


I am using my IKEA 353+ Cobalt Blue dishes for breakfast.

Still eating raspberries from the freezer to make room for a new crop.  A dollop of yogurt and a bit of cream will top of the healthy dish.

I added a banana and a bran muffin.

Here's the whole set I have collected over the last few weeks. 


Sharing with Bernideen's Tea Time
Ruth at  Tuesday Cuppa Tea hosted by Ruth

I would have love to get right into National Afternoon Tea Week but there are too many pressing matters with my parent's upcoming move.

Wednesday, July 19, 2017

Turquoise and Red China Mug

I started with this set of dishes this morning.


The salad plate is by IKEA and features a large white flower outline with a few hits of red petals. 

I paired it with a Cashmere red and white fine bone china mug by Maxwell and Williams which features very similar lines as the plate.

I chose Battenburg lace doilies and a turquoise napkin on a linen tablecloth.


This was breakfast.  I had a whole wheat pancake left over from the other day.
I added a fried egg and some veggies. Mushroom, garlic, red onion and a bit of old white cheddar cheese.  When I use my cast iron fry pan I have to make sure I don`t set the heat too high.  This time the veggies worked out really delicious.  I hope I can duplicate it again next time.


I added a red rose in a small white ceramic vase to repeat the red.  Would be nice to have real flowers in that size but not going to happen.


The tea this morning was Rooibos Cinnamon Chai by David`s Tea. A gift from my niece for my birthday last month.

It was good with a bit of honey and some cream.


I had a bit of raspberry compote which I made earlier which is berries, a bit of sugar and some regular gelatin.  It will be Bavarian but I did not have whipping cream so I will have go shopping to complete the recipe.

I just poured regular cream and served it in this small glass dessert dish.  I bought a couple of these recently and I am very happy with them.  Helps me keep portions on the small side.
I added a Simple Pleasures Cranberry Citrus cookie.  Was great with my second cup of tea.


Sharing with
Bernideen`s Tea Time - Avonlea

Tuesday Cuppa of Tea - hosted by Ruth

Monday, November 21, 2016

Christmas Card - Felt Reindeer

The focal element of this card is a brown felt reindeer.
I printed a border and greeting onto cream card stock.
The reindeer was a bit large for the card front so I adhered him with a large red brad for his eye.
I added a Zot under his tail to keep him in place.
I trimmed a bit off his from legs and the card was good to go.

Christmas Card - DSP Split - BoBunny

This card features the designer paper by BoBunny called Rejoice Collection.

I chose a snowflake and strip to create a DSP split.  The stripe was cut to 3.5x4.00 inches and the snowflake at 1.75x4.00. These were taped together and handled as one piece. 
I placed the chocolate & vanilla grosgrain ribbon across the split and taped the ends to the back.  This layer was then adhered to the front of a Christmas green card.
I cut the snowflake with one of the Marianne Design Creatables - Snowflakes Style 1 dies.  I cut it from cream pearl card stock.  
It was placed over the ribbon and a push pin was used to make the hole for the chocolate brad which holds a red round sequin and the snowflake.


Monday, January 25, 2016

Card Club - Jan - Plaid HB

This is a card for a guy.  I chose a bold navy and cream plaid DSP by Graphic45 - A Proper Gentleman Collection - Cultured Reserve.  I added a cream seam binding across the DSP and adhered it to the card front leave a bit of slack.  I then tied a short length to it in knot on the left.  I color printed the greeting on cream card stock and cut it with the Stampin Up Window Frame Framelits. I added a 2 3/8" square of navy card stock behind it.  This layer was then adhered to the card front with 3D foam tape.

Friday, May 1, 2015

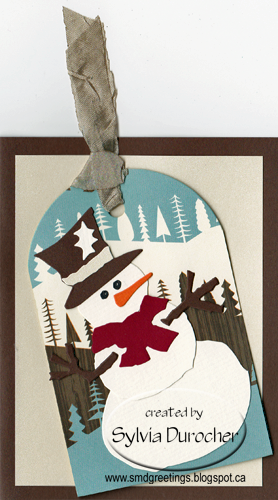
Christmas Card Challenge - May - Snowman - Paper Piecing - Tag

Here's my card for the Christmas Card Challenge for May which is Snowman, Paper Piecing and Tag.  

I chose the Tim Holtz Assembly Snowman Bigz die which made the paper piecing very easy.  I selected the background designer paper first.  It's American Crafts - Campy Trails.  I got a real winter feel from this paper so thought it went well with the snowman.  As a background to the tag I placed a piece of cream pearl card stock, cut to leave a large border all the way around. I decided to use the Jumbo Crescent Tag from Sizzix and cut it from the designer paper.  The paper has a warm white in it so I chose a warm white card stock to cut my snowman. The band on the hat is the same cream pearl card stock. Brown for his arms, a deep red for his scarf and orange for his carrot nose. I drew the eyes in with a black marker. I was tempted to put something on his belly but resisted.   I used quick dry glue from Scotch to assemble the pieces of my snowman.  I glued him to the large tag.  I added a soft seam binding in a complimentary color.  The tag was adhered to the card front with 3D foam tape.

Have you started your Christmas Card stash?  Today may be a good day.  I hope this card provides some inspiration for you to start or continue.  Leave me a comment if you have started!

Sunday, June 1, 2014

Christmas Card Challenge - June - Banner


I tried it again, and I'm happier with this one.  I made the card wide or landscape orientation to have more room to lay out my banner.  I changed the color to a more Christmas green in the layer and the color printed words.  I chose a green baker's twine which I toned down the white with a bit of Tim Holtz Antique Linen Distress ink.  I taped the twine to the back of the ivory layer then mounted my letters JOY with 3D foam tape to accommodate the thickness of the twine.  It gives more dimension to the letters too.


Here's my first attempt at a card with a banner. I think there's something missing but I'm not sure what.  I was going for a graphic look but I think it's too stark. It needs softness but I'm not sure how to add it. I will play some more and post another later.

The Joy banner was created with the Cricut and the Creative Memories Tiny Treasures cartridge. The monogram in red metallic paper at 1.5" tall.  I mounted these on a piece of cream card stock and repeated the banner motif.  I then added the 'to the world' color printed on the bottom half of the same piece of card stock.  I trimmed it to leave a space between the two.  These cream piece were mounted on a piece of dark green card stock which just leaves a small border.  This was then adhered to the front of a cream card.

Monday, May 26, 2014

Card - Farewell

I made this card for a couple who are leaving our office soon for new duties in Toronto.
I started with a blue card and just folded the full sheet in half which makes are large card for everyone to share their sentiments.  I layered onto it some designer paper by Fancy Pants - Tradition from the fancy-free collection by Michelle Coleman.  I punched a border with a Martha Stewart double edge punch from deep red card stock and ran 2 lengths of caramel seam binding through it.  The ribbon was taped to the back of the DP layer.  This layer was then adhered to the card front.  I chose to mix card stock flowers with silk flowers.  I used the Tim Holtz Tattered Flowers die because it provided the size of flower I was looking for. The 2 blue one and the red one were cut from card stock already used in the card. I added 2 velvety satin flowers in between.  I held all of these in place with a large red brad.  The insert is caramel with blue writing.

Monday, April 28, 2014

Note Cards - Bicycle

Another set of note cards.  I used the Stampin Up! bicycle from the Feeling Sentimental set and printed it in black on cream card stock.  I added the greeting in the top right hand corner.  I wrapped them with black cord so they will make a quick and ready gift.

Tuesday, December 31, 2013

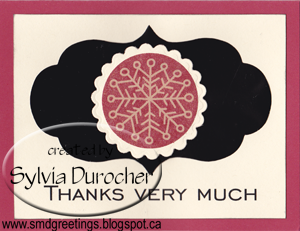
Card - Christmas Thank You!!

Here's my first thank you card for the gifts I received this year!  I always like to create my cards from the paper my gifts were wrapped in.  The center snowflake is from the gift wrap my niece used.  I punched it with my Stampin Up! 1.75" punch. I then cut a cream scallop circle with Spellbinder Nestabilities.  Glued the snowflake to the circle.  I wanted something dramatic so I cut a Tim Holtz label with the Stylized Labels die and text weight black paper.  I printed the sentiment on a piece of cream card stock 3.75 x 5.00 inches and rubbed the edges with a black ink pad.  I glued that to a Ruby Red card.  The snowflake element has been mounted with 3D foam tape.  Super happy with this one!

Sunday, December 1, 2013

Christmas Card Challenge - December - Thank Yous

I chose Washi tape to use on my Thank You cards.  I had a limited supply of Christmas tape.  I chose this hounds tooth and reindeer in cream and red.  I ran them aligned with the bottom edge and cut to the left and right edge of the card.  I cut my thanks from hunter green card stock with a Memory Box thin die.  I used snail adhesive to attach it to the card.  I find this adhesive easily rolls off the areas that are not behind the die. I tied red thread to the holes in a cream button and attached on the corner with a Zot.

This other version is done with Kraft card stock with the same hunter green greeting.  I chose a larger button because it matched well with card stock.  I added heavier thread to balance with the larger button.


Saturday, June 1, 2013

Challenge - Stitching

I make this card for this week`s challenge at Weekly Christmas Card Challenges - Sparkles which is stitching - real or faux.  I chose real which makes it good that I am only making one of these.  I started with this great red foil card stock which I upcycled from a really nice chocolate box at Christmas.  I cut a strip with the Stampin Up! Dotted Scallop Ribbon Border Punch.  I then stitched it with gold thread so I end up with this even pattern of up and down stitches.  I applied double sided tape on the back to keep the thread taut.  I printed the SU! Bunch of Backgrounds - Weathered in Always Artichoke on the cream card front.  I stamped my greeting three times across a strip of Always Artichoke with a small clear stamp.  I then adhered my stitching to it with Zots.  I cut three ornaments with the Spellbinder 2011 Heirloom dies in the same red foil card stock. I taped the gold threads on which the ornaments are hanging to the back of the Always Artichoke strip. I decided to leave the ornaments hang loose.

Monday, May 13, 2013

Card - Challenges - Teal Cream Brown & Gingerbread

I made this card for a couple of challenges, Weekly Christmas Card Challenges - Teal, Cream and Brown and Christmas Cards all Year Round  - Gingerbread
I cut the gingerbread man with a Sizzix original die from dark brown card stock.  I used an opaque marker to add the icing to his arms, legs and smile.  I added a small piece of teal card stock behind his hearts in his middle.  I'm so used to making them red it felt a bit odd to use blue. Stretching myself!  I then embossed a cream layer with the Stampin Up! Northern Flurry folder.  I stamped the greeting in the bottom right hand corner with Stampin Up! Come to Bethlehem set with Taken with Teal ink.  I added and knotted a length of organza ribbon across the top of the cream layer.  This was then added to a teal card. 

Friday, August 31, 2012

Card - Challenge - Santa's Reindeer

I made this card for the Holly Jolly Christmas Card Challenge this week which is Santa's Reindeers
I used the Stampin Up - Dasher stamped in Chocolate Chip on cream card stock.  I die cut it with the Spellbinder Deckled Rectangles nestabilities.  I layered it onto the next size rectangle in Real Red.  To keep with the Christmas theme I found a piece of  Anna Griffin flourish DP which I layered onto a matching piece of card stock.  I added 2 pieces of Real Red 1/4" gross grain ribbon with a piece of Chocolate Chip 1/4" twill tape between them.  I cut the ends at an angle.  The ribbon ends are tucked behind the DP.  I added a MS snowflake punchie in the same cream card stock held in place with a chocolate brown brad. Really happy with this one!

Tuesday, September 27, 2011

Card - Challenge #20 - Square Card

I made this card for CST challenge #20 which was make a square card.  I started with a piece of double sided cardstock measuring 4.25x12" and scored it at 2, 4 and 8, 10".  Folded 2 inches at each end back then folded the halves over the centre for a gatefold card. I unfolded the card and I put the ends over one edge of the Tim Holtz ornamental die to create the fancy edge.  I tacked down the beige fancy edges and placed a 1/8 hole in the centre for the ribbon. I then cut a Sizzix wavy frame in a coordinating cardstock. I glued 3 sides down leaving the top open it on card inside.  I printed a greeting on vellum and trimmed it to 3" and slid it behind the frame.  Pulled the gold organza ribbon through the holes and tied the card closed.

Thursday, August 25, 2011

Card - CST Challenge #15 - SSS Sketch

I made this card for the CST challenge based on this sketch. I started with another photo of a lily from my Mom's garden. It's got this really nice dark purple edge which makes it look exquisite. I printed the lily and cut into an oval. I mounted it onto a coordinate plum textured cardstock rectangle. I chose an cream card to match the center of the lily to which I added a couple lines of embossing on the top half using a border folder. I stamped the greeting in Orchid. I added a moss green satin ribbon. I glued the plum rectangle on an angle. Found a silk flower for the top left corner and bling for the bottom right hand corner.