Showing posts with label hanging loop. Show all posts

Tuesday, September 12, 2023

Sewing Project - Tea Towels


I made a set of tea towels for my niece for her birthday.  A while ago I found a piece of fabric at the thrift store which was a linen/cotton blend and it was mustard color.  Perfect! I said.

I did have to find thread to match so I headed to Walmart on the Monday before school started.  What was I thinking.  The parking lot was jammed and so was the store. I did find what I needed.

I cut the fabric 21 x 30 inches to maximize the fabric I had.  

I had a few problems of my own doing with my sewing machine but with perseverance I solved the issue.  It always purrs like a kitten and I was disturbed when it wasn't but I wanted the job done too. 

I checked my supply of twill tape and found nothing that was not synthetic in a warm color.  I decided to make my own from the fabric itself. I hope it is sturdy enough to stand the wear and tear.

I cut a strip of fabric 2 inches wide and about 18 inches long.  That should be enough. I ironed it in half then opened it and folded it in from both sides. I ironed that flat and sewed it along the open edge.

I cut the strip 4.5 inches long to make this hanging loop.  I decided to place it in the center of the tea towel this time rather than the corner.

This is such gorgeous fabric.  It drapes so beautifully.  The hanging loop in the center makes the tea towel hang shorter which may make a difference.

It is sown into the hem of the tea towel and I double stitched as that is where the most strain will take place.

I am getting better at making mitered corners.  These turned out really well and I added the bit across the corner that secures the folded piece under the miter.

I wanted to add a personal touch which would communicate how much I love her and think about her often.

My sister does a lot of embroidery so I thought I would give it a try.  Should be easy right? Let me say, not so much.  I used the chain stitch and some blue embroidery floss and placed it on the front where the hanging loop was on the back. Top center so she will see every time she uses it.

 Finished size: 19 in W x 28 in L
I am very happy with the end result!  I hope she likes them.

Friday, December 3, 2021

Sewing Project - Tea Towels

I have been working on a sewing project.

I decided to make some beautiful tea towels this year.  I was fortunate to find several pieces of wonderful 100% cotton fabric this fall.  I wanted something with a bit of weight and texture.

These measure finished 20 x 28 inches.   With 3/8 inch fold over hems all the way around.


The Fleur de Lis pattern is wonderful, the botanical pattern gives a nice touch, and the ribbed texture will provide drying excellence.

Each of the towels got a twill tape corner loop for hanging and mitered corners. Super happy with these.   It was a real pleasure to work with 100% cotton.  It ironed beautifully. 


Saturday, April 6, 2019

Fundraising Project - Pocket Washcloths

I volunteered to make these for a fundraiser my niece is participating in on May 1st as a Girl Guide Leader.  Her daughter needs to raise fund for a trip with GG this summer so these hopefully will sell well and put a few bucks in the trip fund.   It was my niece who suggested Pocket Washcloths for kids.  They had small hands and a pocket makes it easier to manage.  She suggested microfiber and terry cloth. 

I purchased a couple of microfiber towels from dollar stores.


The left one is the blue one and I have just scraps left and at a cost $1.30, that was good value.  The yellow towel was one of the 3 this the red packaging set so that is less than $1.00 for each.   I selected terrycloth from my stash and reused the white ones I made to go with my aprons.

Set 1 - This is the first set I made based on some samples I had seen on line.  I cut fabric 5x8 inches.  I made .25 inch seams.  I sewed a strip of cotton butterfly fabric across the microfiber layer first. Then I sewed the front (microfiber) piece and the back yellow terrycloth piece together right sides together.  I added a yellow grosgrain ribbon aligned with the cotton strip in this step.  It is aligned along the cut edge and sits in between the 2 layers.  I trimmed the corners then turned the pocket inside out.  For this set I hem the top edge. I then top stitched the pocket on all three sides.  For sets going forward I took full advantage of the finished edges on the microfiber and terry cloth and placed the finished edges on these pieces at the top.  The other edges will all be covered during the top stitching.
Set 2 - Finding the first set a bit small I chose to make this set cut at 6 inches square.  I found that it may be a bit short for my liking.   I must remember this is for small hands.  All the fabric used in this set is the same as the first set.  Now you can see the finished edge of the microfiber at the top of the pocket.
Set 3 - For this set I cut the fabric 6.00 x 7.5 inches. Now they are a big rectangular.  I chose bug fabric for this set.  Still using the yellow grosgrain ribbon and the yellow terrycloth fabric.
Set 4 - I decided to choose a more masculine fabric for this set.  A nice graphic design in light and dark green.   In this set, I started using the white terry cloth from the hanging towels I made for the aprons.  As these did not sell they were up for reusing.  I also chose to use turquoise satin ribbon for these to coordinate with the microfiber towel.  This white terry cloth is a bit lighter than the yellow stuff I had.  Just makes a bit lighter cloth.
Set 5 - This set continues with the last piece of blue microfiber fabric.  The turquoise satin ribbon and a bit of again masculine wavy square colorful fabric.  This allowed me to use small pieces of fabric as the strip is cut 2" tall and 6 inches wide. Turn over a .25 inch top and bottom and top stitch in place. 
I hope these are a good seller. 

Wednesday, September 26, 2018

Apron - Cross Back - Blue Butterflies

Whew!

Another apron.  This one is cross back again with a beautiful Blue Butterflies and it is 100% cotton.  I bought this fabric so long ago I do not recall what it cost me.  I paired it with an aqua 100 % cotton.

I added a bit on the fold and quite a bit on the back edges.  It is almost 5 inches wider than the pattern when folded.  It provides a great cross over at the back when it is on. 

The patch pockets come from the armhole cut out and I added a bit of aqua to the slant edge of the pockets.  They were top stitched onto the front piece of the apron before assembly.  Two and half inches from center and 15 inches down from the top of the bib. 

The stitching I did on this one is just at the top edge of the back pieces straight across. I ironed it then sewed it from the back side where I could easily see the crease.  Then a line of stitching from the previous line, down by the edge of the pocket to the apron bottom edge.


I put the hanging loop on the front of the apron this time.  I think that works better.
 
Super happy with this one as well.

I am not sure how selling these will go.  I guess people will have to try them on to see how they fit and how long they etc.

I have to move on to other priorities as this has been a marathon sewing session.  I will make a few shirt aprons for sure.


Saturday, September 22, 2018

Apron Handy Towels

I put together some hang towels which will work with my aprons. 

My early aprons had a loop where a towel could be pulled through so they would be handy when wearing the apron.

I then decided that right in middle may not be the best so I put buttons on my last couple aprons which works for people right handed or left handed.

The ribbon loop on the towel hangs on the button.

My aprons have buttons on both sides as they are reversible.


I added the 3/8" ribbon loop to towels I purchased.

Saturday, April 7, 2018

Apron - Adjustable with Casing

I made another apron today so now I have a sample of the three designs I have researched.

This is an adjustable apron with the tied going through a casing along the curve of the bib.  This is the style of my current apron.

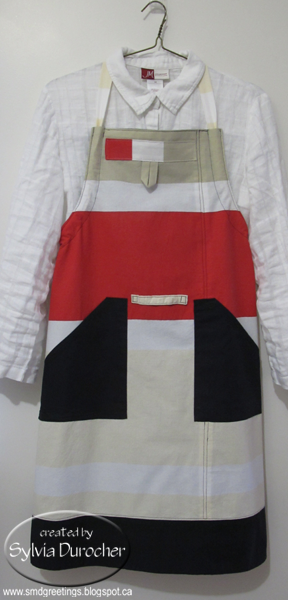
I chose this bold striped cotton fabric in red, ivory and white stripes for this side and a black poly cotton for the reverse side.   I placed a seam offset to the left of center and ensured the stripes were maintained across the apron. I chose to top stitch the seam and the outer edge of the apron in black thread.

I added black patch pockets, a towel loop in the center between the pockets and a hanging loop on the accent at the top of the bib. 


The corners of the pockets are well reinforced with a triangle of stitching.


I will have to decide which design I will use for my new apron.  I have not yet decided the fabric yet.