Showing posts with label deer. Show all posts

Saturday, December 30, 2023

Sylvia's Simple Shots

This Christmas featured 2 big events in one day.  First in the morning was the 4 Sunday of Advent.  We light the LOVE candle.  

We are so loved by God that He sent His Son for each one of us.

May we truly take that in.


I spent most of the afternoon and evening on Christmas Eve with my sister, her husband and my brother.

It was a casual affair where we browsed food - shrimp, ribs, and pyrohy like Mom used to make them.

We caught up on our lives with all the good and bad and it was lovely.

We had blueberries, honey and cream for dessert.  

I headed home about 9pm with  my heart full.


Late on Christmas Eve we lit the Christ Candle which is the middle one.

I just love the sparkle that crackle glass brings.  

Unfortunately, one of the inserts is broken and so I plan on replacing this Advent Wreath next year.

I will keep my eyes out.


I spent Christmas Day at home.

I purchased sourdough cinnamon buns from Freesons for breakfast. They were delicious.  They came highly recommended and did not disappoint.  

Turkey with all the trimmings was on the menu for supper. 

This was the first Christmas without either Mom & Dad.  I missed them a lot.

I headed to my sister's and brother-in-law's on December 28th to have turkey with them.

It was a good drive with good temps, little traffic and a pleasure.

I decided that I would stop and visit a thrift store to get soup bowls to match my white dishes but they were closed till Jan 2nd.

This is how much snow was on the ground for Christmas this year.  Not a lot at all.

The deer came to visit in their neighborhood and I got a decent shot.
They always have a natural tree.  It is covered with personal ornaments each with it's special memory.  I don't think there was a commercial bauble of any type.

The Nativity under the tree with a stable of olive wood made in Germany and the Avon white pieces of the holy family and the additional members of that night.

I did not remember that we have the same Avon white set.  Mine has few pieces.


The birthday party was great.  

This is one of the gifts received.  A vintage Fisher Price tool bench with all the accessories.

A bench press, a drill, a hammer, wood that cuts on the table saw.

All in working order after 20 years in service.

It will be enjoyed for a few more years.

I rode with my sister and brother in law which was appreciated.

It's great to have like minded family that value something vintage and would prefer those to consuming something new and not as well made.

Thursday, November 16, 2023

Cards - Silent Auction Donation


I made a couple sets of cards to donate to the Silent Auction at the Gallery Holiday Party.

The first set features a chipboard deer that was stained with Tim Holtz Distress Stain - Gathered Twigs. I chose a designer paper by We R Memory Keepers - Botanical for the background.  It comes in 12x12 so I could 6 cards with the one sheet. I ripped snowbanks from textures off white card stock.  The moon is champagne card stock punched with the 1`circle punch.  The trees are created with 1) Hampton Arts Tree Art die and stamp set, with olive card stock, 2) the Memory Box Birch Tree Trio die and 3) the Stampendous Truck Tidings die set. The card base is Stampin Up Pool Party. 


The second set of cards features a chipboard snowflake.  I painted them with white acrylic paint then a coat of Pearl Finish. I chose 3 designer paper from the Stampin Up Adventure Bound paper stack.  

For the Pine Boughs set of cards I selected Early Espresso, Chocolate Chip and Baked Brown Sugar card bases. I chose a ginger colored 1/4 inch smooth ribbon. The snowflake is attached with a large clear crystal brad. The greeting is black and white with a flagged end.

For the Birch Tree design I chose Basic Grey card bases. I chose a 1/4 inch black grosgrain ribbon. Again, a clear crystal brad to attach the snowflake. The greetings were left with square corners on this set.

I added white envelopes for all 12 cards.  These were sealed in cellophane - 6 deer then 6 snowflake.


I created a structure to display the 2 sets of cards. I started with heavy red card stock with which I created a pyramid shape then added a piece of chipboard in the middle to provide support to the structure.

I added the sealed packs of cards on either side.  I created a product label to fold over the top.  I then put 2 holes through all the layers with my Crop-a-Dile.  I pulled a red metallic ribbon through the holes and knotted in on the front.

I hope that it generates a few dollars for out club.

I also donated my weaving from a Tactile show, you can check it out here.

Update: All the items sold which is very good news!

Thursday, November 2, 2017

Craft Sale - Christmas Photo Cards

I have made a few more photo Christmas Cards for my craft sale on the weekend. Check out my events page for details.

This was a snowman decoration at the Conservatory a couple of years ago.  Love his happy face.  This is a 3.5 x 4.75 inch photo on a white heavy card.


The standing deer was again at the Conservatory.

Red berry from the Conservatory.


The bird was an ornament on a Christmas tree at the Garden Center.

The Cardinal ornament with birch trees is a glass ornament on display at the garden center.

The oval poinsettia is an old design which I have converted to a photo card.  Love the red poinsettia.


The aqua blue glass ornament was on a tree at the garden center.
The sitting deer was at the Conservatory.


The evergreen bough is a great winter card.
The leaves with red berries photo does not have snow but has wonderful seasonal colors.


White poinsettia taken at the Conservatory.

Wednesday, July 1, 2015

Christmas Card Challenge - July - St. Nick Spatter Buttons

It's time for the Christmas Card Challenge again.  This month it is Santa/St. Nick / Spattering / Buttons.  Santa could be die cut, stamped, color printed. Spattering could be paint, ink or some other color medium.  Buttons could be chipboard, real, die cut. All kinds of options. Be inspired!


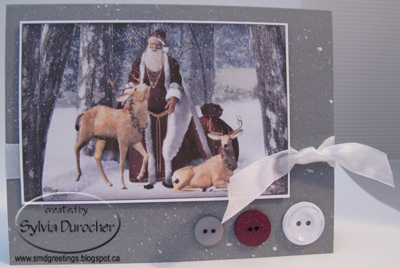
I chose a St. Nick I found on-line which has a rich colored tunic, a snowy grey background and majestic stags.  I color printed it in the size I needed.  I trimmed it leaving a white border.  I dug through my button collection to see what I had that matched either the tunic or the stags.  I chose a grey card which matched well with the background in the picture. I spattered white pearl acrylic paint on the front of the card with a spatter tool then sent them aside to dry.  Once dry, I wrapped a piece of white seam binding around the card front and knotted it on the right hand side.  I repeated the colors in buttons - white, burgundy and grey.  These are held in place with Zots.
Submitted to the following challenges:
Sparkles Christmas Card Challenges - Anything Goes 

Tuesday, April 14, 2015

Card - Deer in Neutrals

I took a sheet from a Spanish dictionary and applied Tim Holtz Distress Stain in Antique Linen and Gathered Twigs.  I dried it with the heat tool and then used TH Distress Stain in Walnut Stain with a brush to paint the landscape and the trees.  I ripped all the edges.  I stamped the greeting in the top right hand corner with Versafine Vintage Sepia with a clear stamp. I chose a Bazzill Pinecone card stock for the card. This layer was adhered to the card front with glue stick which helped to smooth out the wrinkled paper. I punched a 1" circle from Champagne pearl card stock for the moon and adhered it with 3D foam tape.  The chipboard deer is left over from this card project. I applied a bit of bronze shimmer on them with a dry brush but it does not show up in the photo.

I'm submitting this card to the following challenges.
52 Christmas Card Throw Down - Coffee and Cream
Hazels Christmas Card Challenge - Anything Goes

Monday, November 25, 2013

Card Club - November - Glittered Deer

Christmas cards are the order of the day today!  We are making 8 cards - 2 of each design.
I did several things ahead.  The chipboard deer were colored with Tim Holtz Gathered Twigs Distress Stain.  Once dry I applied Deco Art Twinkle Gold Glitter paint.  Thank goodness I did this early in September.  I also spattered black card stock with gold acrylic paint.  Once dry I cut into pieces of 3.5" wide then cut them with the TH Cabinet die. This gives me only 1 notch on each side.  I punched a 1.75" circle from High Gloss Gold Paper with my Stampin Up circle punch, also a Modern Label from the same card stock.  I printed my greeting in black on ivory card stock and punched it with the SU word window. I selected an ivory card.  I adhered the black/gold background die cut to the card front. I glued the gold "moon" circle aligned with the curve on the black die cut.  I glued the greeting to the label and mounted to the bottom of the card with 3D foam tape.  I then adhered the glittered chipboard deer above the greeting placing his head over the gold "moon" circle.

Friday, November 1, 2013

Christmas Card Challenge - Nov - Chipboard

The accent choice for my Christmas Card Challenge for November is Chipboard.  It could be Die cuts, Letters, Ornaments, Snowflakes, Trees, and much more.
I chose the deer chipboard leftovers from this card in Christmas Stack Class in June.
I chose a warm chocolate brown card stock and found a piece of polka dot DSP to match in the Naughty or Nice Pad from Michaels. I painted my chipboard deer with a foam brush and acrylic paint that I mixed up to match the card.  I set those aside to dry. I chose a medium green card stock that coordinated well for the background behind my deer. I die cut it with the SU Deco Labels framelits.  I stamped the die cut with the All Night Media leaf pattern stamp in a darker shade of green ink.  Once my deer were dry, they looked a little plain so I tried sprucing them up a bit.  I tried stamping them with ink but because of the acrylic paint, the ink just wiped off.  I expect Staz On ink would have worked but did not have it in the right color.  I decided to add a bit of texture to them, but you cannot run them through the Big Shot with a folder.  So this is what I did. I laid my embossing folder on the table, laid the deer paint side down and hit them with a small hammer.  Worked pretty well.  On second thought, I may have been able to put together a sandwich that would have worked in the Big Shot.  Will try that next time.  I punched a Stampin Up! Modern Label and printed a Word Window punchie with my greeting.  This was mounted with 3D foam tape.

Wednesday, July 3, 2013

Challenges - Reindeer

I started with a ivory card.  I added the 2 pieces of washi tape on the top left and bottom right and trimmed them at an angle. I colored a chipboard deer with Tim Holtz Fired Brick.  I created a background from script paper from left over cards from a recent project. I found some card stock that coordinated with the red in the washi tape.  I punched it with the new Stampin Up Artisan Label punch.  I added a blue SU Modern Label punchie with a red SU Word Window punchie.  I stamped the sentiment in black with a small clear stamp with a VersaFine ink pad. 
I'm submitting this card in the Holly Jolly - Something New and Clean & Simple FLT247 Sketch.  

Saturday, June 22, 2013

Christmas Stack Class - Winter Deer

 Here's a nice peaceful card for the last set. I bought the chipboard deer during the last Christmas season.  The background paper is Little Yellow Bicycle - Winterings on the beige background.  I printed the narrow frame onto the card stock. The blue background I found here.  I colored the deer with Tim Holtz Distress Stain - Gathered Twig on the beige background and Walnut on the blue background.  The deer is  adhered to the right hand side with his feet placed very near the border. The snowflake is created with a Martha Steward snowflake punch with the same card stock as the card and held in place with a tiny white brad.  I color printed the greetings in a coordinating color and cut into a snow bank with my Creative Memories wavy cutter. It is mounted to the background being trimmed to be inside the frame.  It is adhered with 3D foam tape to accommodate the legs of the deer.