Friday, November 29, 2019

Sympathy Card

I prepared this large A7 photo card for my aunt on my Dad's side of the family who lost a son. 

It must breaks a mother's heart to lose a child.  She is in her eighties but that does not matter.

I added Modern Label punchie with a black greeting to this simple Rose Hip and grass still life.  Mounted with 3D foam tape.


Photo Coasters - Sets


This set was made with the Blue Bird art made my sister. You can find it here.


Photo Coasters - Singles


I have some photo coasters done for this year.  They are 4x4 and have one of my photos on the front which has been protected with modge podge and spray sealer.  They have fleece on the bottom to protect your furniture.


Friday, November 22, 2019

Poster Calendars 2020

I have created a large calendar this year where it is very easy to read the numbers.

It is poster sized at 11x17 inches.  
It will work great on a fridge or file cabinet with magnets.
It can be added to a notice board or bulletin board with push pins. 
It can be taped to almost any surface making it readily available where you need it. 
I decided to provide subject matter that would appeal to almost anyone in the population.  You will find them on my Calendar Page. They are wrapped in seasonal cellophane with a ribbon and tag.

I chose this beautiful Red Poppy with a blurred back ground.  The focal element is just off center.


I took this photo at Elk Island National Park in October.  I love how the leaves are yellow and the trees are nicely blurred.


This is the Silver Roadster I took at the Antique Mall earlier this year.  The image won a prize at the Member Show at the Spruce Grove Art Gallery in the spring.

Tuesday, November 19, 2019

2019 Cardmaking - CH - Class 9

I am back to leading card making classes at Compassion House.  Of course November means Christmas cards.

I am recycling small square Christmas cards.  I trimmed the card to 3.75 inches.

I added a layer of white card stock cut to 4 inches and layered that behind the main layer.

The card base was cut to 4.25 x 11 inches then folded with it at the top.  The silver blue layer was adhered to the navy card base aligned at the top of the card leaving a small border with 3D foam tape.

A length of white grosgrain ribbon was wrapped around the card front and tied on the front.  The ends were trimmed on a slant with scissors.


This card is the same card pieces but put together in a different layout.

I started with a warm grey card base.

I added a Stampin Up Ballet Blue layer cut to 4.00 inches square.

The silver blue layer was trimmed to 3.75 inches.

I chose red grosgrain ribbon which was wrapped around the card base and tied in the front. Ends trimmed with scissors.

The card base is Stampin Up Ballet Blue.

The 4 inch layer is silver metallic card stock.

The ribbon is metallic silver.

Each has a seasonal quarter sheet insert which is glued to the inside.

Loving the colors, the layout and nice and cheery cards.

I had 5 great ladies in this class and all the kits were made.  Wonderful.

Making the kits in the same layout really helped the process.

Thank You Cards - Compassion House

I am delivering some thank you cards to Compassion House today.

Another DSP Split with an oval greeting where I offset a yellow one behind it!    Another with pink tones!
 
A recycled butterfly card which was trimmed to fit the front of the card.  A card with a bit of a masculine theme with the old Jalopy in the bottom right hand corner.


I made up some old card kits to get them out of the house.  These were originally birthday cards so I added an oval Thank you greeting with 3D foam tape and voila another card to go.  I trimmed these watercolored glitter cards to fit on the A2 sized card and layered with a colored layer onto a black card.

Monday, November 18, 2019

Photo Magnets

I decided to add photo magnets to my product line for craft sales this year.  These are created with my photographs with popular sentiments.   Gratitude, Family, Friends, Life, & Kindness are the themes I selected.  They measure 3x4 inches and the back is completely covered with magnet.  Love them.


2020 Photo Calendars

My 2020 Photo Calendars are ready!  

These calendars contain twelve 4x6 pages with an index of the thumbnail images which come with a clip to display it on a wall, bulletin, or file cabinet.  It can also be placed in a frame for an custom presentation.  The image below presents 2 full images and the central image gives you the index of all the images in the calendar.

The Dewy Petals calendar features wonderful flower photos from my photo collection taken in 2019. Poppy, sunflower and a few different blooms grace the pages of this calendar.  The amount of rain we received this summer has been captured in several shots.

January - Dandelion                      February - Tulip                       March - Iris
April - Echinacea                          May - Rose                               June - Pansy
July - Astrantia Major Alba          August - Pasque Flower            September - Sunflower
October - Jacob's Ladder              November - Poppy                    December - 

The Nature calendar contains birds, critters, and leaves from my 2019 photo collection. The interesting squirrel, wonderful leaves and some winter shots are some of the images in this calendar.

January - Leaf                                   February - Squirrel                         March - Frosty Leaf
April - Mallard Duckling                  May - Sparrow                               June - Bumble Bee
July - Chickadee                               August - Lady Bug                        September - Aspen Leaf
October - Mushrooms                       November - Red Berries                December - Snow on Evergreen

The Little Bird calendar has seasonal images for each month of the year.  He is participating in every day activities like hitting the beach, picking apples, and decorating a tree for Christmas.


An art calendar with featuring compositions created with my Cobalt Glass collection.  Several have a pop of yellow to provide a bit of variety for the eye throughout the year.  The bowl of lemons is one of  my favorites which sits on my microwave oven.

Thursday, November 14, 2019

Thank You Cards

These cards are for those people who provided support during the process.  For those of you who have been through it - you need your friends at a time like this.

This card started with a bright green card. 

I added a mottle pattern piece of designer paper in bright greens which was cut to 4.00 x 5.5 inches.  It was adhered leaving a small border.

I wrapped a white doily around the left edge and adhered it to the card front.

I added a navy greeting punched with the 2 inch circle punch with a larger navy circle cut with one of the Spellbinder Nestabililites thin-lits.  This was adhered with 3D foam tape.


This card started with a Kiwi Kiss card base.  

I added a piece of the same mottled bright green designer paper. I wrapped a piece of light blue seam binding around the designer paper and knotted it to the front.  It was adhered to the card front.

I added a label cut with the Spellbinder Nestabilities Labels 13 in the same card stock.  I adhered a light blue card stock star cut with the Stampin Up Star Framelits and a silver star confetti held in palce with a green mini brad. The label was then adhered to the card front.

I added the oval greeting which was printed in blue and punched with the 2 inch oval punch.  It was adhered over the ribbon with 3D foam tape.


Thank You Cards - Renovation

I have been making Thank You cards for those who contributed to the success of this renovation.

This is a Double Sided Paper Split using designer paper from Rusty Pickle - Run It Collection - Game Time.

The paper was cut to 4.00 x 5.50 inches then cut again at 3.5 inches. The smaller piece was turn over and taped back to make a single piece.

I wrapped a piece of dark brown grosgrain ribbon across the join and tape the ends to the back.

I then adhered the layer to the dark brown card front.

I printed the greetings in Early
Espresso on white card stock using the Canada Goose from the Stampin Up set Wetlands.  I trimmed it very close to the printed border.   It was designed to fit perfectly in the square on the label die cut.

I cut the label with the Stampin Up Window Frame thinlits from Early Espresso textured card stock. The greeting was adhered to the label then the label was adhered to the card front over the ribbon with 3D foam tape.

The card on the right started with a dark brown card base as well.  It is a DSP split using designer paper from Authentique - Seasons Collection - Autumn Three. Love the hounds tooth pattern.

The label is the same as above and the car is from the SU Classic Dad set in Early Espresso.  The grosgrain ribbon is the same as above.


This card started with a deep teal card base.

I added a piece of designer paper by Karen Foster Design - My Grandpa - My Hero Collage paper collection. Love the bird houses and tools.

I cut a label as those above in a light blue card stock.  I added the Cardinal from the Stampin Up Cardinal Christmas set in black.  Trimmed close to the border.  Aligned with the square on the die cut label.

I added a turquoise ribbon wrapped around the designer paper layer ends taped to the back about 1/3 up from the bottom edge.

 The label was adhered to the card front with 3D foam tape.


The card on the right started with a dark warm grey card base.  The designer paper from Graphics 45 - A Proper Gentleman Collection - Cultured Reserve.  Love the wonderful plaid pattern in warm colors.

I adhered 2 strips of the designer paper to either side of a warm dark blue piece of card stock.

I added a length of vanilla grosgrain ribbon which ends were taped to the back.  The warm blue layer was adhered to the card front.

The greeting was printed in grey on Vanilla card stock and punched with the Stampin Up Decorative Label punch.  I offset a green punchie to the back of the greeting.  It was then adhered to the card front with 3D foam tape.


I chose a medium blue card base which was cut 11 x 4.25 and folded a 5.5 inches to create a top fold card.

To the red gingham piece of designer paper cut to a 3.75 inch square I adhered a denim flower, a yellow center held by a yellow flower brad.  I used a push pin to create the hole for the prongs.  I used double sided tape to adhere the green fabric leaf.  This layer was adhered to the card front.

I wrapped a length of white pearl thread around the card front and knotted it on the front.

I added a large circle greeting printed in the royal blue ink and punched with a 2 inch circle punch.  i was adhered over the thread with 3D foam tape.

All these cards have white quarter sheet inserts.


 Another DSP Split with blue and yellow designer paper with a stripe on the other side.

I added white grosgrain ribbon over the join.

Adhered to a pale aqua card.

I added a deep warm green greeting with a green label punchie adhered to the back off set.  Stampin Up Decorative Label punchies.  Adhered over the ribbon with 3D foam tape.

Wednesday, November 13, 2019

Recent Photos

The novel is based on real people.

This was an interesting book based on 3 Belgium sisters who lived in Paris in 1880, Antoinette, Marie and Charlotte.   The father a tailor is dead and their mother works in a laundry and abuses drink every day.  All three girls have spent time in the ballet dance school of the Paris Opera. 

Antoinette gets into the fast lifestyle with a boy and loses her position at the school and opera.  The boy is no good but it takes her a long time to see it.  She works in the laundry, a brothel and spends time in jail.

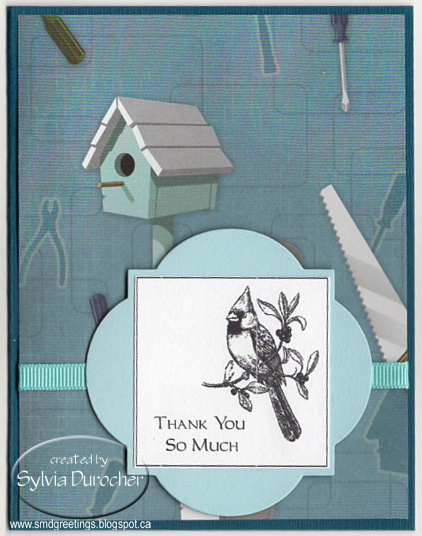
Marie works very hard to support the family.  She works in a bakery from 4:30 am to 8:00 am when she heads to the dance school.  Dance classes during the day and performances in the evening at the Opera.  She is chosen by Edgar Degas a well known painter and sculptor and is immortalized in the "Little Dancer of Fourteen Years".  The original was done in wax and was shown in Paris at the Sixth Impressionist Exhibition of 1881.  The sculpture was in Degas studio all the time he was alive. His heirs decided to have the bronzes after his death and were made in the early twentieth century.

Charlotte is the youngest and smallest but eventually does very well in the opera.  She was the most successful of the 3 in the Opera. The author indicates in her notes that Charlotte was with the Opera 53 years as a dancer and teacher.

When Antoinette goes to prison Marie is left to fend for the family.  The girls are living at a subsistence level which is proven with she gains weight in prison with 3 meals a day.  She improves her sewing skills while with the nuns.  This contributes to success later on.

These girls are at the mercy of well to do men who attend the Opera who may take an interest in them.  That translates into better ballet shoes and dance outfits, pretty dresses but also unwanted sexual attention at times from some of the men.

I prefer the countryside of English estates to the hussle and bussle of a city setting.  I'm glad I stuck it out to the end.  It was worth it.

The can of Masala Chai Rooibos tea arrived.  I have drank there black tea for quite a few years and love it!  With being advised to cut out caffeine I approached the ladies at Chai Wallahs in hopes of them making a rooibos version which would be caffeine free.

I am in the testing phase of this tea.

I have not had much time to just sit down and enjoy a good cup of it yet.

I have been getting ready for the Abstraction Show at the Gallery in December.  That is now all firmed up.  Those will be blogged once delivered to the Gallery.


We had our first big snow storm on the November 11 Remembrance Day long weekend.  The rained Friday night and snowed Saturday and Sunday.

I did take an hour's walk on Sunday at about -14C.  I bundled up and took the camera.  My fingers and tip of my nose were ready to head inside.

It was nice that the wind had not yet removed the snow from all the tree limbs.  


The challenge of Flickr Macro Monday was Reflections.  I had a hard time with subject matter this week.  This is a small ceramic snowman I made in class in the 1970s.

I used my mirror tile as a background to get several reflections of his back.  I like the fact that the reflection does not mirror the front.

You can check my photo stream to see the photo I submitted on Monday.

You can check the entries to Macro Mondays.

Linking up with Through my Lens Challenge #214 hosted by Mersad.

Saturday, November 9, 2019

Happy Birthday Balloons

I made a card for my grand nephew so is celebrating a birthday.

I cut a stack of balloons with a thin die.  I don`t have credits for the die as I bought it second hand.

I cut gold and blue glitter ones, pearl ones, felt ones and velvet paper ones.  Lots of textures on this card. 

I started with the bottoms ones then layered them.  Several top ones are mounted with 3D foam tape.

I cut the greeting with Dee's Distinctively Happy Birthday thin die.  I used heavy white card stock.  I then glued the words to a piece of vellum.  I used tape runner adhesive which I could rub off the areas around the letters. i used double sided tape behind the letters to adhere the vellum.

Added a bit of highlights on the edges with a navy stamp pad.