Showing posts with label Christmas cards. Show all posts

Saturday, December 13, 2025

Sylvia's Simple Shots

I have discovered this Youtube channel - Wondering Melodies.

I just love the watercolor art work in these videos. The characters are so cute. Rabbits, hedgehogs, bears, mice, deer, owls, cats, and more I am sure. I prefer the wild animals.

The Celtic music is very lovely as a background for crafting or slow stitching or just chilling.


My Christmas cards went into the mail on Monday.  A lot less than usual since I can't deliver them to church like I used to. 

I was lucky that I made some last year that did not get mailed because of the postal strike.

That means a new church in 2026.

At $1.30 in postage though there will have to be a reassessment of the list.


With the change in weather I needed a rug at the front door to catch the snow and gravel being dragged in on boots.

I am happy with this 2 foot by 5 foot dark grey one I bought this week.  Covers the area I needed.


It's that time of year again.

The low pressure tire light came on the car this week.  I have this happen every year when the weather turns really cold.

I called to OK Tire and headed over and they helped me out.

It took a bit of time this year to clear the light.  The guy told me it could take 30-50 kilometers.  With being so cold I was not going far.  It did eventually clear before I took a long trip.


This is the book on my bedside this week.  The Evolution of Calpurnia Tate by Jacqueline Kelly.

It was written with youth in mind but it is a great book.

Set in the summer of 1899, Calpurnia is eleven turning twelve toward the end of the year.  She has brothers and a wonderful grandfather.  He is a naturalist and putters in his library and shed out back observing nature.  

Calpurnia's mother wants her to play the piano and learn the domestic arts but she would prefer to accompany her grandfather in the woods, streams and meadows around their home.

She receives the book - The Science of the Housewifery for Christmas which a bitter disappointment. Can she be a scientist in the new century?  I will keep the book because the cover is so beautiful. 

Monday, December 8, 2025

Cards - House Cards - Christmas

I made some sample Christmas House cards for a realtor friend.

The A2 card base is navy blue along with the middle house.  The little houses were cut with the Stampin Up Homemade Holiday Framelits Dies in three different colors. I used markers to add details like windows and doors to the die cut.

I cut a piece of no shed glitter card stock in silver tone stripes. I added the houses and greeting to this layer. Added silver mini brads as door knobs. Taped the sting of greeting to the back.

Once all was added to the glitter layer I adhered it to the card front.  A white blank card insert was added to the inside and a white envelope completed the card.


This card has an A2 white card base.  I added a blue watercolor designer paper cut to leave a small border all the way around.

I used the navy layer with the hole cut for the house on the first card.  I wrapped a piece of cotton thread around the right hand side of the navy layer and knotted it to the front.  I adhered the navy layer to the card front aligned on the left hand side.

I added a red heart punchie in the house adhered with quick dry glue.

I found a red greeting in my stash which is a Stampin Up Artisan Label punchie with NOEL stamped on it.  The NOEL is from the Bright & Beautiful stamp set. Mounted with 3D foam tape.  White insert and enveloped completed the card.

I modified a graphic I found on Pixabay.  I added a greeting with a shadow and my own green wreath to the front door. 

I sized it to fit on the white layer mounted on the A2 green card base.  I printed it on the white layer and mounted it to the card front.

A white insert and envelope completed the card.


Tuesday, August 27, 2024

Cards - Christmas Cards - Trees

I have done these colorful trees on a smaller scale before.

This is an A2 card in landscape orientation.

The bottom of the card is wet with clear water and then you paint your trees above wet on dry until at the bottom you reach the puddle of water you laid earlier.

I did work out how to print the greeting on the bottom of the watercolor panel.

This is Taken with Teal with a seasonal insert and white envelope.


I think these trees are a bit too far apart but at least they are green.

The black greeting printed on the panel with the printer before mounting to card front.

Mounted on a Kiwi Kiss card base with a seasonal insert and white envelope.


Not sure how well this color works but there it is!

Black printed greeting on the watercolor panel.

Card base is Island Indigo with a seasonal insert and white envelope.


Cards - Christmas Trees - Watercolor

I am going to need a lot more Christmas Cards so I decided today to start.

I found a tutorial video on line for these 5 trees last week.

Masked the bottom of the trees then drew 5 triangles with pencil. Painted them with watercolor, drew designs on them, and added metallic accents.  Then spattered the watercolor piece by loading brush with color and tapping it against another brush to produce the blue spots.

I traced the greeting.

Trimmed the watercolor paper to fit on an A2 card. Mounted it onto a SU Baja Breeze card base.

Add a seasonal insert and white envelope.

This one is in non-tradional colors.

Purples and warm tones of yellow / orange.

On the last 2 I worked out how to print a greeting on the printer.  Took quite a bit of time but now I can repeat it when I want.

I did add a black line to ground the trees.

The card base is SU Pumpkin Pie with a seasonal insert and white envelope.


This card is all in blue tones with silver metallic accents.

Mounted on a SU Taken with Teal card base in the A2 set in portrait orientation.

Seasonal insert and white envelope.


Tuesday, June 25, 2024

Cards - Christmas - Snowflake

I need to make more Christmas cards.

I browse my designer paper and chose this 1 sheet from the Season of Cheer DSP set by Stampin Up. I believe this is mistletoe.

The color in this set is Mossy Meadow but I had Always Artichoke instead, also Soft Sky as card bases in the A2 size. 

 I added a length of Mellow Moss seam binding topped with Cool Caribbean narrow rick rack with all ends taped the the back of the designer paper. It was then adhered to the card front.

For the snowflake I punched a MS Snowflake and a Stampin Up one and layered them. I added a large white sequin in the center all held in place with a tiny blue brad.  This was adhered to the card front with a medium Zot.

I added 3 white sequins adhered with Bling Zots. A seasonal insert with a white envelope completes it.

The next card is a DSP Split where I cut the one piece at 3.5 inches and flipped the small piece over and tape them back together.  I taped it to the front of a Soft Sky card base.

I then punched a border with the Stampin Up Dotted Scallop Ribbon border punch in the same Soft Sky card stock.  It was adhered over the join in the DSP.

I found a large oval greeting with a color to match and adhered it over the border punch with 3D tape.


For this card I adhered the designer paper cut to 4.00 x 5.25 inches to the front of an Always Artichoke card base.

I added a strip of light blue across the card and trimmed the ends.

I added a snowflake accent make with the Martha Stewart large snowflake punch in 2 colors - white and blue.  All held with a tiny silver star brad with a silver sequin.

I added a greeting with a Word Window greeting in a similar blue color and mounted to a Modern Label punch in a similar green color.


This card is the opposite coloring to number 2.

Always Artichoke card base with a DSP Split piece of designer paper from the Season of Cheer set.

I used a border punchie in green this time to match with the card base.

I again chose a large oval greeting held in place with 3D foam tape.

A seasonal sentiment on a white insert and a white envelope.


A mirror copy of number 3 card with the alternate combination of colors.

This is Soft Sky card base with the same snowflake accent.

The greeting again is the same with the colors swapped.

A seasonal insert and white envelope.

Press overnight to ensure the tape sticks well

Great to have a few more cards in the box.


Friday, November 24, 2023

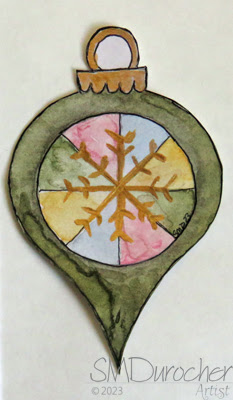
Christmas Cards - Watercolor Ornaments - Process

I decided I wanted to make some special cards for my family.  I wanted to use watercolor and ink. What to make? I considered using die cuts so that I would have a framework to work within.  I did get rid of quite a few so I had to investigate what I had left.

Gingerbread - nice size but not enough artistic options

Snowman - too big and limited artistic options

I have quite a few ornament dies.  

Some too big.  These don't leave any room for a branch or other thing to have the ornament hang.


Others too small.  Not enough to stand alone, then I could make 3 three but that is 3 times the painting and design.  Are they all the same color and design? 

This one is one of the Stampin Up Keepsakes Ornaments as are the 2 small ones above. 

I could have used the three different ones but again a lot of decisions to make and designs to come up with.  

It was very cute.

I decided to use a permanent marker instead of the dip pen because I had watercolor containers, several brushes and several palettes out so I could have easily dip the wrong tool into the wrong liquid.


This is the Sizzix Ornament #2 die which was the right size. It had a nice hanger. 

It had this bump below the round part and here was my first attempt.  I did not like to highlight it by tracing it with the marker. Then it should be shaded to make it look nice.


I could cut the bump off as you can see in this photo.  Yes, that was better.  I was inclined to create the main part of the ornament as a circle which would limit my options.


Then, I remembered that I had designed a digital ornament quite a few years ago. You can see it in this post.   I decided to pursue this option.      Pros: Using my own design was a great idea.  It meant I could size it exactly the height I wanted. It had a hanger. Cons: I would have to cut them out myself.  I decided that would add to the handmade original feel.
I traced the shape onto my nice mixed media paper with a pencil.  I then cut them out and then added the black line with the marker. Eventually, I learned it was better to do the line first then erase the pencil lines and then cut out the shape.  Here is one of my rejects.  I was not happy with the green watercolor on the outside, the circle limited my designs, then I used acrylic gold to try and save this one and I was not happy to mix mediums.
After a lot of trial and error I finally found a process that worked for me. I wanted to put these ornaments on a green watercolor background then onto a card base.   I had problems with the green watercolor layer as well.  I used salt to create texture but it must not have been wet enough so I got very little of it. This is one of my cards.  I'm not sure about just having it stuck there.  It should have a connection but I don't what it will be. Should it be a bow? a ribbon?  Would have been better to think of that before I adhered it.  We shall see what I come up with. 

Thursday, November 16, 2023

Cards - Silent Auction Donation


I made a couple sets of cards to donate to the Silent Auction at the Gallery Holiday Party.

The first set features a chipboard deer that was stained with Tim Holtz Distress Stain - Gathered Twigs. I chose a designer paper by We R Memory Keepers - Botanical for the background.  It comes in 12x12 so I could 6 cards with the one sheet. I ripped snowbanks from textures off white card stock.  The moon is champagne card stock punched with the 1`circle punch.  The trees are created with 1) Hampton Arts Tree Art die and stamp set, with olive card stock, 2) the Memory Box Birch Tree Trio die and 3) the Stampendous Truck Tidings die set. The card base is Stampin Up Pool Party. 


The second set of cards features a chipboard snowflake.  I painted them with white acrylic paint then a coat of Pearl Finish. I chose 3 designer paper from the Stampin Up Adventure Bound paper stack.  

For the Pine Boughs set of cards I selected Early Espresso, Chocolate Chip and Baked Brown Sugar card bases. I chose a ginger colored 1/4 inch smooth ribbon. The snowflake is attached with a large clear crystal brad. The greeting is black and white with a flagged end.

For the Birch Tree design I chose Basic Grey card bases. I chose a 1/4 inch black grosgrain ribbon. Again, a clear crystal brad to attach the snowflake. The greetings were left with square corners on this set.

I added white envelopes for all 12 cards.  These were sealed in cellophane - 6 deer then 6 snowflake.


I created a structure to display the 2 sets of cards. I started with heavy red card stock with which I created a pyramid shape then added a piece of chipboard in the middle to provide support to the structure.

I added the sealed packs of cards on either side.  I created a product label to fold over the top.  I then put 2 holes through all the layers with my Crop-a-Dile.  I pulled a red metallic ribbon through the holes and knotted in on the front.

I hope that it generates a few dollars for out club.

I also donated my weaving from a Tactile show, you can check it out here.

Update: All the items sold which is very good news!

Wednesday, November 8, 2023

Christmas Cards - Joyeux Noel - Blue


Another set of French Christmas cards. These feature blue paste paper my sister and I made years ago.

I chose Stampin Up Brocade Blue card stock for this set.  I cut a layer of Whisper White to leave a small border all the way around.

I cut the paste paper 3.5 inches wide and 4.75 inches tall. I aligned the Memory Box Grand Joyeux Noel thinlit along the top edge top edge up and cut with magnetic platform. The cutting has created many little pieces that I had to make sure to collect.  I adhered the die cut to the white layer with tape and quick dry adhesive around the Noel word to keep it stuck down. I then had to find the right piece for the noel O and E and stick those on with quick dry adhesive. 

The accents were cut with the Martha Stewart large snowflake punch and the Stampin Up Ornament punch. I used a tiny navy star brad for the dot on the J and a blue round sequin in the middle of the snowflake. I adhered a blue star confetti in the middle of the ornament with a Bling Zot. I drew a line to the top with a fine blue marker. A tiny blue sequin was placed for the dot on top of the J. 

Christmas Cards - Joyeux Noel - Green

 Another set of Christmas Cards. 

In this set of cards I used Stampin Up Garden Green as the card base.  Cut one sheet in half, scored and folded each in half to make two A2 cards.

I cut a layer of Whisper White cut to 4.00 x 5.25 inches to leave a small border all the way around.

I chose green paste paper my sister made many years ago.  I cut a piece 3.50 inches wide and 4.75 inches tall. I aligned the top of the thinlit die along the top of the paper making sure it was right end up. The die is the Grand Joyeux Noel by Memory Box. Once cut I adhered the diecut to the white layer with tape and quick dry adhesive around the noel letters to make sure they were stuck to the paper. I then had to find the cutouts that matched and glue the middle of the O and the middle of the E.  I used my QuicKutz - The Quicker-Poker-Picker-Upper tool to hold the tiny piece of paper while I put a dab of glue on it and then carefully put in place. 

The accents are the Martha Stewart Large Snowflake punch and the Hampton Art Tree die from the set. I cut the tree from a warm green card stock and added decorations to it with my white opaque marker. Tiny gold sequins on the top of the J held with Bling Zots. The sequins are gold. A large one on the snowflake and a star on top of the tree.

Christmas Cards - Joyeux Noel - Purple

I made some French cards for my aunts and uncles who are still with us.  Joyeux Noel means Merry Christmas.

I started with the purple paste paper my sister and I made many years ago.  It has been paper that I though too special to use just willy nilly and so it has not been used.  I have to get out of the scarcity mentality and use stuff I think beautiful knowing that more will come when it needs to.

I cut the paste paper to 3.5 inches wide and about 4.75 inches tall.  The die is a thinlit by Memory Box.  I used my magnetic spacer to keep the die in place while cutting.  I cut the paste paper then pulled it off the paper. This requires gentleness because those letters up top are very delicate. I did mark the die with an up this way arrow this time because I did lay it upside down and of course had the greeting the wrong way.

I chose Stampin Up Lavender Lace for the card bases for these cards.  I added a layer of Whisper White cut to leave a small border all the way around. I used double sided tape on the bottom and side and Scotch Quick Dry Adhesive around the noel letters. The bottle has a very fine tip so it was easy to put just where I wanted it.  

Once that was adhered to the white layer, I added my accent pieces. The tree is by Hampton Art and cut from Elegant Eggplant. I added decorations with my white opaque marker. I added silver star and sequin on the top of the J. The snowflake is a large Martha Stewart punch. I adhered to the layer with a dusty purple mini brad and a silver sequin and a tiny sequin on the J. 


Monday, August 1, 2022

Christmas Card Challenge - Watercolor - Aug - Salt Backgrounds

I created a watercolor background for my large Christmas greetings for this month's challenge.

I started with 140lb Arches watercolor paper I purchased from my sister. It had been rolled up so I spritzed it with water and let it relax itself to flatish.

I cut a strip about 6 inches tall and the width of the sheet.  I taped that down to my waterproof work surface.  I used my small watercolor palette I created the other day.  You can follow this link to the post which contains the details. 

I soaked the paper with my spray bottle then I just worked with the greens and blues in my palette. As I moved across I switched from the blues to adding red to create purples. Once I was happy with the colors I misted it again to ensure the whole surface was wet then just added some table salt to the surface.  It then dried for several hours.

I believe this is rough water color paper but is softer than the sheets have I have been using. I was very happy with the pattern produced by the salt.  Once completely dry, I cut it into 4.00 x 5.25 inch sheets.  These will leave a small border of the card base showing.  Since I was not using Stampin Up watercolors it took a bit of evaluation to see which card colors to use.

While the paper dried and searched the internet for some free large greetings I could use. The card above features the one I liked best.  The greetings were sized to be smaller than the watercolor background and printed grey on vellum.  They were then heat embossed with gold powder.  I ripped the edges to provide a more natural edge.

On the right I created some portrait (tall) cards with vellum greetings which also included images. This one is a Christmas tree. For most of  these cards, the vellum is adhered to the watercolor background with tiny gold brads. Then the watercolor layer is adhered to the card base with 3D foam tape squares.

The greeting on the card on the left has been around for a very long time.  It is very classic fonts and makes a great greeting.

The card base on this card is Marina Mist. The brads used on this one are larger sparkly gold star brads. 

I added some vellum adhesive in the opposite corners to keep the vellum close to the watercolor.

 The watercolor background features the transition from green to blue in my original painting.

This watercolor background was the toughest to match to card stock.  I tried Chocolate Chip, Perfect Plum, Sahara Sand and eventually settled on Soft Suede. 

That is the challenge - when I was painting I did not measure the width of the colors so this piece ended up with some muddier colors with the n bright blue on the right hand side.  

This is the other portrait (tall) card where I combined an image and a greeting.

Again, I was not thinking of images at all when I was painting.  I had to trust I could work it out once the watercolor background was dry.

I think this worked out well.


This card features Bermuda Bay for the card base.  Another landscape (wide) layout.

This time tiny gold star brads in all four corners.

I will be adding quarter sheet inserts with a seasonal sentiment to each of these and pairing them with a white A2 envelope.

Another great set of cards for my box.  Ready to give come December st!

These worked out well and the background is worth considering again.

Tuesday, January 11, 2022

2021 Christmas Cards Received

 I cleaned up the Christmas cards I received in 2021 today.  I gave away about 50 and received 16.  I am grateful to those who sent cards and newsletters. There were 3 handmade in the bunch so that is a bonus.  The red tablecloth and plac emats have been put away for another year.

Sunday, November 21, 2021

Christmas Cards for Seniors


I prepared some Christmas cards for seniors which will be distributed to nursing homes by a local scrapbook store.

I have several techniques in this collection of 24 Christmas cards.  

1) recycled commercial cards onto new card bases and new inserts - several which worked better in the 5x7 size.

2) refurbishing handmade cards I have received - some from friends who took my card making classes so the designs are mine but I did not make the cards, some I received in my monthly card exchange. 

I am very happy with the selection and variety in this collection.  Soon they will be delivered to the scrapbook store.

Friday, April 9, 2021

2021 Christmas Card Challenge - Refurbished Cards - Session 2

I continue my clean up of old cards and they need to be use or otherwise disposed of.

A beautiful manger scene which is simple and elegant.

I just added a brown texture card stock layer to the golden rod card base.

The manger layer was then adhered to the brown layer.

I added a greeting with a Stampin Up Modern Label in the the card color and a brown Word Window punchie.  This was adhered to the card front with 3D foam tape.

While shepherds kept their watching
Over silent flocks by night,
Behold throughout the heavens,
There shone a holy light:

I love the beautiful greens in this stain glass window of the shepherds in the fields.

I trimmed the window from the commercial card front.  It was not wide enough so I added a strip of purple to the right hand side.

The stained glass layer was adhered to the card front with 3D foam tape.


A well lit church scene inside a Christmas tree shape with gold foil stars all around.

I trimmed it and then layered it on a piece of white card stock.  Then added to a medium blue card base.

I added a Stampin Up Modern Label punichie greeting in blue. This was adhered to the card with 3D foam tape.


The name above all names "Jesus".  The reason for the season.  Gorgeous trio of candles with holly around the base. I added a green layer to the golden rod card base. Adhered the focal element with 3D foam tape.


The trip to Bethlehem on a donkey.  Mary pregnant with Jesus and Joseph leading the family to their destiny. 

Love the blues and purples in this card.  Adhered with 3D foam tape to a purple card.

I am really happy with these cards. 

Five more cards for the Christmas box.

Friday, February 26, 2021

Christmas Card Challenge - Feb - Watercolor Cards 2

Here are the next 4 cards in this watercolor challenge.

I lightly drew the shapes with watercolor pencils. I then used red watercolor to paint this trio of elliptical ornaments.  The 140lb watercolor paper was taped down to a piece of glass and allowed to dry taped down.

Once dry, I added the black lines with a thin permanent marker.  

I then added spatter with gold liquid acrylic color. 

I mounted this on a dark card base.

This card is a round  ornament in fuchsia color.

I added a string where it hangs and a tiny bow. I added some pearl liquid acrylic to the sections of the shape.  Spattered with fuchsia color.

The greeting is from the Stampin Up Good Greetings set in permanent black ink.

I really loved the snowbanks I created in this composition. 

I added a twig tree with the black marker.

Stamped the greeting on the lower right hand quadrant.

This wreath was created with light and dark leaves. Remember to keep them in the same direction.

I added black outlines on the leaves and a bow at the bottom of the wreath.   

Stamped greeting above the wreath. 

Spattered with red watercolor.