 Cleaning up leftovers. I made this card with materials cut while working out the card kit I posted earlier. I chose cherry card stock to go with button. Die cut the shadows in dark green with the Sizzix Shadow Box alphabet and the letters J&Y in cherry. Glued the cherry letters to the dark green shadows. The ornament under the button in green is a Sizzix as well. Cut the hanger from cherry and glued it on. I pulled some cherry thread through a hole made with a push pin. I glued the J then the Y then centered the ornament in between. I brought the thread up over the edge of the decorative paper and taped it to the back. Glued the decorative paper onto the card front. I'm submitting this card to Sparkles Christmas Challenge this week which needed die cuts.

Wednesday, June 29, 2011
Card - Christmas JOY
Cleaning up leftovers. I made this card with materials cut while working out the card kit I posted earlier. I chose cherry card stock to go with button. Die cut the shadows in dark green with the Sizzix Shadow Box alphabet and the letters J&Y in cherry. Glued the cherry letters to the dark green shadows. The ornament under the button in green is a Sizzix as well. Cut the hanger from cherry and glued it on. I pulled some cherry thread through a hole made with a push pin. I glued the J then the Y then centered the ornament in between. I brought the thread up over the edge of the decorative paper and taped it to the back. Glued the decorative paper onto the card front. I'm submitting this card to Sparkles Christmas Challenge this week which needed die cuts.
Card Kit - Gold Glitter Ornament
 Here's another Christmas Stack Card kit. The focal point is a glitter card stock ornament cut with a Cuttlebug die. I selected red and green card stock and split the cards in half between each. I punched snowflakes with MS punch. I found satin ribbon in the right colors with a speckle of gold. I cut the decorative paper and glued it to the card front. Attached the ribbon to the ornament hanger. I used a bit of glue to tack the ornament in place then added the snowflake over the centre. Use a push pin to create a hole through all three layers and add the gold brad. Trim the ends of the ribbons to the edge of the card. Check the link on the right hand side or follow this link for available card kits. Great idea for time at the lake this summer.
Card - CST Challenge #7 - Baby
 A card for a baby is the CST challenge this week. I checked earlier this week and the cards were pink so decided on a boy's card. I started with a white card. I added a piece of striped paper then a blue crinkled paper. I printed the sentiment on red card stock, trimmed it and placed over the join of the decorative papers. Use white yarn in the button then glue dot to keep it in place. The top need something so I tried several options until these stars punchies were just right.
Tuesday, June 28, 2011
Card Kits - Joy with Damask Buttons
 I put together this Christmas Card Stack kit this week. I had just enough Damask buttons left from my card club class to make a stack kit. I found some decorative paper to match the mustard and olive buttons I had. I selected cardstock in cherry red and olive green colors. I cut the word JOY with my Sizzix Shadow Box dies, the shadow in ivory and the letters in red. These are glued red over ivory. I selected some gross grain ribbon in 2 shades of green. I tied red thread in the holes of the buttons and trimmed the ends. I trimmed and glued the decorative paper to the card front. I added a bit of glue to the back of the ribbon and placed about .75" from the top of the card. Brought both ends to the inside of the card and taped them down. I used a glue dot to adhere the button to the ribbon. I glued the letters below the ribbon, first the J then the Y and centered the O in between. The kit makes 16 cards. You can check my website link on the right hand side or follow this link for available kits.
Wednesday, June 22, 2011
Card - CST Challenge #6 - Bling
 I selected a brown card with a top fold. I cut a white scallop border with a Die-namics die and added sticky turquoise rhinestones (the "Bling") in the centre of each bump. I cut my turquoise piece, ripped the edge and glued it over the straight back edge of the scallop border. The blue in each piece match. I placed a dragonfly, a flutter trail and greeting in Corel Draw and printed it onto white card stock. I trimmed the piece then ripped the edge similar to the turquoise layer and glued it onto the card front.
Monday, June 20, 2011
Card - Accordion Card
 I made this card for a couple who are leaving our office and moving to Toronto. I needed a large card for everyone to sign. I decided on an accordion card. I wanted the left side to represent Alberta so I added mountains and pine tree. The vellum in the centre represents our Muttart Conservatory in the river valley. Then along the road in the centre I created sign posts with locations long their way east; Saskatoon, Winnipeg, and Sudbury. The right hand cover represents Toronto and Ontario. The cityscape, CN Tower and the water.
I used artists canvas 6x9" for the covers. I painted the sky and the grass on with acrylic paint with a bit of a dry brush technique. I used 50lb text weight paper for the accordion which was painted in the same way. I used my Creative Memories Wavy Cutter to create the highway that runs the full length of the card from left to right. I added the white centre line with a Marvy Opaque marker. The mountains were cut by hand, the pine tree is a Sizzix die cut, and the grass was ripped and cut with decorative edge scissors. The Muttart Conservatory is 3 large glass pyramids so I decided on vellum which was scored and then I added a bit of fine black marker to add definition. I designed the road markers in Corel Draw. The cityscape was cut on the Cricut - Paper Dolls Dress Up. I placed yellow paper behind to put light in the windows. I cut the waves with the wavy cutter and chalked them to add some depth. The CN tower was a clipart image which I printed and cut close to the edge. The clouds were cut with the Cricut - Create a Critter. I made a vellum sleeve to hold and protect the card.
Banner - Farewell

Friday, June 17, 2011
Card - CST Challenge #5 - One Layer
 I made this card for the One Layer Challenge on CST. The green daisy is my own design which was printed on the card. I added a yellow cap to the centre and a matching checker board ribbon along the fold. I used a Stampin Up! background stamp to add dirt below the line in Chocolate Chip and the greeting as well. Quick and easy!
Thursday, June 16, 2011
Photo - Word Frame
 This is a photography project I've been working on. I wanted to make a gift for my boss who is being transferred. I've been developing an Alphabet Photography library and so I chose photos that spelled his name "FRED". I had the photos printed in black and white and mounted them behind the white mat in the 3x3" openings of the 8"x8" frame. I then made an identical mat out of vellum to lay over the mat board. I stamped several words that described him. I used my CTMH small alphabet on a long clear mount. I used Versafine Ink - Black Onyx and embossed with black detail powder. I'm really happy with how it turned out.
Alphabet Photography - These are pictures of every things that represent letters of the alphabet. It's important to keep contrast in mind to ensure the letter stands out. I don't have pictures for all the letters but I'm happy with my progress. Some letters are really hard to find. It requires that I look at my world from another point of view. Always a good exercise.
Card - Copper Butterflies
 I used a textured red card stock for the base card. I put a quarter sheet of black cardstock through the Big Shot with the Cuttlebug Oval Scroll frame folder. I rubbed copper Pearl Ex onto the high parts. I sealed it with matte fixative. I cut the butterflies with Spellbinder thin dies from metallic copper card stock. I punched an oval from the same red card stock. Stamped the greeting with Black Onyx Versafine ink on a small clear stamp. I adhered the butterflies and daisy with tiny black brads. A great birthday card!
Wednesday, June 15, 2011
Card Kit - Silver Snowflakes
 I originally did this card here.
I decided to take the suggestions made at class. I expanded the color choices for this kit which now includes pink, lavender, turquoise and navy. It provides quick and easy cards.
I will have to go on the hunt for more foil paper.

Monday, June 13, 2011
Christmas Card Stack - Gold Ornaments
 The gold and black paper is wonderful. I selected card stock to match the decorative paper (black and purple). I found some gold paper that went well with it. I cut a layer of gold leaving a small border and glue it to the card front. Then I trimmed the decorative paper leaving a larger border. I cut the ornament with a Cuttlebug die folder combo "For You" from the gold paper. I glued a small eyelet in the card color to the ornament hanger. I folded the ribbon in half, pulled the fold through the hanger hole and the pulled the ends through the loop and pull taut. I put a big of glue behind the hanger and the ornament. Placing the colored snowflake onto the gold ornament and use a push pin to make a hole for the brad. Push the brad through and spread the prongs on the card inside. Trim the ribbon ends with scissors.
Christmas Card Stack - Ivory Star
 This is Real Red card stock. I selected 2 different red/ivory Designer papers. I trimmed the decorative paper to leave a small border around the edge. I cut the star with the Sizzix #2 star die and the oval ribbon slider with the Cuttlebug die from pearl ivory card stock. I stamped the "Joy" greeting onto the sliders with red ink. I pulled the ribbon through the slider. Once I decided the location of the ribbon I placed a slit in the fold, pulled the ribbon through and taped both ends to either side of the inside of the card front. I glued the star above the greeting.
Christmas Stack Class - Embossed Dove
 This is the first card in the Christmas Stack Class. I selected blue and purple card stock. I cut a square of white card stock and put it through the 2" Cuttlebug Dove embossing folder. This layer is trimmed close to the embossed border around the dove. This is glued to a colored square about 1/8" larger. Trim the greeting layer and glue to the card front. Glue the dove accent above the greeting in the top 2/3 of the card. I added Stickles Frosted Lace glitter to the dove.
Christmas Card Stack - Poinsettia
 I selected Real Red and Handsome Hunter green card stock for these cards. I trimmed the gold embossed Merry Christmas paper to cover the top 2/3 of the card and glued it to the card. I placed the red organza ribbon over the bottom edge of the gold paper. The ends are brought to the inside of the card and taped down. The green leaves were cut with a Sizzix die Flower Layers #2. I stacked the leaves, then the silk poinsettia flowers and aligned them on the ribbon. Used a push pin to create a hole for the brad. I placed the gold sequin onto the tiny gold brad then place it into the hole I just made through the flowers. This adheres the flower accent to the card front. Fold the insert in half and glue to the inside card front.
Photo - Fort Edmonton Park
 I took a photo taking trip to Fort Edmonton Park this weekend with a full day for me. It's been several years since I last visited. Meanwhile, they have added the MidWay with the Carousel and Ferris Wheel being the highlights. I did take a ride on the Carousel. Aren't those restored wooden horses great? They are gorgeous. The line was long for the Ferris Wheel and the squeals coming from the riders made me think twice. Maybe next time. It's not that high.
 I'm working on a photography project and this place offered a lot of great pics. More on that later.
Saturday, June 11, 2011
Christmas Stack Class - Silver Snowflakes
 This is the last card of this Christmas Card Stack Class. This is a very versatile design in the sense that the color can easily be changed to create different looking cards. I choose turquoise and navy for this class but have plans for another kit with 4 different colors. The colors suggested at class were pink and purple. Keep I eye out for it.
I designed the snowflake background myself and color printed it on white cardstock. It was trimmed and glued to the card. I used my Sizzix Large Snowflake die and cut them from silver foil paper. I placed the snowflake and used a push pin to make a hole in the centre for the brad. I added a Martha Stewart snowflake punch in the card color then a silver metal embellishment which is all held in place with a tiny silver brad. The circle greeting is something I designed and color printed. Punched with a 1 1/4 inch punch then layered onto a 1 3/8 circle punchie same color as the card. The strip in the card color is embossed with the Cuttlebug Snowflake folder and cut to .75" X 4.25" and glued below the snowflake. The circle greeting is assembled and using a push pin to create the hole is held in place with another tiny silver brad.
I made 12 cards
Total = 61
Christmas Stack Class - Button Ornaments
 I selected 2 color schemes for this card. One is very traditional red, green and white the other is vintage with cranberry, olive and purple. I designed my ornament hangers and printed them onto vellum along with the greeting. I trimmed the decorative paper (polka dots or diamond pattern) and glued it to the card. I separated the greeting from the hangers but cutting in between. Alternative is to leave it together and just trim the outsides. The hanger piece is square and is mounted to the paper with a narrow bit of double sided paper at the very top which will be covered by the ribbon and under the buttons. I positioned the ribbon at the top of the hanger vellum low enough to cover the tape I had placed there earlier. I made a slit in the fold and pull the ribbon through and taped both ends to the inside of the card. I trimmed the greeting as needed and mounted above the ribbon with 2 tiny brads. The buttons are held in place with Zots.
Christmas Card Stack - Wonder Snowman
 I started by using the Tim Holtz Winter Wonder die to cut my snowmen from corrugated cardboard. I selected ivory with an ivory card and a kraft embossed layer for the other kraft on dark brown card with ivory embossed background. I used the Cuttlebug Devine Swirl folder. I trimmed the embossed layer and glue it down. Then I tied the gold ribbon around his neck. Then decide where he should be in relation to the snowbank. Once decided then just tack him down a bit with a bit of double sided tape. I added the tiny gold brad for his eye. I put a sequin on a tiny gold brad then place the gold fabric snowflake on his belly and made a hole with a push pin, pushed the brad through and spread the prongs on the inside of the card. I added the gold sequin star in the top right hand corner which is the object of his gaze. I cut snowbanks with my Creative Memories wavy cutter and mounted that with pop dots on each end.
Christmas Stack Class - Joy
 Today is my first of two Christmas Stack classes.
 This is a simple but elegant card. I selected metallic paper for the embossed layer. Bronze with ivory card and white pearl with red card. I ran the metallic through the Big Shot with the Flourished Frame folder. Trimmed it to just smaller than the card front and glued it on. I cut a piece of card stock same as the card just the right size to fit in the rectangle and glue that in. I used the Sizzix Phrase Peace, Joy, Love with Christmas Decorations long Sizzlet die to cut the word "JOY". By making the piece of paper just the right size I was able to cut Joy and not the other words. The greeting was then adhered over the rectangle of card stock.
Wednesday, June 8, 2011
Card - CST Challenge #4 Turq/Rose/Wasabi/Expresso
 I made this card for a color combo challenge. Turq/Rose/Wasabi /Expresso. I did have the Stampin UP! cardstock but I think I matched them quite well.
 I started with a brown card, then I cut bottom edge of the turquoise with my CM wavy cutter and embossed it with the Cuttlebug Swiss Dots folder. I cut the flowers with a Cuttlebug 2" die then embossed them with the Sizzix Tropical Paisley folder. I high lighted the right and left flowers with chalk. I added a Cuttlebug outline flower in a dark pink to the centre flower. The stems and leaves were hand cut and glued down. I punched small daisy centers to balance the outline on the centre one. I put yellow brads in the centre of the flowers. I removed the shank on the bee button then adhered it to the card with small Zot.
Challenge - Gold Cream White
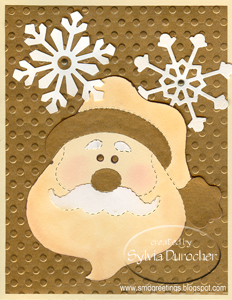 I made this card for the Sparkles Christmas Card Challenge. It's a color combo challenge Gold Cream White. I started with a cream card. I embossed a piece of gold decorative paper with the Cuttlebug Polka Dots folder and glued it to the card front. I cut the Sizzix Santa Head with the same cardstock, then I cut it out of the gold paper and white cardstock. I cut the different layers along the dashed lines from each and glued them onto the cream base. I applied some chalking to add some dimension to the beard and hat. I glued the Santa head onto the card leaving space for snowflakes. The snowflakes were cut from white with Sizzix Sizzlets and are held in place with gold tiny brads.
Cards = 1
Total = 49
Sunday, June 5, 2011
GG - Irridescent 3D Snowflake
 The design depends on having double sided paper. I selected Stampin UP! designer paper. The colors are Bayou Blue and Soft Sky. Any double sided paper would create a different looking card.
The 3D snowflake was purchased as an ornament. I cut off the hanger circle from the top with sharp pliers. I cut a piece of DP 4"x5.25" then cut at 1" from the bottom. This is double sided paper so I turned over the 1" piece. These were glued to the card front. I placed the ribbon over the join of two papers. I created a slit in the fold and pulled the ribbon through and scotch taped the 2 ends to the inside of the card front. I glued the color printed greeting below the ribbon on the right hand side. I cut the scalloped circle with Spellbinder Classic Nestabilities thin die in card stock same as the card. Remove the release paper from the Zot on the back of the snowflake and place in the centre of the scalloped circle.
I made 10 cards for my stash.
Total Cards: 48
GG - Glitter Ornament
 This is a versatile design because you can change the colored card stock and/or the glittered ornament color to quickly create a variety in your cards. I matched the card with the color of the glittered ornament.
The ornament was cut with a Cuttlebug 2" die. The colored snowflake is one from Martha Steward which fits into the ornament perfectly. The colored layer was edged with an EK Success border punch. I stamped the greeting in Versafine Onyx ink with a clear stamp in the top left hand corner of the colored cardstock. I glued the colored layer to the card front. I then layered the snowflake, the ornament and placed them onto the card. Used a push pin to create the hole for the brad through all layers. I pulled the ribbon through the circle on the hanger at the top of the ornament. I added a bit of glue to the back of the hanger and placed the brad into the hole and spread the prongs to the inside of the card. Trim the ribbon ends as needed.
GG - Kraft Christmas Tree
 This design was based on the circle greeting 3D stickers I had purchased. It was a challenge to find paper to match them.
I created a snowflake background and color printed it on parchment bond paper. It has a rectangle frame to highlight the tree. The tree was die cut with the Sizzix Christmas Tree #2 in Kraft card stock. The snowbank was cut from silver foil paper with the Creative Memories wavy cutter. Glue the tree to the card front leaving room above for the star. Glue the snowbank to bottom of the card below the tree. Trim the silver paper to the card edges. Remove the release paper from the circle greeting and place the 3D in the top right hand corner. Remove the release paper from the Zot on the silver star sequin and place at the top of the tree.
GG - Christmas Wreath
 Here are the cards for the Glorious Greetings class. I've included the 2 color options I offered. I sometimes have extra stack class kits available so if you are in the Edmonton area send me an email.
The wreath was cut with the Cricut - Joy of the Season cartridge at 3.5". I cut the layer out of green watercolored scrapbook paper. Those get glued on every other leaf cluster. Just find the ones that match. The greeting was cut with a QuicKutz nested oval thin dies. Glue the greeting to the colored oval. Tie a bow in the red and green plaid ribbon. Glue the gold or silver metallic paper to the card front. Adhere the ribbon bow to the top of the wreath with double sided tape or hot glue. Glue the greeting below the wreath. Fold the insert with the Christmas sentiment in half, place it inside the card with the fold tuck into the card fold. Lift the card front, place glue on the insert along the fold and press down the card front.
Wednesday, June 1, 2011
Cmas Card Challenge - June - Chocolate Red Cream
 This is a color challenge using Chocolate, Red & Cream. I started with a chocolate chip card. I printed my greeting on cream card stock. I printed 6 on 1 8.5 x 11. I used my Creative Memories wavy cutter to cut the greeting into a snowbank. Then I cut the red with the same wave. I put these two together and scotch taped them on the back. I trimmed the red to make the piece measure overall 4" tall. Now the piece is 5.25 wide by 4 tall. This is glued to the card front. I cut the snowflakes out of cream pearl cardstock with my Sizzix sizzlets. I placed them over the red and used a push pin to make the holes and used tiny star brads to hold them in place. I made 6 of these so my total cards is 38.
Card - Christmas Sample
 This is another idea that hit the cutting room floor during my prep for Christmas Card Stack Classes.
 I started with a dark green card. I used a Crafts-Too holly embossing folder which leaves a nice blank rectangle in the top 1/3 of the card. I repeated the holly pattern with the MS holly punchies from the same cardstock as the card. I punched 3 red circles to add to the holly. I glued these together in the embossed rectangle.
Card - CST Challenge #3 - Flower
 This week's challenge is to have a flower on the card. I'm always in Christmas card mode in June because of my Stack Classes so I thought why not!
 I started with a red card and embossed the bottom with the Cuttlebug large dots folder. I trimmed my gold decorative paper to leave a 1/4 inch border. I then placed a nice organza/satin ribbon in red across to cover the lower edge of the gold MC paper. The green leaves was cut with a Sizzix Flower Layers #2 flower die. I then layered a white silk and a red silk flower with a gold sequin in the centre. All held together with a tiny gold brad.
I wanted to only emboss the bottom 1/4 but because the folder is large it would only fit a certain way in the Big Shot so my gold paper would not be affected by the texture underneath.
Card - Glitter Snowflake
 I made this for the CST Christmas Mingle. It's so hard to photograph glitter.
I used a negative hole left from die cutting the Sizzix large snowflake. I placed clear packing tape behind the hole so the sticky is showing in the hole. I sprinkled some MS silver glitter on the sticky tape and pressed gently to get it to stick. I used some MS glitter glue around the edges and dipped those in glitter. Once I was happy with the coverage collected the left over glitter and put it back in the container. While it was drying I found card stock and printed my greeting along the bottom after figuring out where it needed to be. Once dry, I glued down the glitter snowflake above the greeting. I then punched a MS Glacier Snowflake and punched a hole in the centre of each snowflake and held both snowflakes in place with a black brad. It's ready to go in the mail today!
Subscribe to:
Posts (Atom)