Showing posts with label iron. Show all posts

Saturday, February 24, 2024

Sylvia's Simple Shots

Its been a week for improvements in the sewing room department.

I have started buying distilled water for my steam iron which lessens the amount of times I have to clean it.  The cost is minimal about $2 and it is better all the way around.

I also found a water cup for the iron at the thrift store this week.  I have wanted one for a while and since I bought my iron second hand it did not come with one.

I have been reusing a disposable water bottle but it does not have the point to direct the water.

This cup works very well and it again was a bargain at the thrift store.


Another improvement in the sewing room was this clamp I found at the ReUse Center.

This the spool holder that my brother in law made me for Christmas a few years ago. It works well but the corner of my sewing desk is a bit short on space.  Whenever I pull the board to raise the machine it would topple over.  

This clamp is minimal but very effective.  It has been quite a while since I have worried about not toppling the spool holder.


I found this small bag of buttons at the thrift store when I met my sister in Wetaskiwin a while back.

They are vintage for sure with metal inserts in the holes for reinforcement.  There are about 50 of them so I am sure there is a project where they will fit in perfectly.


I had a visit with my youngest sister for Family Day.

She had a couple of friends over and we talked crafts, sewing, and all manner of other stuff.

We managed to make this puzzle while we chatted.

It was nice to be with family.


Wednesday, July 22, 2020

Bernina 830 Sewing Machine & 1st Project

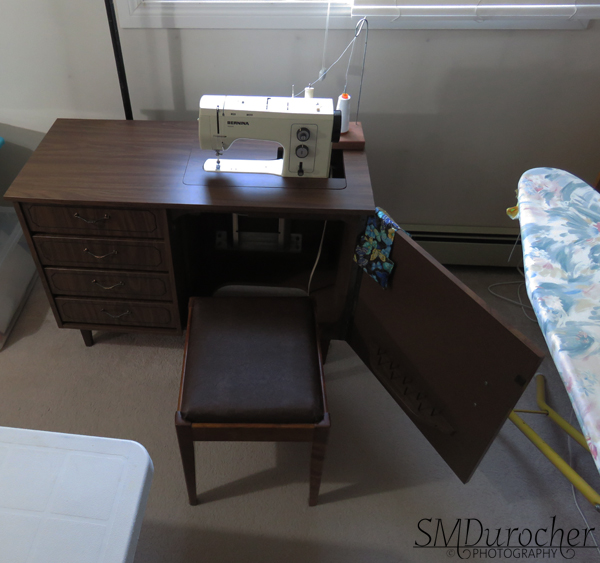
The new to me 1972 Bernina 830 Sewing Machine arrived yesterday thanks to my sister and brother-in-law.   I purchased it in late February through my sister then I started making the space to house it!  Then COVID hit and life changed.  I have continued to clear, de-clutter, and get rid of stuff and last week there was space for it. 

I have placed it in front of the window so that the light will be the best most of the time.   There is enough room on the right for me to access the window to open, clean or get out if I needed to.

You can see the ironing station on the right hand side.   The cutting and pinning station of the craft table is behind the desk and on the left hand side.  That makes a very good working triangle where everything is at hand but there is enough room to work.

The desk has a lifting mechanism which allows it to be stored in the desk, then the machine level to the desk top and then higher still to access the free arm feature of the machine.  It works really well and I will get some lubricant to help it work a little better.
I created Thread Bobbin storage in a Ferraro Chocolate box. I love the clear lid so I can see the contents.  I created the channel organizer with 80lb text paper.  I cut a piece 16 T x 8.25 W inches then scored it every inch.  Then it was a matter of creating the channels to hold the bobbins. I taped the edge on the right to the bottom of the box. As you can see I have expansion room.

I decided to store the sewing machine needles in the space left. 


I used the same boxes for Thread Storage.  They are deep enough to accommodate most spools. I organized the thread by first separating the polyester from the cotton. 

The ones displayed are the polyester which I have the most of.  The spools were organized by color into separate boxes. Reds and pinks, neutrals (black, white and beige), 2 boxes of blues then a box of yellow and greens.


My niece made this Needle storage tag book for my birthday.  It is tag shapes with ribbon sewn to them then protected with a clear one on top. 

The label at the top allows me to remember what I have stored there.  Sometimes you have to switch out needles but you don't want to return it to the new ones.  This system allows me to store it here until I need it again.


These small wooden boxes were made by my brother-in-law when we needed boxes for selling cards at craft sales.  I have not used them for a couple of years because I bought a large card display.  They fix perfectly in this drawer and makes use of all the space.

Small cutting tools, my rotary cutter and blades, measuring tapes, pins straight and safety.


This is the extra hook on the pole where my African Violet lives.

The light on the right hangs over the craft table.


I refurbished it's lace cover today.  I cut the lace in half so that I will have the same fabric for the other light.
I hemmed the top edge then added a white grosgrain ribbon along top of the wide hem on the bottom.  It is a single layer which allows more light to get through.

I will be getting another hanging light for the extra hook which will give me lighting on the left hand side of the sewing desk which likely will be needed when sewing at night. 

It is very exciting to have a dedicated sewing space where everything will be close at hand.  Keep an eye out for quilts in the near future.

Tuesday, March 10, 2020

Chair Protector & Steam Iron Maintenance

I took a break from quilts today to get some mending and small projects for the home.

I have started using my rocking chair more but I wanted to protect the cushion cover.  I sewed this cotton protector to prevent my hair oils from staining the cushion.  I added 2 ties which attach it to the wood back of the chair.

It is done and installed.


I had to do some maintenance on my Sunbeam Steam Iron - Model 4229 today.

I have to confess I have not been cleaning it regularly.  Today, I had to do it 4 times before I felt I had cleaned out a good amount of the gunk from the reservoir.

Recently, I had noticed bits of gunk in the water as it has a clear reservoir which should have been a clue.

I don't find the sole plate as clean as I want it but I will continue to do it regularly and I am sure it will get better.

Lesson:
Clean your steam iron regularly rather than deal with the hassles later.

Saturday, February 1, 2014

How To: Wax Crayon Paper

I'm thinking about Earth Day (April 22 2014) ideas already.  I have been collecting wax crayons given away at restaurants when children are at the table.  This happens regularly for me so I decided to recycle/reuse them rather than them being thrown in the garbage.  There are some great ideas out there. Being a card maker I wanted something I could use in my regular projects. I did some research and here's my process.

1) Cover your work space with a couple of layers of scrap paper.
2) Strip the paper from the crayons.
3) Use a pencil sharpener to create wax shavings
4) Lay your shavings on wax paper in whatever manner you want.  Mixing the colors will create colors like orange, green, and purple.
5) Cover your shavings with another piece of wax paper.
6) Add a couple of layers scrap paper.
7) Heat with an iron designated for crafts on medium setting.
8) Lift scrap paper to reveal your wax crayon paper.

Next time I will use more wax crayon.  Trying to align yellow in the center for flowers was not worth it. Check tomorrow to see what I made with my paper.