Showing posts with label Sizzix Stars #2 die. Show all posts

Wednesday, August 20, 2025

Slow Stitching - August 2025 - Week 3

Comfort Coverlet 2025 - August - Week 3.

My theme for this month is Friends.  

I have diecut fabric with my Bigshot machine from fabric which I associate with each of these friends.

I have started a running stitch background around the stars with a matching colored floss.


Friday, April 18, 2025

Cards - Donation - Teacher Appreciation

This set of cards feature more decorative paper.

The top card has a layer of Japanese origami paper mounted onto a Stampin Up Summer Sun card base. 

I added daisy punchies in green and gold with round sequins in the center and held in place with green mini brads.


This card is again the gorgeous Summer Sun card base.

I mounted a layer of SU designer paper in strips. 

I added a strip of Early Espresso cardstock across the top onto which I knotted some yellow cotton thread.

I added 3 maple leaf punchies mounted with Bling Zots.

The bottom card is an Old Olive card base with watercolor leaf designer pape from Stampin Up.

I added a length of the same green card stock across the top.

I then cut 2 stars with the Sizzix Stars#2 die with sharp points. Layered these and then mounted them onto the bar.

Again quarter sheet inserts and envelopes.


Saturday, October 7, 2023

Photo Shoot - Chrismas - Tiny Wood Stable

I found this tiny wood stable ornament at the ReUse center.  They always have a bit of Christmas all year round which works for me. I am sure it olive wood.

I just removed the eyelet and string hanger from the roof of the stable. 

I added the white fiberfill batting around the base making sure to cover the transition from the table to the background. 

I used my gold foil star die cuts again on this  composition.  I wanted to leave some space at the top so I can add digital elements as I go along.

The star background again is 12x12 designer paper by Creative Imaginations created by Helen Dardik.

This will work for a 3.5x5 inch layer on an A2 (4.25x5.5") card, a 4x6 print on a 5x7 A7 card, a 4x6 photo background for the Christmas Countdown calendars. And who knows what future projects.


This process entails taking many photographs, tweaking the composition, post production work including cropping and sizing for specific outcomes.

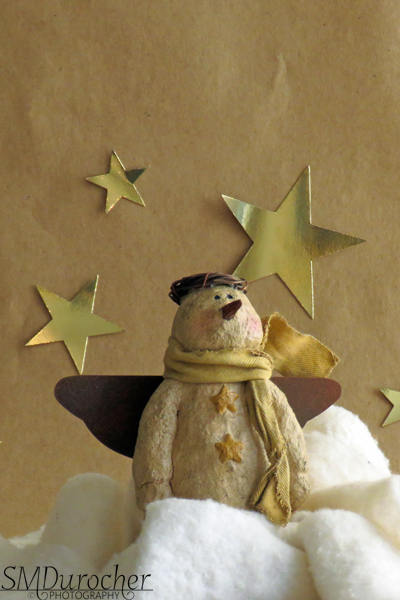
Photo Shoot - Christmas - Warm Snow Angel

My sister gave me this wonderful warm color snow angel.  It is quite large and would not fit into my tiny photo studio so I just put him on the shelf. I photographed him at her house years ago. This is a set of cards I create with that shot.

With a lot of thinking about it I realized that I could use my background stand to hold background paper.  That worked out really well. Check the photo below.  It can be set up narrower than I usually use it from photographing my art for gallery shows.

Now I could create a background in proportion to his size.  Also I now have 4 feet of table to create depth of field with items laid further apart.

I used some warm and natural quilting batting for the snowbank.  I cut gold foil stars with my Sizzix star #2 die that cuts 4 stars in various sizes.  Found the foil card stock at ReUse for free.

With this composition I have enough space at the top to either add a digital greeting for a card or a place holder and words for the countdown calendars.

So glad he came back to me.

Friday, March 5, 2021

Christmas Card Challenge - March - Large Greetings Small Cards

I continued my large greeting Christmas Cards making with the aim to create A2 (4.25"x5.5") sized cards. 

I continued to use the Winter Frolic Cricut Cartridge. This greeting is 3.5" T x 3.5" W. I cut it from Champagne pearl card stock and paired it with an ivory card base.   

The acrylic ink background features royal purple color with some bright spots.

I used copper accents layers with the crown is part of the shift layer of the greeting then I cut stars with the Sizzix Star#2 die.  

These were adhered to the acrylic ink background and the large greeting was adhered with 3D foam tape.

I spattered it with copper acrylic color, a toothbrush and straight edge.


 This next card I chose a blue green piece of acrylic ink background on glossy photo paper.  It was trimmed from 4x6 to 3.75 x 5 inches.

It was adhered to a white card base.

The pearl white large greeting was mounted aligned to the bottom of the background with 3D foam tape.  

I added a silver star in the upper left hand corner.  It was cut with the Sizzix die.

It was spattered with an iridescent liquid acrylic.


Another ivory card with the champagne large greeting.  

I cut the crown from gold card stock and adhered with double sided tape. 

I added sequins in gold and copper adhered with Bling Zots. 

Since the copper was out this one was spattered at the same time as the other.

I added seasonal quarter inserts and white envelopes and they are ready for December 1st.

Tuesday, June 2, 2020

Ready 2 Go All Occasion Stack Kit - Set 03

Angled Rectangle

I started with a grey card base.

I chose designer paper by Creative Imaginations - Art Warehouse - Danielle Johnson cut to 4.00x5.25 inches. I laid the designer paper onto the card front at an angle then adhere it.  I trimmed the excess to the card edge with scissors.

I cut the dark green Decorative Label punchie in half crosswise then trimmed the points off with scissors.  I offset these behind the greeting.   The accent was then adhered to the card front with 3D foam tape.

Split Square

I cut a 4 inch square of designer paper into 2 equal triangles by cutting top left hand corner to opposite corner with a paper cutter.   These were glued to the card front aligned to the top and the bottom.   That leaves a nice band of card color on the diagonal.

I wrapped a length of white grosgrain ribbon around the card front and knotted on the front.  Trimmed the ends on the slant.

I assembled the flower accent by putting the small flower then the large flower onto the brad.  Press the prongs apart on the back.

I added the 3D foam tape to the back of the flower accent and adhered it to the card front.

A quarter sheet insert is glued to the right hand side.

 Masculine DSP Split

I selected a kraft colored card.

I chose a designer paper by Creative Imaginations featuring stars.  I cut it to 4.00 x 5.25 then cut again at 3.5 inches.  Turned the small over and tape to 2 pieces back together.

Wrapped the designer paper layer with ginger grosgrain ribbon and taped the ends to the back.  Adhered to the card front.

Assemble the star accent and adhered to the front with 3D foam tape.

Ready 2 Go All Occasion Stack Kit - Set 02

Hexagon Trio

I chose an ivory card.

I wrapped the ivory grosgrain ribbon across the designer paper and taped ends to the back.  Adhered it to the card front.

I adhered the 3 hexagons to the bottom half of the card below the grosgrain ribbon.

I assembled the greeting by adhering the greeting to the colored circle then to the scallop circle.  The whole greeting was then adhered over the grosgrain ribbon with 3D foam tape.


Masculine DSP Split

I selected a kraft colored card.

I chose a designer paper by Creative Imaginations featuring stars.  I cut it to 4.00 x 5.25 then cut again at 3.5 inches.  Turned the small over and tape to 2 pieces back together.

Wrapped the designer paper layer with ginger grosgrain ribbon and taped the ends to the back.  Adhered to the card front.

Assemble the star accent and adhered to the front with 3D foam tape.

Nature Sticker

I layered the nature sticker onto coordinating card stock and trimmed leaving a narrow border.  I added 3D foam tape to the 4 corners on back.

I adhered an embossed layer leaving a small border to the card front.

Adhered the strip of black card stock onto the embossed layer.

I adhered the nature sticker to the card front.

I added the aligned on the black strip

Tuesday, June 18, 2019

2019 Cardmaking - CH - Class 6

I have decided to stick to one layout which allows one to make a wide variety of cards.  Because I never know how many ladies will show up it makes it hard to plan the number of card kits I need. This way I can just add card kits to my box at any time and be ready for the class. The remaining kits will just go to the next class.  The ladies attending turns over regularly as they finish their treatment and others take their place.

These kits are based on the DSP Split layout where the designer paper layer is cut to 5.25x4 inches then cut again at 3.5 inches. One of the pieces is turned over and the pieces are taped together on the back.  A ribbon is laid across the join and the ends are taped to the back of the DSP layer.  This layer is then adhered to the card front.  This is a versatile layout as you can see it can work tall or wide with the narrow piece on the left or right. With alternating the combo on the double sided paper each card can be different.

The Stampin Up Artisan Label was used on this set.  The greeting was printed on white card with Kiwi Kiss and Early Espresso and punched with the coordinating punch.

The designer paper used on the card shown is by BoBunny - Little Miss - Little Miss Dorothy.  The other I selected is Basic Grey - True Love - Giddy.

The grosgrain ribbon is pink.

The greeting is adhered over the ribbon with 3D foam tape.

I chose this set of cards to have no greeting which allows it to be used for any occasion.  The designer paper for this set is by Simple Stories - Snap Color Vibe - Dot/Stripe in Green and Yellow.

The ribbon is white grosgrain ribbon.

The textured card bases coordinate with the color of the DSP in green and mustard.

It label was cut with one of the Stampin Up Apothecary Framelits.

The accent has a white silk flower in the center held in place with a coordinating mini brad.  The 2 white buttons on either side are held in place with Bling Zots.

 It is adhered to the card front over the ribbon with 3D foam tape pieces.

This is supplies from last month's class which I have converted into the DSP split style card kit.

I chose Stampin Up Print Pattern in Garden Green with the Early Espresso card stock. Some kits have the Garden Green card base.

I added a length of white grosgrain ribbon for across the split.

The star accent was assembled by layering all three and adding the tiny star brad in the center.  This was adhered over the ribbon with 3D foam tape.

I create the greetings in Early Espresso with the Teeny Tiny Wishes set and punched them with the Decorative Label Punch.  I cut the label in half along the points.  It is adhered aligned along the bottom of the card.

Monday, May 29, 2017

Card Club - May - Stars for Dad

This was the Father`s Day card in this card club.
I started with a black card. I cut a piece of designer paper by Rusty Pickle - Game Time - Run It.  This is the back side which looks like wood grain. This was cut 4.00 x 5.25 and adhered to the card front leaving a small border. 
The sun burst is a thin die from Stampin Up.  I love this one.  It was cut from bronze heavy text weight paper which was larger than the A2 card front.  I used Scotch Quick Dry adhesive for this task. Once adhered to the card front the rays were trimmed to the edge of the card.  
The stars were cut from taupe card stock and the same heavy text weight bronze paper with the Sizzix Star 2 die which has 4 different sized of stars.  The large taupe star was adhered to the center of the start burst.  The greeting had the right hand end flagged then adhered to the center.  The bronze medium and the taupe small stars were adhered together.  This accent was then adhered over the large star with 3D foam tape.  The greeting can easily be left out or adhered on the right hand corner.