Showing posts with label square. Show all posts

Sunday, July 12, 2026

Slow Stitching Fabric Patches

I have been wanting to make some of these so I decided to make some for a prize at our family event.

1. A red left ladybug on white linen on blue denim. 

2. Hills and sun collage onto a cotton foundation layer. Pink French Knots in the foreground. Sewn to a piece of heavy black cotton.

3. A yellow felt sun on white linen stitched to a piece of blue denim.

4. A red felt heart with a white stitched flower onto a piece of white linen sewn to a piece of heavy striped cotton fabric.

5. Four birthday candles made with fabric scraps with stitched flames on a couple pieces of white linen. Sewn to a piece of heavy black cotton.

6. A blue bird stitched to some linen which was sewn to a piece of blue denim.

The patches measure 3 5/8 inches square.  It was a good start to a slow stitching project. 

Friday, April 3, 2026

2026 Slow Stitching Project - Page 13 - G1

I am following K3N Cloth Tales' slow stitching project for 2026.  A to Z times 2.

This week's prompt from K3N was Grid.  I stitched my grid on the outer rim in black thread.

I then filled in the lines with green thread in both directions. Some came from the ORTs tin, nice to get rid of a few of those.

I then chose 2 shades of Grey to fill in the spaces with whatever I liked.  Stars, diamonds, running stitch, crosses, circles, flowers, leaves, rectangles, and French Knots.

I am happy with the low key look of this page.


Wednesday, September 10, 2025

Card Making - Sets Continue

I switched to the "In Full Bloom" Simply Scrapping Kit for these cards.

I picked the Sage Shadow card stock from the 12x12 kit and trimmed it down to make two A2 cards with a few left over pieces.

On the left, I cut the desinger paper to 4.00x5.25 inches and then wrapped a wide piece of Baja Breeze gros grain ribbon around it and taped the ends to the back. I adhered the layer to the card front. I created an accent by punching a bee from the DSP with the .75 inch circle punch then added a 1" punched circle in Barely Banana card stock. Layered these and adhered over the ribbon.  On the right is the other designer paper in the kit. I ripped the right hand edge of the DSP layer leaving to show the white core of the paper. I added a strip of white card stock on the left and then added another circle bee accent like in the previous card.

Contiued with the same scrapping kit. 
Cut each of the designer papers to the leave a small border. The A2 card bases are Barely Banana card stock 12x12 cut to 8.5 x 11 cut in two for these cards. 

On the left, I created an accent with a strip of Sage Shadow with Barely Banana  squares and bling brads. The strip was mounted with 3D foam tape to accommodate the brad backs which are quick thick.  On the right, I made slits in the designer paper to accommodate a strip of Barely Banana card stock making sure I did  not cover the yellow elements. I taped that strip down on the back with scotch tape. I added a narrow strip of Lavendar Lace cardstock over the yellow and adhered with double sided tape. 

Each card gets a white quarter sheet insert and a white envelope.

Tuesday, September 9, 2025

Back to Card Making - Card Sets

I need a few cards for upcoming events so I spent a couple of days in the craft room.

I am working with the Stampin Up "Friends and Flowers" simply scrapping kit.

I chose Whisper White card bases in the A2 size. I chose one of the designer papers in the kit which is Tempting Turquoise with white flowers. I added some white seam binding across the width of the cards and tied in a knot in front.  The left card has a daisy accent created with my large daisy punch with a circle center all held with a tiny white brad.  The right hand card has a button accent with white thread through the holes placed in the bottom right hand corners.

This set of cards is working with the same scrapping set. I chose the striped designer paper. 

On the card on left I chose some sticker from the set to cover the raspberry stripes. I used one of the square stickers and topped it with a square of designer paper. I added a greeting in the turquoise strip - Thinking of You from the Teeny Wishes set stamped in Chocolate Chip. The right hand card highlighted the raspberry color and I chose the square sticker in that color, added a square of turquoise floral DSP, a flower sticker along with a leaf sticker. The center of the flower is another of the stickers. 

Monday, October 7, 2024

Oil Diffusers - Travel Case - Set 2

 This is the next set of One of a Kind Oil Diffusers in a travel case.

Just Bee - I made a bee by appliqueing 3 yellow pieces onto a black base piece of felt. I added a circle for the head which I stitched to the body. I used a piece of thin gauzy polyester fabric and cut out the wings. I satin stitched all the way around the outer edge of the wings then put some texture stitching in the wings. I stitched the wings to the body. I then stitched the bee to a piece of turquoise felt which measured about 4x4 inches.  

The back is a piece of cotton fabric which looks marbled.  I added my loop for the hanger and the yellow drop.  The 2 layers were stitched together with blanket stitch all the way around.


Follow your Heart - I cut 3 hearts in different sizes getting smaller as I went. I stitched these together with running stitch then added the 3 flowers at the top of the white one. I then stitched the whole heart to the front of a white background piece of felt measuring approximately 4x4 inches. I stitch the follow stitching in pink around the heart.

The back piece of this diffuser is cotton in a bright fuchsia color with a hanging loop and a pink drop. I chose white thread for the blanket stitch all the way around.  It comes with a travel case.

Note: The background fabric should have been a light color so it would not have darkened the white felt on the front.


Tea Time - This oil diffuser features a yellow teappot ( my favorite) which I drew then cut out of yellow felt. I place a strip of white lace along the edge of the front layer to serve as a tablecloth. I stitched the teapot onto the navy layer over the lace adding accents to it as I went.

The back of this diffuser is white felt with a navy loop and drop.  It comes with the hanger in a travel case.


Just One More Chapter - I created a small book to put on the front of this diffuser.  I chose a patterned piece of cotton and a white cotton for the inside.  I hand stitched these together, trimmed the corners and turned the piece inside out.  The book is stitched to the green backer along the spine of the book so that it opens. I put a little quote on the inside. 

The backer is yellow felt with a loop and drop.  I blanket stitched all the way around with green thread.  It comes with a hanger and a travel case.

Thursday, April 25, 2024

"My Bag" Tag Process

I have been thinking about this idea for a while.  I have made many bags in the last few years. Several for myself, others for gifts, still others to donate to good causes. Some are for shopping, some for carrying books, and the latest for wine bottles. They are well finished, made to last, functional and look nice. 

I would like for those who use my bags to think of them as their own special bag.  It protects their stuff, makes carrying stuff easier, it is unique and easily recognizable at a social event when it is time to head home. 

After some brainstorming, I decided to attempt making tags for the bags I make.  I still have a supply of shrink plastic from card making days.  That should work.  Well this has been a process. 

My first ones were "tiny".  After I had the size down and asked for feedback. It was suggested they have round corners, be sewn with white thread to match the plastic better, should have 4 holes and maybe the edge of the bag would be better. The last photo is the model I am going with. I will put them on all my bags in stock and going forward. Size is 2"x1.25 with four 1/8" holes before shrinking.


I made a paper tag to explain my intention with the the making of the bag and how I hope they will use them.

A pretty shopping bag that you don't forget in the car when you go grocery shopping.  

Using a wine bottle bag at your next get together making bring a bottle easier and remember its your bag so bring it home.

A book bag to protect your book when you commute to work, take a trip, or take it to the park to enjoy the sunshine.

A book to hold your organizer/planner/daytimer and those essential things you need when you are out and about. 

A project bag to hold the pieces of your latest craft project. 

A lunch bag to bring your meal at work, at a sporting event, or at the park.

I am sure there will be different bags in my future.

Sunday, March 24, 2024

Sewing Project - ReUsable Bag - Quilted Swirl


I made another ReUsable Shopping Bag today.  

I started with the 12.5 inch quilted square I picked up at the ReUse Center this week.   I backed the square with a 14" square of white 100% cotton. I chose to do this because the yellow fabric was thin and showed the pattern of the turquoise fabric through and with a finished layer I could create a pocket. I top stitched the swirl to the white cotton by following 2 of the diamond shapes in the quilting.  I then, used the technique of self binding to finish the edges.  That means bringing the white to the front and folding over and again and top stitching down. I mitered the corner with a technique I research a while back for napkins. Perfect Mitered Corners Tutorial

I then chose a turquoise microfiber cloth which matched well and created it with finished seams on the inside to a final width of fourteen inches. I sewed the quilted swirl to the front of the bag (should have done it before the sides).  I left a piece of the top edge open and created a pocket by top stitching are tall rectangle following the quilted pieces.

I created the handles by hemming the ends, pressing in half then in half again and top stitching the ope and folded sides. They were 19" long by .75" wide. I folded the top edge of the bag 1" then again another inch and sewed it down with the wavy decorative stitch. I placed the handles 4" from the edges and sewed them down the 2 inches they overlapped the bag. 

I created a skirt for the top of the bag with a double layer of white cotton and a double layer of turquoise microfiber. I serged the cut edges.  I folded over the serged edge about 1" along the finished top edge of the bag and top stitched in on.  I then folded in the serged short ends in and top stitched the 2 of them together on the side seam of each bag. 

I used white thread for this project.

Tuesday, February 20, 2024

Sewing Project - Creating Blocks

I started creating blocks from my slow stitching pieces.  I needed a way to finish these so I can put them into some sort of project when they are complete I will have 52 at the end of the year.

I decided to buy a neutral fabric and headed to the thrift store. See picture below.

I was going to just zigzag them onto the cotton and overnight I came up with a better idea.  What if I used ribbon to finish off the edges? Dipped into my stash of ribbon to see what I had.  I had some gold and ivory organza - too stiff and too see through. Keep looking.  Then I remembered a roll of navy seam binding.  Yeah that will work.

I decided to buy some 100% cotton fabric in the form of the king sized flat sheet. I choose a light grey with some texture in the fabric. I had a cone of thread to match. Wonderful.

I took a bit to figure out how to use the seam binding.  In the end I just folded it in half.  By running the fold along the edge of the sewing machine I could get it to stay folded.  I did enough to get around the slow stitch piece and got started.  

The roll of seam binding I see is viscose which means it is pretty old. Viscose is a natural fabric so that is good as well.

I have owned these roll for about 10 years and you can see that I paid $2 at a thrift store somewhere along the way.  I have used it for card making in those years and there is plenty to finish this project as well.

Very happy I was able to shop my stash.
The edges of the slow stitch pieces are not crisp in most cases so I decided on a decorative stitch with a zag in it to ensure I captured the full edge of the piece. I left an open end before I started stitching and then aligned the folded edge of the seam binding on the outer edge with the open edge toward the middle of the piece. After a little practice I was able to created 90 degree corner folds with decent precision with an applique pin. Once I returned to where I started I cut the incoming end short enough to fit into the end I had left when I started.  Folded the edge over on one of them and pulled them taut and sewed over the overlap. A bit of back stitching done!

I have done the 8 complete slow stitching pieces.

Just thinking they could be used as an accent on a bag or some other sewing project.  

Saturday, April 29, 2023

Sewing Project - ReUsable Make Up Remover Pads

In my research to make these ReUsable Make Up Remover pads it was recommended that they should be made in different colors.  

Some make up will stain the pads and so the person using them should have the opportunity to select the color that would work best of the make up being removed.

These were cut to 2.75" square to custom fit the container I selected to put them in.

I chose square because cutting circles wastes fabric and does not provide a good start and ending point.

The colors selected for the medium toned ones was based on the recipient of these.

Her favorite color is purple.  Each of these are backed with the same fabric as the the front.

It can be fun to mix and match fabrics if you want to create pads with funky prints.

The serger thread is grey on one side and ivory on the other with the needle threads being grey which mostly goes with all colors.

I don't really want to rethread this machine too often.

I did find a good video on how to turn the corners with the serger.

One reviewer suggested black for the removal of mascara because it stains for sure.

I made a stack of each variety.  Several reviewers were suggesting 14 which does 2 weeks for 1 week if 2 are used each day for different removals.

Here's a stack of black flannel ones.


I bought is box to store the pads. I liked the fact that there were 3 different compartments for the three colors of pads.

The compartments are a bit taller than wide which allows for some place for your fingers to access the pads, especially when the stack is lower down in the box.

The lid will keep them clean and dust free.


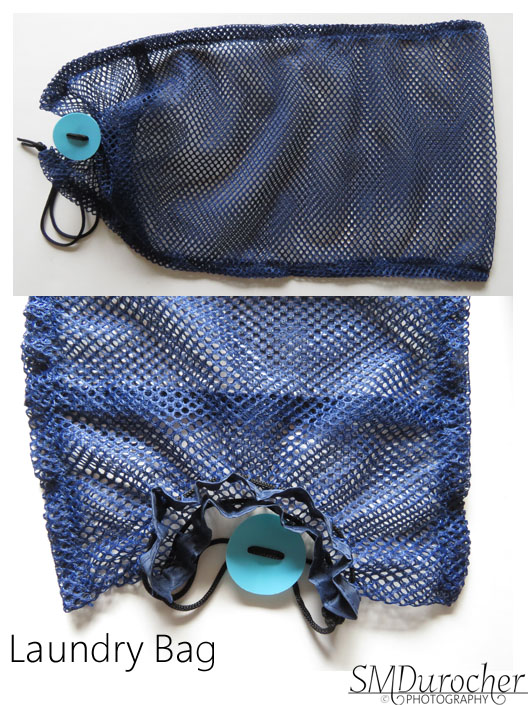
Most of the postings on line suggested that laundry bag should be used to ensure these small fabric pads don't disappear in the laundry machine.

I recycled a mesh product from IKEA into this laundry bag.

Love the color.

I added a cord as a tie and the turquoise disc as a closure was made with my sister during my visit.

You can see the details in this post here.


Serging the edges of 2.75" inches of fabric become quite tedious and it takes a lot of thread so I am not sure I will be making too many more of these. But as a custom gift it was the perfect thing.

Wednesday, March 1, 2023

Card Exchange - March - Five Petal Flowers

I used the Stampin Up Five Petal Flower punch for my March exchange cards.

I started with a Soft Suede card base A2 in portrait mode.  I cut a layer of this gorgeous screen printed handmade paper.  

I wrapped a length of Early Espresso Taffeta Ribbon on the left hand side and tape the end to the back of the decorative paper. 

The decorative paper was then adhered to the card front with double sided tape.

I created the flower accent with a pearl white flower stacked with a Cherry Cobbler one then the same flower in a smaller size punched in pearl white all held together with a red mini brad.  

The accent was then adhered to the card front with a piece of 3D foam tape.

This card is in the landscape orientation. The card base is Very Vanilla. 

I adhered a strip of the decorative paper along the left hand edge.

Then added a piece of non shed gold glitter card stock and taped that over the edge of the decorative paper and trimmed the top and bottom to the card edge. 

The accent is a square of Cherry Cobbler then a piece of decorative paper leaving a small border. 

Again the five petal flower accent was adhered on the square with 3D foam tape.

These will be off to my partners shortly.

Saturday, January 29, 2022

Card Exchange - January - Watercolor Birds


I have been busy so my Card Exchange cards are almost late.  I decided to use the small bird image I used for the thank you project I did in December.  This time I wanted to actually paint the birds.   I prepared my pieces of watercolor paper with different background colors.  The paper is 3.5 inches wide and I just applied a wash down the sheet changing the colors as I went. It was taped down and allowed to dry completely.

I trimmed the pieces of watercolor paper to squares roughly having a different color in each square.  I traced the bird onto the center of the square by placing the line drawing below my watercolor onto my light table. I used a permanent black fine Sharpie marker to trace the image.  I then used the colors I had mixed for the backgrounds to color the bird accordingly.

Then I matched the card base to the bird color.  The one on the left is Close to Cocoa and the right is Bashful Blue.  I added a length of Soft Suede grosgrain ribbon across the card and taped the ends under the focal element.  The birds are attached with 3D foam tape.  I spattered the cards with a bit of brown watercolor.

These are off to my partners.

Wednesday, October 27, 2021

Stained Glass - Sunrise

I've always wanted a stained glass piece for my window and thought it would be a nice retirement gift but it did not happen.  So I decided that I would pursue the idea and see where it led.  In my mind I see a colorful image casting beautiful colors on the wall and ceiling, almost sparkly.

First, I had to decide what image did I want?  Sunflowers are a favorite but I chose a sunrise as it represents a new beginning, hope, and a look to the future.

Second, research as to what a piece would cost, which window would work best, and would it do what I wanted.

Third, a trial run - how? I found a site that provided a video on how to create a piece of faux stained glass art and a few steps with easily found supplies. At Art Emporium the Faux Stained Glass video used basic school glue and acrylic color to make an art piece.  

Frame-  I found a white frame in my stash that did not have a mat and was quite large measuring  16.5 inches square so it likely would not be used in my photography.  It also had words on the glass that I removed with a razor blade.  Cleaned the glass thoroughly.

I needed some original art now so I browsed online sites with stained glass sunrise projects and after looking at hundreds I started to have an idea what mine would look like.  I did not want the pieces to be too bulky or too simple.  Remember I want lots of color.  


I drew the first sketch - sun off center, water and hills in the foreground.  I did not want straight lines like in the little one drawn below the sketch. 

This one was drawn at 7 inches square.


I traced it onto not the best watercolor paper and used my Stampin Up Watercolor  Wonder Crayons to color it.  I loved the colors but I stumbled with getting a variety of shades of green in the hills.  Of course, a real stained glass piece will not be a shaded as this one.

I asked a few folks for some feedback. 

I recognized that I had a hard time drawing the secondary rays on the left hand side.  Someone suggested that I copy the image and put then flip it so I could roughly follow what I did on the right on the left.

The hills were too similar and did not have enough pieces.

Ok, I can work with that.


So with that feedback I started on the second sketch.  This one was also at 7 inches.  

I now had light yellow pieces on the left hand side as well and more pieces in the hills.

I marked out the which rays would be Orange, Yellow and Light Yellow.  I wanted green blue and blue in the sky pieces.

Happy with that so lets move on.


Now it had to be enlarged to fit the frame I described above.  The glass could not be removed from the frame so I would have to be painted and leaded in place.  Because of that I chose to keep the design from going all the way to the frame.  That meant I did not have to touch the frame with the leading.

I enlarged it to 14 inches square and decided to put a frame around the edge which would leave about 1/2 inch between the wood frame and the lead frame on the glass.  Excellent.

Another suggestion was made that I paint it in the colors I was planning on using in the final piece just to be sure I was happy with it and still had a chance to adjust if needed.

So I traced the 14" piece onto some Bristol Vellum heavy card stock which was leftover from an art class I took years ago.  It had to be pieced together just like the sketch was earlier, to be large enough.

I sampled the liquid acrylic colors I had and made some selections.

The colors chosen are listed below:

Nick Bantock - Chrome Yellow, Deep Turquoise, Prussian Blue, Sap Moss Green, Chartreuse

Daler-Rowney FW Acrylic Inks - Flame Orange, Rowney Blue


Here's the Bristol Vellum piece all colored in. The yellows in the first row of rays are not all the same color.  I was just enjoying the process.  

I will be able to mix colors in the final product as well.

Of course, it will be more watercolor in tone than a glass piece will be.

I am happy with the hills this time in shape and color.

I used a Sharpie black marker with a fine tip to do the black leading on this piece.


Now I can get ready to transfer the image to the glass in the frame.

I placed the frame over the painted piece of Bristol Vellum and taped it carefully in place.  I will be putting the black leading on the glass surface on the inside of the frame. 


I chose Pure Black by Folk Art for the acrylic paint.

I reused at glitter paint bottle with a fine tip.  The black leading is mixed 1 part black acrylic paint and 4 parts white glue.  Test it to be sure it flows nicely so you can easily draw your lines.

I traced the black lines on the glass following the  drawing above.


You will see from the photo on the left that I put the art on my light table so that I kept the composition in the same direction as the original so when I flipped the frame back to the front it would be same as the original art.

Once the black leading was applied it needs to dry completely before you paint your color.  The video recommended overnight.  I painted my lines in the early morning and by the late afternoon they were dry and I could move on to the color.  The fun part was beginning.


I used some condiment cups to mix up my clear glue and acrylic color.  A cup for each color.

I applied the glue with a small wide craft brush and made sure I rinsed thoroughly before moving to the next color.

Then I followed my color chart from earlier and painted the sun and up then from the horizon line down to keep my hand and fingers away from my finished work.  

I let that dry over night.   


I discovered that I missed the top right most space when I was painting.  I did paint that several days after it was hung.


The next morning all was dry so I put the eye screws in the top middle of the width of the frame.  I chose wire to ensure it could carry the weight.  I have a second curtain rail so I slid a hanger onto the rail and screwed it tight. I then placed a carabiner between the wire and the hanger.  

I hung it in the window and waited for the sun to shine.  It took 3 days to have the sun shine and for the colors to be on the walls of the living room.

I was not anticipating it being so random as to when I would see the colors sparkling.

Of course, looking out it looks really nice but when the sun shines it is great. 


Another down side is that the sunshine only shines for a limited time through the window and the stained glass.  So I have to be around and paying attention to see the sparkle for the 10 minutes it is on the wall before it moves off the the book case.

In this photo the image is half on the wall and half on the side of the book case.

It took over a month from start to finish.  

The costs in materials was minimal. School glue on sale in early September. Liquid acrylic I already had. And my time.

Thanks to the artists who provided feedback and support during the process.

This was a great learning experience. Drawing, mixing colors, and sticking with it.   The biggest thing I learned is that I want sparkle all the time or when I need it not just when the sun shines in the window.  I am so glad I did not invest hundreds of dollars to learn this lesson.  I will enjoy it when the sun shines.

So, I have started another project to get the sparkle all the time or at least when I want it!  More to come on that project in days to come.

Tuesday, May 4, 2021

Exchange Cards - May

These are my cards for May.  Turquoise, white and silver is the color scheme.

The white card base has a designer paper layer with a plaid pattern.  

I created the focal point with SB Circle Nestablities in 3 sizes.  The large white was embossed with the Cuttlebug Script folder, then the middle circle is turquoise solid card stock then a silver foil layer embossed with the  Cuttlebug Diamond in the Rough folder. I added a white daisy confetti with a blue tiny brad.  

The greeting is color printed and punched with the Stampin Up Modern Label.  It was adhered to the card front with 3D foam tape.


I flipped the designer paper over and used the polka dot side for this card and changed the orientation to landscape.

I cut the squares layers with the Sizzix Square Thinlits in the same colors as the first one. I added a little note brad in the center.


Monday, April 27, 2020

Birthday Card for a Teen

I started with the polka dot designer paper squares which were corner rounded on 2 corners.  I layered those onto corresponding blue card stock squares.

I chose a medium blue card base.  I added a bright green designer paper layer leaving a large border.

I added a rick rack accent which involved my twisting together blue and white rick rack and then ironing it flat.  It goes right around the card and is joined under the scallop greeting.

A scallop circle in the same blue card stock with a 1 3/8 inch circle greeting in blue and white.  Adhered with 3D foam tape.  The corner rounded squares were adhered with 3D foam tape too.   This one will get there in time for her birthday.

Tuesday, February 4, 2020

Sewing Project - Quilt Topper Help

I took this set of Pineapple Quilt Squares home on Monday night.  A friend from the group was no sure how to proceed with these and needed help.  These squares were made where the pinks would create the pineapple when assembled like the one below.


I suggested that if the squares were sashed that would bring out the central square.  Yes, it would disrupt the pineapple but so what.  No big deal and it would look pretty.

The first thing to be done was clean up the squares by removing all the threads and bits of fabric.

Then they had to be squared to a consistent size.  I started at 11.25 but found one was smaller at 11.00 so redid the others to match. Now I had nine 11" inch squares.

The blue fabric was cut to 2.5 inches wide.  I cut a 6 to 11" wide and sewed them to the middle row squares top and bottom. Then, I added the another square on top and bottom on the other side of the blue top and bottom. Now I had 3 columns of squares.  I then cut long strips of sashing and sewed that between the columns to complete the square you see at the top. 

I am returning the piece to my friend who will move forward with the final quilt topper.

Monday, January 20, 2020

Sewing Project - Quilt 2 - Blue Green Squares

I finished another quilt today in time to share with the ladies at Quilting tonight.

This is another inheritance from the lady that passed away.  There was a stash of fabric and our leader took all the pieces home and cut 5" squares.  She packaged these together and we were each given a set of 40 squares at our Christmas social get together on Dec 9th.

I worked a lot on trying combine the patterns and eventually just reassembled them into larger squares.  I needed 48 5" squares so I dug into my stash to find what I needed.  Worked out pretty well.

Final Size: 41.50W x 54.00T inches

Colors: Blue, Green and Navy

Squares: 9.5 inches

Backing: A small print green patterned fabric in 100% cotton. 

Sashing: 4" strips of Navy in between the printed squares and rows between the patterned squares.

 Technique: QAYG Mom Style


I pinned my flannelette batting and my green backing together then using QAYG sewed the rows across.  I laid the navy top strip first then added the first wide patterned row and sewed that down and ironed it.  I then added the next narrow navy strip before quilting the first patterned row which gave me a line for my quilting of the patterned squares.


Binding: Navy at 2.5 inches.  Sewn to the back, folded to the front and finished from the back to make sure I did  not get navy thread on the green backing fabric.  I used a wide zig zag stitch to make sure I caught the fold over on the front.

Quilting: I just outlined the printed squares at a .25 inch.

Lessons learned:
Sewing down the navy strip below the patterned row helped me align my quilting on the patterned squares easily.
I used white thread to assemble the quilt and then switched to navy when I got to the binding.

It will make a great quilt for a boy!