Showing posts with label mini brads. Show all posts

Friday, June 14, 2024

Card - Birthday - Watercolor and Flowers

This card is for my aunt who celebrates her birthday soon.  

I chose a SU Crushed Curry textured A2 card base. 

I cut a piece of water color paper left over from the paper I made for these pieces.  I adhered it to the card front.

I wrapped a length of Crushed Curry grosgrain ribbon along the left hand side and knotted it a the top. 

I added 3 handmade paper flowers on the right and held them in place with coordinating mini brads.

I added a SU Modern Label greeting in the bottom right hand corner with 3D foam tape.

I added a quarter sheet insert and envelope.  It is ready to go.
 

Sunday, November 5, 2023

Simple Sentiments - Photo - Set 5

I chose to add a banner to this fifth set of Simple Sentiment cards.

I started with a Stampin Up Lucky Limeade card base, cut, scored and folded.

I chose a SU Pale Plum card stock banner which was 2" wide and banner cut with the Banner Triple Punch by Stampin Up.  I added 2 mini brads to the banner placing them just below the photo. 

I adhered the banner to the card aligning it to the focal point on the flower. The flower is a White Geranium which is a 4x4 photo taken at the St. Albert Botanic Park.

I added a quarter sheet insert and a white envelope.


I started with  this small crab apple 4x4 inch photo.

The card base for this card is Ruby Red card stock.  Cut 8.5 W x 5.5 T inches, scored and folded in half.

I chose More Mustard for the banner which was cut with the Banner Triple punch.

I added 3 warm red mini brads aligned on the center of the banner.  It was then adhered to the card front.

The photo was then adhered on top of the banner. Nice to have the banner reach the edge of the card so the color repeats at the top.

Added an ivory envelope and a quarter sheet insert.


The photo on this card is a close up shot of the plant Mother of Thousands as each of the plantlets along the edge of the leaf can produce a new plant. Took this one at the Muttart Conservtory.

The card base is Glorious Grape.

The Banner is Green Galore. It was cut to 2 inches wide, the end cut into a banner with the Banner Triple punch.  I aligned the banner alogn the focal point of the photo.

I added 3 purple eyelets to the banner which I mounted with the Crop-a-Dile tool.  I did mark the spaces on the back to ensure they were even.

The banner and the photo were adhered to the card front.

A white quarter sheet insert and a white A2 envelope were added.

This flower is a False Sunflower.  It is a gorgeous bloom in any garden.

I chose Garden Green card stock for the card base. Considering that most of the flowers are taken in gardens makes sense. I may need to source out some more of this color.

I aligned the banner with it's green eyelets along the focal point of the 4x4 inch flower photo.

These were both adhered to the card front.

I added an A2 envelope and a quarter sheet insert.

Super pleased with these cards.

I will pair them in sets of two - one flower and the other a nature one.

Thursday, September 8, 2022

Card Exchange - Red & Black Daisies

I started with the plastic daisy accent and built the cards around that.  I added a silver cardstock scallop behind the daisy and held all this together with a black mini brad.

The designer paper is Stampin Up. I chose it for the black and white circles.  I wrapped a piece of grey twine around this layer and taped it in place at the back.  This was then adhered to the front of the black card base. I added the daisy accent in top left hand corner over the twine.

The greeting is color printed circle in red layer over a red Modern Label punchie. This was adhered with 3D foam tape.  A quarter sheet white blank insert was added.

This is very similar supplies with the opposite color scheme based on the black daisy.  I chose the portrait orientation this time. 

The twine was wrapped on the diagonal off each corner of the designer paper and knotted to the front then taped to the back.  The same paper was used here.This layer was adhered to a Real Red card base.

The scallop circle is Real Red as well and layered the same way.  Adhered to the top left hand corner.

The circle greeting is color printed in black and punched with the 1.25 inch circle punch. The Real Red circle is punched with the 1.38 inch then adhered to the back of the greeting circle.

This this then adhered to the card front with 3D foam tape.  

A blank insert and a white envelope rounds out the card.

These are off in the mail tomorrow.

Sunday, April 17, 2022

Exchange Cards - April

We are starting a new session of card exchange.  I've decided to get my cards ready ahead of time so I will not disappoint folks when I am busy moving.

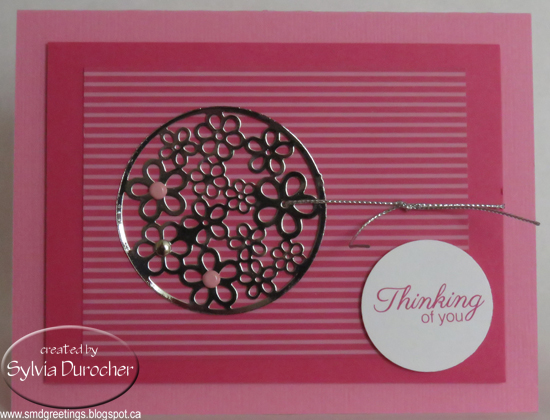
I had these silver chrome metal earrings in my stash so I off the hanger and mounted them with brads.

I chose Striped designer paper by SU in Rose Red and cut it to about 4x3 inches. I adhered it to a piece of sold Rose Red card stock measuring 4.75 x 3.5 inches. I placed pink and silver brads into the holes in the larger flowers in the metal accent.  

I strung a piece of silver cord through one of the flowers and wrapped around this layer and knotted it on the right. This layer was then adhered to the front of a Pretty in Pink card with 3D foam tape.  I added the round greeting in the bottom right hand side again with 3D foam tape.

On this card it the same layout with different colors.  The card base is Chocolate Chip.  The designer paper seems to have pink and brown lines so I chose those colors for the brads in the metal accent.

I cut the designer paper larger this time to 4.00 x 5.5 inches.  Attached the silver cord in the same way.

The greeting is punched with the Modern Label Punch in color printed in Chocolate Chip with an offset of solid card stock same as the card base. It was adhered with 3D foam tape.

Saturday, July 31, 2021

Birthday Cards - Big Cards for Big Birthdays

This is a half sheet card meaning it measures 5.5 x 8.5 inches.

I started with a Very Vanilla card base.

I chose a sheet of designer paper from Springtime Vintage Series.  A lovely blue and ivory small floral print.  I cut it to leave a small border.

I added a piece of Baja Breeze Stitched Grosgrain ribbon to the top third of the card and taped the ends to the back.  It was then adhered to the card front.

I color printed a greeting on Very Vanilla card stock and cut it with one of the the Deco Label Framelits.  I then cut a textured Baja Breeze one as well.  I cut that in half and adhered them to the back of the greeting offset for the color to show.  It was adhered with 3D foam tape.

I added 3 pearl buttons in the bottom right hand corner adhered with small Zots.  A nod to the seamstress that my Mom is.


I started with felt finish printed card stock from Authentique - Remberance Collection - Remberance One.

It is printed in burgundy on warm white so I decided to just watercolor the flowers on the piece I had cut leaving a small border.  I chose More Mustard for the flowers and Always Artichoke for the leaves. This was great fun!

I added a twill ribbon of Bravo Burgundy topped with a grosgrain ribbon in More Mustard.  These were adhered to the back of the layer then adhered to the Bravo Burgundy card front.   I printed the greeting on Very Vanilla card stock and ripped the top and bottom.  I adhered it with 2 More Mustard mini brads.  This one is for my Aunt who celebrates a special birthday later this summer.