 I have been working on very long projects recently. A lot of problem solving also.
If you read my last post about the Sunrise Stained Glass piece I realized that I would not have the sparkle when I wanted it.
I set out to solve that problem I decided I needed a stained glass light/lamp.
I headed to the ReStore store in hopes of finding a vintage Tiffany type lamp which would create sparkle on the walls and ceilings.
The store had a few - one had amber glass - that's not going to work. None where plug in lamps. There was a great chandelier of clear glass but it was $100.
I was fortunate that my sister was with me and we revisited the lighting section.
I found a crackle glass light which would work. The picture on the right is an example of the what I found.
It was a swag pendant ceiling light with a crackle glass shade. The metal parts are much fancy than the one I bought.
I could not find a price so when I headed to the check out I mentioned that there was a 50% discount on in stock light fixtures.
He mentioned that he could not reduce the $1.00 price any further. Wow! I was thrilled.
The fixture metal support was antique bronze lacquered.

You can see in the photo on the left actual metal fixture which supported the crackle glass shade.
The wiring was cloth covered and the socket was ceramic/porcelain. After a bit of research, it was like new in the 1950-60's.
The original had a incandescent light bulb but I decided that I would use an LED which produced no heat, especially in an enclosed shade.
I took the pendant lamp completely apart then I had the shade separated.
I spent a few days trying to figure out how I could convert the light in a lamp with a plug in and switch.
I decided that it had to be a desk lamp.
This shot is with a small flood light fixture inside the shade.
That is the sparkle I am looking for!
This light is very directional, the light cord comes out under the shade which makes it unstable.
I was encouraged that I was headed in the right direction.
So, on my regular day out I headed to thrift stores.
There were a lot of lamps but some I could not take them apart easily, some were very tall, a few had an aesthetic that I liked. I hesitated making impulse purchase despite I was very anxious to get something.

On the third store I found exactly what I was looking for. An IKEA desk lamp with a very large glass globe shade with the perfect base.
It was $10 but considering that the shade cost me a dollar I splurged and paid the price.
The base has 2 prongs on very strong springs which fold toward the bulb and release outwards inside the shade to keep it in place.
It had a plug in cord with a switch on the cord.
Here, I have colored several cells on the crackle shade with Sharpie markers.
That is starting to look like what I really wanted.
I was trying to decide whether I would leave half clear and half colored.
The Sharpie markers I had did not have enough color options so I investigated the liquid acrylic paints I had on hand.
Here you can see the prongs on the base which hold the shade in place.
Now I have found the 40 Watt LED Clear Light bulbs. They were stored behind a lock at the department store. It was about $10 for 2 bulbs so I'm not sure why they were locked up.
Now with the light bulb in the base it was time to put the shade on.
See how the top light pattern is very linear. That is because of the yellow light filaments in the clear light bulbs. All clear LED lights them.
I wanted something softer and smoother. Now I needed a clear diffuser to soften those lines.
I hunted around my photo studio because I have collected several materials to use as diffusers over the years.
I found what I was looking for.
I think it is plastic that one might use to line kitchen cupboards. It is pebbly and textured with little round knobbies and quite clear other than the texture. It worked to diffuse the lines very nicely.

Here's a shot of the set up for painting the cells on the round shade.
I chose colors that I liked. I decided to leave the crackle lines between the cells clear because it would be a pain to paint and it provides space between the color on the wall when it is shining.
I left it over night but some of the colors were still not dry. I ended up getting some on my fingers when I touched the shade to get it on the lamp base.
I don't know if they will every dry.
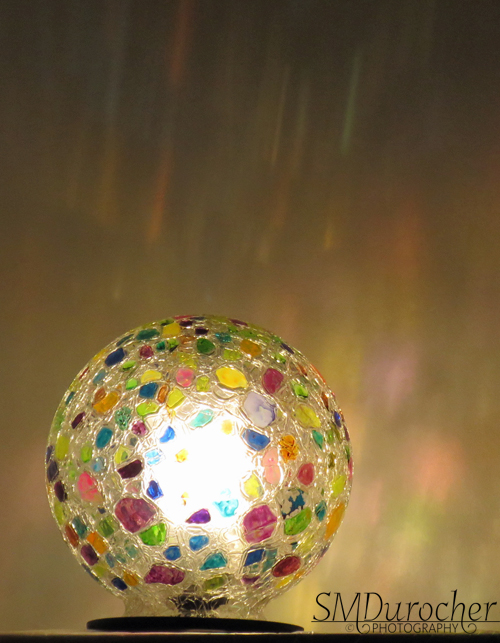
It is in place and I don't have to touch it again till I have to replace the bulb and with 10,000 hour life time that will be a while.
It is very magical. I love it.
The linear colored shadows on the top are where the diffuser is open at the top.
Such is life.
I set it up in my bedroom. There is light on the 2 walls and the ceiling. I can see it from my bed so I can lay there and enjoy it.
Now what would be perfect is if I could go to sleep with it on but it would go out on it's own.
That would mean a timer.
I was all set to pay $20 for a timer but today at the thrift store I found one for $4.
I checked it to make sure it worked and took it home glad to pay that price.
Now I can go to sleep with sort of the northern lights every night.
Except tonight the post took me so long that I missed the 10-11 o'clock time frame I had set.

 I have been working on very long projects recently. A lot of problem solving also.


A fun story of how you made your goal a reality!
ReplyDelete