Monday, June 29, 2015

More Cards from Decorative Paper

Here`s a card made with acrylic paint paper in purple and pink.  It was just brushed onto heavy weight paper with a paint brush.  I tried to mix the colors where they intersected.  It`s bright paper.
I selected a purple card that coordinated.  I cut the piece of decorative paper to leave a small border of card color.  I printed the black small letters onto a quarter sheet of white card stock with registration marks to align when I die cut.  Once, printed I aligned the marks with the edges of the Sizzix Happy Phrase die and cut the word Happy.  I trimmed the white greeting layer to 3.75 x 5.25 inches and used a corner punch on all corners to add a bit of interest.  I glued the decorative paper to the card and then applied 3D foam tape to quite few areas on the greeting to keep the pieces in place.  The middle pieces in the H the middle piece in the Y.  I then added the holes for the a and the ps with 3D foam tape as well.  It`s a bit tedious but I like the effect.  I added 3 purple sequins in the top right hand corner for a bit of bling.  These are held in place with Zots.

I made a couple of baby cards with a onesie cut with the Cricut machine and the Wrap It Up cartridge.  I cut them at 2.25 inches from white card stock. I cut the acrylic paint paste paper to leave a small border of navy card.  I added a piece of white lace into which I strung a piece of dark blue 1/8 inche satin ribbon.  The ends were tucked behind the decorative paper and taped down.  This layer was then adhered to the card front.  I added a shorter piece of ribbon in the bottom right hand corner tied in a knot onto the piece in the lace.  I added a knot bow onto the onesie which is held in place with a Zot. 

I made a similar card with pink acrylic paint paper. This time I chose the landscape orientation to change it up a bit.  I cut a piece of white card stock and embossed it with the De`vine Swirls folder from Cuttlebug.  I added a piece of link pink satin ribbon wrapped over it with the ends taped to the back.  This layer was then adhered to the card front. I added a shorter length of the same ribbon and tied it in a knot on the longer piece and trimmed the ends.  I added a knot bow again to the onesie.

I selected the masculine decorative paper I had used earlier and paired it up with a bright green card which worked well.  I printed a leaf trio graphic which I designed myself in brown on ivory card stock.  I layered it with the same card stock as the card.  I added an accent strip across the bottom 1/3 of the card.  I laid a piece of gold card stock onto a strip of the card green card stock. The decorative paper does have gold accent which don`t show up well in the photo. Trimmed the ends to the card edges.  I mounted the leaf accent with 3D foam tape over the accent strip.

I made a wedding card with some simple decorative paper.  I used Tattered Angels Glimmer Glaze - Sugar Cane is the color.  I spattered it onto white card stock with a spatter tool.  I keep some of the glaze in it`s original consistency then for the larger dots I thinned it with water and spattered again.  Once dry and ironed flat I printed a black frame onto it.  I cut the wedding couple with the Cricut and the Stretch Your Imagination cartridge.  It was cut at 4 inches with the silhouette option.  I cut it from brushed gold card stock which matched well the Glimmer Glaze.  I placed 2 small heart punchies in the top right hand corner to balance the couple in the frame.  I glued the decorative layer to the front of a black card.  Really happy with this one!

I started with this blue purple acrylic paper.  I paired it with a turquoise card.  I trimmed the decorative paper to leave a small border.  I cut the Memory Box Thanks die from the decorative paper then glued a piece of purple card stock behind it and glued the holes back into the a and k. I adhered the decorative paper to the card front. I cut a border of ovals from the same purple card stock with a thin die that I bought second hand so I don't know the maker.  Do you? Leave me a comment. I tied a bow from white seam binding around the 2 ovals in the center of the border.  I then adhered the border to the top third of the card.

Thursday, June 25, 2015

Cards with my Decorative Paper

I'm working on creating cards with the stack of decorative paper I have made in the last little while.
On this card I used one of my alcohol ink backgrounds from this session.  I cut the decorative paper with the Memory Box Grand Happy Birthday die then mounted it on a piece of white card stock which was trimmed to leave a small border. This layer was then adhered to a pink card.  I added 3 deep pink sequins in the top right hand corner held in place with bling Zots.


This card has some of my bubble paper which tends to be softer in color. The paper was made in this session. I printed the greeting in a coordinating color then I die cut some leaves from it with Spellbinder Foliage thin dies.  They are individual dies so I could add a couple single leaves and place them as I wanted.   The white layer is trimmed to leave a small border of the decorative paper which was trimmed to leave a small border of the green card.


This teal card features a piece of decorative paper as a background to the white frame.  The frame was cut with the largest die from the My Favorite Things - DieNamics Stitched Frames set.  I used white card stock for the frame and the butterfly which was cut with the Sizzix Winged Beauties framelit set.  I added a bit of stamped stippling below the frame in case it is used with out a greeting. A greeting could be added if one chose.  On this card I used one of my alcohol ink backgrounds from this session.
I chose to make a more masculine looking card from decorative paper made with acrylic paint in various shades green and brown applied with a sponge over material to create texture such as a mesh bag.  I chose an ivory greeting layer into which I cut the word with the Stampin Up Little Letters framelits.  I cut this layer to highlight a generous frame of the decorative paper. This was then adhered to a brown card. 
This decorative paper is acrylic paint with paste paper technique.  I cut it down to leave a border of the blue card. I punched all 4 corner with a decorative corner punch. I cut a flower with the Cricut at and the Straight from the Nest cartridge from white card stock. I cut it at 4 inches.  I adhered the flower on the card front in such a way to leave some room on the right hand bottom for a greeting if a person chooses.
I started with a turquoise card onto which I stamped a Stampin Up Itty Bitty background with Island Indigo.  I cut the decorative paper with the SU Top Note die.  I tied a piece of white seam binding around the bottom half and knotted in the front.  I then created a focal element with silk green leaves, then a purple card stock flower cut with the SU Flower Fair framelits.  I curled the ends forward.  I added a large white silk flower, a medium silk flower then a white iridescence sequin which are all held in place with a tiny turquoise brad.


 These are a result of discussions on the weekend with my sister.  Here are her cards.

Wednesday, June 24, 2015

Mushroom on a Table

I took this photo on the weekend when I was visiting my Mom & Dad. This mushroom was growing in between 2 of the boards of their picnic table.  Check out the nail on the left hand side of the photo. 

Submitting to the following:
B&W Wednesdays


I've included the colored one as well.  You can see the faded green paint in this picture.

Water Drops

I took this photo right after the gardener had watered the flower bed.  The flower had wonderful water drops on it's petals.  I like the way the background was dark and the flower light.  I just cropped this image a bit. 

Submitting to the following:
Macro Monday 2

I Heart Macro

Monday, June 22, 2015

Mosaic Monday - Ducklings

I went for a trip to the wetlands after a BBQ a week ago.  It was later in the day so the lighting was different.
There were ducklings swimming around with mama duck keeping a real close eye on me.  The Ruddy Duck was a new bird to me, so that was exciting.  I would have preferred to have the Red Wing Blackbird on a reed but I will take what I can get.  The Grebe looks like a juvenile so I'm not sure if he has parents around somewhere.

Joining Mosaic Monday host by Judith at Lavendar Cottage.

Wednesday, June 17, 2015

Watercolor Images

I made these cards for my card exchange group.

I started with Adorn It - Art Play Paintables - Be Awesome by Lindsay Ostrom.  This is sold in a 12x12 page with 12 images. These are images printed on watercolor paper and ready to be painted. I used a water brush and pan watercolor to add some color to these images.  I chose to leave the girls face white because I thought I would screw up a flesh color. Sunflower are my favorites. Once painted I let them dry then pressed them flat.  I chose a blue card for the first one to match with the bee wings and trails.  I added a layer of vellum to the card front then I added the green polka dot designer paper.  I mounted the watercolor piece with 3D foam tape.  On the right card I omitted the vellum and cut the designer paper into a strip and triangles and adhered them as shown.  The watercolor piece is mounted with 3D foam tape.

Tuesday, June 16, 2015

Bird on Crumb Cake

I started with a Stampin Up Marina Mist card.  I added texture to it with one of the Itty Bitty Background stamps in MM ink.  I created the background bands with narrow strips of Season of Style DSP left over from this project.  I adhered them so they would fall behind the central element.  I repeated Crumb Cake in the central rectangle which I layered onto a piece of Whisper White.  I stamped the bird from the Punch Potpourri in MM on white and punched him out.  I punched the wing and the branch from MM card stock.  I glued the branch, then the bird then the wing in the bottom left hand corner.  I was tempted to add more MM on the Crumb Cake but resisted.


Can you tell I've been shopping at SU Retired Sales?  I have been looking for this stamp set for a while and found it on the weekend. Yippee!

Submitting this to the following challenges:
TGIF 07 Sketch

Monday, June 15, 2015

Snowflake on Trio

I started with a Stampin Up Island Indigo card laid in the portrait orientation.  I added a narrow strip of Whisper White in the left third of the card front.  I cut 2 squares of Winter Frost DSP and layered these on squares of Basic Grey card stock.  I cut a snowflake from non shed silver glitter with the smallest on the Snow Flurry Bigz Die.  I mounted on the middle square.  I mounted the 3 squares with 3D foam tape.  I stamped the greeting with one of the stamps from the Good Greetings set in Not Quite Navy ink.

Submitting to the following challenge:
CAS colors & sketches #128
Sparkles Christmas Card - #28 Anything Goes

Bird on Branch

I started with a Stampin Up Bashful Blue card and used my Itty Bitty Backgrounds to add some texture with Wild Wasabi ink.  I lined up some small scraps of the Winter Bright DSP laying the blue piece on a piece turned over to show the WW color.  I wrapped a piece of white thread around the piece a couple of times and knotted it.  I stamped the bird from the Punch Potpourri with WW on Whisper White then punched it.  I cut the branch from WW card stock and the wing from white.  I cut a piece of white and pressed it into the WW ink pad to add a bit of interest to the white rectangle. I glued the bird and the branch to this piece then mounted it to the card front with 3D foam tape. 

Submitting to the following challenge:
Fab Fri 66 - sketch

Red Strawberry

I captured this small ripe strawberry at the Community Garden.  It looked delicious.  It was very sunny so I have some pretty harsh highlights. I'm not sure what white stuff has been captured by the leaves but it makes it look fuzzy.

There were a few which had been eaten to the stem by some furry critter so I hope that the owner visits the garden every day to pick these wonderful fruit. 

Submitting this to the following challenges:
Macro Monday 2
I Heart Macro - 107

Mosaic Monday - Community Garden

These photos are from my walk through the Community Garden in my area.  It likely contains about 50 small plots. Everything is so dry but there were red strawberries, blooming chive, and a few green tomatoes.

Many of the plots are decorated with garden ornaments.  I chose this cat face.  It is metal with a solid face and wire body which mostly disappears with the busy background.  It is about 12-14 inches tall.

The blue flower is wonderful.  I'm not sure what plant it is but it could be flax.

The bee was quite still for longer than usual which is why I got a decent shot of it.  They are buzzing about very diligently collecting pollen.  The purple chive flowers seemed to the most popular as there was constant activity.  Fortunately, many plots in the garden has some so I could move from plot to plot to get a photo or two.

The garden has very spongy rubber paths which is interesting.  They have a small building for storage.  We did get some rain over the weekend so that should help the green.

Submitting it to the following challenges:
Mosaic Monday at Lavender Cottage hosted by Judith

Friday, June 12, 2015

Sail Boat on the Sea

I made a masculine card today.  I started with the Stampin Up Sail Away stamp on watercolor in Early Espresso.  I added blue in the sky and water with the Not Quite Navy
Watercolor Wonder crayon and the Aqua Painter.  I added a hint of sun in the top left hand corner with a More Mustard WW crayon.  I trimmed down the watercolor paper to 5 x 3.75" and layered it onto a piece of Marina Mist card stock which just leaves a small border on the Early Espresso card.  I cut a Bitty Banner with the framelit in EE and then stamped the greeting from the Good Greetings stamp set in Baja Breeze cause I have no Marina Mist stamp pad. These were layered and mounted to the car front with 3D foam tape.

Submitting to the following challenges:
Paper Pal Arts - #255 Early Espresso, Maria Mist, Sahara Sand.
Cute Card Thursday - #377 Beside the Seaside


Stack of Teacups

I started with the designer paper from Creative Imaginations which is watercolor with calligraphy words on it.  The variations in color provides lots of card color options. I chose a light warm green. It's light and summery. I cut the piece of DP to leave a small border.  I used the Memory Box Tea Cup Stack.  I cut the first layer in a soft aqua glossy card stock.  Then I cut it again from a deep blue green card stock.  This time making sure I did not lose any of the confetti pieces so that I could put them back in the holes of the first one.  I put scotch tape on the back of the aqua one and then just placed the pieces back in. Once all done, I trimmed the extra tape away from the outside edges with scissors.  I color printed my sentiment on white card stock then trimmed it to 2 x 5.25 inches.  I punched slots in the top and bottom with the Stampin Up punch.  I ran a caramel seam binding through the slot to the inside of the card and back through the slots in the top.  Tied a knot and trimmed the ends.
Submitting to the following:
Come and Get It Challenges - Paper Piecing.
Coffee Loving Cardmakers - Summer Blog Hop.


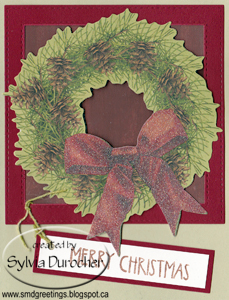
Christmas Wreath

I started with a light green card fold in the tall orientation.  I cut the frame from deep red card stock with the Die-namics Stitched Square Frames.  It's 4" square.  I backed it with a piece of painted brown paper which repeats the brown in the pine cones.  I stamped the greeting on white with brown ink and a clear stamp.  I layered that onto the same red card stock as the frame. These were layered together then I punched a 1/8" hole in the corner and added an olive thread to it.  I then tied the tag onto the frame with the thread.  The frame accent was then adhered to the top of the card front.  I added some double sided tape to the back of the tag to keep it in place on the card front below the frame.  I then adhered the wreath accent (brand unknown) over the frame with 3D foam tape.

Submitting to the following challenges:
Holly Jolly Christmas Challenges - Frame It.
City Crafter Challenge - tic TAG toe

Wednesday, June 10, 2015

Water Drop

There aren't many water drops around here because things are so dry.  I walked by these hostas shortly after someone watered and the drops were still there. Once I converted the photo the water drop popped!  Looks like it's headed down the slope.  I cropped the photo to have the water drop be the focus.

Here's the colored one.

Submitting to:
B&W Wednesday.

Monday, June 8, 2015

Inside a Petunia

Petunias are not flowers I would normally photograph.  They are plentiful and come in a large number of colors.  This morning I decided to see what I could do if I got really close.  They have interesting inside bits.  I liked to color of this one and the focus was good.  There are a few dirt particles but that comes with the territory when outside.  I did crop the image to move the focal point off center.
Sharing this at
I Heart Macro 
Macro Monday 2 

Mosaic Monday - Tea for One

I have set up tea for me today.  I wanted individual tea bag saucers for when I serve tea and found these porcelain spoons at a garage sale. The price was right so they came home with me.  I am storing them in a glass dish for now. The top right is a few chocolate almonds in a bowl.  The main photo is breakfast. Muffins, cheese, and a banana with with a large cup of tea.  In the bottom left is my honey jar, center is the glass coasters, and bottom right is a yellow Tuppeware container where the goodies for tea are stored.  Golden yellow and navy blue is the color scheme for my kitchen and I am using golden yellow and turquoise in the dining room.  It's a work in progress.  I found a gorgeous honey dish the other day, so keep an eye here for it in a later post.

Sharing this at Mosaic Monday at Lavender Cottage hosted by Judith.

Sunday, June 7, 2015

Card - Christmas Kraft Red Black

I started with a Kraft card.  I placed a hand drawn line on my designer paper with a black marker. I cut red triangles from card stock.  I added dots with a marker then I glued them along the line to create a banner. I stamped the tree and greeting from the Stampin Up Contempo Christmas stamp set with Versafine Onyx stamp pad.  The snowflake from the SU Delightful Decorations.


Submitting this card to the following challenges:

Holly Jolly Christmas Challenge - Use Kraft
City Crafter Challenge - Add a Banner
Crafty Hazelnut's Christmas Challenge - Anything

Card - Gentle Trees


I started with a Stampin Up Mellow Moss card.  I stamped a piece of Whisper White with Versamark ink and the Harlequin background stamp.  I clear embossed the background then watercolored it with Regal Rose ink using an Aqua Painter. I wanted to tone it down so I stamped Lovely as a Tree in Mellow Moss on the bottom third of a piece of vellum and clear embossed them also.  I stamped the greeting from Little Bit of Cheer stamp set with Regal Rose and embossed it also.  I cut the background to leave a large border.  I cut the vellum just a bit bigger.  I placed three white candy dots above the trees.  I placed Zots behind the candy dots and a bit of vellum adhesive behind the trees to adhere the vellum to the background.  I adhered the background to the card front.

Submitting this card to the following challenges:
Color and Sketches for clean & simple cards - 127 Colors  


TGIF #TGIFC06 Watercolour Challenge

Saturday, June 6, 2015

Card - Butterfly Thank you

This is a card made with Stampin Up product. I started with a Soft Suede card.  I added a layer of Delicate Dots DSP cut to leave a small border.  I punched top right and bottom left corners with a corner rounder.  I cut a piece of Rose Red card stock with one of the flowers from the Flower Fair framelits.  I ran it through the Pretty Print embossing folder.  I brushed the embossing with ink pad. I stamped the greeting from an unknown stamp set with Soft Suede on Whisper White and embossed with clear powder. I brushed the edges with the ink.  I cut the butterfly with the Sizzix Winged Beauties thinlit from So Saffron card stock.  I used an Aqua Painter to add the body of the butterfly with Soft Suede ink.  The greeting is adhered to the card front with 3D foam tape.
Submitting to the following challenges:
Pals Paper Arts - 254 Color Challenge

Wednesday, June 3, 2015

Greeting Card Gift Set with Folder

I decided to package some of my Stampin Up cards in gifts.  At this time, these would make great gifts for teachers. 
I designed the cover with the Stampin Up Tea Shoppe stamp set.  I used 3 different tea cups on the 3 folders. I mixed So Saffron with a few different colors. Not Quite Navy, Island Indigo and Elegant Eggplant.  The folder holds 4 cards protected in cellophane sleeves.The folder measures 6" x 11". I scored the 11" side folder at 5.5" then .75" on each side to create the spine.  I placed 2 one quarter inch holes in the spine .75 inches from the center of the 6" spine.  I used a piece of So Saffron 7/8" twill ribbon and I created an innie outie bow then flagged both ends.  The folder is used as a card for the recipient.  Their name can be written on the front and your sentiments can be put on the inside cover.


This second picture shows the cellophane sleeves with 2 cards each.  The sleeves are adhered into the spine.


Pine Cone B&W

I went through the photos I took a few days ago to see if one had enough contrast to go to black and white.  I chose this pine cone photo where the green pine needles have turned dark and the top bits of the pine cone are lighter. The background has a good mix of light and dark. The focal point is just off center and I have some of the ends of the needles and some not.
I think nature is wonderful, inspiring and relaxing.


I've included the color version. 

Submitting to the Black and White Wednesday hosted at My Memory Art.


Tuesday, June 2, 2015

Rain!

It's wet! It's raining this morning.  Just a quiet gentle rain.  We really need it.  I walked for an hour and did not get soaked without an umbrella. 

Monday, June 1, 2015

Dandelion in the Sun

I took this photo on my walk this morning. The weather was perfect not too hot not too cool.

This is a dandelion in full seed.  The shot is taken from the underside. I love the way the sun highlights the fluffy white seeds.  The white clouds in the sky provide a repetition of the white.  The sun through the green spikes looks great.

I'm submitting it to:
Macro Monday 2
I Heart Macro

Mosaic Monday - Apple Blossoms

I appreciate so much the time to go take a walk and shoot a few photos while I am out in nature!
This week it was lilacs and they smell so wonderful. A pink one and a very blue one. Apple blossoms in a couple of colors.  A beautiful yellow tulip poppy with the unopened heads glowing in the background.  The robin on a wire.  It was keeping an eye on me but it's not a bad shot.

Submitting this to Mosaic Monday with Judith at Lavender Cottage. 

Christmas Card Challenge - June - Nativity - Brayer - Glitter

It's time again for the June Christmas Card Challenge.  The three elements are Nativity, Brayer and Glitter.
I started by making a brayer background with several blue ink pads from light to dark.  I brayered the lightest in the center and then layered the darker colors towards the top and bottom edges. I then stamped it with a script background stamp and clear embossed it.  I then used the same stamp with navy blue ink.  I chose a medium to dark royal blue card.  I trimmed the brayer background to leave a small border.  I punched the night sky stars with a Creative Memories Star border punch.  That gave me dark stars in the sky.  I cut the nativity from pearl card stock with the QuicKutz Nativity die.  I was able to include the shepherds but not the wisemen.  I adhered the background to the card front then the nativity die cut to the background. I repeated the stars in the sky with a non shed glitter card stock cut with the Sizzix Star and Star Bursts bigz die. I trimmed away the star that came with the die cut to add a glitter star adhered with 3D foam tape.

In this close up you can see the clear embossed sections to the right of the glitter star.