Saturday, October 21, 2023

Sylvia's Simple Shots

I visited the Heritage Hills Wetlands this week on a day where the weather was considerably cooler than a few days ago.  

Also, there was not waterfowl to be found.  No Red Winged Blackbirds so I expect they had headed south.  I have not seen any V formations of Canada Geese headed south but I may have missed them.

Considering that it is almost Halloween we have been blessed with a wonderful fall.

I did find this sparrow.


Most of my siblings headed to the Big Mall for a get together, our first since both Mom and Dad have passed. 

My sister organized a night out to a dinner theater.  We made time before supper to visit but a pub was not the best venue though it was close by. Dealing with the crowds at the mall were stressful.

The dinner theatre - music was excellent, food was very good, company was great, but I have to say it was a late night for me.

We need to make the effort to continue to get together so I am grateful for the sister who planned and those that attended.

I did manage to get an appointment to get my flu shot and my COVID vaccine this week.   They were just made available this week.

I got the shots in my left arm on Thursday and I did take a pain killer to sleep that night. I did take pain meds another couple of times.  

I guess it was at least 3 to 4 days with a sore arm but no other side effects.

I did get my appointment at my regular pharmacy so that was very convenient.


I did get a big grocery shopping trip done before the snow came.

I found these dishes on sale at the grocery store and decided that I would get a set of 2 cups and plates since they were under $1 each. The color is marked as wheat.

I added a nice glazed gourd and a small shiny glazed bowl. I believe this color was sunflower or something like that. That would have been the preferred color but there were no cups left in that line of dishes.

Just another option for hosting a friend for tea.


I decided to try my hand with a dip pen.  It has been on my mind for a while and Inktober came across my feed on Flickr I decided to try it. Inktober is a yearly event where drawing is encouraged.

I did have to unpack my liquid inks to give this a try.  I cleaned some nibs and got started. 

I really have no idea what I am doing.  I just created marks on a piece of card stock.  

I have view a few videos since this attempt and found better nibs in my stash. 

It's just a relaxing time.


Friday, October 20, 2023

Christmas Cards - Arched Joy

Here are my first Christmas Cards for 2023.  I generally do a Christmas Card Challenge but it did not happen this year.

I used the TH Arched Frame die into which I placed the TH Joy Mover and Shaper die.  Running this combination in the Big Shot with the striped designer paper I got my main element.

I chose a designer paper with a variety of colors which allowed my to use several colors of card stock.  Top left - Handsome Hunter, top right - Tempting Turquoise, bottom left - Kiwi Kiss and bottom right - Island Indigo.

The Joy is visible against the darker card stock.   

I printed the words "to the World" on white card stock in coordinating colors and trimmed them to .75" tall and then cut the left hand end into a banner by hand.  This was mounted to the card with 3D foam tape aligned on the right hand side. 

I added a quarter sheet insert and a white A2 envelope.

Thursday, October 19, 2023

Oil Diffusers - Tree Scent Ornaments - Felt

I really wanted to make some felt ornaments now that my die cutting station is set up. 

The white felt layers were cut with the Sizzix Snowman and Hat Bigz die.  I cut two of them and then embroidered the front one.  

I added 2 tiny black buttons to it's belly. I embroidered the face.  

I then put them together with blanket stitch around the edge with white cotton thread.  I stuffed it with fiberfill once I had most of the edge done.  Then finished off my blanket stitching.

I added a blue scarf made with a bit of blue cotton fabric.  I unraveled the edges a bit and then wrapped it around his neck and tied a knot. I did add a stitch with blue thread to keep it in place.

I wanted to make a gingerbread stuffed as well.  The 2 layers of brown felt were cut with the Sizzix Gingerbread Man original die.  

These were more challenging because it has holes in it. I placed and stitched a red piece of felt behind the hearts and stitched around them. 

I added icing to the arms and legs with white stitching. The eyes were a tough because they are holes. Again, I put a piece of black felt and added stitching to define the eyes.The mouth is a slit so I just used a black permanent marker to highlight where it was.

I used the blanket stitch around the edge with brown thread.  Once I was nearly all the way around I stuffed it with fiberfill making sure I did not interfere with the felt pieces I had put in there. 

I added a bow of red embroidery thread around it' s neck. The hanger is thread.

Two layers of yellow felt were cut with the Sizzix Star #2.  This is a large single star die. 

I chose a variegated piece of yellow thread.  I created the five star stitch in the middle then add the running stitching to each of the points on the star.

I used the same thread to add the blanket stitch all the way around the star.  I added fiberfill when I just had a bit of edge left.  Finished off the blanket stitch all the way around.

I added a hanger with the same embroidery thread.

The 1-2 drops of essential oil should be applied to the back of the ornament.  Another few options to add scent to your tree this Christmas season.

Wednesday, October 18, 2023

Oil Diffusers - Tree Scent Ornaments - Wreaths and Hearts

I decided to use some of the few balls I had left over from the diffusers I made last year.

I paired them with these vintage light reflectors that I got from the thrift store a while ago.  I was not sure what I was going to use them for but vintage at a good price had them coming home with me.

Here I added a white pearl bead, a snowflake bead then the turquoise felt ball.  Those were strung onto white crochet cotton.  I put 2 reflectors back to back. They have large holes where the light bulb would have gone through so I needed something large to make sure the assembly stayed tight.

I dipped into my stash of buttons and now I was looking large ones.  Yes, there were some that were big enough.  I coordinated the color with the felt ball in the front.

You can see on the back that there are these metal tabs so I pressed all those flat against the body of the reflector.  I then strung the big button, pull everything tight and put a few knots.  Trimmed the end of the crochet cotton.

They look like wreaths which fits into the seasonal decor.

These reflect the light really nicely and will fit into any Christmas decor.


The reflectors came in 2 different styles.

Ones with round petals and these on this ornament that had pointy petals.

Here I used a black felt ball and 2 white snowflake beads and decided to have the ball parallel to the center.  After stringing the snowflake beads I brought my cotton to the center of the fell ball to go through the reflectors.

Again, I found a large black button to finish off the back and ended with another set of knots to ensure the full assembly would stay in place.

Just another choice for scent on your artificial tree this season.


Tuesday, October 17, 2023

1 of a Kind - Tree Scent Oranments - Set 3

Another set of these very cute Tree Scent Ornaments.  These can be used to give your artificial tree a scent.  Choose your favorite Christmas essential oil and apply 1 or 2 drops and enjoy.  

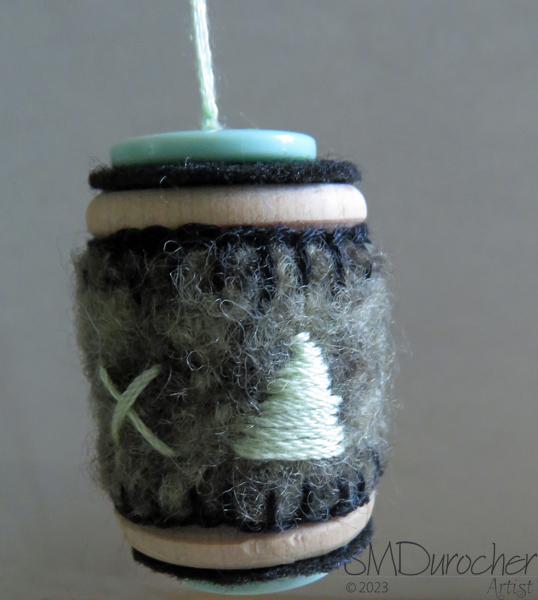
Here I have grey felted wool to which I have added royal blue blanket stitch on the top and bottom edge.

I had stitched white snowflakes around the middle.

The top features white felt circle and a grey button.

The hanger is the royal blue thread in 6 ply.


This felted wool makes me think of woodsy so I put small triangular trees on the middle panel of this ornament.

I chose black embroidery thread for the blanket stitch around the top and bottom edges.

The top features a black felt circle and a medium sized button.

The hanger is 6 ply embroidery thread in the same color as the tree on the wool panel.


A Bumble Bee colored ornament.

It features the ivory and black felted wool panel around the middle of the ornament. 

I use golden yellow embroidery thread for the embellishments.  The blanket stitch on the bottom and top edges.

I followed the fabric pattern with cross and dash stitches.

The top features a black felt circle with a golden yellow button.

Embroidery thread in 6 ply for the hanger.


I put white snowflakes on this woodsy felted wool panel.

I used chocolate brown thread for the blanket stitching along the top and bottom edges.

The top has an ivory felt circle cut the the SB Nestabilties smooth circle die - the smallest in the large set.

Topped with a brown button and brown embroidery thread hanger.


Another daisy on this grey houndstooth wool fabric panel.  

I did triple fold this fabric and stitched the ends to ensure no unraveling of the ends.

I chose pink thread for the daisy and the dashes in the middle.  Same for the blanket stitching along the top and bottom edges.

Charcoal grey felt circle at the top cut the the nestabilities die.

Topped with a pink medium sized button.

Pink 6 ply embroidery hanger.

This is the last set for this year.  I learned a lot in the process.  I got some feedback that they could be a popular item.  Let's hope so.

Sunday, October 15, 2023

Sticky Note Holders - 3 Sets

I made 3 sets of Sticky Note Holders with my photos on the front.  You can check out the process in this blog post.

Here is the green set.  I chose the red poppy, a yellow warbler, a beetle and a red wing black bird for this set.

The designer card stock has very little pattern.

I did have enough leftovers to punch my tabs from the same card stock.

The folds did produce white places because it is white core card stock.  Nothing I could do about that.

I could have used solid card stock but that is not the look I wanted.

Here's the pink set.

The pink cosmos, the dahlia, rose and poppy in the bottom right hand corner.

It would have been best if I photographed these before I put the celloband and tag but that is the way it goes.  Too late do it otherwise.

The cellophane band ensures that the sticky note pad stays in the holder until it heads home with a customer. 

It also provided a great place to tuck the tag with information and credits to the back.


The blue set features a dandelion (Salisfy), alium, a tree swallow chick, and mooks hood.

The info tag was printed and cut to 2.75 so it fit nicely in the back of the holder.  I strung it through the tab so that it would stay with the not e holder until it headed some with the customer.

By tucking it between the cello band and the holder it stays nicely out of the way.


Saturday, October 14, 2023

Sticky Note Holders - Photos

I decided to make Sticky Note Holders as small gifts this year.  I wanted to use photos if at all possible.  I did some brainstorming with my sister and came up with this idea.

Square photos I have!

I had sticky notes in blue, green and pink so I selected my photos based on those colors.  I choose flowers but also other stuff from my previous nature photo calendars. 

I chose designer card stock in smooth colors so that it would not clash with the photos.

I designed my photos with a black border all the way around wider than I need it.  I printed two 3x3 photos on a 4x6 with Christmas greetings in the extra inch.  This will allow me to trim the photos as I see fit and not worry too much about whether the border is same on each photo.

I decided to go with a pocket design so the front would be clear of any closure.  This makes the most of the photo on the front.

I did end up adding a tab to the back sheet cause in some cases it was a bit hard to pull the sticky note out of the pocket.  

This also ensures that the sticky note is always put into the pocket sealed side first which is the tightest.  Once a few sheets are taken it will be easy to pull the pad from the pocket.

I used my Stampin Up Round Tab punch.  Punched the shape from the scraps, scored it down the middle, tape on both sides, aligned to the edge and press down. 


Turns out the tab should be in the center which makes pulling the pad out even and therefore easier.  Some are not quite in the center.

It looks very nice.

When the sticky notes are gone you can just add another pad onto the last sheet and start all over again.

This holder makes having notes handy in your purse or briefcase.  It keeps the note corners square, the notes stuck to the pad, and easy to find.


It looks nice on your desk by providing a pretty something to look at instead of boring notes.

It took a couple of tries to get the box right.  The bottom tabs need to fold from side to bottom.  If the tabs are folded bottom to top they interfere with the sliding of the pad of notes in the holder.  I had to sleep on that problem but woke up in the morning with the best way to make them.

Having a score tool was essential for this project. The bottom tab is 3/8" as that is the width of the pad. I used quick dry adhesive to glue all the tabs.
It took a bit to find a way to add just a bit of looseness.  I added a smidge on the side scores which allows just enough space.  I glued the box with the pad inside to that I could adjust a very bit when I glued the side tab.

I used double sided tape to adhere the trimmed photo to the holder front.

Sylvia's Simple Shots

I took a walk around the lake with my sister before lunch.  This is a female Bufflehead. It is a duck.

It was a beautiful day.

I had started out early in the morning so I had skipped my morning exercises so it was good to have a bit of blood flowing before sitting for another couple of hours.


I travelled south with my sister and brother-in-law to spend Thanksgiving day with my nephew and his family. This is their first Canadian Thanksgiving as they have been living in China for the last few years.

The buns on this plate were made by my nephew and I have to say that when we walked in and smelled bread I was so reminded of walking into my Mom's house.  He had inherited her way with bread.  It is just delicious.

This is Turkey Dinner my sister prepared for me as a take home meal when we got back from down south.

It was nice to have a meal ready after all the driving.  I was lucky that my brother in law did half of it.

We did have a short visit with my niece/goddaugther. She was swamped on the weekend so she did not join us on Monday for turkey dinner.

Where the Wind Blows - Caroline Fyffe was a nice light read.  After a weekend of travelling it was nice to just dive into a good book for a while.  I just read it almost in about 3 sessions.  A good cup of tea or 2 or three. 

Set in Wyoming in the horse and buggy days.  Chase Logan has come to deliver news to Jessie Strong that her husband is dead.  Jessie has been living at the homestead alone for months as her husband was working further west.  Jessie was raised in an orphanage where she met a tiny little girl named Sarah.  She has arranged to adopt Sarah who arrives 1 day after Chase brought the tragic news. She knew they would not allow her to adopt if she was not married.  She asks Chase to pretend to be her husband to allow the adoption.  As it is they have brought along a 13 year old boy, Gabe,  they would like for her to take on as well.

Things go from pretending to maybe there is something between them, to a neighbor finding out that Chase has been living at the homestead and insists that a wedding take place. 

Chase decides to take his "family" back to his property in Logan Meadows. He has wired his friend to make the shack ready for when they will arrive. Then there is a 2 week journey in late fall with snow on the ground. Chase, Jessie, little Sarah, Gabe and his friend Jake who was looking for an adventure.  They arrive to find a pleasant surprise and land and accommodations.  Great book!

Friday, October 13, 2023

1 of a Kind - Tree Scent Ornaments - Set 2 and Stand

I made a few more 1 of a King Tree Scent Ornaments.  These ornaments can hold your favorite tree scent essential oil to give your artificial tree the right scent.

It could also be a favorite Christmas scent of your choice. The scent will dissipate and you can choose a different oil another day.

Love this bold black and white check felted wool.

I decided to pair it with red.

I put blanket stitch along both edges with black embroidery thead. 

I changed color to red and using the squares in the fabric I put X and dashes along to bottom half and just dashes long the top.

Red felt on top with a large black button on top of that.  Black embroidery hanger.

I had most of my buttons spread around my work area in separate bowls.  I found this cute small oval button which matched well with the thread I had selected so I decided to use it.

For this bright felted wool I chose bright green and blue.

I put blanket stitch in green along the top and bottom edges. 

I then stitched the button in the center front and then added dash stitches in blue above and below the button.

The top felt is green with a button button. 

True Blue embroidery floss hanger.

I decided to do one ornament in Oiler colors - blue and orange.

I used the wool denim colored felt.

I added a blanket stitch along the top and bottom edges in orange. 

The center pattern is a set of crossed dash stitches.

I cut the top felt circle from the same fabric with my smallest die from the Large Nestabilities smooth circle dies.  Fits perfectly.

Topped with orange buttons and the same orange embroidery thread for the hanger in all 6 plys.


Another Tree Scent ornament with bright colors.

The wool cuff is bright green and I chose purple embroidery thread.

I put a blanket stitch along the top and bottom edges.

I put stars patterns along the center of the wool layer.

The top has a purple felt circle and then a bright green medium sized button.

Purple 6ply embroidery thread hanger.


The fabric for this ornament was wool suiting so I folded it top to the back and bottom to the back so I had 3 layers to work with. 

I did have to stitch the ends which were stitched over with my connecting stitches.

White blanket stitches along the top and bottom edges.

I followed the plaid pattern with my white thread in dash stitches.

The top felt circle is red topped with a medium white button.

The hanger is white in 6 ply thread.


I needed another stand for Tree Scent Ornaments.  I went shopping this week and found this black folding stand. 

The Christmas stuff was out as well so I picked up a package of silver wire hangers.  I just squeezed them onto the wire frame.

I will put my sign on the back wire with the clothes pin.

I had the piece of wood in my stash which was perfect. It stabilizes the stand when there are ornaments on it. I will have to secure the legs into the slots.

Enough space on this stand for my 1 of a Kind Tree Scent Ornaments.


Monday, October 9, 2023

1 of a Kind - Tree Scent Ornaments - Wood Spools

Tree Scent Ornaments are ornaments on your artificial Christmas tree that are oil diffusers.  You place oil on the felt and it makes your tree smell like you want.  If you want it to smell like a real tree you can place essential oil that would give you that scent. I discovered last year that I no idea what kind of tree we had when we were kids.  I believe they were spruce trees.  You could also choose any scent that makes it Christmas for you.  I have made a variety of these ornaments last year and will continue this year with new styles this year.

I saw samples of these spools with embroidered wool on line over a year ago.  I really liked them.  
This was a project by Susan Lenz.  You can check out her blog post here.

Many of her wooden spools are older than mine and have the words embedded in the top and bottom ends of the spools.

She filled a small wooden bassinet of these.  It must have taken her a long time.
I had collected small pieces of wool at the ReUse center over the last 6 months.

These small spools come from Mom's stash.  She saved her spools and of course she sewed for many years when thread was sold on wooden spools instead of the plastic we have today. The wooden spool was eliminated in the 1970's.

I started with a 5 small wooden thread spools which I sealed with Modge Podge several days ago.  They measure about 1.25 inches tall and 1" around.

I gathered my bits of wool, my embroidery thread, a bucket of felt and a bucket of buttons and tackled this project.  Something good to listen to on the TV and a cup of tea.  I was there way longer than I expected. 

Raw wood works as a diffuser as well so any drops running down from the top will go down the center of the spool and be absorbed.

I am not sure that taking the time to seal the outside did much.  I was hoping to make the edges more warmed tone.  You don't see much of the spool at the end.

This wool was a left over from a sweater which may have shrunk.  I cut it 1" wide and 3" long.

There was a bit of pink on the edge which inspired me to  use pink thread on this one.

I split my embroidery thread into 3 strand lengths.  It is great to work with this material as there are not unravelling edges and it is quite thick.

I just made it up as I went which a rudimentary knowledge of some embroidery stitches.

Here I put different border stitches and daisies around the center.

The felt pieces on the top and bottom are cut about 1" across.

I chose medium sized pink buttons for this one.

On this ornament I used the pattern in the wool to guide my embroidery in the middle of the spool. 

The turquoise 100% cotton thread I used was not standard embroidery floss.  I split it as usual but I had a really hard time keeping it integral.  It would just come apart sometimes.  I will keep it in it's 2 strand version next time.

Turquoise felts on the top and bottom with tan buttons which matched well with the fabric I used.

I did not have any regular embroidery floss in the right color.  I am not sure where I collected this thread as it is packaged like the other stuff.  It was for sure at a Thrift store.

On this ornament, I embroidered white snowflakes on the navy blue portions of the fabric.

I managed to do the blanket stitch along the top and bottom edges.

White felt on top and bottoms with smallish navy button over the that layer.

I did not have any trouble when I used the regular embroidery thread, in this case white.

This fabric as other colors and patterns to it will make more spools and they will look different.


The wool on this ornament was very thick and the colors were quite mottled.  You can see that the fabric sticks out quite a bit from the wood edge.

I chose a denim blue embroidery thread and put blanket stitch along both edges.  I put diamond shapes around the middle.

The wool circles on the top were denim blue and here the buttons are a bit larger and I think it works better.

Again, I think this fabric was a shrunken wool garment and that is why it is to thick.

I think esthetically the fabric is a bit too thick as I just wanted to fill in the well on the spool.


On this last one, I chose the fabric for the color and it was cotton flannel instead of wool.  This comes with challenges. The edges are not integral.  On this one I folded the top and bottom edges to the inside and that worked well.

The biggest challenge was finishing the edges where the ends meet.  That had to be finished with a folded edge and I sewed that with regular thread.  Then when it came to connecting them at the back I used the red embroidery thread as I had been on the others.  The bigger buttons for sure look better.

I would not use flannel again, it was just too much work.  Three layers of layers fills in the space on the spool the nicest.

I do have some pieces of wool suiting which might be a better weight but may have the same edge problems as this flannel.

These are ones for now.  I have other styles I want to make.   I found the dimensional ones sold the best last year.  Stuffed hearts are easy and I can make snowmen and gingerbread men as well. 

Sunday, October 8, 2023

Calendar - Countdown - Four More

Cool Snowman Countdown Calendar featuring the scene I created and photographed. 

On this 4x6 I added the "Days until Christmas" and the star digitally onto the photo that I took.

The birthday side features bright red polka dot designer paper with silver metallic balloon punchies with black strings.

This one got a black dry erase marker.


On this Green Red Ornament countdown calendar I used a red ornament on a green background with a pine bough.  I created this digital composition a few years ago. I created all these elements myself.

I added the star and the words digitally above the ornament.

The birthday side has some beautiful blue paisley designs with olive green and chocolate brown sprinkled around the shapes.

I chose the green dry erase marker for this calendar.


The calendar features a Bethelehm collage that I created on artist board. I painted the board a medium blue.  I then ripped cardstock paper that I had painted in deeper tones of blue.  The paper was also embossed with the Swiss Dot folder.  The darker pieces were adhered onto board leaving the blue color show in between.  
The Bethelem buildings a a similar design to my Simple Bethelehem.  They were traced, cut from card stock, painted with silver domes and lit windows. The bottom third was cover with crinkled paste paper in deep blues and purples. The silver band of metallic card stock was cut with the Creative Memories Decorative Trimmer and adhered over the collage.

I did have to manipulate a photograph of this artwork to make the silver band wider to allow for the words and space for the numbers.  

The birthday side is a piece of wonderful floral designer paper with purple and yellow flowers and yelllow bees. This calendar was paired with a purple dry erase marker.

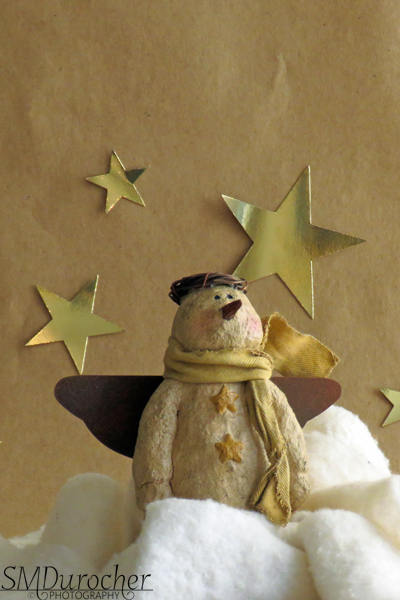
Warm Snow Angel count down calendar was made with the photo shoot I did the other day.

I added the words "Days until Christmas digitally before having the 4x6 printed professionally.

The birthday side is a colorful wirly swirly designer paper featuring many colors.

I paired this calendar with an orange dry eraser marker.

These are ready to go!

Calendar - Countdown - Simple Bethlehem


Frames: I used discontinued Tolsby 4x6 frames from IKEA for this calendar.  It the past I have packed these in plastic and decided not to this year.  That created some issues to overcome - mainly how to store the marker and ensure it does not disappear while on the craft table.  I created a clear plastic loop which I adhered to a piece of white 4x6 card stock with clear tape.  I then used silver glitter washi tape to make it pretty and visible. I also used a piece of clear tape to hold the marker to the frame until it is purchased. I had thought of using bubble tea straws for the loop but I mislaid them so I had to just move ahead. With the new by-law these may become a thing of the past.

Markers: The first set of markers I purchased did not have erasers included.  I spent a day spinning ideas about making dry erase board erasers and just decided to buy markers with felt erasers attached. Having to do it again I would have searched for all black markers. Maybe that is not so much fun for the kids which is the whole point.

Images:  I have designed quite a few digital Christmas cards in the past so that was pretty easy to mine my archives to find images.  Also did a photo shoot of Christmas images you can see here. Birthday is a completely different story so I just resorted to using scrapbook designer paper with banners for that side.

Tags:  I made up 2x2.75 inch tags that document the way to use the calendar. I attached the tag to the base of the frame since I decided not to enclose these in plastic.

The Bethlehem image used here is one I created digitally a while ago.  It has been created with a light blue oval background. I have used it in several projects over the years.  Here I designed a 4x6 photo with the digital Bethlehem add the words "Days until Christmas" then had the photo printed.  The challenge is to have a place light enough that the numbers will show up. The birthday side is bright designer paper in red with royal blue balloon punchies with black strings. 

Saturday, October 7, 2023

Photo Shoot - Chrismas - Tiny Wood Stable

I found this tiny wood stable ornament at the ReUse center.  They always have a bit of Christmas all year round which works for me. I am sure it olive wood.

I just removed the eyelet and string hanger from the roof of the stable. 

I added the white fiberfill batting around the base making sure to cover the transition from the table to the background. 

I used my gold foil star die cuts again on this  composition.  I wanted to leave some space at the top so I can add digital elements as I go along.

The star background again is 12x12 designer paper by Creative Imaginations created by Helen Dardik.

This will work for a 3.5x5 inch layer on an A2 (4.25x5.5") card, a 4x6 print on a 5x7 A7 card, a 4x6 photo background for the Christmas Countdown calendars. And who knows what future projects.


This process entails taking many photographs, tweaking the composition, post production work including cropping and sizing for specific outcomes.

Photo Shoot - Christmas - Warm Snow Angel

My sister gave me this wonderful warm color snow angel.  It is quite large and would not fit into my tiny photo studio so I just put him on the shelf. I photographed him at her house years ago. This is a set of cards I create with that shot.

With a lot of thinking about it I realized that I could use my background stand to hold background paper.  That worked out really well. Check the photo below.  It can be set up narrower than I usually use it from photographing my art for gallery shows.

Now I could create a background in proportion to his size.  Also I now have 4 feet of table to create depth of field with items laid further apart.

I used some warm and natural quilting batting for the snowbank.  I cut gold foil stars with my Sizzix star #2 die that cuts 4 stars in various sizes.  Found the foil card stock at ReUse for free.

With this composition I have enough space at the top to either add a digital greeting for a card or a place holder and words for the countdown calendars.

So glad he came back to me.

Photo Shoot - Christmas - Cool Snowman

I worked on Christmas photography for cards this year.

This was a fun one.  This was created with free and found objects.

It started with the blown glass snowman I found at the ReUse Center.  I needed an environment for him and it took a few days for me to remember the little house and find it. 

It is a small gingerbread house that lights up.  I think IKEA but it is not marked.  

The white wood tree pick - I cut the pick to short and put it into a styrofoam block so it would stand.

The tiny bottle brush tree came out of an ornament which I managed to extract with a piece of wire.

The snow is fiberfill batting for quilts.  It is stretched, moved around, fluffed up and patted down as needed.  Added a bit to the chimney. The house and snowman are raised so they don't get lost in the snow. Need enough snow to cover the transition from the the table to the background.

The background is a piece of scrapbook designer paper in navy star night sky.  Perfect.

It is 12x12 designer paper by Creative Imaginations created by Helen Dardik.

I now have a photo that can serve different purposes.  Trimmed to the right size of 4 x 6 it will become a Christmas background for one of the count down calendars. More about that later.  It will need a few words and a star where the numbers can be written At this size it can also be used on a 5x7 A7 photo card when I add a digital greeting.  The shot can also be trimmed to 3.5 x 5 inches to be used on a 4.25x5.5 inch A2 greeting card.  This turned out so well.  

Sylvia's Simple Shots

Beaumaris Lake has been a great go to place for photography this year.  Big trips have not taken place.  This lake has enough landscape to provide a variety of photographic fodder.

Here is the water reflection of the hand rail around one of the many view points along the walking trail. Love that absolutely blue Alberta sky.

Does it look like birds all facing one direction?


We don't get a lot of red leaves here in this province.  I found a few. 

An nice trio of gorgeous red maple leaves against that grey bark of the tree.

We have an about 5 block stretch of road along a main throughfare in our city where Manitoba Maples are planted.

At this time of year, cars are parked on the edge of the road end to end along the whole stretch.  Families are taking their photos, photographers are taking people shots with the red leaves, and it is just mayhem.

I found these at Beaumaris Lake.  I was so glad not having to stop at the busy spot.

A sweet shot of a single red berry with green leaves still on the branch.

Nice color dare I say Christmas colors.

We have had a beautiful fall with wonderful sunshine and warm temperatures.  Many shirt sleeve walks in October.


Angel Promises Fulfilled by Henry K. Ripplinger.  This is book five in the series.

Jenny Hamilton is enjoying her new home in Regina. The gardens are finally looking as she wants filled with wildflowers. The Thanksgiving Angel has arrived and been placed near the gazebo - a replica of the one she had at the estate in Ottawa. 

Jenny has resisted visiting Henry's gallery as she thinks he is still married and does not what to complicate his life.  In the meantime she would like to reconcile with her son after rift which precipitated the divorce.  Jimmy is rebuffing all her attempts at reconciliation.

At Eddy's wedding most of the major players are in one place, Father David is officiating, Peter is the best man, Henry is in the front row, ans Camilla is with her family.  Things are starting to fall in place.

While in the hospital deathly ill, Jenny asks her son Jimmy to sell her house as she will not be returning to it. He takes the easy way out and sells the house with all the contents as he does not want anything of his mother's. 

Henry and his son Josh look at the house with anticipation that Josh would be moving his family into the city but Henry is taken with the house.  It is perfect.  He buys the house lock, stock and barrel for himself to have a place to stay when he does not want to commute from the acreage. 

Father David Engelman has officially retire and moved to the senior's home.  He is still called to minister to folks so he takes on the residents as his new congregation.  He revives the chapel in the complex and starts to hold bible study and mass.  He is doing hospital outreach and has been visiting a very ill woman on her deathbed.

This book is full of miracles.  Finally, Henry and Jenny are wed!

Tuesday, October 3, 2023

Card - Watercolor and Ink - Fall Colors

The original ink drawing was done on 90lb watercolor paper measuring 4.00 X 5.25 inches.  I used a fine tip permanent black marker.

I was inspired to start ink pieces by the Inktober Challenge. 

I drew it then applied watercolor to it in fall colors. Yellow, oranges and browns.

I rubbed a black marker around the edge to finish off the lines in the drawing.

I added a fabric accent "City Express Post" 2 cent stamp.  Unfortunately, I was not express enough and this card is a few days late. 

I added 2 deep yellow mini brads at the top and bottom of the stamp. The watercolor drawing was then adhered to the front of a Tangerine Tango card.  

I will hand deliver the card tomorrow.


I have been working on art pieces for the upcoming Value of Color show at the art gallery.  Turned out to take more time than I thought.  Keep an eye out for those coming at the end of October.