Saturday, July 29, 2023

Sylvia's Simple Shots

I finally took a trip to the University of Alberta Botanic Garden this year.

I chose a day when rain was not predicted to fall which turned out to be Saturday.  There was an art walk taking place and several weddings but that is the way it goes.

These gardens are always wonderful.  The temperature was around 21c which made it shirt sleeve weather.  I brought myself a snack for halfway through.  I met neighbours on  my way out so I was later than I had planned.  I arrived around 10:20 am and left shortly after 2pm. 

There is the Kurimoto Japanese Garden, the AGA Khan Garden, Indigenous Garden,  and much more.

There are domes set up which I expect have been there since they reopened during COVID.  The Gift Shop is gone and the butterflies in the Tropical Showhouse are also gone.  I had a wonderful day with tons of photos some of which will likely end up in my annual photo calendar.

The Alchemist by Paulo Coelho was a great read.  A short book filled with adventures.

"To realize one's destiny in a person's only obligation - the Alchemist"

I think with Mom and Dad now gone I am having to redefine the parts of my life that they occupied.  Feeling a little adrift and looking for ways to find a new path.


While on a visit to my sister's house recently we walked down the block to a garage sale.

I purchased this cutie and my sister gave me the stick he sits on.  I used a Zot to hold him in place.

He resides on the table for now.


In the Shadow of Croft Towers by Abigail Wilson was a great historical novel.  Sybil Delafield is hired to be a companion to an elderly lady.  The coach she is travelling in is robbed before she arrives. She is asked to deliver communications in the form of letters to folks in the town but to be sure no one else knows.  

When fellow passengers of the robbed coach are later murdered, Sybil’s hunt for the truth takes on a new urgency. The only person she can rely on is Mr. Sinclair, Mrs. Chalcroft’s godson, but under all his charms he too leads a double life. Sybil must decide if he is the one honest voice she can trust, or if he is simply using her for his own advances.

Croft Towers holds more than its share of secrets . . . and Sybil is determined to uncover them all.

Enjoyed this one immensely.

I had been on the hunt for a flower vase for the table.  

The one I had been using for years was a floral shop clear with swirls on the sides.

I have looked a lot of them and I was quite sure I wanted a clear cut glass one with a bit of personality.  Crystal would be nice.

Then, I found this art glass one.  Look at the ribbon of honey colored glass around it's middle.  It was perfect. Tall enough for bouquet of flowers, heavy enough to stay up right, the bubbles in the glass disguise the stems to some degree and the band of yellow glass was the icing on the cake.

I have decided to buy myself flowers so that I can have flowers on the table like Mom did.  I don't have a garden and not enough sun on the balcony to grow them.  Beautiful.


Susannah's Garden by Debbie Macomber.   Debbie has become an author I can rely on for a good read.

This one started pretty slow with Susannah having marriage problems and what was she going to do.  She is at a cross roads and where will life lead her.

The year Susannah Nelson turned eighteen changed everything: her boyfriend, Jake, left her unexpectedly, and her brother died in a car accident months later.

At fifty, Susannah finds herself regretting the paths not taken. Long married, a mother and a teacher, she should be happy. But she feels there’s something missing in her life, although she doesn’t know exactly what. Not only that, she’s balancing the demands of a temperamental twenty-year-old daughter and an aging mother who now needs her help.

When Susannah goes home to Colville, Washington, to look after her mother, she decides to try to find out what happened to Jake all those years ago. In returning to her parents’ house, her girlhood friends and the garden she’s always loved, Susannah also returns to the past—and the choices she made back then.

I recently purchased this Rooibos Lemon Cream tea.  This is my first time tasting it.

It is delicious and the fact that it is rooibos makes it caffeine free is a bonus.

Check out the color of this tea!  

It just picks up my mood to see this gorgeous deep yellow color in a pitcher.


Friday, July 28, 2023

Sewing Project - Pinafore Jumper

I had a desire to make a summer jumper.  This is very unusual for me but I said to myself - okay.

The pattern was based on Cross Back Apron I made a few years ago.  

It hangs on your body from the shoulders and is easy to sew and easy to wear.  It just slips over your head and it adjusts to size very nicely.

I still had this apron so I chose that as the basis of my new project.

I had some purple fabric that I was going to use for the outer layer.

After some thought and discussion I decided to use microfiber for the lining.  It would be slippery, dark and make the garment not see through.

It was a deep purple color so fortunately it would be okay with the fabric I had chosen.

I decided to make the lining  my pattern since I had lots of that fabric and could cut another if I needed to.


Since the apron did not meet in the back I knew I would have to add some including a seam allowance for the back seam.

Top Left - I added a wedge in the front by leaving the top on the fold and added a good amount in the front and some to the length too.

Back - I added several inches - this would fall about mid back for me.

Back - I then kept the angle down to the bottom hem area and added length.

Front Bib - Added just a bit for a seam allowance.

I sewed the back seam and then "tried it on" to see if it was going to be big enough and not too tight.  It seemed pretty good.  I did cut a piece of brown paper as a pattern.

I had to change my mind about the outer fabric because the width of the first fabric was not wide enough.  I chose a tie dyed white cotton from a duvet cover I bought for the fabric.  That was plenty wide enough to cut the piece.  I tried to keep the colors to the purple and turquoises in this fabric.  You can see some pink/coral on the straps and some at the very back.  It would be okay with the purple lining fabric, too.

I then sewed the back seam.  I then placed the 2 layers right sides together and sewed the top seam around the bib and across the back and back up the side of the bib.  I then turned the garment right side out and ironed it and top stitched. 

The straps were cut 3 inches wide, sewn and then ironed with the seam down the middle of the back side of the strap.  I top stitched both side of those.  I then sewed one end of each strap to the corners of the bib. 

Then I started figuring out where the straps should cross and where the other ends of the straps should be sewn to the back to hang properly.  Once pinned I sewed those in place with a square with back stitching.  I then folded it in half front wise and evened out the bottom edge and then folded it the other way and did a bit more adjustment. The bottom hem is .5 fold over then 1" hem sewn by machine.

It turned out nice but I felt it was a bit on the light color for me so I had a discussion with my sister about dying it.  I had purchased Rit Dye in Teal which is a hot water process.  I did not have what I needed to do hot water so I took the Dylon fabric dye she had in Sea Green.

With the cold water process the dye gets dissolved in hot tap water and the same with the salt. These are then added to the water in the plastic pail which is enough to cover the garment. 

The garment is wet before putting it into the dye bath and then it has to be stirred constantly for 30 minutes and then regularly for the next hour. I did it every 15 minutes.  Then the garment is rinsed until the water runs clear.  I did this in the white bathtub and that took 5 times.  I did dye some of my white flannel for unPaperTowels with the left over dye.  Once that was rinsed as well I just ran a small  regular load of laundry.

Here's the final pics.  It did even out the background so that is a good thing.  I was expecting to get more color than I got with this process.  I expect that a cold process may produce lighter results, maybe the color was supposed to this light but the water still had color in it.

Pockets - I am glad to have added the narrow strip on the slant of the pockets.  I did have to move them up about 3 inches and I forced myself to do right away otherwise it would have been frustrating to use them.

It was a great project.

It will go faster the next time as this was a learning process for making the pattern and the dyeing process.


Monday, July 24, 2023

Sylvia`s Simple Shots

This book - Fingal O`Reilly, Irish Doctor by Patrick Taylor was another wonderful visit with these characters.

It was very interesting to learn about his early years as a medical doctor.  His passion for his patients was there from the beginning.

Switching back and forth between now being a newly wed having married Kitty his first love. Adjusting to life at Number One with 2 women in the house - Kinky and Kitty.

I always love reading these books.


I found a few Tinker Toys at the thrift store this week.  We had a set when I grew up and played with them a lot.

I bought them for sentimental value.  They did not come in this wonderful tin.

I expect they may come in handy for constructing structures in the future how knows.

I have a good number of long, medium and short pieces as well as quite a few wheels.


Sunday, July 23, 2023

Fairy Light Memento

After Mom's Funeral in April and the internment of both Mom and Dad I felt a need to have a memento to remind me of their love, commitment and my gratitude for having them in my life for over 60 years.

I love glass and have enjoyed looking at vintage, crystal and depression glass on several You Tube channels. 

I decided that I wanted a Fairy Light as my memento.  I could light it when I wanted comfort and a tangible reminder of them.  The vintage ones are hard to find and very expensive. Contemporary examples are more reasonably price.  One of them is by Fifth Avenue Crystal and those still were running about $100 on line which I was not prepared to do the online thing. I could not find anything in my area on Kijiji so I put out the word what I was looking for as most folks did not know.

About mid May I got a call from one of my sisters that she had found a Fifth Avenue one for $30.00 on Facebook. I said YES!  She was kind enough to pick it for me.  Towards the end of May I was able to collect it from her house but with the craziness going at my house it stayed in the box for a while longer.

I did start my plans for how I wanted to decorate it and light it.

This some pictures from on line because I did not take pics of mine before I started.

As you can see the base where the tealight would sit is not flat so I needed something to fill in that space and allow my tealight to sit nicely and safely.  I looked at several ideas for something small and clear like vase filler or seed beads.  Vase filler was going to be way more than I needed and clear sead beads with out silver lining were not available.  Durign the few days I spent with my sister in late June we visited a Dollarama and I found these.
These clear plastic diamonds were small enough to fill in the space, they were clear and the price was right.

Once I was home, I poured the bag of the smallest diamonds in the base and then set the clear plastic tealight holder on top.

It was perfect. They filled the cavity below the tealight exactly the way I needed.

The bottom right hand photo is seeing the candle wax completely melted in the clear plastic tealight holder and you can see the diamonds below.

There is the risk of spilling the diamonds out of the base as they are just sitting there but that is okay.

I knew I wanted green and blue glass beads so the light would go through them.  Dad's favorite shirts which Mom made for him were forest green and Mom's favorite color was blue.  Not cobalt but a true blue.

The Fairy Light offered 2 places to put some sort of decoration.  The indent on the shade and the one just above the base.

Here's my first attempt with EBeads on the base.  It's hard to tell in this photo but we received a small locket at the funeral.  We cleared Mom's stuff at Easter and we had slated her clothes to be donated. When the time came my sister could not send Mom's favorite dress to the thrift store and she decided to make it into mememtos for the kids and grandkids.  She put a small piece in the lockets for the boys and the girls received a scarf from the fabric.

The locket is still a memento from both Mom and Dad.

During this time my mind was working on what to buy for beads.  I did enjoy the Fairy Light a few times lit late at night.  

As you can see in the above photo only the shade is lit with the tealight at the top of the base.  I made the decision a few years ago to limit my use of real candles and switched to wax for scent.  I do have a few real tealight candles because sometimes in photography nothing but a real flame will do.

The thought crossed my mind that if I could find a light which the Fairy Light could be placed on then it would not be fire and the base would be lit as well.  

The brainstorming began.  I have an etched crystal block which has a LED light in the base which lights it up. Okay, that one has several colors of lights that rotate through - red, green, yellow and blue I think.  Well I knew I did not want colored lights. Now, I want a white LED light round base.  I put that into Google and stuff came up. They do sell LED light bases for crystal and glass figurines, etched glass items, and gemstones etc.  Again, none easily available in retail stores in my area. But I persisted!  Eventually, I found round puck light which can be placed under your upper cabinets.  They are battery operated and light when you press the center of the puck. I brought a tracing of the Fairy Light base with me to make sure that it would stand safely on this puck. I was a the big orange store which on line indicated there was 16 in stock.  After asking several customer service reps for assistance I received what I needed. A couple of guys checked the inventory and sure enough there was supposed to be some in stock.  A sharped eyed young man said there the right number on that box way up there! Up they went and brought down the box, I check the diameter against my tracing and walked out of there with 3 for less that $20 and the AAA batteries were included.

This is starting to fall into place.  Beads are next.

I decided that Michaels would by my starting place for beads.  The day I was there the shelves were mostly empty.  Supply chain issues? I don't know. I found some green faceted beads in the size that would work but no blue ones.  Another girl in the aisle said she was going to visit a Michaels in a city south of ours as there were fewer customers there and hoped the selection would be better.  After giving that some thought I decided to follow here lead.  Into the car and headed south on the big highway.


Sure enough, there was the same green ones in the the 4 different sizes and cobalt blue ones in the 8mm size which were on sale! One of the green strings was 8mm. Perfect.  They were faceted.

I used strong beading cord left over from my Christmas tree project

I placed the green and blue glass faceted beads alternating the colors until I had enough to go around the shoulder of the shade.  I tied my knot then added a few more for dangles.  I added an EBead and a silver crimp bead at the end to keep the beads in place.
 

I chose to use silver lined EBeads for the string of beads on the base of the Fairy Light. Again, I chose deep green and cobalt blue for color. I tied the cord tight with 3 knots.

I added the hinged locket on the string and let it sit over the knots.  That worked out really nice.

One of my sisters had the lockets in her stash of craft stuff and brought them with her.  It was great to be able to have something from that day.

As you can see it is hinged so I may put a bit of Mom's dress in it.


I am so happy with how this project turned out. It took almost 3 months for all the pieces to come together but it is so gorgeous.  I will enjoy it for years to come.

I love you Mom and Dad!

Saturday, July 22, 2023

Sylvia's Simple Shots

I finally found American White Pelicans at Beaumaris Lake.  There were at least a dozen in a couple of groups. 

They were getting along with the Canada Geese which there were somewhere around 50 of them on the water.  Thanks goodness it is a big pond.

I enjoyed an evening walk instead of my usual early morning walk. I walked from 8 to 9 pm.  It was a very nice temperature so there were loads of people on the path.

This shot was great because the reflection of the main pelican is good and you can see the reflection of the one next to him and the orange tip of its bill. The light is really good.  

The field blueberries were on sale this week.  My sister and I have been on the look out. She had often found them in her neck of the woods but with a call the regular supplier no they did not get any this year.

She called to say that one of the large supermarkets had them on sale.  I had my supper and headed out in hopes that there was supply on the shelf.  There was!

I bought enough to put 5 regular bags in the freezer and eat some fresh for a few days.

Thanks sister!

I am working on a bit of an update on the living room.

Now that I have another chair added to the mix I thought the rocking chair at minimum needed a wash and the buttons replaced.

I purchased the chair second hand back in 2016.  I had washed the covers then and as you can see it is white.

I gave it the covers a good scrub and a bit of bleach on the stains and it turned out really well.

I search my stash for buttons and choose these shell button which have a grey undertone.

It is nice to have that project done.

I am working of new cushions for the living room.  Trying to work in the ivory, deep moss green and the yellow chair colors along with the navy on the dining room table which sits in front of the balcony window.

A solution appeared!

I dropped the car at the dealership for its regular maintenance and I headed out to Fabricland to get thread and zippers for cushions I had planned.  I had purchased several different fabrics that I thought would work for the new green chair. Well, check out this upholstery fabric I found at the fabric store. It includes all the colors I would have wanted - grey, mustard, ivory, navy, warm green, and yellow in a heavier synthetic fabric. It will match all the chairs, include the navy, will last longer than cotton, and it was on sale for $5 a meter.  

I said YES!
 
I dropped off a bag of blankets to the rep for  Project Linus.  The blankets were made my 2 of my sisters.  I have not gotten back to making quilts as most of my fabric is still in storage and I believe will remain there for another while.

It was great to connect with this lady that I have been meeting for the last 5 years at least.

Project Linus provides blankets to people in emergency situations.  They are handed out by paramedics, police officers and fire fighters.  Those who need them get to keep them.


The book this week was T is for Trepass by Sue Grafton.  It was nice to have a visit with Kinsey Milhone again.  This story deals with a vulnerable senior who needs help after a fall.  There is no close family and a couple of the neighbours care but are not family. 

Someone is hired to provide care for Gus who lives next door to Kinsey and Henry Pitt.  He is known to be testy with the neighborhood kids and all around grumpy old man.  Solana Rojas was hired and Kinsey was asked as a private investigator to check out her references for the family.  Just the basics was requested.

Solana is a career criminal and has stolen an identity to get this work.  She is treating Gus very badly and has started liquidating his assets. She is restricting the neighbour's access to visit.  Kinsey is getting suspicious and eventually takes action to rescue Gus from his caregiver and saves his life.

I have to say having had ailing parents this story hit too close to home at the beginning of the story.  Generally, Kinsey deals with murders which is much removed from my world and is easier to accept in a fictional text.

My aunt invited me over to watch te movie, Avatar - The Way of Water.  We had stir fry for supper with blueberries and raspberries with yogurt for dessert. Yummy! A walk through her garden before we settled down for the movie. Only then did we discover it was over 3 hours long. It going to be a late drive home.

I watched the first movie (2009) - Avatar as soon as it came to theaters in my area. On a big screen with friends it was really great.

In this movie I found the war outweighed the family dynamics and values of the movie.  It is set up to have a third movie and I am not sure that I would watch the next one because it will be all out war.

It was a beautiful movie to watch!

Thursday, July 20, 2023

Set of Cards

I made a set of cards with one single sheet of designer paper.  The design is by graphic45 - Couture Collection - Gorgeous - I agree it is a beautiful floral paper. Rich colors and a dramatic black background.  This paper measures 12x12 inches. Cutting 4 inch strips I ended up with 6 pieces for A2 cards. With the direction of the design all the cards were created in the portrait orientation.

Next I selected card bases for these cards.  With the colors in the paper there was lots to choose from.  Finally, I chose Old Olive, Lost Lagoon, and Dusty Durango.

For card 1 I cut the layer down from the top and flipped the piece to show off the blue striped backside. I then added a strip of orange card stock across the split.

I added a Decorative Label greeting mounted with 3D foam tape. A white quarter sheet insert finished the card.

For card 2 I did the same layout but put the stripes on the bottom this time.  I laid a length of So Saffron ribbon across the split.

The base this time is Lost Lagoon.

I layered silk flowers in warm tones and a small gold sequin onto a tiny black brad to create the floral accent which I mounted on the bottom left hand side.  The brad was pushed through the designer paper keeping all layers together.

This layer was then adhered to the card front with double sided tape.

A white quarter sheet insert was added.
This is card 3.

Here I split the layer top to bottom instead of side to side. Once split I flipped the small piece and taped back the designer paper so I could handle it as a full piece.

I added a length of Apricot Appeal grosgrain ribbon over the split and taped the ends to the back.

I added a Dusty Durango butterfly accent on the bottom right side.  The butterfly was cut with the Sizzix Winged Beauties thin dies.  I used my steel plate to ensure all the tiny spaces were well cut. I wrapped black thread around the body of the butterfly and left the ends to be the antennae.  Adhered with double sided tape.

Quarter sheet insert completed the card.


Card 4 has an Old Olive card base.  

The designer paper was left at 4.00 x 5.25 inches.  

I wrapped a length of Baja Breeze ribbon across the middle and taped the ends to the back.  

I added a Artisan Label greeting with black letters which was adhered with 3 D foam tape over top of the ribbon on the right hand side.

A quarter sheet white insert completed the card.


Card 5 is similar to card three.

This time the ribbon is So Saffron which is wrapped over the designer paper top to the bottom with the ends taped to the back of the layer.

I added some Candy Dots to the left of the ribbon in pink tones to coordinate with the large flower near the bottom of the card.

A white quarter sheet insert on the inside.


Card 6 repeats the lay out of the DSP split with the striped paper on the bottom.  

A length of wide Tango Tangerine ribbon across the split with ends taped to the back.

I found 2 tiny turquoise blue buttons in my stash.  They are adhered to the ribbon with Bling Zots.

A white insert on the inside.

This makes a nice set of card with enough variety to be interesting.  Versatile in that some have greetings and others are left blank to used for any occasion.

Happy with this set which will given as a gift.

Wednesday, July 19, 2023

Birthday Cards

My Final July birthday for my niece's husband.  He celebrates the same day as Mom did when she was with us.

I chose a SU Crumb Cake A2 card base. 

I added two pieces of designer paper which measure 3 inches square. I chose coordinating designs and adhered one top left and other bottom right. 

I added an oval Kraft tag with jute tie.  To that I added a oval greeting with burgundy letters. 

I added a large sequin and gold glitter star brad in the bottom left hand corner of the greeting. It was adhered to the front of the card with 3D foam tape.

A white insert was added to the inside of the card.

This card is for one of my sister that celebrates early August so it needs to get into the mail now.

I used SU textured Lovely Lilac as the card base.

I cut a tag from Handsome Hunter card stock with the Sizzix Tag die. I embossed the bottom end of the tag with the SU Script embossing folder.

I added a piece of vellum to provide a base for the tag with judiciously placed tape.  I adhered the tag in the top right hand corner.

I added a Decorative Label greeting printed in Lovely Lilac in the top left corner adhered with 3D foam tape.  White insert in the landscape card.

Tuesday, July 18, 2023

Exchange Cards - Purple Flowers

My cards for my exchange group are ready.

This month I chose purple/blue flowers for the cards.

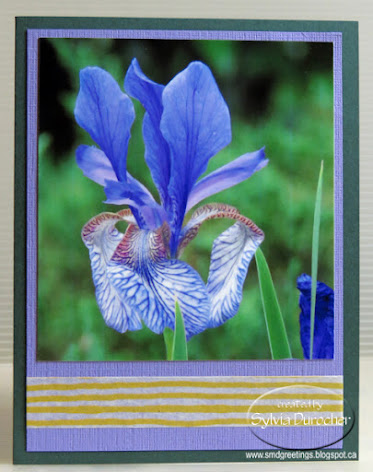
The first card is a photo of a blue iris.

I trimmed the photo to make it skinnier and  mounted it onto a piece of Lovely Lilac textured card stock. 

I added a length of yellow striped SU designer Washi Tape below the photo.

This layer was adhered to the front of a SU Handsome Hunter A2 card base in the portrait orientation.

A white quarter sheet insert was added to the inside of the card.


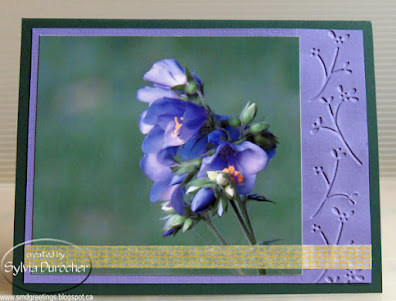
The second card features a photo of Jacob's Ladder taken at the Botanic Park.

The 4x4 photo was trimmed at the top to fit the Lovely Lilac layer.  The lilac layer is textured card stock from Stampin Up and was embossed with a border folder.

I chose a yellow SU Washi Tape with a plaid pattern to place below the flower.  I had to trim it in half so it would not interfere with the flower.

White quarter sheet insert.

Wednesday, July 12, 2023

Belated Birthday

I made this card for a friend whose birthday was in April but I just lost track of it.  

She is here visiting so I will give it to her at supper tonight.

Card base is A2 in Rich Razzleberry with a top fold.

I cut another piece from my larger watercolor paper piece and chose this blue purple section. I cut a Stampin Up Top Note die.

I added a length of Elegant Eggplant grosgrain ribbon wrapped top to bottom on Top Note die and held it in place with a crystal large brad.

I cut large flower in Elegant Eggplant and smaller one in Not Quite Navy and added a small silk all held with a silver mini brad.  The flowers are Tim Holtz - Tattered Flowers.

White insert quarter sheet on the inside.

Thursday, July 6, 2023

Cards - July Birthdays

 This is a birthday card for my sister who celebrates a birthday this month.

I chose a piece of watercolor paper I colored up a while back with playing with my Stampin Up Watercolor Wonder Crayons.  It was 9x12 inches.  I chose to cut it with the Tim Holtz Vintage Cabinet Card.  I mounted a layer of silk flowers filling in the top half circle of the die cut. I chose a large oen with warm toned ends, then a pink organza one and then a small ivory one all held in place with a gold mini brad.

I added a pink Modern Label punchie topped with a Word Window punchie with the greeting.  This was adhered below the flower on the diecut with 3D foam tape.

The diecut was adhered to the Lucky Limeade green A2 card base.

A white quarter sheet insert was added to the inside.

With the other half of the watercolor sheet I cut a Tim Holtz Cameo Frame. 

I chose to highlight the bit of yellow towards the bottom of the diecut and so cut big H and B with the Stampin Up Typeset Alphebet dies in Crushed Curry.

I traced the rest of the words with a More Mustard marker.

I added 2 gold glitter star brads to the left of the B.  The diecut was then adhered to the Lucky Limeade card front of with 3D foam tape.

A white quarter sheet insert was added.

This is for my nephew whose birthday has already passed but that's okay I was in touch by email.

Wednesday, July 5, 2023

Die - Decluttering and New Work Station

 All my die cutting stuff has been in storage for a year and half.  I knew that I wanted to get rid of a lot of them so I decided to unpack the 10 boxes and make the hard decisions.

My sister helped me as she was going to chose from what was left and was willing to liquidate the rest.

I brought 4 boxes home out of 10 which was really good.  I had worked out how I was going to set up the station when I got home.  I set up the shelving unit on July 1st. 

We had scoped out some clear containers at Dollarama while I was at her house. Once I looked at what I had brought home and purchased a few more.  These were all original thick dies so they are really heavy for plastic containers.

The containers had feet and the shelving has gaps between the boards so I needed something to on the shelf to allow the containers to slide.  

I dug into my plastic placemat stash which were just the right depth so I needed 2 to make it wide enough for the shelf.  I used clear packing tape to join them and that solved that situation.  The placemats sometimes have textured surfaces so I had to turn them upside down so the smooth side was facing up.


I had to do the same thing for the diecutting shelf where I was putting my Big Kick machine.  I used some wonderful yellow striped ones and again taped them together. The machine has feet which may be a problem with the gaps and I don't what to lose small pieces of paper in the gaps.

There is lots of room on the shelf for my work light, a small garbage can, and a wooden box that holds my spacers and cutting plates.  These need to be close at hand everything I cut something.

I love the yellow stripes on the work surface.


Generally, the thick dies in either original or Bigz size fit in old style CD storage containers.  I had these wooden storage boxes from IKEA and the dies fit in perfectly. Luckily most of them were empty so that was a win.

I have not labeled all the drawers yet but I will. One drawer contains the amount of embossing folders I kept.

The wood boxes are much sturdier than plastic but I still have to be careful  I used to store dies in plastic pop crates which were very sturdy.


The red drawers will hold thin dies which are stored in CD cases.  Those have not been unpacked yet.

The black case was designed for the Sizzix original dies so that is where they are stored.  I have a really hard time using stuff I can't see so I may have to put die cuts on card board and hang them in the space to at least remind me what I have.

The second shelf has the small yellow and green dies and sizzlets, and movers and shaper dies in clear containers.

I am using this translucent corrugated plastic sheet from IKEA on my die cutting work shelf to provide a neutral background for taking photos of my cards for my blog.

The plastic is stored on the top shelf above the red wicker baskets when not in use.

Here you can see my grey IKEA lamp in it's super heavy white base which sits on the left.  The shelf is by a window but there will be times that I need a light to work.

The wood shelf is from IKEA as well is was called STEN when I bought it 20 years ago.  The shelves are 11 inches deep and about 33 inches wide.  With the cross brace on the back it make for a very stable work surface.  Strong enough to hold the weight involved with storing these dies.
Here's my die cutting work station.  There is still some space on the bottom shelf which I am not planning on filling.

It works really well and I am so happy to have it back.  It may have to be dismantled if I move this year but at least is way more manageable.  Now it lives in the craft space which is wonderful.

The dies I did not keep were gone through by my sister, then my niece and the rest will go to my sister who runs a daycare.  There are about 30 dies going to her.

They will have good homes and I have just so much less to manage.  Many dies I had purchased when I was running card  making classes and card club.  Many suited that situation but I no longer need them as I don't do classes anymore.  I am retired.