Sunday, March 31, 2019

Photo Blogging - Six

I have been chasing large plastic poker chips.

My niece is planning a girl guide project in June and put the call out for poker chips to be used as tokens in the camp.

I have found quite a few stashes of these for good prices.  My sister is also on the hunt.

We need 1500 chips and we are over 1000 so we certainly get what she needs before the deadline.

This traditional game pieces are being dumped as people go to digital entertainment.


Spring has arrived.

I have 6 new leaves on my African Violet plant as the light outside becomes brighter and longer

I love the contrast of the green against the red stems.

The leaves have not developed their fuzzy surfaces yet.

I see little flower buds in the back there so maybe I will soon have purple flowers on this plant.


I found some silicone muffin liners for this very old pan I inherited from my Mom.  I had not used it because I was sure what I would put into the cups would stick.

It is a mini muffin tin with 16 cups.

Love the colors in this set of liners.  I think they were a Halloween collection.

Now I could make some mini muffins which will certainly come out easily.


I found a cobalt blue tea bag holder to join my collection which now makes it at 6.

Unfortunately, they will not all sit in the holder.

It will certainly work very well with my Blue Nordic dishes.


Here are six props I bought in recent days for my macro photography.

I love the small elephant with a great red oriental bead.
Three filigree metal work beads.
A blown glass heart which was a drink marker.
The turquoise star was an earring.  The plastic circle is a cabinet door knob.
The gold Japanese fan is a jewellery piece as well.  It actually opens and closes.

I am joining the Photo Blogging Challenge - March 2019 - Six hosted by Lil HooHaa.

Saturday, March 30, 2019

Juried Member Show - Accepted Submissions & Winner

These 2 photographs were accepted into the show.  The reception was held today.

Silver Roaster
15 x 15 inch frame
Double White mat
8 x 8 inch Color photo

This photo was taken at an antique mall in town. It is a stainless steel car book end. Again, taken for a Flickr Challenge of circles.  The circle of headlight, wheel, and wheel reflection.

It was a Winner!  I received the third prize ribbon and some cash.


Who Are You?
14 x 14 inch frame
Black mat
6 x 6 inch Color photo

This photo was taken at the John Poole Wetlands in Sturgeon County. It is a Wilson Snipe.  He just looked at me while I took many photos.  It was in the setting sun golden hour and the light was wonderful.  It was a great experience.

I was so happy that I bought the camera with a great zoom.

The reception was great. 


Friday, March 29, 2019

R2Go Stack Kit - Custom

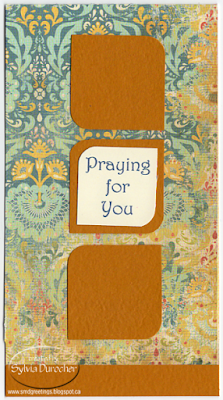
I had a request for a custom Ready 2 Go Stack Kit.  She wanted the greetings to be about praying.

I chose to used No.8 envelopes with double sided designer card stock.  The 12x12 was cut 3 3/8 inch wide and 12 inch tall.  I then scored the fold at 6.25 inches. I added a 1/2 inch strip of black card stock at the bottom.  The easiest way to do that is to tape a strip bigger than what you need along the edge with invisible tape.  Then trim all 3 sides with the paper trimmer.

To repeat the black I cut a scallop border in black as well which I glued along the top edge and again trimmed on the left and right sides with scissors. 

The vellum greetings are 2 x 4.25 inches.  Color printed in black and clear embossed.  It this then adhered aligned with the top of the card and centered.  The scallop border is then adhered on top of that aligned with the top.

A white insert is added for the giver's personal message.

The paper is by The Girls' Paperie - Jubilee - Carousel.

This time I cut the paper the same way.  I scored it at 2 inches then from there 6.25 inches. This creates a gatefold card with the opening in the middle.

I added an Espresso brown strip of card stock along the edge and taped it down.  This one is wider than the .5 inch needed so it over laps onto the flap on the right.

I created greetings on stone colored paper which would work both pieces of designer paper I chose.  The letters are the dark brown of the small strip.  They are cut to 2" square.  It was adhered centered on the brown strip but with double sided tape only on the left hand side.

The paper is by Carta Bella - Beautiful Moments - Beautiful Banner Paper.  The other paper also had horizontal lines going across the card.

Another portrait tall card.  You have to be careful when folding designer paper because it has a white core and if the paper fibers are not well scored they will crease and expose the core which does not look great.  I ran my tool along the score line from both sides to stretch and soften the fibers.  Works well.

I added a half inch strip of coordinating ginger card stock along the bottom again attached with invisible tape. 

With the same card stock I punched the squares with the Creative Memories Double Square punch which does 1.5 and 1.25 inch squares which layer well.  The solid card stock is the larger and the greeting is the smaller. I used my corner rounder punch to do 2 of the corners. I adhered 3 squares aligned down the center of the card.

The greeting was printed in blue on ivory card stock, punched and corner rounded.  It was adhered to the center square. 

The paper is by Carta Bella - Traditions - Antique Damask. The other designer is very similar in pattern and color.

Thursday, March 28, 2019

R2Go All Occasion Stack Kit

I had the daughter of a friend request some card kits as an activity for the women's group she runs in Ontario. She is here visiting her Mom for a couple of weeks. I jumped at the chance!

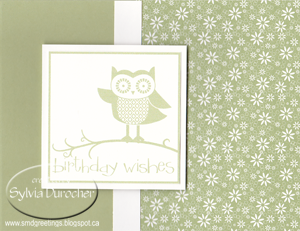
These are coordinated printed card stock with stripes and daisies.  They were corner rounded 4 inch squares. 

I cut the striped one in half and adhered one half aligned to the top and bottom edge of the card leaving a small border.

I wrapped a piece of white satin ribbon around the daisy layer, knotted it to the front and trimmed the ends.  It was adhered to the card front with 4 pieces of 3D foam tape.

I adhered a Stampin Up Modern Label white greeting  in the top left hand corner of the daisy layer. 

The card has a quarter sheet blank insert glued to the inside.

I have not used the following layout for quite a while.

I cut 12x12 designer paper into 6 inch squares.  I then cut the paper with my Creative Memories cutter on the largest circle with the red knife.  This is just under 6 inch circle.  These were then cut in half.

The paper shown here is by Making Memories - Animal Crackers - Jack Vanishing Dots.  I chose coordinating card stock in several colors for the kit. I adhered the half circle along the fold and trimmed the excess on the right and left card edges.

I added a black seam binding ribbon tied along the fold and trimmed the ends.  I then added 3 black sequins on the right hand side adhered with Bling Zots.

Of course, I turned to the old stand by - the DSP Split.

The designer paper was cut to  4.00 x 5.25 inches then cut again at 3.5 inches.  The small piece was turned over and aligned to the larger piece. These  taped on the back together to create a full layer. 

The paper shown here is by We R Memory Keepers - Wildflower - Botanical.   I just love this paper.  I provide a variety of paper and card stock in this kit.

I aligned the Espresso color grosgrain ribbon across the join and taped the ends to the back of the designer paper layer.  This layer was then adhered to the card front.

I color printed some greetings and punched them with the Stampin Up Artisan Label.  It was adhered to the card front over the ribbon with 3D foam tape.

I started with the label cut with the Tim Holtz Cameo Frame die.  I used a variety of designer paper for the labels.

The card bases are all white card stock.

I then cut a large card stock flower with the Sizzix Flowers & Leaves die.  I chose the color based on the color of the label. 

I added a large & small silk flowers in white with a white flower sequin on a white brad.  Using a push pin to make a hole in the designer paper I then pushed the prongs through and push them apart on the back.  The label was then adhered to the card front.

I added the color printed greeting punched with the Stampin Up Artisan Label punch.  It is adhered to the card front below the flower with 3D foam tape.

I have included the card samples so she had teach the class with something to show the ladies participating.

Wednesday, March 27, 2019

Sympathy Card - Photo

I am sending this photo card to my aunt who recently lost a friend.  They share mutual interests and were walking buddies.

The friend she met in the last few years and was much too young to pass away.

This is a petrified wood tree trunk taken at the Royal Alberta Museum.  I love the colors in this image with the off center focal point.  As you can see by the number of rings it was a very old tree.


Tuesday, March 26, 2019

Card Making Session - Art Cards with Pencil Crayons

I have been getting together with a friend to make cards once a month. My regular card club has been cancelled due to lack of participation.

I worked on Art Cards which needed to be colored.  I chose color pencils this time instead of watercolor and the water brush which I used last time.

I selected some blues and purples for this card. 

The greetings were printed in black on vellum and clear embossed with clear powder.  They were wrapped across the paint brush layer and the ends were folded to the back.  This layer was adhered to the front of a black card.

Tiny black brads were then placed on either side of the greeting through holes made with a push pin.  The prongs were press apart on the inside of the card.

I placed a blank white insert in the inside of the card.

The 3 designs and greetings are part of a greeting card gift set which will be donated to a fundraiser
at the end of April.


Shared Birthday Card order

I had a request from a friend for a spring looking card for her aunt who shares her birth date with my friend.

I chose to recycle a commercial card featuring Goldfinches. I trimmed it so that there was an even border on a 5x7 A7 large card.

I added a purple layer which was cut into 2 triangles which were adhered in the bottom left and top right corners.

I printed the aunt words onto the same card stock as the card and punched it with the Stampin Up Modern Label punch.  It was adhered to the top left hand corner with 3D foam tape.  I added the rest of the sentiment to the insert on this inside of the card.

Iridescent sequins were added to the card front with Bling Zots.

Monday, March 25, 2019

Sympathy Card

I made this card for my friend who lost her Dad a week ago. 

I have recycled a commercial card front into this 5x7 A7 large card. 

I trimmed the commercial card on both sides.  I trimmed extra on the right because there was some pink which I wanted to remove. With only the purple left I chose a purple card to coordinate. Purple is her favorite color so that should be appreciated.

Now I had to add a bit of cardstock on the right to make an even border.  I cut a strip from the back of the card and cut it with my Deckle Edge scissors. I taped the edge to the straight edge with tape.   I added a length of purple satin ribbon over the join and tape the ends to the back of the layer.  It was adhered to the card front.

I added iridescent sequins to the card front with Bling Zots. It will be on it's way tomorrow.

Saturday, March 23, 2019

AAC Juried Members Show submissions

I brought 3 photos to be juried today.  I dropped them off this morning and I returned to the gallery after 3pm anxious to see which one(s) were selected.  We were guaranteed at least one would be entered into the competiton.

I had 2 photo accepted into the show!  Not what I was expecting at all. I have posted the one one here.

I will reveal those selected on reception day, March 30th! Check back then.


Here's the one left on the table and not destined for the wall at the gallery.

Juxtaposition
13.5 x 17.5 inch frame
8 x 12 Color photo

This photo was taken down town last summer for a challenge on Flickr.

The front building is the Canadian Imperial Bank of Commerce which was built in 1919 in the late Renaissance Revival style. The building behind is one of the Scotia Place towers built in 1983 which has a glass facade.

I found the contrast of these two buildings interesting in several ways.
  • The building styles 
  • Material stone vs glass
  • Eras 1919 vs 1983

Thursday, March 21, 2019

Welcome to my Kitchen

This morning was the get together of our women's fellowship group - Welcome to my Kitchen. 

I was on snacks along with another lady.  I made Orange Cranberry Bran muffins which disappeared quickly.  I brought yogurt and some cheese cubes.  Veggie straws and fresh fruit were also included.

I enjoyed a big mug of tea.  Many enjoyed hot coffee.  The table was over flowing with food and folks. 

It was a very good morning. 

Devotions focused on "We are unique and God's handiwork." 

Prayer time had many health concerns.

Books were swapped and many went home with new reads for the month. 

Good conversations took place. 

Tuesday, March 19, 2019

Ready2Go Christmas Stack Kit - Blue & Cream Dove and Peace on Earth

I worked on a Christmas Stack kit in case someone wants to get a head start on those cards.

The image is a recycled Christmas card featuring navy, light blue and cream.

I added a light blue layer of card stock to repeat that color which was cut to 4 x 5.25 inches leaving a small border.

I chose a cream card in the tall orientation.

These layers were all adhered to the card front with the light blue first and the dove next.

I created a greeting with the Stampin Up Artisan Label punch.  I used the navy and light blue in teh greeting, color printed it and then punched it out.

It was adhered to the card front with 3D foram tape aligned on the dark/light line on the dove layer. 


This is another recycled Christmas card layer. 

I cut the black layer to 4 x 5.25 inches leaving a small border of card base showing.

I chose Kraft card stock to repeat the kraft colored swirls on the right hand side.

The Peace on Earth layer was adhered to the black layer then I used 3 round tiny brads in the top left, bottom left and bottom right corners.  A push pin was used to make the holes before the brad was inserted.  I selected 3 of the dots in the design for the star brads.

The 3D foam tape was cut in 4 pieces and placed on the 4 corners of the black layer.  It was then adhered to the front of the card.

A quarter sheet insert was used in these cards.

Loving how this one came together.

2019 Cardmaking - CH - Class 3

Another session of card making at Compassion House tonight

These cards are designed with the One Sheet Wonder design which makes efficient use of designer paper.  This my OSW1 layout design for 6x6 inch paper.

The designer paper is Stampin Up  Print Pattern in Ruby Red with the matching card stock.  The piece of designer paper is adhered to the right hand side of a wide card. The strip of solid card stock is glued over the left hand edge of the designer paper.

The greeting is from the So Happy For You stamp set in the same color as the card was trimmed with scissors to the frame. The greeting is cut to 3 inches. It was then layered onto a square of white card stock.  This layer is adhered to the card front with 3D foam tape centered on the card front.

The greetings are for these 2 card are designed with Stampin Up So Happy For You, Owl Occasions and Blooming Marvelous stamp sets.

The designer paper is from the Patterns Print III pack.

The colors I chose are Certainly Celery and  Almost Amethyst on Lovely Lilac card.

These layouts are very versatile and can be put together wide or tall.  The images can be used for young and older recipients alike.   

Ready2Go AO Stack Kits - DSP Split - Artisan & Apothecary Labels

These kits are based on the DSP Split layout where the designer paper layer is cut to 5.25x4 inches then cut again at 3.5 inches. One of the pieces is turned over and the pieces are taped together on the back.  A ribbon is laid across the join and the ends are taped to the back of the DSP layer.  This layer is then adhered to the card front.  This is a versatile layout as you can see it can work tall or wide with the narrow piece on the left or right. With alternating the combo on the double sided paper each card can be different.

The Stampin Up Artisan Label was used on this set.  The greeting was printed on white card with Kiwi Kiss and Early Espresso and punched with the coordinating punch.

The designer paper used on the card shown is by BoBunny - Little Miss - Little Miss Dorothy.  The other I selected is Basic Grey - True Love - Giddy.

The grosgrain ribbon is pink.

The greeting is adhered over the ribbon with 3D foam tape.

I chose this set of cards to have no greeting which allows it to be used for any occasion.  The designer paper for this set is by Simple Stories - Snap Color Vibe - Dot/Stripe in Green and Yellow.

The ribbon is white grosgrain ribbon.

The textured card bases coordinate with the color of the DSP in green and mustard.

It label was cut with one of the Stampin Up Apothecary Framelits.

The accent has a white silk flower in the center held in place with a coordinating mini brad.  The 2 white buttons on either side are held in place with Bling Zots.

 It is adhered to the card front over the ribbon with 3D foam tape pieces.

Monday, March 18, 2019

R2Go AO Stack Kits - DSP Split - Scallop & Decorator

I have been working on Ready2Go All Occasion Stack Kits for my upcoming class in April.

These kits are based on the DSP Split layout where the designer paper layer is cut to 5.25x4 inches then cut again at 3.5 inches. One of the pieces is turned over and the pieces are taped together on the back.  A ribbon is laid across the join and the ends are taped to the back of the DSP layer.  This layer is then adhered to the card front.  This is a versatile layout as you can see it can work tall or wide with the narrow piece on the left or right. With alternating the combo on the double sided paper each card can be different.


For this card I chose 2 different designer paper to use with the Stampin Up Scallop Circle accent.  I chose black card bases for both papers.  The designer papers feature floral on one side and stripes on the other. 

The one shown on the left is October Afternoon - Sidewalks - Hide and Seek.  The other paper was from a pad for which I do not have the details and features blue, ivory and green as colors.

I chose the same light blue stitched grosgrain ribbon for both designer papers.

The greetings were printed on ivory card stock in black and punched with the Stampin Up 1.25 inch circle punch.  The scallop circles were all punched from black card stock to match the card. They are adhered to the card front with 3D foam tape position over the ribbon.


For this card with the Decorator Label I chose 2 designer papers.  The one shown is by Heidi Swapp - Sugar Chic - Fabulous.  The other is by Kaiser Craft - Secret Bird Society Collection - Mystery.

The card base is black with black grosgrain ribbon across the join.

The greeting is created with a solid card stock offset behind the black greeting on white card stock.  They were punched with the Stampin Up Decorator Label punch.  The solid one is cut in half on the short side then the points of the straigth edge are trimmed off.  These are then adhered to the back of the greeting offset on the right and left sides. Once assembled 3D foam tape is placed on the back and it is adhered to the card front over the ribbon.

Sunday, March 17, 2019

Recent Photos

 I finally got some good photos of the chickadees at the bird feeder. I took LOTS of photos and ended up with a few good ones.

                 I am not looking at you!                                                   Hello!
                 I'm busy eating.                                                                I am outa here!

The water is running and the sun is shining and it feels so good!

Spring arrived all of a sudden here last week.  I have been able to get out with the camera 3 times this past week.

The pussy willows agree that spring is here and let's get on with it!

I wholeheartedly agree.


The sunsets have been great.

I captured the con trail of a plane headed up as the sun set.

Last night there was cloud cover which hid the sun early.


I finished this book this week.  I can take Christmas all year round - books, stories, cards bring it on!

A large tree chosen for Rockafeller Square is 50 years old and has been lovingly tended all these years. It is stolen the night before it is to be felled. Why? Who? When? All the press is here and no tree. 

This mystery is because it has something hidden away in its branches which has been there for a long time as well.  The item is worth a long of money and the one who secreted it there years ago comes back to claim his prize.  What he doesn't know it that this tree grows from the top so he could have just climbed it like he did when he hid the flask.  No need to steal the tree.

In the end the tree does make it to New York all lit up for the world to see.

The Nuthatch bird was eating from the suet feeder totally hanging upside down.
The Woodpecker was being very cagey and only peeking around the corner to check if I was still there.

I will get a better photo another day.


Check out my Macro Monday photo - Volume Dial on my stereo

Sharing with
Mosaic Monday #19 hosted by Angie at Letting go the Bay Leaf.

Thru Your Lens #183 hosted by Mersad

Whims & Fancies

Wednesday, March 13, 2019

Card - St. Patrick's Day Birthday

I made this card for a friend again this year.

Her aunt celebrates her birthday on March 17th St. Patrick's day and appreciates a special card.

I cut the card base from warm textured card stock.

I then printed the special greeting onto a piece of bright green card stock which was trimmed to leave a small border.

I chose some striped green designer paper by Graphics 45 - Twas the Night before Christmas. This is the reverse side.  I punched 4 hearts with the Stampin Up Sweetheart punch keeping the lines perpendicular.  The stem was handcut from a scrap of the same paper.

I added a large bright green flower brad to the center of the arrangement.

It is off to be mailed shortly.

Cards - Special Granddaugther Christmas cards

A friend asked me to make special cards for her granddaughters from a couple of the Christmas cards she received last year.

As they were large cards to start with I chose the half sheet size card size at 5.5 x 8.5 inches.

Doggie Reindeer

I trimmed the card front. I then chose a deep espresso card base to coordinate with the large reindeer antlers which I scored at half of the full letter sized card stock and folded.

I placed holes in the recycled card to the left and right of the central image with the Stampin Up Slot punch.  I ran a red cotton ribbon through the doggie card front through slots then across the inside of the card and knotted it along the edge of the right hand edge of the image. 

I created a special greeting which was printed in green on white card stock.  I created the banner with the Stampin Up Banner Triple punch by layering the greeting onto a red card stock layer leaving a small border.   The greeting is adhered to the card front with 3D foam tape.

Doggie Elf

I trimmed the card front a bit to have it fit on a half sheet card.  You can see the iridescent glitter in the top left corner so I wanted to work with that. 

I chose a kelly green card which I scored at the half to give me a 5.5 x 8.5 inch card. 

I found some wide ribbon in my collection with an iridescent strip which matched the recycled card front. I cut 5 pieces of ribbon and flagged the bottom ends.  I placed double sided tape onto the card and then placed the ribbon at different lengths across the card as shown. 

I adhered the doggie card aligned the card top with 3D foam tape.  I printed the special greeting onto white card stock and created the same banner greeting as before with the banner punch.  It is attached to the card front with 4 tiny red brads in each corner.

I included white inserts with a special sentiment.

Monday, March 11, 2019

Recent Photos

It was "spring forward" because of Daylight Savings Time this weekend.

I went to visit Mom and Dad as we are finally having decent temperatures and the traveling was good.  I had postponed the visit 3 times because the temps were in the -25C or worse for the last few weeks.

I captured some of the sparkle in the snow along the highway.  I was able to stop because it was near 0C which was very pleasant.

I loved the shadows I saw yesterday.  I have managed a few in this shot as well.


I finished this book.  It was story about Novalee, a pregnant 17 year old abandoned in a town in Oklahoma.

She meets a Sister Thelma Husband, a devout Christian and the welcoming committee for the town. Forney Hull, the man who runs the local library. Novalee seeks out Forney's help in caring for her buckeye tree, a gift from Benny Goodluck.   She be befriended by a photographer which was my favorite connection to Novalee.  The novel has a happy end because Novalee has finally found her native place where her heart is. There, Novalee regains her love and good luck, which she didn’t have all her life.

I attended my aunt's art reception on Friday. She was presenting her latest intuitive art series.

The weather in the morning was very snowy and travelling was not the best.  I pressed on as the roads were not slippery and the temperature was decent.

She really appreciated the support.  I brought healthy muffins and we had a sprinkle of folks drop by all afternoon. I managed the food while she visited with those who came to see the show.

I always enjoy spaghetti but don't want to used canned sauce from the grocery store.

I went on line and found Beef Stroganoff sauce.  It had lean ground beef, onions & garlic, mushrooms and canned tomatoes.

The sauce was made with white sauce, the tomato juice from the canned tomatoes, and of course sour cream.

I managed to freeze 5 containers to I can have this sauce a few more times.  Loved it!

I finally have all the plumbing jobs done in my place.

The kitchen sink drain has been cleaned to ensure no back flow of soapy water in the sink. That was Jan 24th.  It has been 6 weeks of making calls, waiting for response, more communication, water shutdowns, and plumbers from 2 different companies. 

This is the new sink, taps and aerator installed in the bathroom.  It is nice and shiny.  It was no dings in it and the best part is the underneath is no longer rusting and making a constant mess under the sink.

I have reorganized the storage under the sink as well so things are not just dumped in there.

With refurbished bathtub taps as well it is feeling like a new bathroom. No dripping taps, no mess, great storage all is good in there.

This is my Flickr Macro Monday submission for this week.  You can check out my Flickr photo stream here. 


I created the mosaic from great sunny shadow snow shots from Sunday.

Sharing at Mosaic Monday #18 hosted by Angie at Letting Go of the Bay Leaf.


Also sharing with Through My Lens 182 hosted by Mersad Donko.