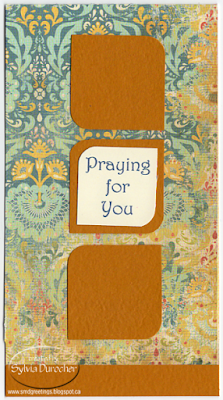
I had a request for a custom Ready 2 Go Stack Kit. She wanted the greetings to be about praying.
I chose to used No.8 envelopes with double sided designer card stock. The 12x12 was cut 3 3/8 inch wide and 12 inch tall. I then scored the fold at 6.25 inches. I added a 1/2 inch strip of black card stock at the bottom. The easiest way to do that is to tape a strip bigger than what you need along the edge with invisible tape. Then trim all 3 sides with the paper trimmer.
To repeat the black I cut a scallop border in black as well which I glued along the top edge and again trimmed on the left and right sides with scissors.
The vellum greetings are 2 x 4.25 inches. Color printed in black and clear embossed. It this then adhered aligned with the top of the card and centered. The scallop border is then adhered on top of that aligned with the top.
A white insert is added for the giver's personal message.
The paper is by The Girls' Paperie - Jubilee - Carousel.
This time I cut the paper the same way. I scored it at 2 inches then from there 6.25 inches. This creates a gatefold card with the opening in the middle.
I added an Espresso brown strip of card stock along the edge and taped it down. This one is wider than the .5 inch needed so it over laps onto the flap on the right.
I created greetings on stone colored paper which would work both pieces of designer paper I chose. The letters are the dark brown of the small strip. They are cut to 2" square. It was adhered centered on the brown strip but with double sided tape only on the left hand side.
The paper is by Carta Bella - Beautiful Moments - Beautiful Banner Paper. The other paper also had horizontal lines going across the card.
Another portrait tall card. You have to be careful when folding designer paper because it has a white core and if the paper fibers are not well scored they will crease and expose the core which does not look great. I ran my tool along the score line from both sides to stretch and soften the fibers. Works well.
I added a half inch strip of coordinating ginger card stock along the bottom again attached with invisible tape.
With the same card stock I punched the squares with the Creative Memories Double Square punch which does 1.5 and 1.25 inch squares which layer well. The solid card stock is the larger and the greeting is the smaller. I used my corner rounder punch to do 2 of the corners. I adhered 3 squares aligned down the center of the card.
The greeting was printed in blue on ivory card stock, punched and corner rounded. It was adhered to the center square.
The paper is by Carta Bella - Traditions - Antique Damask. The other designer is very similar in pattern and color.


No comments:
Post a Comment
Thanks for visiting. I love to read your comments.