
Tuesday, December 31, 2013
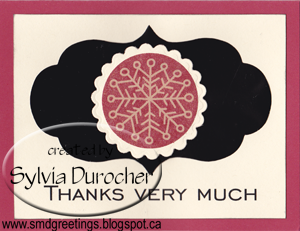
Card - Christmas Thank You!!
Wednesday, December 25, 2013
Card - Digital Christmas 2013 - O Little Town of Bethlehem

I created this card in order to send Christmas greetings to folks I connect with by email or on-line.
I created this art for a project that fell through so I decided to use it for my digital Christmas card this year. I started with a 5x7 canvas panel. I embossed white card stock with the Sizzix Swiss Dots folder then ripped it into strips and glued it to the panel horizontally to create illusion of clouds. I used the buildings I designed a long time ago, printed them on blue card stock and fuzzy cut them. I cut out the windows and put yellow paper behind. These were then glued to the panel. I painted the whole thing with several shades of blue/purple ink. You will see that the card stock absorbed ink differently than the canvas which created different values of color. I glued my Bethlehem down over the strips. I added silver star which I hand cut and the wavy band was cut with the Creative Memories Wavy cutter and glued down as well. I dry brushed some silver on the roofs of the buildings and a little around the art piece.
Monday, December 23, 2013
Card - Christmas for Girls

Cards - Christmas for Girls

Card - Christmas Cards for Girls

 I made these cards as a result of a request from one of the girls at work for Christmas cards for her girlfriends and Mom. I chose the Christmas Magic designer paper by Fancy Pants Designs. It was cut with the Sizzix Tim Holtz Cabinet die. I added a Baja Breeze card and layered a piece of embossed vellum in between. The embossing folder is Sizzix Textured Impressions Sugar & Starry Night By Basic Grey. I wrapped white narrow organza ribbon around the die cut and tied it in a knot on the left hand side. I punched the Cherry Cobbler color printed greeting with the Stampin Up! Artisan Label punch. I punched another one from Cherry Cobbler and cut it in half width wise and then layered them behind the greeting. I added a small bling rhinestone above the Merry. This greeting is adhered to the card front with 3D foam tape. I placed 2 white silk poinsettias and a deep wine flower in the centre and pushed a hole through all the layers and held them all in place with a coordinating large brad. The card on the right is punched with the SU Decorative Label punch.
Saturday, December 21, 2013
Cards - Last minute Christmas

I cut the background paper with Spellbinders Label One die and glued that to the card. I then layered the circle which matches the card color, the large snowflake and small black snowflake and made a hole in the centre with a pushpin and added the tiny black brad to hold them all in place.

I punched a Stampin Up! Modern Label punch from the same background paper and added a color printed greeting punched with the SU! Word Window punch. The color of the greeting matches the card color. The white snowflake above was cut with the Cricut and the Winter Lace cartridge. The silver snowflake on the right was made with the Martha Stewart punch. The black snowflakes are MS too!
Friday, December 20, 2013
Photo - Carol Sing

I love Christmas music so I really enjoyed the carol sings I have participated in.
Check out your area to see if there is one in your neighbourhood!
Sunday, December 15, 2013
Photo - Nativities Three


The variety in presentation, material and design is great. You can find my previous postings here and here.
Saturday, December 14, 2013
Calendar - Word Of God


Tuesday, December 10, 2013
Tag - Poinsettia

I cut the tag from designer paper and added a second light colored one I could write on! Added a organza bow and a Stampin Up! five petal poinsettia in red and green. All held in place with a gold brad and a blingy flower for the centre.
Dog Treat Boxes

I started with Starbucks Tazo Tea Tins which I covered with this great Christmas Dog decorative paper. Their scarves and jackets have glitter on them. I trimmed the paper to the height of the box and used double sided tape to stick it to the box and wrapped it all the way around (about 14"). I then used washi tape in red and ivory hounds tooth to finish the top and bottom edges. I created tags for each box by printing the details on kraft card stock and punching it out with the Stampin Up! decorative label punch. I layered this unto a punchie of the same in red paper. I cut it in half across the width and trimmed the points and glued them offset on the top and bottom. I then punched another layer from the decorative paper to cover the back of the label. I placed the dog bone treats into a bag, tied it with heavy red cord and then added the tag so it would hang outside the box lid. The bottom picture is the treats cooling on racks. These will make a great gift to bring to a hostess who has furry friends at home.
Monday, December 9, 2013
Photos - Nativities two


Saturday, December 7, 2013
GC Holder - Musical Notes

I made this gift card holder with the Sizzix Jumbo Crescent Tag die and black cardstock. I folded the card stock in half before cutting. Here's a link to the ones I've made before. This time I placed the fold on the side instead of the bottom. I added some music paper to the front. I hand cut the curve at the top and punched the hole with a 1/4" punch. I cut the music notes with the green Sizzix small music notes die. Some in copper and some in black. I added the greeting with the Stampin Up! Modern Label punch and the Word Window punch with the greeting being color printed. I added a copper metallic ribbon to keep it closed.
Sunday, December 1, 2013
Card - Cute Dog

I printed the dog image which is from Graphics Fairy on white cardstock and trimmed it. Then I layered it with a piece of turquoise card stock to match it's silk pillow. I then cut a piece of gold card stock to match the gold tassels. The greeting is printed directly on the card in a deep turquoise color.
Christmas Card Challenge - December - Thank Yous

 This other version is done with Kraft card stock with the same hunter green greeting. I chose a larger button because it matched well with card stock. I added heavier thread to balance with the larger button.
Subscribe to:
Posts (Atom)