Showing posts with label donation. Show all posts

Tuesday, December 10, 2024

Purple Dove Stitching

I was donated some batik fabric from one of the girls at Sewing Group a couple of weeks ago.

The pieces were large enough to create an accent panel for a bag.

I tucked the 4 triangles in each corner then couched the seams to the foundation layer.

I used a white piece of linen as the background of my focal element.  I cut the bird from a coordinating fabric from my stash. I made the wing from the same purple batik. Some heavy stitching for the eye.

Not sure when it will end up as a bag.  

Thursday, November 16, 2023

Cards - Silent Auction Donation


I made a couple sets of cards to donate to the Silent Auction at the Gallery Holiday Party.

The first set features a chipboard deer that was stained with Tim Holtz Distress Stain - Gathered Twigs. I chose a designer paper by We R Memory Keepers - Botanical for the background.  It comes in 12x12 so I could 6 cards with the one sheet. I ripped snowbanks from textures off white card stock.  The moon is champagne card stock punched with the 1`circle punch.  The trees are created with 1) Hampton Arts Tree Art die and stamp set, with olive card stock, 2) the Memory Box Birch Tree Trio die and 3) the Stampendous Truck Tidings die set. The card base is Stampin Up Pool Party. 


The second set of cards features a chipboard snowflake.  I painted them with white acrylic paint then a coat of Pearl Finish. I chose 3 designer paper from the Stampin Up Adventure Bound paper stack.  

For the Pine Boughs set of cards I selected Early Espresso, Chocolate Chip and Baked Brown Sugar card bases. I chose a ginger colored 1/4 inch smooth ribbon. The snowflake is attached with a large clear crystal brad. The greeting is black and white with a flagged end.

For the Birch Tree design I chose Basic Grey card bases. I chose a 1/4 inch black grosgrain ribbon. Again, a clear crystal brad to attach the snowflake. The greetings were left with square corners on this set.

I added white envelopes for all 12 cards.  These were sealed in cellophane - 6 deer then 6 snowflake.


I created a structure to display the 2 sets of cards. I started with heavy red card stock with which I created a pyramid shape then added a piece of chipboard in the middle to provide support to the structure.

I added the sealed packs of cards on either side.  I created a product label to fold over the top.  I then put 2 holes through all the layers with my Crop-a-Dile.  I pulled a red metallic ribbon through the holes and knotted in on the front.

I hope that it generates a few dollars for out club.

I also donated my weaving from a Tactile show, you can check it out here.

Update: All the items sold which is very good news!

Monday, October 30, 2023

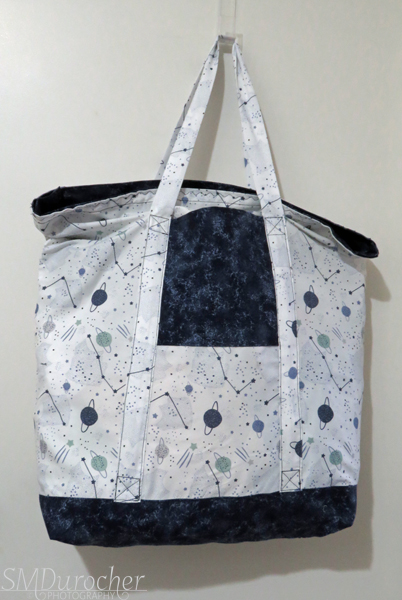
Sewing Project - Large Tote Bag - Stars and Planets

My sister and I had a conversation the other day about projects which we could make to give back. 

I still have quite a few microfiber fabric which can be used for another project.  Originally, they were collected to make Re-Useable shopping bags.

Those were donated and have not sold really well.  I think presentation is the problem. I am moving on.

Morning Star is an organization which supports women in crisis.

There is no dignity in carrying all you own in a plastic garbage bag so large bags can be used to give these women some self worth.

I chose the Stars and Planets pillowcase which is made of deluxe microfiber fabric. 

I paired it with some cotton fabric in deep navy small pattern which was donated to me when a quilter in our group retired and de-stashed her supplies.

I decided to put a piece of navy on the bottom since the fabric is white the bottom of the bag will likely get dirty fast and being a dark color will help.

I layered the cotton over the microfiber which will add strength.

I wanted the bottom to be boxed. I created the corners at 5 inches across then folded the  triangles onto the bottom of the bag and sewed them down.  That will add layers on the bottom and help to add structure to the bottom corners.

I chose a navy thread so it does not show on the cotton fabric.  It is more evident on the microfiber pieces.


I created the zipper insert the same what I made it for my own tote bag.  I used the method explained in this video Tutorial by Crafty Gemini.

This produces a completely finished edges with no open fabric ends.  Tabs are added to the 2 ends of the zipper so it is easy to pull open and shut.

I hemmed the top edge of the bag after I cut off about 10 inches off the top of the pillow case once I had undone the seam that created the top hem.  I used that fabric to make the handles. Microfiber more durable than cotton being handled all the time.  Handles are 1.25 inches wide finished with the seam place in the back center. They are 53 inches long. I tied the bottom of the handles in the cotton bottom for sturdiness. They were sewn 7 inches from the sides. 
 

It is important to have reinforce the stress points to ensure there is some strength is distributed to take the wear and tear.

The zipper insert is the same width as the opening of the bag. It is about 6 inches deep which is slightly more than the bottom but we have to account for the seam to put it in.


Now it is just a matter of pinning it very carefully and sewing the insert into the top of the bag.

I chose this decorative stitch on my sewing machine which produces this wavy seam which adds a bit of pretty to the bag.

Once the zipper insert is sewn in the zipper end tabs can easily be accessed when opening or tucked in when on your shoulder. 

It does allow an addition amount of space for hold stuff when the bag is full.

With the zipper insert the same width it makes the bag well sealed to ensure there are no holes where one could lose items from inside the bag.

The color of the zipper provides some contrast in the dark fabric so it is easy to see.  The tabs also help the find the zipper slider.

I will be making a few more of these to be donated in early December.


Saturday, March 11, 2023

Sylvia's Simple Shots

I found another piece of Robert Held Art Glass at the thrift store the other day for under $2.

It is a candle holder with a pulled feather design in the base with blues, greens and purples.

I have placed a tealight on top as I don't have taper candles.

I just love this art glass and it is a good thing I don't live close to his studio in British Columbia.  I do follow him on Instagram @robertheldartglass so I look forward to seeing his new stuff as it comes out.

I have found the pieces I have in thrift stores.  I have a heart and a small vase in my collection.

It is signed on the bottom as usual.


We continue to add to my list of exercises to rehab my right knee and loosen my mid back.  I noticed yesterday after about 3 hours of sewing that it was very tight so I did my stretches before going to bed.

My knee is doing well and I added step ups last week and I am starting to use the stairs again.  It goes better going up than down.

It will come.

I have an MRI on it next week so we will see what it looks like on the inside there.


It's been cold again this week. Everyday the low's are in the -18C to -20C without the wind chill.

I had to take the bus to medical appts this week very early in the morning so it was cold!

On Wednesday the wind was very strong and standing waiting for a bus is no fun.


Two days of heart tests this week.   This is an investigation of a period of dizziness in January.  It cleared up once the tension in back was released so I don't expect anything significant coming out of these tests.  Interesting what life sends my way.

I bought a tiny bottle with a drip lid so I can carry essential oil in my car.  I chose the bergamot grapefruit combo for this time around.

Essential oils should not freeze so I can leave it in the car.

It was a hassle to bring the diffuser up, then remember to add drops just before I was headed out, then hang it back on the rear view mirror.  

Now I can do it whenever I feel the need.


I hosted lunch for 2 of my aunts after our visit to Muttart Conservatory on Friday.  My first time back since the pandemic.  I will include my pics in a separate post.

We had a great time and with time after for a good visit.

I made yellow split pea soup and whole wheat tea biscuits with yogurt with blueberries for dessert.

I soaked the peas overnight so I could cook the soup that morning.  Once the soup was simmering I made the biscuits.  They turned out well this time because I left the dough thick enough.  I usually roll them out too thin.


I have a basket of ReUsable Bags ready to donate to GrammaLink  Africa fundraiser later this year.

I made 17 bags since February 4th.  It was a learning experience and I am happy with the results. I kept one for myself so 16 are being donated.

Most of them are microfiber so they will last a long time.

I hope it puts a few dollars into the hands of grandmothers in Africa who stepped up to care for their grandchildren when the parents died of AIDS.

Feels good to give back.

I did visit the Muttart Conservatory this week with 2 of my aunts (my Mom's sisters).

I bought a yearly membership which will allow me to go anytime I want and also visit the Zoo regularly.

The spring flowers were all in bloom in the feature pyramid.

I chose the Amaryllis because it reminds me of my Mom who I miss every day.  She was such a great lady.

This is the variety Minerva and it so reminds me of Christmas.  They can appear on seasonal greeting cards.  Classic combination of red, green and white.

Looking forward to more visits once life settles a bit.

Tuesday, May 18, 2021

Seniors Week - June 7-13 2021 - Card Donations

I worked on more cards for the Seniors Week Project.

I started with the yellow and blue layer which I made last summer.  It involves making a marking tool with old toilet paper rolls to create dandelion flowers.  

That layer was trimmed to 4.00 x 5.25 inches. 

I placed a piece of blue rick rack across the bottom third and taped the ends to the back. This layer was then adhered to the front of a medium blue card base.

I added a color printed greeting punched with the Stampin Up Decorative Label adhered with 3D foam tape.

This card was created with a 4x4 photo reused from one of my photography calendars. 

I trimmed the 4x4 down a bit to leave a bit more of a border. 

I added the vellum sentiment which I adhered to the photograph with gold flower sequins held in place with orange tiny brads.  This full layer was then adhered to the front of a yellow card base.


These cards are reusing a small card I made for a Stampin up party I held years ago.  I had leftovers and they just sat. 

The accent layer has a Tango Tangerine base with Tempting Turquoise designer paper.  I added an accent strip in orange punched with the Stampin Up Dotted Scallop Ribbon border punch. 

The tag was stamped with the Too Terrific Tags set in Tempting Turquoise on Whisper White. Layer onto Tango Tangerine with a Tempting Turquoise grosgrian ribbon held in place with an orange tiny brad. 

The Whisper White layer was embossed with the Swiss Dots folder and trimmed to leave a small border. It was adhered to the turquoise card base.

The stack is growing!

Thursday, January 30, 2020

Sewing Project - Quilt 5 - IKEA Fabric Panel

I finished the companion quilt from the IKEA cotton panel of kid design.

Finished Size: 38.5" W x 44" T

Front: IKEA fabric panel

Backing: Caramel textured cotton fabric

Batting: Fleece

Binding: Striped cotton fabric

Quilting: Followed the stripes across the quilt.

Applique: Star from warm yellow fabric with ivory thread.


The backing fabric is opaque enough to hide the red color of the fleece inside.

The binding was leftover fabric in bright cheery colors similar to the front fabric.  It was cut to 2.5 inches.  You can check out this video for binding how to. Fool Proof Quilt Binding.

I pinned the layers together with small safety pins before I ran the lines of quilting across the front.  I chose ivory thread to hide it as much as possible.

I then squared it and applied the binding.  It will make a child a nice quilt to help them through a difficult time.

For the batting in between the front and back I used leftover pieces of fleece from this Pot Protector Project.

Lessons Learned: I decided to make my last seam along the binding. I ironed the binding at pinned it before making my last seam thinking I would have a better chance to catch the back layer but I did miss a few spots - more than I expected.  I will work on that.


Wednesday, January 29, 2020

Sewing Project - Quilt 4 - IKEA Fabric Panel

I finished another small quilt today.

Finished Size: 39" W x 44" T

Front: IKEA fabric panel

Backing: Red Cotton Twill fabric

Batting: Fleece

Binding: Striped cotton fabric
Fool Proof Quilt Binding video

Quilting: Followed the stripes across the quilt.

The backing fabric is heavier than quilting cotton which was really nice.

For the batting in between the front and back I used leftover pieces of fleece from this Pot Protector project.

The binding was leftover fabric in bright cheery colors similar to the front fabric.  It was cut to 2.5 inches.

I pinned the layers together with small safety pins before I ran the lines of quilting across the front.  I chose red thread to hide it as much as possible.

I then squared it and applied the binding.  It will make a child a nice quilt to help them through a difficult time.

Wednesday, September 4, 2019

Donations to a Fundraiser

I prepared a couple of photos to donate as prizes at a fundraiser being held this weekend.

The 8x10 inch frame is metal in a gun metal gray color.  It has very angled edges.

I chose a black mat 8x10 mat with an 5x8 inch opening. It is archival but in a size I would not likely use for the gallery.

The photo is a black and white photo 8x8 inches of chess pieces I took a couple of years ago for Flickr Macro Mondays. It fit perfectly in this frame.

I placed the pawn and shortest piece in the front then aligned the knight in the middle ground and the queen in the background.  I was just making an appealing presentation of the shapes of the pieces.  I have since learned a bit of how chess is played from my grand nephew.
This frame is a warm white color.  It is plastic in an 8x10 inch with a very narrow profile.  It was very easy to assemble the sandwich to insert in the frame.  Very well designed.

I paired it with a shot of The Wilson`s Snipe I took at the wetlands when I first got my zoom.

An oval mat is not likely something I would use for the gallery and it is archival as well.

The photo is an 8x8 inch which I printed a while back.  The color of the frame works really well with the colors in the feather of the bird.


I put together a gift pack of 10 A7 5x7 photo cards as well as a prize at this fundraiser.  I have decided to go back to making A2 cards as those are more efficient in materials and time.

I hope the folks that receive these will enjoy them in their world whatever that may be.