Showing posts with label apron. Show all posts

Wednesday, October 24, 2018

Apron - Gathered Half Reversible - Soft Leaf

Another gathered half apron featuring soft leaf print 100% cotton fabric with a moss green textured cotton fabric.

I placed two 6 inch patch pockets on the print side. 

This is a reversible apron.
 
It has a 24 inch waistband with 26 inch ties.

The ties easily create a knot or bow in the back.

Reinforced stress points.

I love the solid textured side of this apron.

I need to move onto other art for my sale on November 2 & 3rd.


Tuesday, October 23, 2018

Apron - Reversible Gathered Half Apron

This time it is a reversible gathered half apron. 

I chose a colorful print I bought at the SEESA Sale on Saturday and an aqua solid100% cotton to make this half apron. 

I placed a 6 inch patch pocket on the print side in the aqua fabric. I`m still have problems with my right and left reversed so the pocket is on the left hand side. I hope it works for the new owner.

Thirty inch ties are great to knot this apron in the back.  Long enough to accommodate various sized middles.

The edge has been top stitched on the sides and bottom.


The waist band is 24 inches wide by 2 inches tall.  The ties are 2 in tall by 30 inches long.  They fit into the ends of  the waist band then the skirt is inserted into it and the inside this tacked down with the top stitching.

The skirt is 29 inches wide by 17 inches tall plus the 2 inch waistband for an overall height of 19 inches.  This provides 5 inches of easement which I think is quite adequate and easily accommodated with the double front design.

All the edges are finished in this apron. 

I love this one.


Grey Flannel Cover Up

All this sewing has been a learning experience for me.

This is a beautiful soft flannel garment.  It was a Wosley XL short sleeved men`s shirt.

The result of a solid color and short sleeve is a toned down look and no ties.  The sleeves went into the pockets.

I chose black bias tape.

I was out to quilting group today and I brought my earlier apron to show the leader of the group.  She tried it on.

I have a challenge of needing  someone try them on and see how it fits and adjusts.

Someone there who has worked with seniors suggested that these could be used as cover ups while eating.   This maybe more accepted by some than an adult bib. I never even thought of that.

I am loving my progress!


Monday, October 22, 2018

Grey Pinstripe Smock Apron with Red accents

I started with a Ralph Lauren grey pinstripe 16.5/36 L men`s shirt.

I decided on red bias tape around the neckline and the arm holes.

I used one of the long sleeves for the patch pockets onto which I added red bias tape on the slant edge.

I used the other long sleeve for the waist ties. I cut the stripe 2 1/4 inches wide and 80 inches long. I ironed the sides into the center then ironed it in half.  I top stitched the ties with red thread and created square ends.  This fabric would have been too heavy to turn a tied inside out.


It includes my standard features of a hanging loop at the back, tacked tied to allow them to adjust as needed, reinforced stress points on the patch pockets and the ties long enough to tie in front.

Red Denim Snug Half Apron

I started with an extra large red denim men`s shirt.  I paired it with a small amount of red and white small print 100% cotton fabric.

I cut the shirt straight across under the arm holes. 
I measured 6.5 inches from the side seam and trimmed the buttonhole and button pieces off the shirt. I hemmed the sides of the apron with a wide hem.

I created a waist band from the denim and sewed that onto the top edge of the apron leaving about .5 inch beyond the side seam.

I created a pocket which was 9 inches tall and 10 inches wide. With a snug apron the pocket needs to have some fullness in order for one to get their hand inside.   I hemmed the top edge and created 2 small pleats in the bottom edge of the pocket making it a square pocket. I sewed it onto the right hand side of the apron with top stitch.

From the print fabric I cut three stripes 3 inches wide and 35 inches long.  These when sewn together created a strip 105 inches long.  I wanted them long so they could wrap around and tie in front. I pointed the ends and sewed the strip closed leaving a space in order to turn it inside out.

I sewed the ties by aligning the center of the ties with the center of the apron. I stitched it to the waist band of the apron top and bottom.  This closed the space left to turn it over and adhered it securely to the apron.

This apron will work well for a slim person.

Sunday, October 21, 2018

Burgundy with Floral Accents Apron

This apron started with a Joseph & Fiess 100% cotton (17.5/33) men`s shirt.  I had not really thought about how it being a solid color would affect my process but the price was good so I brought it home.

Well it did.  I just could not put solid bias tape on this one.  I hit the SEESA Rummage Sale today and found the exact fabric I needed to finish this apron.

It is a floral with a grey background, white, dusty pink and burgundy flowers with gold accents.  The down side is I had to make my own bias tape so there was not savings on time with this apron but it was worth it.

I used the handmade bias tape for the round neck and arm holes.  I used the same fabric for the patch pockets. I just hemmed the open edge of the pocket. The ties were created on the straight edge of the fabric.  They were just tacked to the back of the apron so they can adjust as needed to the wearer.

The ties started out at 3 inches wide then iron flat with the seam in the center. I put a line of stitching in the center which offers a bit of structure to the ties.

Reinforced stress points on the pockets and hanging loop.

This is an XL large apron in my opinion.


Friday, October 19, 2018

Apron - Purple Plaid

Another apron for my sale in November.   This one is made from a large ENYCE men`s 100 cotton shirt in purple plaid.

I added purple bias tape around the neck opening, arm holes and the slant on the patch pockets.

As always I have reinforced the stress points on the pockets.

The ties have been tacked to the middle back of the apron which allows them to adjust as needed when tied in front.

I added a hanging loop at the back. 

Wednesday, September 26, 2018

Apron - Cross Back - Blue Butterflies

Whew!

Another apron.  This one is cross back again with a beautiful Blue Butterflies and it is 100% cotton.  I bought this fabric so long ago I do not recall what it cost me.  I paired it with an aqua 100 % cotton.

I added a bit on the fold and quite a bit on the back edges.  It is almost 5 inches wider than the pattern when folded.  It provides a great cross over at the back when it is on. 

The patch pockets come from the armhole cut out and I added a bit of aqua to the slant edge of the pockets.  They were top stitched onto the front piece of the apron before assembly.  Two and half inches from center and 15 inches down from the top of the bib. 

The stitching I did on this one is just at the top edge of the back pieces straight across. I ironed it then sewed it from the back side where I could easily see the crease.  Then a line of stitching from the previous line, down by the edge of the pocket to the apron bottom edge.


I put the hanging loop on the front of the apron this time.  I think that works better.
 
Super happy with this one as well.

I am not sure how selling these will go.  I guess people will have to try them on to see how they fit and how long they etc.

I have to move on to other priorities as this has been a marathon sewing session.  I will make a few shirt aprons for sure.


Apron - Cross Back - Sunny Side Up

I made another apron this morning.  I chose the 100% cotton fabric called Sunny Side Up by Ro Gregg.  I lined it with a piece of chocolate brown fabric.

This one is wider than the last one.  I added 3/8 of an inch on the fold as well as 3 inches more than the pattern.  Over all folded dimension was 20 inches at the under arm.

I used the remnant from the armhole cut out to make the patch pockets.  I edged the slant of the pocket with a strip of the chocolate brown fabric from the lining.

The pockets were placed a little farther apart as well at 2.5 from center rather than 2 inches.   It is a bit longer as well at 37 inches bib to hem but I maximized the length of the brown. I just could not cut off just a bit.

I did place one line of stitching down the front on the skinny brown line to keep the 2 pieces together.  Choosing the brown means the seam hardly shows.

The straps were cut 3 inches wide by 27 inches to ensure I had enough.  This time is sewed an end in order to have something to push on when turning it over. It went really well with my 12 inch chop stick.  Ironed it flat with the seam in the center.

The straps were securely attached with X stitching in the front on the bib.  The straps were crossed and securely attached to the back as well.  Still 22 inches between bib and back edge. 


I love the extra cross over at the back and the weight of this one feels great.

These are wonderful colors.  Another beautiful apron which I hope someone just wants to buy!


Tuesday, September 25, 2018

Apron - Cross Back Daisy

Another apron today.  I tried a new design for those who do not want ties on their aprons.

I started with this warm rust floral fabric and chose a light yellow cotton for the lining.

I used my own pattern from earlier aprons and adjusted how the straps worked.

I cut two pieces of the pattern one patterned and the other solid.  I cut them at the same time so they would be a perfect match. 

I cut the patch pockets from the remnant created where the arm hole was cut. I added an accent strip to the slanted open edge of the pockets cut from the lining fabric.

The pockets were then top stitched onto the front patterned piece.

The front and the lining were sewn together, turned inside out, and top stitched to close the gap used to turn inside out. I also placed a line of stitching from the top of bib to the bottom of the apron just left of center to secure the 2 pieces together.

The straps were cut 2.5 inches wide and about 27 inches long just to make sure I had enough.  I sewed a seam with right sides together then struggled to turn the strap inside out. I like that the seam can be placed in the back center of the strap.

I securely attached the straps to the top corners of the bib.  I decided that 22 inches between the top of bib to the edge of the back worked so I cut the strap 24 with a 1 inch overlap at each connection point.  I ensured that the straps were "crossed" then securely attached the bottom end of the strap to the back edge of the apron.

I may have to do something different for turning the straps inside out.  I think I would also like to have the apron wider so there the back edges come closer together when it is one a person.

Shirt - Craft Cover or Apron

Upcycled another men's shirt into a garment that would work as a craft cover, a smock apron, or a extra layer for any reason.  It provides excellent protection for your clothes.

This was a navy 100% cotton Eddie Bauer shirt in XL.

I cut the neckline into a V this time as this is a bigger size and a larger person may need a big more room.

I cut the sleeves off leaving the seam intact with the garment.

I used the one long sleeve to make the waist ties and the other for the large patch pockets. 

I chose royal blue double wide bias tape which I added to the neck line, the arm holes and the slant edge on the patch pockets.

I attached the ties at the waist on the sides of the garments. They are 40 inches long each.  It allows the ties to knot in the front or the back.

The patch pockets were placed on the front either side of the button front about waist high and top stitched.

The back is left plain with the hanging loop added just below the bias tape.


All my aprons have hanging loop which allows it to be stored on a hook or peg. All the stress points are reinforced and the tie can be tied at the front or the back.
Another one done for the sale.

Monday, September 24, 2018

Upcycled Shirt - Smock Apron

I designed a new apron to use a used men's shirt.

This is a men's large 100% cotton plaid shirt in red white and navy.  The fabric is beautiful.

I cut the neck line into a nice round ensuring that the first button was close to the neck line.  I cut the sleeves off leaving the seam on the apron.  I chose red bias tape for this project.  I then sewed on the bias tape on the neckline and the sleeves.

I used one of the long sheets to make the extra long tie which allows tying in the front to back to the back.  In some situation you may not want these ties dangling in front. It was sewn to the center of the back of the apron.

The second sleeve became 2 patch pockets on the front of the apron.  I used the last the red bias tape on the slant edge of the pocket to coordinate with the rest of the apron.  The pockets had the seam allowance ironed then it was top stitched in place below the waist tie.

This is a great apron which provides great clothing coverage, excellent pockets, and a versatile tie.

The original shirt pocket remains as well as the button down front.  This one worked out so well.  It would work for a smaller person as you will be wearing it over clothes.

Saturday, September 22, 2018

Apron Handy Towels

I put together some hang towels which will work with my aprons. 

My early aprons had a loop where a towel could be pulled through so they would be handy when wearing the apron.

I then decided that right in middle may not be the best so I put buttons on my last couple aprons which works for people right handed or left handed.

The ribbon loop on the towel hangs on the button.

My aprons have buttons on both sides as they are reversible.


I added the 3/8" ribbon loop to towels I purchased.

Monday, May 21, 2018

Apron - Shirt - Tan Burgundy Navy Stripes

I made up a shirt apron as well.

This process takes a men`s XL shirt and makes it into a quick apron.  I started with a 100% cotton shirt in a stripe pattern.

I cut the front on a slant from the arm hole to the collar then along the back of the collar down the other side.  This was hemmed by folding the fabric over and again and stitching to create a hem.


I used half of the back which was removed to make the 2 front slanted patch pockets.  I switched the direction of the stripe so they would show up nicely.

The pockets are reinforces on the corners to ensure they will hold during regular wear.  The original pocket on the right hand side is still there but because the lines align you can barely see it.

In this case I did not sew down the front button hole layer as I did not what to have navy stitching on my tan front stripes.


I used some of the other half of the back to create the ties.  Cutting along the stripes I cut a 2 inch strip, folded each side into the center and then folded in half again.

I stitched along the non fold edge with the navy thread in the machine.
Makes a sturdy tie but not too heavy to create a bow.

I reinforced where the tie connects with the apron with stitching in a box pattern to ensure it does not come loose.

The ties were 30 inches or so and tie nicely at the back in a knot or bow.

Because the shirt had short sleeves it just provides enough fabric to create the extras one needs.  There is very little fabric leftover.

This fabric is not as heavy as I had hoped so the apron is lighter weight than I would like it to be.

I expect it will do its job of protecting your clothes none the less.


Navy & Block Print Apron

I put together another apron this weekend.

I started with this wonderful botanical print in navy, red, and ivory.  It is a Guaranteed Wax Block Print by HiTarget on 100% cotton.

I selected a navy 100% cotton fabric for the other side.

I made the shoulder ties from the print fabric.  Cut the strips 3.5 inches wide and sewed a half inch seam and turned it inside out.

It is a long apron measuring at 39 inches from the top of bib to bottom edge.

I sewed on 2 navy buttons on the top center corner of the pockets which allows the hanging of a towel on either side.

I used the same strip for the loops at the back which provide adjust-ability to the apron.  I placed 2 loops about an inch apart. 

The wearer can choose both as in the photo or just one of them at the height which works best for them.

Rectangular pockets with slanted openings make them very accessible when the apron is worn. 

You can cross the straps or pull them straight down to the back loops.

The straps are long enough to allow a nice bow when tying the apron.


The print has been brought to the other side of the apron.

There is a band at the bottom and a patch on the bib.


The apron has a loop to hang it when you are not wearing it.

A close up of the back loops.

The buttons placed on the pockets to provide a place to hang a towel at hand.  It can be hung on the left or the right hand side. 


Saturday, April 7, 2018

Apron - Adjustable with Casing

I made another apron today so now I have a sample of the three designs I have researched.

This is an adjustable apron with the tied going through a casing along the curve of the bib.  This is the style of my current apron.

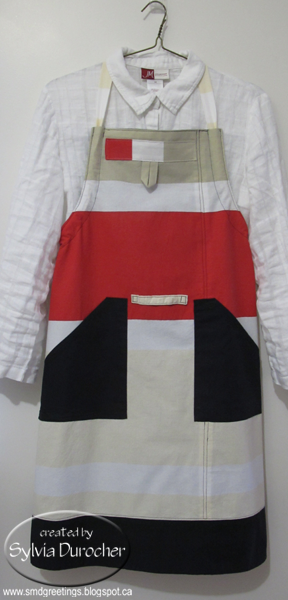
I chose this bold striped cotton fabric in red, ivory and white stripes for this side and a black poly cotton for the reverse side.   I placed a seam offset to the left of center and ensured the stripes were maintained across the apron. I chose to top stitch the seam and the outer edge of the apron in black thread.

I added black patch pockets, a towel loop in the center between the pockets and a hanging loop on the accent at the top of the bib. 


The corners of the pockets are well reinforced with a triangle of stitching.


I will have to decide which design I will use for my new apron.  I have not yet decided the fabric yet.

Wednesday, April 4, 2018

Shirt Apron

I thought I would take up a suggestion from a friend to make a shirt apron.  This is an apron made from a man's shirt.  I was out yesterday to my favorite thrift store and I purchased a XXL men's denim shirt.  I brought it home and washed it and today I made an apron.

You will find many tutorials on line on how to make one of these.  We take advantage of many of the parts of the shirt.  We keep the collar, the side seams, pockets, and the bottom hem.  Basically, you cut off the sleeves and the back.  Trim the front to angle from the collar to under the former arm hole which is hemmed.  I used one of the sleeves to make the ties and the other to make the two large patch pockets.


I left several buttons open at the top to allow it to come over my head.  I have sown down the button strip from the 3rd button to the bottom edge to stabilize the front so it will act as a single piece.


I made sure that the stress points on the apron are reinforced to ensure a long life of protecting our clothes while cooking, crafting or creating.

On the right is the extra stitching in the corners of the patch pockets.
Here's the reinforcement on the attachment of the ties to the apron.  It helps a lot to have kept the double seam on the side which provides a strong point to support the back ties.

The ties are about 23" long which is plenty to just tie at the back but not enough to bring back to the front.

A great project!


Tuesday, April 3, 2018

My First Apron

I spent my day off yesterday making my first apron.  Last week I had sorted my stash of fabric and put together a couple of piece which coordinated well and there was enough to make a reversible apron.  The fabric is a solid dark green with a printed green/black stripes with white flowers.

The adjustable apron I currently use I purchased several years ago. I love the design but the fabric is very stiff and the pockets are not useable because they are straight up.  I think pockets at an angle would be more natural for how my hand will get into them. It is not reversible. It has a loop to hang it up at the end of the day.

I have researched adjustable styles on line from which I gleaned a couple of add ons to the one I have. Then I took mine to our Easter girls get together with my Mom and sisters.  We girls are of several sizes and heights so that gave me some feedback about what works and what does not work.

There was some ripping out seams and changing things as I tried it on and felt adjustments were necessary.  

Here it is!
The garden flower fabric on the left and the dark green cotton fabric on the right.

I added patch pockets in the alternate fabric on each one.

The shoulder straps for tying are long and can be brought to the front if you want.

The back features loops where you pull the shoulder straps through to then tie the apron at the back or the front.


It allows you to tie couple of ways as well.

The shoulder straps can be crossed at the back and run through the opposite loop and tied at the back or the front.

The shoulder straps can be brought straight down to the loops and then tied at the back or front.

This provides versatility to the apron wearer to adjust the apron to their comfort.


I added a loop in the front on both sides where you can pull a towel through so you have one at hand all the time.

I added a loop on the green side at the top of the bib which allows you to hang it up at the end of your time in the kitchen.

I want to thank the ladies who gave me feedback which helped with this project.