Showing posts with label CCE. Show all posts

Saturday, September 30, 2023

Exchange Cards - September - Yellow Flowers

My Exchange Cards for September feature autumn colored flowers.

This first one is a sunflower.  The 4x4 inch photograph is from one of my annual photo calendars.  Trimmed the numbers off and it was ready to go.

I chose a Stampin Up Summer Sun card base.  I cut a 2" strip of black card stock which I punched with the SU Banner Triple Punch.  

It is very versatile as it easily centers the V on several widths of banners. Allow allows you to make any length.

Once that was adhered I installed 3 golden yellow caplets by making holes with the Crop-a-dile and then inserting the caps and choosing the right settings to press these into place.

A full half sheet white insert make this a card which can be used for any fall occasion.

This card features the same Summer Sun card base. This time I chose a Chocolate Chip piece of card stock which I aligned closer to the top of the landscape oriented card.

I adhered the 4x4 inch photo of a dahlia aligned on the left.  

Then, I chose a metal postage stamp brad in a golden yellow color.  I marked the spot for the prongs on the back and used a push pin to create a hole for them.  Press the prongs apart on the inside.

A full half sheet insert and this card is ready to be mailed on Monday.

Friday, August 4, 2023

Cards - Exchange

My August exchange cards are ready!

Again, I am using 4x4 inch photos from my 4x6 photo calendars.

I believe this is a strawberry flower with morning dew.  I would have taken it at the Community Garden.

I chose a Handsome Hunter card base.  

I cut a Stampin Up Lattice die in white.  I adhered it behind the flower photo allowing only a portion of it to show on the bottom.  

I added small yellow handmade paper flowers, white flower sequins and black tiny brads on the intersections of the die cut.

I then adhered this layer to the front of the card base, added a quarter sheet insert on the right hand panel and a white envelope.

Excellent.


My next card features a Queen Anne Lace flower which I would have taken in Ontario when visiting my sister.

The colors on this one were warmer so I chose a white card base.

I cut the SU Lattice die from a warm green textured card stock.  I split the diecut in two and placed one half on top and bottom of the photo.  The diecut was taped to the back of the photo then the layer was adhered to the card front.

The photo needed a bit of something so I used my fine black marker and added a dash frame all the way around the photo.

The photo has been trimmed to about 3.5 inches square.

I added a white quarter sheet insert and a white envelope and it is ready!

Tuesday, July 18, 2023

Exchange Cards - Purple Flowers

My cards for my exchange group are ready.

This month I chose purple/blue flowers for the cards.

The first card is a photo of a blue iris.

I trimmed the photo to make it skinnier and  mounted it onto a piece of Lovely Lilac textured card stock. 

I added a length of yellow striped SU designer Washi Tape below the photo.

This layer was adhered to the front of a SU Handsome Hunter A2 card base in the portrait orientation.

A white quarter sheet insert was added to the inside of the card.


The second card features a photo of Jacob's Ladder taken at the Botanic Park.

The 4x4 photo was trimmed at the top to fit the Lovely Lilac layer.  The lilac layer is textured card stock from Stampin Up and was embossed with a border folder.

I chose a yellow SU Washi Tape with a plaid pattern to place below the flower.  I had to trim it in half so it would not interfere with the flower.

White quarter sheet insert.

Monday, June 12, 2023

Exchange Cards - Pink flowers

I got my exchange cards made today.

I started with 2 4x4 photos from my previous calendars. I chose 2 pink flowers - a rose and Ninebark.

I chose Stampin Up Pretty in Pink card stock as the base for both cards.  I used a corner round punch on this photo.  I used the SU Slot punch to make a slot in the fold where I could pull my ribbon through. I used Basic Black Scallop Dots ribbon for both cards.

I wrapped it around the card front and taped the ends together in the front.  I then used a black mini brad to adhere the Martha Stewart champagne butterly punchie to the ribbons and press the prong apart between the ribbon and the card.

The photo was adhered to the card front with 3D foam tape in all four corners.

I added a quarter sheet insert to the inside.


On this card I changed the orientation to landscape/wide.

I wrapped the ribbon around the card front and taped it down in the front where the photo would cover it.

I chose a corner punch which added 2 notches to either side of the photo.

I added a sentiment which was printed black on white cardstock and punched with 1 inch punch then mounted to a 1.25 inch black circle punchie. I put a hole and threaded through a white thread and hung it on the Scallop Dot black ribbon.

The photo was adhered to the card front with 3D foam tape.  These are off tomorrow.

Monday, May 29, 2023

Exchange Cards

I got my Exchange cards made for May.

I have decided to use my 4x4 photos from my past calendars.

This is a beautiful Red Poppy I think taken at the community garden.

I chose Tangerine Tango card base with a small piece of green card stock that I taped together on the back.

I stamped the green with Border Builder stamp set - script in Basic Black ink to just to knock down the plainness.

I wrapped a piece of Daffodil Delight ribbon around the element over the join and taped the ends to the back.

I then adhered the full layer to the card front with double sided tape.


This card features a warm rich orange rose taken at the Botanic Park.

I chose the same Tangerine Tango card base.

I added some complimentary strips of card stock behind the photo. Cameo Coral, Groove Guava and Peach Parfait.

I adhered the strips and trim the right hand end with scissors cutting at an angle.

Adhered photo with double sided tape.

Wednesday, March 1, 2023

Card Exchange - March - Five Petal Flowers

I used the Stampin Up Five Petal Flower punch for my March exchange cards.

I started with a Soft Suede card base A2 in portrait mode.  I cut a layer of this gorgeous screen printed handmade paper.  

I wrapped a length of Early Espresso Taffeta Ribbon on the left hand side and tape the end to the back of the decorative paper. 

The decorative paper was then adhered to the card front with double sided tape.

I created the flower accent with a pearl white flower stacked with a Cherry Cobbler one then the same flower in a smaller size punched in pearl white all held together with a red mini brad.  

The accent was then adhered to the card front with a piece of 3D foam tape.

This card is in the landscape orientation. The card base is Very Vanilla. 

I adhered a strip of the decorative paper along the left hand edge.

Then added a piece of non shed gold glitter card stock and taped that over the edge of the decorative paper and trimmed the top and bottom to the card edge. 

The accent is a square of Cherry Cobbler then a piece of decorative paper leaving a small border. 

Again the five petal flower accent was adhered on the square with 3D foam tape.

These will be off to my partners shortly.

Wednesday, February 1, 2023

Card Exchange - Feb - Red Raffia

Used this beautiful screen printed designer paper on this set of cards.

I used a Cherry Cobbler card base for card number 1. 

Cut the DSP to 4.00 x 5.25 inches and adhered to card front.

I chose 2 pieces of left over card stock in greens and used the SU Eyelet Border Punch on the bottom edge of both of them. 

Layered them together and punched 2 one eight inch holes evenly spaced from the center.

I pulled the Cherry Cobbler Raffia through and knotted it on the front.  This layer was adhered to the card front about 1.5 inches down from the top edge. 

It was adhered with 3D foam tape. I unraveled the raffia to have the ties spread out.


For this card I used a Chocolate Chip brown card base.

I added a decorative paper layer leaving a small border. 

I used the light green card stock and punched both edges with the Eyelet Border punch.  

I wrapped a length of Early Espresson Taffeta Ribbon across the front and taped the ends to the back. 

Place 2 one eight inch holes evenly spaced from the center, pulled the raffia through and knotted it to the front.   This layer was adhered to the card front with 3D foam tape.  White blank inserts and white A2 envelopes. 

Sunday, January 1, 2023

Card Exchange - Jan - Silver Snowflakes

Some snow flake cards for January exchange.

I started with Not Quite Navy card base.

I added a blue snowflake designer paper which coordinated well but I purchased from Michaels years ago.  Cut it down to 4.00 x 5.25 inches.

I pulled out some old Satin Stitched Ribbon in the color Midnight Muse which was an in color at the time.  Works well with the warm dark blue. Wrapped around the designer paper and taped the ends to the back.

I created the accent with a silver fabric snowflake from the dollar store, then a white plastic snowflake sequin held together with a warm navy star tiny brad. Pushed through the DSP.  

The whole layer was adhered to the card front with double sided tape.

The card is in the tall or portrait orientation and the next is in the wide or landscape orientation.

This card is identical to the first one except the orientation is changed.

I added a quarter sheet white insert to the inside and a white A2 card.

These will be out to my partners very soon.


Thursday, December 1, 2022

Card Exchange - Dec - Triangle Trees

These are my December exchange cards.  I used the beautiful screen printed decorative paper again because the colors where Christmasy.

I selected a beige card base.

I cut some triangle trees from solid card stock. For this card it was a warm green then I cut the decorative paper a bit smaller leaving a border all the way around.

I used pencil crayons in browns and greens to create a soft background and for the tree trunk at the bottom. I then adhered the Christmas Tree over top.

I added a red star sequin at the top of the tree and gold ones around the rest of the card.  These are adhered with Bling Zot glue dots.


For this card on the right a very similar layout to the top one.  This time I used a Very Vanilla card base.

Same warm green solid card stock for the tree.  

Again, a color pencil background and tree trunk.  A red star sequin at the top of the tree.

The small stars were punched from gold card stock with my Creative Memories star border punch. This is the largest of the one in the border.  I adhered them with Scotch Quick Dry liquid glue as it has a very fine point on the bottle.

I used the green pencil crayons to add some rays to the stars.

A seasonal insert was added as well as a white envelope and they are ready to go.

Thursday, November 24, 2022

Card Exchange - Nov - Screen Printed Paper

This sheet of beautiful screen printed paper stayed with me when many of the other 12x12 sheets left last week. 

It had so many Stampin Up colors in it. Early Espresso, Kraft, Very Vanilla, Cherry Cobbler, Soft Suede, Chocolate Chip and Melon Mambo.

On this card I cut the decorative paper to 5.25x4.00 then placed on a Very Vanilla card base. I cut the paper following the floral design from left to right. I then cut a piece of Melon Mambo to finish the rectangle along the cards bottom edge.  This was adhered first then the decorative paper over top of that leaving a small border all the way around. I added rhinestones in the center of the flowers with Bling Zots glue dots.

On this second card, I but a piece of designer paper for the top of the cards and a piece of Melon Mambo for the bottom and chose a Soft Suede card base.  

I ran my piercing wheel tool to make some wavy lines in the solid card stock on the bottom to provide texture.  I adhered that below the piece of designer paper on the top.  

I added a piece of Very Vanilla card stock across the join of these above mentioned papers and adhered it with double sided tape.

I then punched a SU Five Petal Punch flower in the pink and then the ivory card stock.  I layered these and added a small yellow flower in the center. This accent is held together with a deep pink mini brad.  The flower was adhered on the strip of paper with 3D foam tape.

These are off to my exchange partners this week.

Monday, October 31, 2022

Card Exchange - Oct - Blue and Orange

I put together some cards for my exchange partners.

The paper sure looks like SU but it was not marked so I guess not.

It matches Groovy Guava, Baja Breeze and Early Espresso.

I cut the designer paper to leave a small border of card color.  

Then I taped a length of Early Espresso Taffeta Ribbon and taped the ends to the back of the designer paper layer.

This layer was then adhered to the card front.  The card above is orange in Groovy Guava card base in wide orientation.

I then put together an accent with a SU Scallop circle of Early Espresso with a white silk flower layered on top followed by a large copper sequin which is all held together with an orange mini brad.

The flower accent is adhered to the card front with a piece of 3D foam tape.  A quarter sheet white insert was glued to the inside.

The second card is blue with Baja Breeze card base and has a tall orientation. 

These will be off to my partners shortly.

Thursday, September 8, 2022

Card Exchange - Red & Black Daisies

I started with the plastic daisy accent and built the cards around that.  I added a silver cardstock scallop behind the daisy and held all this together with a black mini brad.

The designer paper is Stampin Up. I chose it for the black and white circles.  I wrapped a piece of grey twine around this layer and taped it in place at the back.  This was then adhered to the front of the black card base. I added the daisy accent in top left hand corner over the twine.

The greeting is color printed circle in red layer over a red Modern Label punchie. This was adhered with 3D foam tape.  A quarter sheet white blank insert was added.

This is very similar supplies with the opposite color scheme based on the black daisy.  I chose the portrait orientation this time. 

The twine was wrapped on the diagonal off each corner of the designer paper and knotted to the front then taped to the back.  The same paper was used here.This layer was adhered to a Real Red card base.

The scallop circle is Real Red as well and layered the same way.  Adhered to the top left hand corner.

The circle greeting is color printed in black and punched with the 1.25 inch circle punch. The Real Red circle is punched with the 1.38 inch then adhered to the back of the greeting circle.

This this then adhered to the card front with 3D foam tape.  

A blank insert and a white envelope rounds out the card.

These are off in the mail tomorrow.

Saturday, July 2, 2022

Exchange Cards - July - Chrome Circles

I had these chrome circles with flowers inside in my stash.  I believe they are old earrings (when big earrings were a thing).   I have clipped off the hanger with my wire snips.

I punched a 2 inch circle from coordinating card stock which in this case is Garden Green.  I placed it behind and pushed holes through for the mini brads. 

I chose a card base of Bashful Blue and scored it to create a tall card standing with fold at the top.

I wrapped Early Espresso seam binding around the card front and taped ends on the left hand side.  I adhered the metal circle with 3D foam tape over the place where the ends were taped.

I added strip of designer paper along the bottom edge of the card.  

I chose an oval color printed greeting to match the card color and adhered that with 3D foam tape.

This card is just a swap of the Bashful Blue to the Garden green for the card base.

Bashful Blue 2" circle behind the chrome accent with mini brads in Bashful Blue, Garden Green and Early Espresso.

They are finished off with a blank quarter sheet insert on the inside with a white envelope.


Wednesday, June 1, 2022

Exchange Cards - June

This months exchange card feature gold non shed glitter paper and plastic daisy accents.

I chose a Real Red card base and mounted black and white designer paper to the front. I placed a black daisy plastic flower onto a gold glitter scallop circle held together with a red mini brad and attached it to the designer paper. 

I ran a length of black thread from the flower to the edge of the designer paper and taped it to the back.  I adhered this layer to the card front.   

I added a narrow strip of gold glitter paper towards the top of the card.  I mounted a Stampin Up Modern Label Punchie greeting on the left hand side over the gold strip.

For this card I swapped the colors of the plastic daisy flower to red with a black mini brad.  

I changed the orientation to portrait (tall).

The strip of gold glitter paper is wider and adhered across the bottom of the card.

I wrapped the black thread over the glitter strip.

I created the greeting with a 2 inch oval punchie layered with a solid red one which was cut in half and offset on the right and left sides.

The greetings are adhered with 3D foam tape.

I added a white insert and envelope.

Sunday, May 1, 2022

Exchange Card - May

These cards are for my card exchange partners. 

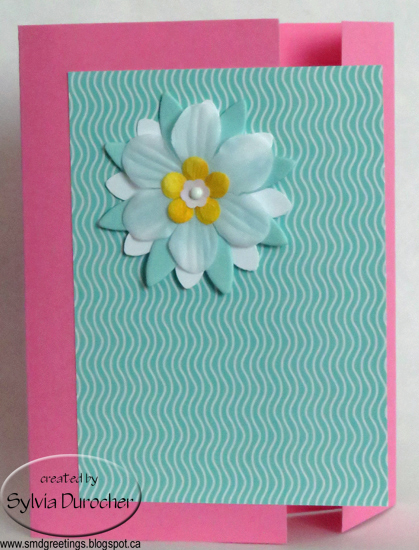
I started with the aqua handmade paper flowers then chose the Stampin Up Fresh Prints designer paper then the pink card base.  

This card has a Stampin Up Pretty in Pink card base with a designer paper layer featuring the color of Coastal Cabana which matches super well.

I layered a white flower sequin, a yellow handmade paper flower by Prima, then a white silk flower, the large handmade paper flower and lastly a large white card stock daisy punchie onto a white tiny brad.  Once aligned I pressed it into the DSP and press the prongs apart on the back.

The card base was scored at 1.5 inches then 5.75 inches and folded to the front to create an offset fold.  

The flower accent layer was adhered to the card front with double sided tape just on the left hand side so the Coastal Cabana DSP would overlap the small flap.

The card on the right has the same accent layer of die cut flowers and DSP in Coastal Cabana as the one above.

The card base for this one is Pink Passion which is a deeper version of the one above.

These are headed off to my card exchange buddies.

I added a white quarter sheet insert and a white envelope.


Sunday, April 17, 2022

Exchange Cards - April

We are starting a new session of card exchange.  I've decided to get my cards ready ahead of time so I will not disappoint folks when I am busy moving.

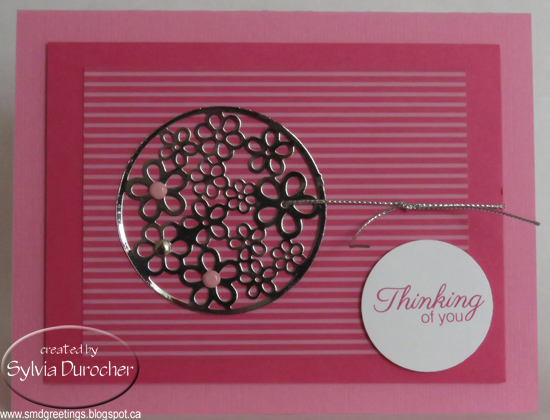
I had these silver chrome metal earrings in my stash so I off the hanger and mounted them with brads.

I chose Striped designer paper by SU in Rose Red and cut it to about 4x3 inches. I adhered it to a piece of sold Rose Red card stock measuring 4.75 x 3.5 inches. I placed pink and silver brads into the holes in the larger flowers in the metal accent.  

I strung a piece of silver cord through one of the flowers and wrapped around this layer and knotted it on the right. This layer was then adhered to the front of a Pretty in Pink card with 3D foam tape.  I added the round greeting in the bottom right hand side again with 3D foam tape.

On this card it the same layout with different colors.  The card base is Chocolate Chip.  The designer paper seems to have pink and brown lines so I chose those colors for the brads in the metal accent.

I cut the designer paper larger this time to 4.00 x 5.5 inches.  Attached the silver cord in the same way.

The greeting is punched with the Modern Label Punch in color printed in Chocolate Chip with an offset of solid card stock same as the card base. It was adhered with 3D foam tape.

Thursday, March 17, 2022

Card Exchange - Spring Watercolors


I am trying to get caught up on things.  

I decided to make some spring watercolors for my March exchange cards since the spring solstice is on Sunday.   I tried some wreaths yesterday which did not go well so I turned the paper over and tried again.

Some purple and pink blossoms on sprigs of greenery.  I used my Loew Cornell palette for these pretties.

A bit of spattering with the flower color and the leaf color and let it dry.

Fortunately, I still had 8.5 x 11 card stock which was not packed but it was white.  I did not like the idea of white watercolor paper on white card stock so I painted the edges of the card base with black watercolor.  Love the shades in the border when I adhered my watercolors to the card front.  With the photo studio also packed away I had to come up with alternate photo location. 

These are pressing and will be off to my card partners this afternoon.

Thursday, February 10, 2022

Exchange Cards - February - Watercolor Birds


These cards were made back in late January.  You can check the Watercolor Birds post.  This bird really adapted well to different coloring.  I was not sure it would.   

The left one was mounted to Old Olive card base and the right to Lovely Lilac.  They were spattered with brown watercolor by flicking the paint brush.  The ribbon is Soft Suede placed across the card and taped under the focal bird element.

These are off to my exchange partners.

Saturday, January 29, 2022

Card Exchange - January - Watercolor Birds


I have been busy so my Card Exchange cards are almost late.  I decided to use the small bird image I used for the thank you project I did in December.  This time I wanted to actually paint the birds.   I prepared my pieces of watercolor paper with different background colors.  The paper is 3.5 inches wide and I just applied a wash down the sheet changing the colors as I went. It was taped down and allowed to dry completely.

I trimmed the pieces of watercolor paper to squares roughly having a different color in each square.  I traced the bird onto the center of the square by placing the line drawing below my watercolor onto my light table. I used a permanent black fine Sharpie marker to trace the image.  I then used the colors I had mixed for the backgrounds to color the bird accordingly.

Then I matched the card base to the bird color.  The one on the left is Close to Cocoa and the right is Bashful Blue.  I added a length of Soft Suede grosgrain ribbon across the card and taped the ends under the focal element.  The birds are attached with 3D foam tape.  I spattered the cards with a bit of brown watercolor.

These are off to my partners.

Thursday, December 9, 2021

Card Exchange - Nov 2021

I am getting caught up on my exchange cards.

These are late for November.

I used the Sizzix Bigz Die -Assembly Snowman by Tim Holtz and cut all the pieces for this snowman.  The hat and eyes from black, the nose from orange, the hat band and scarf from red velvet paper, the arms from textured brown cardstock and the snowballs from white card stock.

I embossed the falling snow background with the Sizzix - Tim Holtz - Alterations Collection - Christmas - Texture Fades - Snowfall and Speckles in blue card stock.

I adhered the snowman with quick dry adhesive then mounted him on the card with 3D foam tape.  I added a prism snowflake attached with bling Zot and a SU Artisan Label greeting in the bottom right hand corner.