Showing posts with label process. Show all posts

Thursday, April 25, 2024

"My Bag" Tag Process

I have been thinking about this idea for a while.  I have made many bags in the last few years. Several for myself, others for gifts, still others to donate to good causes. Some are for shopping, some for carrying books, and the latest for wine bottles. They are well finished, made to last, functional and look nice. 

I would like for those who use my bags to think of them as their own special bag.  It protects their stuff, makes carrying stuff easier, it is unique and easily recognizable at a social event when it is time to head home. 

After some brainstorming, I decided to attempt making tags for the bags I make.  I still have a supply of shrink plastic from card making days.  That should work.  Well this has been a process. 

My first ones were "tiny".  After I had the size down and asked for feedback. It was suggested they have round corners, be sewn with white thread to match the plastic better, should have 4 holes and maybe the edge of the bag would be better. The last photo is the model I am going with. I will put them on all my bags in stock and going forward. Size is 2"x1.25 with four 1/8" holes before shrinking.


I made a paper tag to explain my intention with the the making of the bag and how I hope they will use them.

A pretty shopping bag that you don't forget in the car when you go grocery shopping.  

Using a wine bottle bag at your next get together making bring a bottle easier and remember its your bag so bring it home.

A book bag to protect your book when you commute to work, take a trip, or take it to the park to enjoy the sunshine.

A book to hold your organizer/planner/daytimer and those essential things you need when you are out and about. 

A project bag to hold the pieces of your latest craft project. 

A lunch bag to bring your meal at work, at a sporting event, or at the park.

I am sure there will be different bags in my future.

Friday, November 24, 2023

Christmas Cards - Watercolor Ornaments - Process

I decided I wanted to make some special cards for my family.  I wanted to use watercolor and ink. What to make? I considered using die cuts so that I would have a framework to work within.  I did get rid of quite a few so I had to investigate what I had left.

Gingerbread - nice size but not enough artistic options

Snowman - too big and limited artistic options

I have quite a few ornament dies.  

Some too big.  These don't leave any room for a branch or other thing to have the ornament hang.


Others too small.  Not enough to stand alone, then I could make 3 three but that is 3 times the painting and design.  Are they all the same color and design? 

This one is one of the Stampin Up Keepsakes Ornaments as are the 2 small ones above. 

I could have used the three different ones but again a lot of decisions to make and designs to come up with.  

It was very cute.

I decided to use a permanent marker instead of the dip pen because I had watercolor containers, several brushes and several palettes out so I could have easily dip the wrong tool into the wrong liquid.


This is the Sizzix Ornament #2 die which was the right size. It had a nice hanger. 

It had this bump below the round part and here was my first attempt.  I did not like to highlight it by tracing it with the marker. Then it should be shaded to make it look nice.


I could cut the bump off as you can see in this photo.  Yes, that was better.  I was inclined to create the main part of the ornament as a circle which would limit my options.


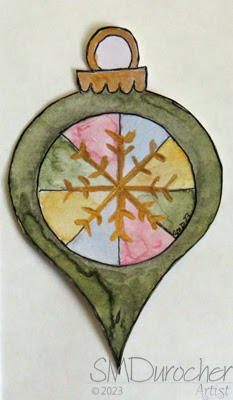
Then, I remembered that I had designed a digital ornament quite a few years ago. You can see it in this post.   I decided to pursue this option.      Pros: Using my own design was a great idea.  It meant I could size it exactly the height I wanted. It had a hanger. Cons: I would have to cut them out myself.  I decided that would add to the handmade original feel.
I traced the shape onto my nice mixed media paper with a pencil.  I then cut them out and then added the black line with the marker. Eventually, I learned it was better to do the line first then erase the pencil lines and then cut out the shape.  Here is one of my rejects.  I was not happy with the green watercolor on the outside, the circle limited my designs, then I used acrylic gold to try and save this one and I was not happy to mix mediums.
After a lot of trial and error I finally found a process that worked for me. I wanted to put these ornaments on a green watercolor background then onto a card base.   I had problems with the green watercolor layer as well.  I used salt to create texture but it must not have been wet enough so I got very little of it. This is one of my cards.  I'm not sure about just having it stuck there.  It should have a connection but I don't what it will be. Should it be a bow? a ribbon?  Would have been better to think of that before I adhered it.  We shall see what I come up with. 

Monday, March 6, 2017

Mosaic Monday - Restoring a Cast Iron Fry Pan

I have been looking for a cast iron fry pan for a while. I have been checking the thrift stores but the prices seemed high based on my budget. After checking out new ones, the second hand prices became more appealing and were likely going to be better quality. I should have done some research on line before buying but I lucked out.

Here's what it looked like when I brought it home with a price within my budget. The surface was very rough and black.  I liked the weight in my hand and the size at 8 inches was perfect.
I started scraping the inside and came to realize that there was a layer of crud which could be scraped off.  The bottom was even worse.
There was some writing on the bottom that I could barely make out.  Taiwan was one of them.

Upon checking several places on line the verdict seemed to be not favorable for these made in the east. I realized that these were from vintage resellers who were collecting on brands made in the west before 1960. There were a couple places that had restored them and the users were very happy with the pan.  


Encouraged, I then searched on-line for the process and the tools required. 

A plastic table cloth to protect my working surface, plastic gloves, steel wool, and paper towels.  I used a old butter knife as a scraping tool but I see it missed appearing in the photo.

Check out that crud!!


Caring for a cast iron fry pan requires immediate cleaning after every use.  I recognized that I would have to season this pan once I was done.

As you can see, this one has been allowed to rust sometime in its life.  It took me 3 hours of very hard work to get back down to the metal.

I suspect this one was used on an open fire which would explain the very heavy layer of crud on the bottom.  The inside was quite a bit easier to clean.

It received 2 baths in boiling water in hopes of softening this layer of crud.  I covered it completely in hot water and let it soak for 10 minutes then let it cool.  I worked on it some and saw results so after a scrap especially on the bottom I soaked it for a second time.  Between the knife and steel wool I was getting down to metal.

I was making progress!
The next step was a scrub with coarse salt and a bit of water applied with steel wool.  I applied this treatment twice to the inside and twice to the bottom.

As the metal surface was emerging the remaining layers of crud were being revealed. I took time between treatments to scrap the tougher bits.

It was starting to look like it might have when it was new.


I was not able to completely get rid of the rings in the center.  But it was looking pretty!

I headed for bed late in the night.

Seasoning would be on the agenda for the next day.


The seasoning process involves covering the pan with a thin layer of vegetable oil inside and out.  Then placing it in a 350F oven for 1 hour.

The pan underneath is to catch any drips.

After the hour, just turn the oven off and allow the fry pan to cool in the oven.


The result is a really smooth cast iron fry pan.  It feels really nice.

I look forward to using it.  I hope i will get a good sear on a steak, a nice color on Welsh cakes and who know what else.

It was a very interesting experience and very worthwhile.

My body is telling me that it was not happy to have worked so hard and repetitively on this project.  
Sharing with Maggie at Normandy Life for Mosaic Monday #30.


I`ve made pancakes, fried steak, and stir fried veggies in it so far! Excellent.

The original numbering system for old cast iron fry pans equated to the eyes (holes) in a wood stove. You would removed the cover to the hole and placed the fry pan directly in the hole which provided direct access to the fire in the stove.  Some had ridges on the bottom to help that process. The old fry pan typically have very smooth interiors and are much lighter in weight than those made in after the mid 60s.
I know more about these now so I will take that along during my thrifting.  There are a couple in my world who are on the hunt.  I will do what I can to help them out.