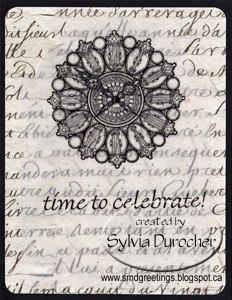
Still another card for the CST Home Page Card Challenge. It was to include a clock on the card. I found some images of clock faces on line and printed them on vellum along with a greeting.
The clock face is vintage and the hands are just about the same size so a little harder to read the time.
This is a black card with script background designer paper. The colors worked but the greeting gets lost in the background. I punched the corners with my corner rounder. I added some definition to the hands from the back side of the vellum with a fine black marker to help with the readability of the time. Again a tiny black brad in the centre of the clock and some vellum adhesive behind the greeting.
Showing posts with label DP. Show all posts
Monday, May 19, 2014
Challenge - Pink Clock
Here's another card for the Home Card challenge at CST which is a card with a clock on it. I printed them on vellum.
This clock has the circle separated into wedges of color for each number. The hands of the clock are black and quite dainty. It has red second hand.
For this card I chose a dark brown card with a red tone to it. I mounted a piece of salmon colored polka dot designer paper leaving a large border. I then cut the vellum to smaller than the DP so it would leave a border as well. I put a tiny black brad in the center of the clock and some vellum adhesive under the greeting.
This clock has the circle separated into wedges of color for each number. The hands of the clock are black and quite dainty. It has red second hand.
For this card I chose a dark brown card with a red tone to it. I mounted a piece of salmon colored polka dot designer paper leaving a large border. I then cut the vellum to smaller than the DP so it would leave a border as well. I put a tiny black brad in the center of the clock and some vellum adhesive under the greeting.
Labels:
brown,
celebrate,
challenge,
clock,
clock face,
DP,
HPC,
pink,
polka dots,
vellum
Monday, February 24, 2014
Card Club - Feb - Baby Onesie
I'm trying to add in a few cards for those other occasions into card club as requested by the ladies. Baby cards being one such occasion.
I cut the onesie with the Cricut and the Wrap It Up cartridge. I chalked the edges a bit to add some dimension. I adhered the small flower sequins to the front with Zots for Bling which are very small. Worked great. I matched the onesie to the card colored then added a soft colored DP to the card front. Once adhered I added a white picot edge satin ribbon across the bottom third of the card and taped the ends to the inside of the card. The greetings I included were congratulations or Welcome Baby!. They were colored printed to match the card color and punched with the Stampin Up Modern Label punch. I added the onesie with and the greeting to the card front with 3D foam tape. I made some green, yellow, and purple which will work all the time.
Labels:
2014 Card Club,
baby,
chalk,
DP,
flower sequins,
green,
Modern Label punch,
onesie,
satin ribbon,
SU,
white,
Zot Bling
Monday, December 23, 2013
Card - Christmas Cards for Girls
I made these cards as a result of a request from one of the girls at work for Christmas cards for her girlfriends and Mom. I chose the Christmas Magic designer paper by Fancy Pants Designs. It was cut with the Sizzix Tim Holtz Cabinet die. I added a Baja Breeze card and layered a piece of embossed vellum in between. The embossing folder is Sizzix Textured Impressions Sugar & Starry Night By Basic Grey. I wrapped white narrow organza ribbon around the die cut and tied it in a knot on the left hand side. I punched the Cherry Cobbler color printed greeting with the Stampin Up! Artisan Label punch. I punched another one from Cherry Cobbler and cut it in half width wise and then layered them behind the greeting. I added a small bling rhinestone above the Merry. This greeting is adhered to the card front with 3D foam tape. I placed 2 white silk poinsettias and a deep wine flower in the centre and pushed a hole through all the layers and held them all in place with a coordinating large brad. The card on the right is punched with the SU Decorative Label punch.
Labels:
Artisan Label punch,
bling,
blue,
brad,
Christmas cards,
color printed,
decorative label punch,
DP,
embossing folders,
greeting,
poinsettia,
red,
rhinestones,
Sizzix,
Starry Night,
SU,
TH,
TH Cabinet Die,
vellum,
white
Tuesday, June 18, 2013
Card - Farewell - Blue Floral
Another card for the farewells at work. I started with a large half sheet leaf green card. I added the designer paper, which I ripped at about 1/3 down from the top. I added a strip of blue card stock down the center at 8.25" tall onto which I added a length of bright green grosgrain ribbon. The ends of the ribbon were taped to the back of the DP. This layer was then adhered to the card front. I cut a scallop oval in an off white card stock with Spellbinder Nestabilities, then layered a smooth oval of the same blue as the strip, then a punched some sprigs of green leaves from some green card stock with the Martha Stewart punch. I added 3 off white silk hydrangea flowers to the center held in place with a large blue brad.
Labels:
blue,
brad,
DP,
farewell,
Flowers,
green,
grosgrain ribbon,
half sheet,
hydrangea,
large card,
leaf,
MS,
nestabilities,
off white,
oval,
punch,
SB,
scallop oval,
white
Card - Farewell - Taupe Orchids
I made this half sheet card for a couple leaving our office. I started with a taupe card onto which I layered a piece of Designer Paper by LilyBeeDesign - Buttercup - Puddles. I trimmed the paper to center the paisley like design on the card front. I cut a Spellbinders Nestabilities Label 13 from the same cardstock and spattered it with white acrylic paint. I punched holes in the top and bottom with the Stampin Up! slot punch. I pulled 3/8` grosgrain ribbon through and taped the ends to the back of the DP. I chose one of my photos of orchids and applied a sepia filter to it and printed it on white card stock. I cut it with a Spellbinders Oval Nestabilities and then cut a white oval in the next increment. These were layered and adhered with 3D foam tape to the center of the label. I placed a taupe brad through the ribbon and card front just above and below the oval center.
Labels:
brads,
DP,
farewell,
Flowers,
grosgrain ribbon,
half sheet,
Labels 13,
large card,
orchids,
oval,
Photo,
SB,
slot punch,
SU,
taupe,
thin dies,
white
Sunday, June 16, 2013
Card - Birthday Flowers
I made this card for my sister. I will be with her for her birthday this year which has not happened in years. She has moved closer so I anticipate it happening more often. It is so good!
I think the card is Marina Mist. I layered onto it a Spellbinders A2 Fancy Ribbon Threader white layer. I run a piece of blue seam binding through the bottom threader which matches the card really well. I found a complimentary piece of designer paper trimmed it to not quite square and adhered it above the threader. I layered onto it 3 flowers cut with Sizzix Flower Layers #10. The large ones cut from pearl vellum and the small ones from matching card stock. After making holes through the flowers and the card front with a push pin I added a small white sequins to the tiny white brads which hold the flowers in place.
Labels:
blue,
DP,
Flowers,
ribbon slider,
Ribbon Threader,
SB,
seam binding,
sequins,
Sizzix die,
tiny brads,
white
Thursday, April 18, 2013
Card - Books
I made this card for my brother-in-law's birthday. Here's the sample on which I based my card.
I started by finding small designer paper scraps in my bucket. A great scrap buster technique. I selected them in the brown tones. I cut them down to .75 but they needed to be trimmed some more. The sample I found indicated 5/8" which is closer to the right width. Length 4.75" before trimming the ends. The ends are cut with a circle punch. Check out the link above for details. I used my Chocolate Chip ink pad to color all the edges of the books before I glued them to a piece of scrap paper. I tied some thick crochet cotton around the stack of books and added 2 Cuttlebug die cut tags onto which I added my greetings. This was layered onto a piece of ivory which I used chalk to create a bit of a shadow and then adhered the stack. I mounted these layers to a dark brown card.
Saturday, April 13, 2013
All Occasion Stack Class - Book Birthday
I started with the BoBunny Weekend Market Study designer paper with the great books on it. With the great colors in this paper I selected brown, blue, green and burgundy card stock for this set of cards in the stack. I have shown the brown one here. I selected a taupe gross grain ribbon which I placed across the DP and taped the end to the back. This layer was then glued to the card front. The greeting was color printed on taupe card stock and punched out with the SU Decorative Label punch. I then punched another label in the same color as the card which I split in two lengthwise from one point to the other. It could be split widthwise as well. I trimmed the points I cut through off so they don't show when I offset them. I then glued the solid colored label halves offset to the top and bottom of the greeting label. I placed 3D foam tape piece at either end and placed it over the ribbon.
Saturday, April 6, 2013
Card - Diecut Thanks
I made this card for my nephew who helped me with some new technology challenges I had on the long weekend.
I selected a kraft card then I added a piece of this great Block Print designer paper. I cut the greeting letters with the Cuttlebug Red Tag dies in ivory card stock. I chalked them a bit with navy chalk. I wrapped the DP piece with navy seam binding and tied a short piece in a knot below the greeting.
Labels:
block print,
chalk,
Cuttlebug die,
DP,
ivory,
kraft,
navy,
Red Tag,
thank you
Wednesday, March 27, 2013
Dog Treats
We had a fund raising bake sale at work today. Last night I made dog treats in the shape of dog bones. I made 2 different kinds - peanut butter and the other fruit based.
On the left, I cut a designer paper with doggie words and images with the TH Ornamental die, folded it in half and added a color printed tag.
On the right, I wrapped metal tea tins with designer paper and I added the red label with the ingredient details which bridges the shortage of the DP.
We had a very good sale but doggie treats were not as popular as last year.
On the left, I cut a designer paper with doggie words and images with the TH Ornamental die, folded it in half and added a color printed tag.
On the right, I wrapped metal tea tins with designer paper and I added the red label with the ingredient details which bridges the shortage of the DP.
We had a very good sale but doggie treats were not as popular as last year.
Labels:
color printing,
cookie cutter,
dog,
DP,
tea tin,
treats,
words
Monday, January 28, 2013
Card Club - Jan - Gatefold with Square Accent
The girls at card club have asked for cards for specific occasions. I included baby, wedding, and heart cards in this kit. I started with a purple card and scored at 2 1/8 from either side which will create a gate-fold card where two side flaps fold to the center. I added pieces of designer paper on each flap. I color printed the square accents which were layered onto a 2.5x2.5 inch piece of white card stock. The insert is placed on the center panel and was cut to 4" x 5.25"
Labels:
2013 Card Club,
card,
color printed images,
Designer Paper,
DP,
gate fold,
square
Monday, January 21, 2013
R2G Card Kits - Woodsie Felts Cmas
I created these cute card kits with felt shapes. Red moose, green trees and white snowflakes. I selected wood background Designer Paper from Rusty Pickle call Game Time. I printed the greetings on off white card stock in Chocolate Chip. The greeting is cut to 1/2 tall and 4 1/4 inches wide. I selected dark brown card stock onto which I glued the DP. I placed the Woodsie Felt shape near the bottom of the card and using a push pin created a hole through the felt and the card. On the moose I selected a place where his eye would be and inserted a brad which holds the felt in place. On the tree there is a hole at the top so I place a star brad there. On the snowflake I placed the brad in the centre. On the greeting I cut a flag end on the right and aligned the left to the edge of the DP and glued it down. I used a Zot to hold the button in place to the left of the greeting.
Monday, October 29, 2012
Cards - Quilting - DP

On these cards I used some quilting related designer paper.
The card on the left I placed a 4" square of DP on the top portion of the bittersweet orange cad. I added a seam binding ribbon below the square and tried a new way to tie it. I made a hole in the centre of the space, then ran the ribbon across the card through a slit in the fold through the hole to the front with one end going above and the other going below the ribbon going across the card. Tied a knot and a bow.
The card on the right I split the 4" square in half and placed the pieces at the top and bottom of the card. I placed a greeting in the centre space that was color printed then cut with one of the Apothecary Framelits. It is held in place with 2 mustard brads.
Cards - Quilting Theme

I made some Pin Wheel cards for my Card Gift Sets for the upcoming sale. Check out the original posting here with all the details. These are red, white and black. Stamped greeting on the Word Window punchie.
Sunday, October 28, 2012
Cards - Cherry Blossoms
I've been using these Cherry Blossoms which I cut with the Cricut back in September. I've used them for incentive and card club. These cards are going into card kits for my sale next Saturday.
Labels:
cherry blossoms,
circle punch,
color printing,
Cricut,
DP,
nestabilities,
Sizzix die,
texture
Wednesday, October 24, 2012
Coaster Calendars - Vellum Sentiments - More

I made a lot more coaster calendars. Here a few more of the different ones I made. I made some golf ones, some friendship ones as well as general ones. You will see on the purple friendship one I designed some sentiments in ovals. The down side is they had to be cut by hand so I only made a few of them.
Labels:
brads,
calendar,
coaster,
DP,
friendship,
golf,
music,
sentiments,
vellum
Tuesday, October 23, 2012
Coaster Calendars - DP - Vellum Sentiments
Still working on coaster calendars. I've taken a different direction. These I have pasted Designer Paper paper to the front and trimmed to the edge. I took a long time and several rabbit holes before I settled on this way to present the sentiments. Really happy with these! The sentiments are printed on vellum and cut with one of the Apothecary Framelits from Stampin Up! which makes it super easy! Then I attached to the front with 2 tiny black brads. In some cases I have chosen DP that relates to hobbies like sewing, quilting, music and golf which help me reach these customers. I've put a hole in the top centre and a magnet on the back which should work for most people.
Labels:
Apothecary Framelit,
brads,
calendar,
coaster,
color printing,
DP,
framelit,
sentiments,
vellum
Monday, October 22, 2012
Card Club - October - Pears DP
The card features some terrific Designer Paper from Basic Grey with pears and flowers on it. I decided to make the card the deep burgundy color in the paper and selected a teal card stock for the eyelet border. The border was made with the SU border punch. I used the Modern Label punch with the Word Window punch for the color printed greeting. The DP was cut to 2.5 inches then the teal to 3" and border punched then split in two.
Labels:
burgundy,
color printing,
DP,
Modern Label punch,
pear,
teal,
word window punch
Saturday, October 20, 2012
Card - Challenge - Pink Black White
I made this card for the Home Card Challenge on my CST group. The challenge was a color challenge.
I started with a black card onto which I adhered a piece of Designer Paper in pink stripes. I added a piece of black gross grain ribbon vertically on the card and taped the ribbon ends to the inside. I cut a Spellbinders Label Nine nestabilities in dark pink then a smaller one in another designer paper with pink shoes. I glued these together then adhered it over the ribbon. I added a SU eyelet border in white at the top over the ribbon and DP. I added a SU Modern Label punchie in black with a pink SU Word Window greeting.
Labels:
black,
color printing,
DP,
eyelet border,
nestabilities,
pink,
SB,
shoes,
SU,
white,
word window punch
Subscribe to:
Posts (Atom)


