Showing posts with label zipper. Show all posts

Monday, March 30, 2026

Sewing Project - Front Zipper Pouch

I made another bag the other day.  I wanted to give the Front Zipper Pouch a try.

I chose this beautiful floral print in cotton.

I chose ivory thread and a taupe zipper.

I added a layer of flannel for a bit of padding.

The lining is gorgeous navy microfiber fabric which will wear well.

The cotton outer layer was cut 9 3/8 inches x 23.25 inches.  The flannel was cut 9 3/8 inches by 21.75 inches long.  The zipper is a 9"/23cm one.

The flannel was quilted to the cotton with the curvy decorative stitch vertically along the full length. 

I made a wrist strap by cutting a length of the cotton outer fabric, folding it in half then in half again and top stitching both sides. Finished it measures 4 inches long.

Then I inserted the zipper on the short end between the outer and the lining.  Now, I have a tube with the zipper inserted.  It was a matter of deciding where the zipper would be placed. I could be at the very top or some where along the top third of the pouch. I chose 2.5 inches down from the top fold. Once decided, I pinned the side seams right side out, added the wrist strap above the zipper and stitched about 1/8 inch from the edge then turned inside out and sewed the side seams at generous 1/4 inch to enclose the first seam inside. Turned it right side out.  Pressed really well.

I added a metal charm on the zipper pull so that it would be easy to open and close.

Note: I should cut the flannel from the sides seams as they are quite thick.  I was planning on doing some stitching on it but I have not come up with an idea that seems to fit so I will pondering it over the next few weeks.

Finished size is 8" wide x 11" inches tall.

Wednesday, December 13, 2023

Sewing Project - TV Chair Outfit - Cushion and Headrest Cover

This is my TV chair with its new outfit.

I received this chair from my aunt as a gift this summer and it reclines to bring a footstool.  I loved it.

I have been using the fleece blanket I had on the couch but it is too big and get caught in footstool when I get up and close it.

I wanted a new blanket, a new cover for the cushion I have been using and an updated head rest cover.

There is still a remote control holder to come but I have not decided and designed it.
 

This is the Cushion Cover.

I used the fabric I purchased this summer which matched all the chairs in the living room.  You can see the fabric in this post.

I found a yellow zipper in my stash that would be long enough for a side opening.

This fabric frays very easily so I had to serge all the edges as I went along.

I cut 2 pieces of this fabric 21 inches x 15 inches. This would allow 1 inch seam allowances. 

I followed this tutorial to put the zipper in. It worked perfectly.  I used the selvage edge of the fabric and folded it in 1 inch on both pieces. I sewed the ends about 3.5 inches leaving the center open where the zipper will show.  

The zipper is 14 inches on the 18 inch side. I then pinned the zipper to the opening making sure to mark where the metal bits were to make sure I sewed on the far side of those.

Once the zipper was in I could just sew up the other 3 sides. Make sure you move the zipper pull down before you sew up the sides as that is the opening you will use to turn it inside out.

I did have a large seam allowance (2.25 inches) across from the zipper but it was better to have too much than find I was short.

I had pinned loosely to figure out where the seam should be.  

Sewed it the other sides together and turned it inside out, used my chopstick to push out the corners. My little cushion fit perfectly inside.

I used the grey thread to sew this project.

Headrest Cover
The research and gathering of fabrics I did this summer paid off because the piece of 100% cotton upholstery fabric was in the bucket.

That will work for the headrest cover.  I paired it with a piece of microfiber fabric from the stash as well. 

I laid the cotton over the microfiber and then used my long quilting ruler to mark a rectangle with square corners. 

I then sewed those together leaving a small area to turn it around.

I then turned it inside out and ironed it flat.

I stitched a seam very close to edge to close the opening I used to turn it around and it finishes off the edges nicely.

I had gone a while back to purchase twist pins to keep the arm rest covers in place.

I dug out 2 of them and tacked the head rest cover in place.


I am very happy with the final results of this several day and 3 piece project.

I have 3 pieces that can easily be washed and kept clean.  This will keep my chair clean as well.


I will be working on the remote control holder.  I think it will be over the arm rest


I will keep you posted.


Friday, November 10, 2023

Sewing Project - Tote Bag - Red Tulips

I made another tote bag for charity. See the previous one here.

This is a beautiful red tulip microfiber with green accents and a red zipper.

This pillowcase was small so only 18 inches wide. I was lucky that one of my shorter zippers was red. Win Win.

I used the fabric from a forest green pillowcase of poly cotton for the accents on this bag.  The handles will be more durable rather 100% cotton.

I added a fabric on the bottom again to help with keeping the bag looking good and providing more strength to the bag if it is very full.  I boxed the corners again.

I chose to fold over 3 inches at the top of the bag to strengthen the to edge and help with the proportions. I created handles with the poly cotton green fabric. They were cut 3.5 inches and were 40 inches long on each side. 

I put pockets on both side because I had the fabric and who can't use an extra pocket. Phones, keys, day books always need to be close at hand.

I used the same zipper panel as before.  This works so well.  The red zipper is very visible in the green panel.  I followed the Zipper Panel Tutorial by The Crafty Gemini. Tabs at each end makes it easy to find and open the zipper.  It goes completely across so gives full access to the bag.

I chose to make the handles only go down just below the pockets on both sides.  Well anchored ends and connections at the top.

Boxed corners and a decorative stitch along the top edge of the pocket and the seam which holds the zipper panel in place.

Will be off to charity before Christmas.

Monday, October 30, 2023

Sewing Project - Large Tote Bag - Stars and Planets

My sister and I had a conversation the other day about projects which we could make to give back. 

I still have quite a few microfiber fabric which can be used for another project.  Originally, they were collected to make Re-Useable shopping bags.

Those were donated and have not sold really well.  I think presentation is the problem. I am moving on.

Morning Star is an organization which supports women in crisis.

There is no dignity in carrying all you own in a plastic garbage bag so large bags can be used to give these women some self worth.

I chose the Stars and Planets pillowcase which is made of deluxe microfiber fabric. 

I paired it with some cotton fabric in deep navy small pattern which was donated to me when a quilter in our group retired and de-stashed her supplies.

I decided to put a piece of navy on the bottom since the fabric is white the bottom of the bag will likely get dirty fast and being a dark color will help.

I layered the cotton over the microfiber which will add strength.

I wanted the bottom to be boxed. I created the corners at 5 inches across then folded the  triangles onto the bottom of the bag and sewed them down.  That will add layers on the bottom and help to add structure to the bottom corners.

I chose a navy thread so it does not show on the cotton fabric.  It is more evident on the microfiber pieces.


I created the zipper insert the same what I made it for my own tote bag.  I used the method explained in this video Tutorial by Crafty Gemini.

This produces a completely finished edges with no open fabric ends.  Tabs are added to the 2 ends of the zipper so it is easy to pull open and shut.

I hemmed the top edge of the bag after I cut off about 10 inches off the top of the pillow case once I had undone the seam that created the top hem.  I used that fabric to make the handles. Microfiber more durable than cotton being handled all the time.  Handles are 1.25 inches wide finished with the seam place in the back center. They are 53 inches long. I tied the bottom of the handles in the cotton bottom for sturdiness. They were sewn 7 inches from the sides. 
 

It is important to have reinforce the stress points to ensure there is some strength is distributed to take the wear and tear.

The zipper insert is the same width as the opening of the bag. It is about 6 inches deep which is slightly more than the bottom but we have to account for the seam to put it in.


Now it is just a matter of pinning it very carefully and sewing the insert into the top of the bag.

I chose this decorative stitch on my sewing machine which produces this wavy seam which adds a bit of pretty to the bag.

Once the zipper insert is sewn in the zipper end tabs can easily be accessed when opening or tucked in when on your shoulder. 

It does allow an addition amount of space for hold stuff when the bag is full.

With the zipper insert the same width it makes the bag well sealed to ensure there are no holes where one could lose items from inside the bag.

The color of the zipper provides some contrast in the dark fabric so it is easy to see.  The tabs also help the find the zipper slider.

I will be making a few more of these to be donated in early December.


Saturday, April 29, 2023

Sylvia's Simple Shots

The critters are starting to stir if they were here all winter.  Others are arriving backs from the southern climes.

The White Squill is a perennial flower that is one of the first spring flowers.


Got some news on Sunday that the leader of our quilting group is moving away.  I have volunteered with her on women's ministries for many years. 

They were able to sell their house and will be moving to be near their daughter.

She has liquidated most of her fabric stash.  She brought odds and ends that needed a new home so I was grateful to receive zippers, serger thread, a bit of bias tape and a small box of buttons.

I found the smallest red heart buttons in this box.  They certainly will come in handy for Macro Monday challenges.

Thanks so much for sharing.

We will have lunch with before she goes.

I am so glad to have my tax return done for another year.

Now that I am retired it is so much easier but I seem to forget that and procrastinate.

It took only a few hours and it was done.


I had time to have a walk around Lois Hole Centennial Provincial Park with my friend which I had not seen in a couple of months.

The red wing black birds had not returned yet.  I missed their distinctive calls.

The Canada Geese were jockeying for the best nesting places.

The water is very low so I hope all the birds find places to raise their young.


I attended the show where my aunt was displaying here old car watercolors.  They turned out really well. There was over 50 artists on display.

I met my other aunt and her husband at the venue.  We went for a walk along the Sturgeon River while we waited for the reception to start.


I is for Innocent by Sue Grafton is book I finished this week.

It`s always nice to reaquaint myself with Kinsey Malone the private investigator.  She has new work digs and is taking on work on her own.

Lonnie Kingman has hired her to continue work which Morley Shine was doing for him but he died suddenly.  Kinsey thinks it will be just a bit of final work and all the information will be ready for the civil suit.

David Barney was acquitted of the murder of his rich wife - Isabelle.  He is now spending her money - thank you very much.  Finding Morley`s files a but unorganized she needs to retrace some of those steps and redo interviews.

David`s story seems to be corroborated by evidence that he is innocent. 

Tuesday, March 28, 2023

Sewing Project - Bespoke Casserole Carrier

I brought my sister some fabric that came my way both at the ReUse Ctr and from the quilting group.  She offered to make me a casserole carrier.  She was planning a zippered one but had not worked out the details. I thought a less bulky zippered one is what I would like so we set out together to design one.  She had this nice navy embroidered fabric and we found some yellow fabric that matched the stitching quite well.

I had brought one of my casseroles to ensure that it fit nicely. 

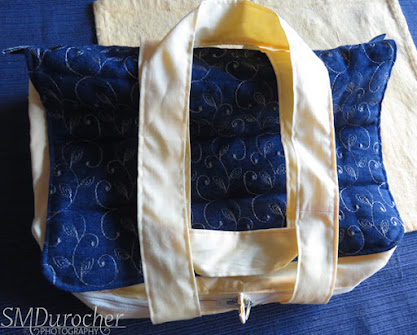
This photo is of the carrier closed the the handles folded on top.

She paired the navy embroidery fabric with some navy cotton fabric for the inside.  We cut the navy layers based on the casserole and rounded the corners. Then we sandwiched fiberfill in between these 2 layers, sewed all the way around and turned it right side out.

We checked again to see if it was going to be big enough.  We had planned for a band of yellow for the height of the carrier. 

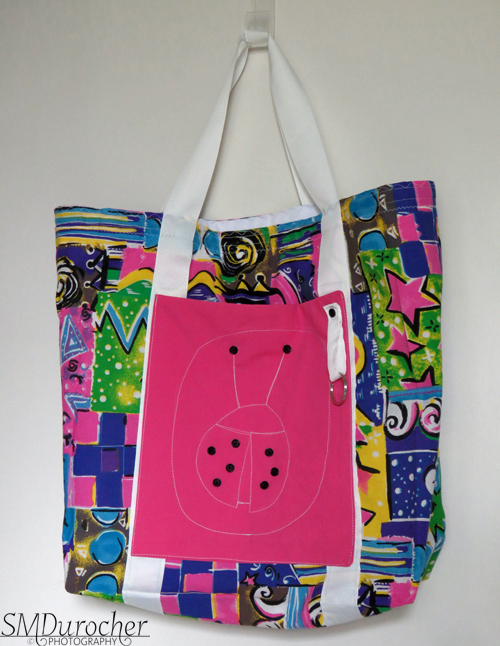
We used the same method I used for my bespoke tote for the adding the zippers to the side band.  You can find this tutorial here. We found 2 yellow zippers in her stash. We decided to make the zippers go around the carrier to the left and to the right. We planned to have the side band be 4" tall but it ended up being a bit taller than that at almost 5 inches.

The carrier features tabs to open the carrier, to close the zippers, handles.

The blue tabs are at the back of the carrier and help when one is closing the carrier.  They had to be sewn directly to the zipper.

The yellow tabs are in the front where the zippers meet and there is one for the left zipper and one for the left zipper to help with the opening of the carrier.

The handles are long enough to accommodate several containers and are centrally located to allow the container to be balanced in the carrier.

I thought it would be a good idea to have something stiff in the bottom of the carrier so I searched my stash of wood and found a piece of plywood 8 inches square.  That will do nicely.

My sister donated from Mom's stash a piece of blue anti slip material in Mom's favorite color.  I wrapped it around the wood board and voila it works out perfectly.

Now, the dish will stay in the center of the carrier and will not slide around.

Really happy to have reused materials.

The carrier with my beautiful yellow casserole by Kitchen Aid.  It was a gift from a friend for my birthday years ago.

That seems to be a good fit.

This casserole measures 11 inches handle to handle and does have a lid with a knob which means the height needs to be accommodated but we measured for that.


And here it is ready to take a dish to a potluck, picnic, a family get together and party with friends.

It works so well.  

And because I had my casserole it is just the right size.  I really like the zippers which will keep all the stuff inside.  The handles will go a long way to keeping the dish level and help to avoid spills.

Of course, being navy it should handle any spills well.  It is easy to wash with all the fabric cotton.


I have 3 other containers that this carrier will handle. 

This is my non stick blue casserole dish which measures 12 inches across the handles.  It does not have a lid so parchment will ensure that the top of the carrier does not touch the food in the dish. 


Here's the carrier with Mom's bean pot which I use for soup.  Not sure I would carry it with soup in it but it could be cabbage rolls or some dish like that.

It has a lid with a bit of a knob on the top but it is taller that the other dishes but only measures 10 inches handle to handle so that helps to accommodate the additional height.


And not to be out done with hot dishes it can also carry my Tupperware mixing bowl.

It could hold fruit, salad, dessert, and very much more.

This carrier will come in very handy when taking food on the road.

Thanks so much sister for the joint project.

It turned out wonderfully.

Thursday, June 30, 2022

Lined Tote Bag - Fundraiser


We have a family event coming up where we get together over a weekend.  These relatives are on my Mom's side of the family.  Aunts, uncles, cousins will be showing up to visit, share, eat and generally have a good time.

We always have a table of handmade items, art, or otherwise crafted items which are auctioned to raise funds for the next event.

With much of my supplies packed I decided to make a lined bag with a liner which could be used to carry knitting, crochet or other manner of crafting projects.

I started with a piece of fabric which was meant to be added to some denim but when I found a pink zipper in my stash it became much brighter a project.

I found the white wide grosgrain ribbon for the handles, the white microfiber fabric for the lining, so all I needed was some accent fabric for the pockets.

Off to the second hand store.  This was the only pillowcase in the right shade of pink so it came home with me.  

I loosely followed this Tutorial on Instructables to make the bag.  It is a gusseted bag with pockets.  I chose to line it with the leftover microfiber fabric from making my bespoke everyday bag.  I do not like microfiber sheets for the bed but some of them are extremely good quality and make superb fabric for sewing projects.

I added a zipper with the same method as my bespoke bag. 

How to Add a Recessed Zipper to Any Tote Bag video.  I used the microfiber because it matched the liner and it made the zipper very visible.  I'm not sure it was the best choice because of the softness of the fabric.  I chose a fancy stitch to attached it to the top of the bag.  I went right around the top of the bag to have it nice from the outside.

The fabric had a lady bug graphic on it and the other half was solid pink.  I chose to trace the graphic onto the pink side and stitched it with white thread.  I added small black buttons to the antennae and the spots.  For the other side I left the lady bug as it was designed.

I did make the pockets double as it was 50% polyester and 50% cotton and was a bit thin.  I cut two and sewed all the way around and turn the patch pocket inside out and ironed flat.

I chose to sew the pockets on top of the handles instead of behind as in the tutorial so I would not lose any of the ladybug. The corners are reinforced.   The pockets are a good size at over 8 inches square.  Will hold patterns, books, or any other flat object associated with the craft being carried.

The gusset is 5.5 inches wide.

The bag will be laundered to remove the white lines on the pink fabric.  
The repetition of the design gives the presentation of the bag a cohesive look.

The buttons were added to the pocket before it was sewn onto the bag.  I used black thread to not distract.

I added a ring on a tab to the front to allow one to secure keys which could then be flipped to the inside of the bag.  It may be any other type of tool which relates to the craft which one one wants to keep handy.

I used a black button just like the ones on the lady bug to keep things looking coordinated.


The white microfiber is really nice and heavy and worked really well as the liner. It will wash like a dream I am sure.  Being white helps one to find things in the bag.  It finishes off the bag very nicely.

The tabs on the zipper make it easy to open and close. 

The fact that the zipper does not seal the bag closed allows for perhaps knitting needles to stick out if necessary

Most people can always use an extra bag.  With the ban on single use plastics in our near future we need to start packing bags in the car for our shopping.   This one will do nicely.

Sunday, April 26, 2020

Sewing Project - Zippered Tote - EDC

I made myself a zippered multi pocket tote today.  I have been thinking about this project for several months.  It will replace this one.

I wanted to make some improvements mainly a zipper at the top to ensure the contents stay inside. I wanted more outside pockets. Having a pen handy is always nice.  I have purchased a small binder to use which would not have a space for a pen so the bag needed one.

I did watch several videos as refresher on assembling a tote and in particular for the zipper. 

The fabric I used is from a fall jacket that the zipper has been a problem.  I have replaced the jacket.  Since I have been wearing the jacket for at least 7 years and the fabric seems indestructible,  why not use it for a bag that will get a lot of use.  I used one sleeve from the jacket, the dark green outer fabric and the navy lining.  I used the inside of the green as my good side of the bag.

The exterior piece of the tote measures 9.25 T and 20.5" W.  I used grey thread since I did not have any dark green thread.  Would have been better on the strap top stitching if it had been dark.

The pocket panels I created from batik cotton in wonderful colors on one side and a cherry colored cotton on the other side.  I only had 2 small pieces of the batik so I wanted to make best use of it. Those are 4.5" W and 9.25 T same as the main piece. I top stitched just below the cherry on the top before I sewed the panels to the dark green exterior along the other edge. I placed the panels 2.25" apart based on the center of the exterior panel at 10.25 inches.  I am planning a 2" box bottom.

The straps pieces were cut 1.5 inches wide and over 35 inches long.  I used the bias seam approach from my quilts to connect 2 pieces to create my straps. I sewed the side then turned them inside out.

Finished they were .5 " wide and 33" inches long.   I wanted the straps to run the full length of the tote.

I created 2 bags with the lining one just a smidge smaller than the exterior one.  I sewed the 2 side seams, boxed the corners on both at 2" then tacked them down to the bottom with a triangle of stitching.  This was done on the green and the navy one.  I added a narrow channel of green fabric on the one side.

I placed the exterior inside the lining and sewed the top edge leaving an open space to turn them inside out.  Once right side out and the lining in the tote and put a line of decorative stitching along the top to close the opening and add a bit of stiffness to the top edge.

The straps were added once the tote was assembled because I wanted them to hold the lining in place as well as create the pockets on the outside.  I placed them 2.25" from the side seam. I started on the bottom, pinned everything very well and tacked the strap 2 inches from the top edge.  Putting on the straps was quite challenging because there not much room to maneuver.

Just being patient and pinning very closely it worked out well.  I have 6 outside pockets in this tote.  The center pockets are larger and the side ones are smaller.  Just what I wanted.  I added some batik fabric at the very top of the handles where they will get the most wear.

Then it was the zipper.  I had prepared the zipper ahead of time and wanted to insert it inside for a recessed one.  But of course, the batik fabric panels on each side were too long now that I had box corners.  Plan B.  I just sewed the panels to the outside of the tote where I had reinforced the edge with decorative stitch earlier.   I added extra reinforcement X a little higher on the strap now that I had cotton behind it which will give it more strength and it is still not too close to the zipper.

I added pull tabs at each end of the zipper to help with opening and closing it.  I left extra zipper so that the bag can be opened the full width of the bag. Makes getting things in and out easy.


The channel on the one side is designed to hold a pen.  I am still a notebook and pen person.  I carry a note book every time I got out which contains listings of the day's list as well anything I am on the hunt for.  I track size, color, and other details so I am prepared when the right thing comes along.

That is why I always carry my measuring tape. In the past it lived in a pouch but this will do nicely.

Considering the old is 3 years old and barely shows wear this one should last a long time.   I love the batik fabric and it works so well with the dark green fabric of the tote.

It took most of the day but really happy with this project.