 My sister and I had a conversation the other day about projects which we could make to give back.
I still have quite a few microfiber fabric which can be used for another project. Originally, they were collected to make Re-Useable shopping bags.
Those were donated and have not sold really well. I think presentation is the problem. I am moving on.
Morning Star is an organization which supports women in crisis.
There is no dignity in carrying all you own in a plastic garbage bag so large bags can be used to give these women some self worth.
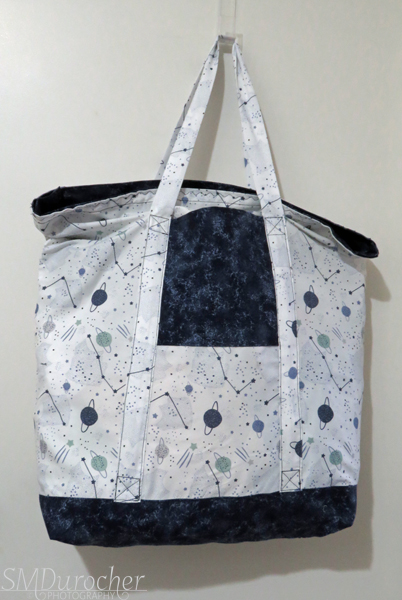
I chose the Stars and Planets pillowcase which is made of deluxe microfiber fabric.
I paired it with some cotton fabric in deep navy small pattern which was donated to me when a quilter in our group retired and de-stashed her supplies.
I decided to put a piece of navy on the bottom since the fabric is white the bottom of the bag will likely get dirty fast and being a dark color will help.
I layered the cotton over the microfiber which will add strength.
I wanted the bottom to be boxed. I created the corners at 5 inches across then folded the triangles onto the bottom of the bag and sewed them down. That will add layers on the bottom and help to add structure to the bottom corners.
I chose a navy thread so it does not show on the cotton fabric. It is more evident on the microfiber pieces.
I created the zipper insert the same what I made it for my own tote bag. I used the method explained in this video
Tutorial by Crafty Gemini.
This produces a completely finished edges with no open fabric ends. Tabs are added to the 2 ends of the zipper so it is easy to pull open and shut.
I hemmed the top edge of the bag after I cut off about 10 inches off the top of the pillow case once I had undone the seam that created the top hem. I used that fabric to make the handles. Microfiber more durable than cotton being handled all the time. Handles are 1.25 inches wide finished with the seam place in the back center. They are 53 inches long. I tied the bottom of the handles in the cotton bottom for sturdiness. They were sewn 7 inches from the sides.
It is important to have reinforce the stress points to ensure there is some strength is distributed to take the wear and tear.
The zipper insert is the same width as the opening of the bag. It is about 6 inches deep which is slightly more than the bottom but we have to account for the seam to put it in.
Now it is just a matter of pinning it very carefully and sewing the insert into the top of the bag.
I chose this decorative stitch on my sewing machine which produces this wavy seam which adds a bit of pretty to the bag.
Once the zipper insert is sewn in the zipper end tabs can easily be accessed when opening or tucked in when on your shoulder.
It does allow an addition amount of space for hold stuff when the bag is full.
With the zipper insert the same width it makes the bag well sealed to ensure there are no holes where one could lose items from inside the bag.
The color of the zipper provides some contrast in the dark fabric so it is easy to see. The tabs also help the find the zipper slider.
I will be making a few more of these to be donated in early December.

 My sister and I had a conversation the other day about projects which we could make to give back.


No comments:
Post a Comment
Thanks for visiting. I love to read your comments.