Wednesday, October 27, 2021

Stained Glass - Sunrise

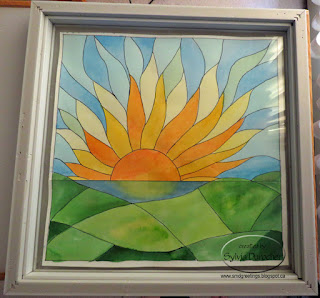
I've always wanted a stained glass piece for my window and thought it would be a nice retirement gift but it did not happen.  So I decided that I would pursue the idea and see where it led.  In my mind I see a colorful image casting beautiful colors on the wall and ceiling, almost sparkly.

First, I had to decide what image did I want?  Sunflowers are a favorite but I chose a sunrise as it represents a new beginning, hope, and a look to the future.

Second, research as to what a piece would cost, which window would work best, and would it do what I wanted.

Third, a trial run - how? I found a site that provided a video on how to create a piece of faux stained glass art and a few steps with easily found supplies. At Art Emporium the Faux Stained Glass video used basic school glue and acrylic color to make an art piece.  

Frame-  I found a white frame in my stash that did not have a mat and was quite large measuring  16.5 inches square so it likely would not be used in my photography.  It also had words on the glass that I removed with a razor blade.  Cleaned the glass thoroughly.

I needed some original art now so I browsed online sites with stained glass sunrise projects and after looking at hundreds I started to have an idea what mine would look like.  I did not want the pieces to be too bulky or too simple.  Remember I want lots of color.  


I drew the first sketch - sun off center, water and hills in the foreground.  I did not want straight lines like in the little one drawn below the sketch. 

This one was drawn at 7 inches square.


I traced it onto not the best watercolor paper and used my Stampin Up Watercolor  Wonder Crayons to color it.  I loved the colors but I stumbled with getting a variety of shades of green in the hills.  Of course, a real stained glass piece will not be a shaded as this one.

I asked a few folks for some feedback. 

I recognized that I had a hard time drawing the secondary rays on the left hand side.  Someone suggested that I copy the image and put then flip it so I could roughly follow what I did on the right on the left.

The hills were too similar and did not have enough pieces.

Ok, I can work with that.


So with that feedback I started on the second sketch.  This one was also at 7 inches.  

I now had light yellow pieces on the left hand side as well and more pieces in the hills.

I marked out the which rays would be Orange, Yellow and Light Yellow.  I wanted green blue and blue in the sky pieces.

Happy with that so lets move on.


Now it had to be enlarged to fit the frame I described above.  The glass could not be removed from the frame so I would have to be painted and leaded in place.  Because of that I chose to keep the design from going all the way to the frame.  That meant I did not have to touch the frame with the leading.

I enlarged it to 14 inches square and decided to put a frame around the edge which would leave about 1/2 inch between the wood frame and the lead frame on the glass.  Excellent.

Another suggestion was made that I paint it in the colors I was planning on using in the final piece just to be sure I was happy with it and still had a chance to adjust if needed.

So I traced the 14" piece onto some Bristol Vellum heavy card stock which was leftover from an art class I took years ago.  It had to be pieced together just like the sketch was earlier, to be large enough.

I sampled the liquid acrylic colors I had and made some selections.

The colors chosen are listed below:

Nick Bantock - Chrome Yellow, Deep Turquoise, Prussian Blue, Sap Moss Green, Chartreuse

Daler-Rowney FW Acrylic Inks - Flame Orange, Rowney Blue


Here's the Bristol Vellum piece all colored in. The yellows in the first row of rays are not all the same color.  I was just enjoying the process.  

I will be able to mix colors in the final product as well.

Of course, it will be more watercolor in tone than a glass piece will be.

I am happy with the hills this time in shape and color.

I used a Sharpie black marker with a fine tip to do the black leading on this piece.


Now I can get ready to transfer the image to the glass in the frame.

I placed the frame over the painted piece of Bristol Vellum and taped it carefully in place.  I will be putting the black leading on the glass surface on the inside of the frame. 


I chose Pure Black by Folk Art for the acrylic paint.

I reused at glitter paint bottle with a fine tip.  The black leading is mixed 1 part black acrylic paint and 4 parts white glue.  Test it to be sure it flows nicely so you can easily draw your lines.

I traced the black lines on the glass following the  drawing above.


You will see from the photo on the left that I put the art on my light table so that I kept the composition in the same direction as the original so when I flipped the frame back to the front it would be same as the original art.

Once the black leading was applied it needs to dry completely before you paint your color.  The video recommended overnight.  I painted my lines in the early morning and by the late afternoon they were dry and I could move on to the color.  The fun part was beginning.


I used some condiment cups to mix up my clear glue and acrylic color.  A cup for each color.

I applied the glue with a small wide craft brush and made sure I rinsed thoroughly before moving to the next color.

Then I followed my color chart from earlier and painted the sun and up then from the horizon line down to keep my hand and fingers away from my finished work.  

I let that dry over night.   


I discovered that I missed the top right most space when I was painting.  I did paint that several days after it was hung.


The next morning all was dry so I put the eye screws in the top middle of the width of the frame.  I chose wire to ensure it could carry the weight.  I have a second curtain rail so I slid a hanger onto the rail and screwed it tight. I then placed a carabiner between the wire and the hanger.  

I hung it in the window and waited for the sun to shine.  It took 3 days to have the sun shine and for the colors to be on the walls of the living room.

I was not anticipating it being so random as to when I would see the colors sparkling.

Of course, looking out it looks really nice but when the sun shines it is great. 


Another down side is that the sunshine only shines for a limited time through the window and the stained glass.  So I have to be around and paying attention to see the sparkle for the 10 minutes it is on the wall before it moves off the the book case.

In this photo the image is half on the wall and half on the side of the book case.

It took over a month from start to finish.  

The costs in materials was minimal. School glue on sale in early September. Liquid acrylic I already had. And my time.

Thanks to the artists who provided feedback and support during the process.

This was a great learning experience. Drawing, mixing colors, and sticking with it.   The biggest thing I learned is that I want sparkle all the time or when I need it not just when the sun shines in the window.  I am so glad I did not invest hundreds of dollars to learn this lesson.  I will enjoy it when the sun shines.

So, I have started another project to get the sparkle all the time or at least when I want it!  More to come on that project in days to come.

I Love You Card

I made a card for my Dad who is in hospital and not doing well.

He is too sick to have the surgery he needs to fix his arm which was broken in a fall very early morning Friday.

I just wanted to let him know that I love him and whatever happens all will be well.

We have started the process of him moving from the apartment to a place with more care.

He is in his early 90s and has survived many health issues.

I pray that God blesses him today and that he knows how much we all love him.

I watercolored the heart, ran a line of gold metallic ink around it and spattered it with the 3 colors I used - Nick Bantock - Vermilion, Rose Madder and Plum.  Added a gold ribbon wrapped around the card front and tape to the inside. Mounted the heart to a brown card A7 base with 3D foam tape. 

Thursday, October 21, 2021

11 x17 Wall Calendar


I have enjoyed my 11x17 photography wall calendar this past year.  It was prettier than the ones I have printed in the past but of course it required professional printing.

I decided to make myself one for 2022!

I chose this bright shot of a House Finch that I took in the spring in early morning at the wetlands.

I was not able to highlight the holidays before printing it so a highlighter will be used again this year.


A few Cards - Paisley Petals

I made a few cards this week for my Mom.

I choose a sheet of designer paper from the Paisley Petals collection.  The colors featured are Brocade Blue, Bravo Burgundy, Cajun Craze, Always Artichoke.  Blue is Mom's favorite.

I was under a time crunch so I chose designer split layout.  The blue floral is the back of the patterned side.  

I chose Brocade Blue card base, a strip of green card stock with a greeting in blue punched with the Modern Label punch.  

The card on the right is Bravo Burgundy card base with a coordinating banner with an Always Artichoke greeting.  Greetings punchies are mounted with 3D foam tape.

The card on the left features Cajun Craze card base with Marina Mist card stock strip with burgundy greetings.

The card on the right is Brocade Blue base with a corresponding blue paper.   I trimmed it to leave a small border, wrapped a length of white seam binding around and knotted it to the front.  This layer was adhered to the card front and then the greeting punchie was mounted perpendicular to the the ribbon.

I hope she likes them.

Monday, October 18, 2021

Sylvia's Simple Shots

The colors this fall are amazing.

Caught this vibrant orange maple leaf at the park on Friday.

It was perfect and the light was making it glow.  

We hardly ever get this kind of color in our fall leaves in the west of Canada.

I was thrilled to capture this one.  I did not even think to pick and press it.  I hope others enjoyed it because I chose to leave it behind.


The plants in the north window are doing so well. 

The spider plant is getting ready to produce flowers and propagate.  I expect these could become babies.

That must mean it is happy!  I am remembering to water it regularly and I gave all the plants fertilizer the other day.


I was given another African Violet by my sister.

I managed to get it to hang in the north window.  It is on the small hanger as the spider plant I just mentioned.

She gave it to me about a month ago now.   I do remember to water it from the bottom.  I will keep it away from the cold window in the winter.

I hope this one does better.

I used to able to grow these years ago and have flowers on them so that is what I am aiming for again.


I finished this book last week.  The Dance by Dan Walsh and Gary Smalley.

Marilyn is married to Jim Anderson, a successful businessman. After 27 years of marriage, Marilyn has had enough of feeling unloved and neglected. She wants to experience some measure of happiness before she's too old to enjoy it, even signing up for dance lessons, something Jim would never do, not even on their wedding day.

The dance is a metaphor for the relationship she has with her husband and the physical dance she so would so much enjoy doing with him.

They both meet older and wiser mentors who help them negotiate this crossroads in their marriage. 

I was glad it was the first book in the Restoration Series so if I chose to follow the series I am at the beginning.  I will not be chasing down the next books but we will see if another shows up sometime.

I finished this book this weekend.  The Return by Nicholas Sparks.

The story of an injured Navy doctor -- and two women whose secrets will change the course of his life. Trevor Benson never intended to move back to New Bern, North Carolina. Having been injured in Afghanistan and having inherited his grandfathers cabin he decides it's as good a place as any to figure out his way forward.  It holds wonderful memories of his childhood.

Natalie Materson is the deputy sheriff and Callie is a quiet, hard working teenager who lives in the trailer park up the road from the cabin.

A crisis triggers a race to uncover the true nature of Callie's past, one more intertwined with the elderly man's passing than Trevor could ever have imagined. In his quest to unravel Natalie and Callie's secrets, Trevor will learn the true meaning of love and forgiveness . . . and that in life, to move forward, we must often return to the place where it all began. 

I have been working on this project for several weeks.

I drew the original and did a test watercolor of it in this post.

Once I had decided which frame I was going to use I needed to enlarge it as well as make some design improvements.

Then it was suggested that I color the large one with the colors I planned to use in the final project.  That was completed this week.

I then had to transfer the design to the back of the glass.  You can check out this video for the instructions for Faux Stained Glass featuring Elmer's Glue.

The "leading" took less time to dry than I anticipated so I finished it yesterday and hung it with the hope of seeing the sun through it this morning.  Disappointed.  Overcast and cool all day so far.  Maybe tomorrow.

I hope to see the magic on the walls when the sun shines.

Progress is bring made on the Wall Christmas Tree as well.

I purchased a photo shelf for the space where the tree will hang.  The ring will be bolted to the shelf then the tree will hang from there.

I found the perfect s hooks at Ikea with one end bigger enough to go over the branches.

The star will also have to be painted gold because right now it is green.

Good thing I started in January. 

It will be ready to hang in early December.


The Flickr Macro Mondays Challenge this week was "smoke".  Steam was also allowed.  It was very challenging photographing something that just disappears so quickly.  

After check the group there are a few things that last a little longer - namely incense.

You can check out my Photostream (SMDPics)to see the shot I submitted.

Thursday, October 14, 2021

2022 Photo Calendar - Nature


 Another winning year for nature photographs.  A lot of walks and visits to wetlands garnered some new species for me.  The Blue Heron was the first time I got a good shot of one.  I have seen them before but they were hiding in the reeds.  The Bunny and the Lesser Yellow Legs are also firsts. 

01 Jan - Lesser Yellow Legs                                07 Jul - Muskrat

02 Feb - Wasp                                                      08 Aug - Barn Swallow

03 Mar - Downy Woodpecker                              09 Sep - Dragonfly

04 Apr - Bunny Rabbit                                         10 Oct - Red Wing Blackbird

05 May - Rednecked Grebe                                  11 Nov - Fiery Skipper Butterfly

06 Jun - House Finch                                            12 Dec - Blue Heron                   


Are you a planner?  

Do you want to see a date in the upcoming month?

Is your calendar stored in the black metal holder?

This calendar can deliver.   Just slide the current month up about a third of the way up to reveal the next month dates.

This idea came from one of my calendar users who has had one of these on his desk for nearly a decade.

Thanks for the tip!

2022 Photo Calendar - Garden Flowers


I have my 2022 Garden Flower photo calendar.  It is so wonderful that nature continues on despite the health crisis in our world.  I am so blessed to be able take photos outside.  I have captured some winners again this year.

01 Jan - Pasque Flower                            07 Jul - Pansy

02 Feb - Salvia                                        08 Aug - Dahlia

03 Mar - Grape Hyacinth                        09 Sep - Sunflower

04 Apr - Daffodil                                    10 Oct - Fuchsia

05 May - Astrantia Major Alba               11 Nov - Red Poppy

06 Jun - Pink Cosmos                             12 Dec - Late Tulip


Are you a planner?  

Do you want to see a date in the upcoming month?

Is your calendar stored in the black metal holder?

This calendar can deliver.   Just slide the current month up about a third of the way up to reveal the next month dates.

This idea came from one of my calendar users who has had one of these on his desk for nearly a decade.

Thanks for the tip!


Monday, October 11, 2021

Happy Thanksgiving


Wishing everyone  a Happy Thanksgiving as we celebrate in Canada!

Monday, October 4, 2021

Sylvia's Simple Shots

I spotted this tree dropping it's red leaves all over the ground at the gold course.

We have so few red fall leaves here that it is a big deal when I see them.

I did walk the golf course when they were closed during the first bit of the pandemic but now that is not possible.  I would have liked to pick a few leaves to press.

I guess I will enjoy it from afar.


This is one of the books I bought at the large garage sale early in September.


A story of redemption and getting back to core values. Mary Bridget Washburn finds herself in Alexandria, where she hopes to bring happiness to a troubled widowed pastor and his three children. She is running from her past which included an abusive father, the loss of her children and being on the fringes of a meth drug business.

With a job and a place to stay God provides a way for her to remember her faith, her christian grandmother's influence, and her love of children.

The crisis comes of course in the last couple of chapters. The pastor as well has some turning around to do and manages to see the light in the end.

It has a happy ending and justice is served.

If you have checked out my posts this week you will see that I finally accomplished my Wall Christmas Tree. You can follow the link to see the full details of that project. 

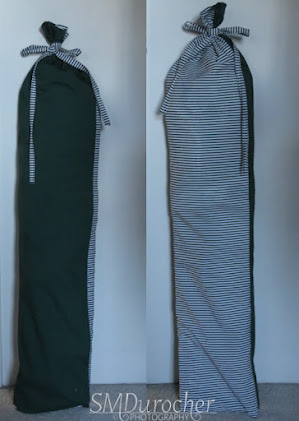
I mention in that post that I wanted to make a bag to store it when it is not on the wall.

I dug through my stash of fabric and selected a dark green and green and white striped poly cotton fabric.  There was just enough with only small bits left over.

The bag measures 40 inches tall by 9.5 inches wide finished.  I had a strip of the striped fabric which I made into a tie.  I just attached it to the side of the bag and I can just scrunch the top of the bag and tied it around.

I also created a piece of cardboard about 8 inches tall and 32 inches wide to provide some stability when rolled up.  I placed the tree on a piece of cloth added the card board and rolled.  This was there is less likelyhood the wires or cords getting entangled.

Super happy with this.  It's so nice to ahve the sewing machine out all the time which allows me to just whip up a project.

This is still some fall color with folks putting out chrysanthemums in their flower beds.

I'll take it while I can get it.

These are a great pink color and I have seen white, yellow and orange ones as well.

It is getting cooler here and we are close to having below zero lows over night.


The challenge for Flickr's Macro Mondays this week is "stars".  Of course there are many options for this challenge.  To the right you find one of the shots I took featuring small paper clips with star holes in the front.  You can check out my Photostream (SMDPics) to see the shot I did submit.

I am sharing with Angie who hosts Mosaic Monday #150 and 
Mersad who hosts Through My Lens #307.

I hope you have a good week!

2022 Photo Calendar - Big Skies

I designed an new format of photo calendar for this year.

This is a 6x4 inch calendar which is in the wide orientation.  

I have been using square shots for the last 10 years in my tall calendars that it took a bit to scout out rectangular shots for this calendar.

The major change in this calendar is that the photography takes priority.  So many people don't use a paper calendar anymore that I decided to put the focus on the photo while still providing a minimal calendar.

The calendar is one line below the photo and has the holidays highlighted in blue.

I chose a narrower focus on the type of subject matter as well.   Being in Alberta with wonderful blue skies all year round I dug my photo stash for great sky images.

They can be placed in a black metal holder in the wide format very similar to the one for the tall calendar.

I did not think I took many landscape photographs but I am drawn to skies.

I have included many dramatic skies from the last year or so.

Our urban and country views are included in this photography calendar.

I think of it as eye candy!


Here's the calendar sitting in a black metal frame which holds all 13 pages (12 months and the index). 

I have lifted the index page just enough to see the title all year long.

As the month changes just move the front page to the back.

The calendar gives you a quick look at the dates.

2022 Photo Calendar - Black and White Abstract


I have been working on 2022 Calendars.  I have created a Black and White Abstract one this year.

It features various shots I took this year converted to black and white.  I wanted images that were graphic and not necessarily readily recognized.

You can just slip this one into your holder from last year.  It has a good sized calendar with the holidays bolded.  By slipping the current month up you can see the upcoming month as well. 

I am happy with the way this one turned out.


Are you a planner?  

Do you want to see a date in the upcoming month?

Is your calendar stored in the black metal holder?

This calendar can deliver.   Just slide the current month up about a third of the way up to reveal the next month dates.

This idea came from one of my calendar users who has had one of these on his desk for nearly a decade.

Thanks for the tip!


Sunday, October 3, 2021

Thank You Cards

I made thank you cards for those who helped with the Wall Christmas Tree project.  

I started with a pea green textured card. 

I embossed a white layer with Cuttlebug Thanks Words folder.  I adhered it to the card front with double sided tape.

I cut a triangle tree from SU Gumball Green and embossed it with a Cuttlebug lines folder.

The tree and the star confetti were attached to the card front with 3D foam tape.

These are on their way!

Friday, October 1, 2021

Wall Christmas Tree Project

I have completed the Wall Christmas Tree I envisioned back in January 2021.

I made a plan, sourced and purchased materials and supplies, and recruited help. 

It's been just under 9 months for the vision to come to life.  

My plan was for the branches to start at 4" and increase by 4" for 8 rows.  That would bring my tree to 4 feet tall and 40 inches wide.

I decided it needed to have some bling so I would include some crystal faceted beads.

I was going to make holes in the branches so I could thread my cord through rather than have the cord on the outside where it would show.

I investigated cording and consulted with my aunt  who does jewelry and we decided on nylon cord - C-Lon Bead Cord which has a tensile strength of 36 pounds. She was kind enough to lend me a spool so I could take what I needed. The color is flax.

Now that I had the cord I was able to do some testing about how I would thread it and the size of beads I could use.  I decided that I would put crystal beads above and below the branch and wrap around each of these.  I then would use crimp beads on the top and bottom of the sandwich to keep them in place when I stored it after the holiday.  The idea is that I just roll it up and put it in it's own bag (which I will make).  Easy peasy!

I needed to source branches so I made a visit to the country and had a friend help me cut some birch tree branches.  I wanted them no bigger than 1/2 inch and started at 1/4 inches.  I did not need a lot because some branches made 2 rows.  My helper drilled holes in the ends as well.

I visited my local arts and crafts store for the crystal faceted beads and crimp beads and they were on sale! Yeah.

Yesterday, I decided it was the day to get started.  I assembled my tools and supplies.

A saw to cut any bits off, drill to make new holes if needed, nylon cord, crimp beads, crystal beads, an awl to make the holes bigger, scissors to cut thread, the S hook was the one I used to test branch size, and crimp pliers I borrowed from my aunt. 

I cut 2 lengths of C-Lon nylon bead cord double of 12 feet to ensure they were long enough to go around all these beads and branches.  

I decided to start with a ring so that I would have a definite point on my tree. 

I chose a gold split ring because it was what I had and it turned out to be a good idea.  When I was stringing the lights on I was able to engage the wire into the ring because it was split. 

Cords added to the ring with hatch hitch knot.  

To keep the cords together at the top and start the bling I added a crystal bead.

Then I put an over hand knot with all 4 threads and tucked it just below the glass bead.

I then figured out which cord was which because one had been cut just a bit shorter than the other.  Now I had one cut length on the right with the center on the ring and another on the left.

I now could start to string beads on each side.  It took strict paying attention to make sure I got the beads in the right order. A crimp bead, a crystal bead, through the crystal again, then through the branch and around again, then a crystal bead and through again and finish with a crimp bead. 

This is the first row of the 4" branch.

I would not crimp the beads until the end.


I continued the process doing these steps on the right hand side then the left hand side of each branch.  I averaged between 5.5 to 6 inches between each row. 

Sometimes I had to adjust the distance because the branch was not exactly level.  Having not crimped my beads I could just adjust as I needed.

Repeated the process for all 8 rows, left and right it they were all in place.

I put the last of be beads in place late last night and decided I would only crimp the beads today after a good night sleep.

I made my final adjustments to the beads and the branches, etc this morning.

Once I was happy with the overall look I use the blue handled pliers and crimped all the silver beads above and below each set of branches both right and left.  

There is no going back now.  Things are securely held in place and no way to adjust or replace any of the beads.

This allows me to take down and store the tree with out my branches moving up and down the threads.  It was very good when hanging when gravity was doing its thing to keep the branches in place.


I dug through my bin of photography props to find the metal star.   

It is about 8 inches which which may be a bit on the big side.   Here is is hanging as a test to see what the final tree may look like.

I think this works for now.


Next, came the lights.  I had purchased the lights in January while they were on 50% clearance after Christmas.   A string of fairy starry lights.  Very tiny lights on a silver gold wire.  

I wanted them to be plug in type rather than battery operated so I had to go with a longer string.  At 50 feet of lights I thought it would be more than enough to do the job.

I measured my pattern which indicated I would need 44 feet so I left a few at the top for the star.   I hung the tree in my patio door on the first curtain rod so I had space behind the tree to move the string back and forth with ease.

The first time I went down the left side wrapping an the cord, then across the bottom wrapping around the longest branch then up the right hand side wrapping on the cord between the branches.  The second wrap was down from the top on the right cord across the first branch down the next cord across the branch till I got to the bottom. The third wrap was coming back up to the top catching the cords on the opposite sides and again every branch which left me at the top.  I then just wrapped them around the cord again on the right hand side and along the bottom branch to leave my plug hanging down in the middle of the bottom branch.   That was perfect!

It has turned out exactly how I wanted.  I have put a picture nail in the wall to hand for now but I will need a different hook so it will hang away from the wall a bit so I can hang dimensional ornaments as well.  I will have to check my supply of SHooks as well.  The next step is a bag to store it safely when it is not hung.