Showing posts with label snowbank. Show all posts

Monday, February 26, 2024

Card - Slow Stitching - Mountain Cabin

I stitched another card. With the same fabric as an earlier one, on this piece of fabric I saw a mountain. 

Not sure I got the snow caps right. 

The sky is full of stars.

The little cabin is surrounded by snow banks.

The little cabin with its door and window.

I put a border in dark blue with a running stitch.

I adhered it to the card front of a navy speckled white card stock. 

A quarter sheet insert and a white envelope is headed for the card box after sitting under books overnight.

Tuesday, January 4, 2022

Sylvia's Simple Shots

It's cold and windy.  The wind blew overnight and created a few winter landscapes aka snow banks.

We are at -27C feels like -36C wit the windchill. 

I confess, I took this photo from inside.

I did go out last week to mail stuff that needed to be postmarked in 2021.  I had 2 pairs of fleece sweat pants; a long sleeved shirt, my blue fleece jacket and my winter jacket; a tuque and my parka hood; 2 pair of gloves, and my winter boots.  I had 5 blocks to walk to the post office, I stood in line for a few minutes then 5 blocks back.

On the weekend it warmed up to -12C so I did my big grocery shopping and put the gas in the vehicle.  On Sunday I had a visit with my aunt as we were headed back in the deep freeze.  It was nice to have a couple of hours with my humans.

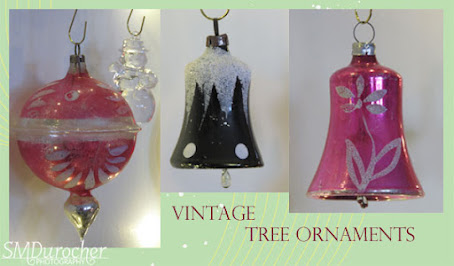
While visiting my aunt she mentioned that she was liquidating some of her ornaments as she has downsized to a 4 foot tree from a 7 footer. 

I was allowed to choose a few.  These are the ones I chose because of course I have a much smaller tree myself these days.  They are all glass and old. The pink round one is 2 inches in diameter and the bells are a bit smaller.  The bells actually have clangers and tinkles when rung.  I think these would be classed as Shiny Brights which were ornaments imported from Germany in the early 30's.  The left one is not silvered on the inside which I understand from my research was discontinued during WWII which sometimes helps to determine the age of an ornament.  You can check out more information on Shiny Brights on Wikipedia.

I finished this book last night.  A Turn in the Road by Debbie Macomber.   A story of a road trip with Bethanne, Annie her daugther and Ruth her ex-mother in law.  They travel from Seattle to Florida for Ruth's 50th Class reunion.  Bethanne has been divorced for 6 years when her husband walked out on her and their 2 kids.  She had to reinvent herself after being his partner in life and his biggest supporter in his realty business.  Having hosted many events in support of his business she turns to setting up a Parties business and has done very well.  She has several stores which she runs with the help of her daughter and a business manager.
On the trip the itinerary changes as each woman puts in her dibs for where to stop along the way.  Ruth wants to stop and look up a woman who was a neighbour and friend when she was first married. The girls pitch in at the restaurant during their visit.  The next stop is to visit a beautiful lake which some customers had mentioned at the restaurant.  The rental car breaks down and help arrives on motorcycles - the bikers from the restaurant. Bethanne takes a ride back to town with Max on his bike to get help.  He had caught her eye the day before when she was waiting tables. All three women have their love stories develop.   Ruth was meeting an old flame from high school at the reunion.  Bethanne's ex-husband now divorced again makes a play to reunite and Annie meets several young men along the trip.  
I found the struggle between these three women to get along as they wrestled with their own insecurities about life and men challenging.  I guess that is what it's like.   It was just okay for me.

I decided to purchase some essential oils sometime in December.  They were a bit pricey. My favorite essential oil bottle was getting low and I was not going to the biggest craft sale to purchase more.  My wax melts as well were needing refreshing and I was not going out into a crowd to find a Scentsy rep. 

I found a health food store with the scents I wanted.  Pine Needle for the Christmas Tree and Grapefruit and Bergamot to replace my near empty bottle.  I use it on my doll diffuser mentioned here.  I put a drop on each morning as I do my exercise.

I thought I would just use beeswax to make wax melts.  I melted some and added my grapefruit and bergamot oils and let it solidify.  

When I researched a bit more I discovered that I need to add coconut oil so it will melt in the warmer.   So I will have to wait till it warms up next week and purchase some.

This one will have to be remelted and adjusted.

I used a silicone mold to form it and it should be the right size to fill my warmer's bowl.

This project is on hold for the time being.  I did have some Scentsy pieces left so I still have time to make this project work.


I received this felt tree oil diffuser from my sister for Christmas.

It will get the pine needle scent next year.   I think I had a bit of a reaction to it this year so I will leave that for the time being.

Love the light color and stitching on this cutie.

It will go into the box with the decorations and come out next year.  Maybe next December the world will have righted itself.


The theme for Flickr Macro Mondays this week was "cotton".   Mom and Dad are now settled in their new residences. Mom at the lodge and Dad at ExtendiCare. Fortunately, only across the parking lot from each other.  During the sorting out of this from Mom & Dad's move I brought home an apron my Mom embroidered about 60 years ago.

It features these beautiful cabbage roses, so I used that for my image on Macro Mondays.  You can check out my Flickr Photostream at SMDPics

I am sharing with Angie who hosts Mosaic Monday # 162 and Mersad who hosts Through My Lens #319

Have a great week.  It good to be back. 

Sunday, December 5, 2021

Winter Birthday Card

A birthday for my Dad who celebrates his birthday this week.

I will see him tomorrow.

Dark green A2 card base, spattered with Gleams White acrylic paint.

I cut 3 trees with the Hampton Art Tree thin die.  I chose dark and warm green card stock.

I added a bit of white to the dark one I put in front.

A SU Modern Label punchie greeting in the bottom right adhered with 3D foam tape.

Friday, February 26, 2021

Christmas Card Challenge - Feb - Watercolor Cards 2

Here are the next 4 cards in this watercolor challenge.

I lightly drew the shapes with watercolor pencils. I then used red watercolor to paint this trio of elliptical ornaments.  The 140lb watercolor paper was taped down to a piece of glass and allowed to dry taped down.

Once dry, I added the black lines with a thin permanent marker.  

I then added spatter with gold liquid acrylic color. 

I mounted this on a dark card base.

This card is a round  ornament in fuchsia color.

I added a string where it hangs and a tiny bow. I added some pearl liquid acrylic to the sections of the shape.  Spattered with fuchsia color.

The greeting is from the Stampin Up Good Greetings set in permanent black ink.

I really loved the snowbanks I created in this composition. 

I added a twig tree with the black marker.

Stamped the greeting on the lower right hand quadrant.

This wreath was created with light and dark leaves. Remember to keep them in the same direction.

I added black outlines on the leaves and a bow at the bottom of the wreath.   

Stamped greeting above the wreath. 

Spattered with red watercolor.

Wednesday, December 9, 2020

Winter Wonderland Birthday card

This is a birthday card for my Dad.

I created a winter wonderland with diecut trees, a snowbank and a large greeting.  I spattered it with Maya Mist Iridescent Pearl spray.

I chose the half sheet size using 1 sheet of light blue card stock to simulate the sky.  It accomodated the large greeting better as well.

The trees were cut from a couple of pieces of green card stock.  I put the lighter one in front.  I stacked them against each other.

The large greeting was cut with the Memory Box Jumbled Happy Birthday die and the same color as the darker trees.  The snow bank was cut with the Creative Memories Decorative Trimmer from heavy card stock.  All pieces were adhered with quick dry adhesive by Scotch.  

I spattered it with iridescent liquid as the spray no longer works.  I put a couple of drops on a plate and used an old toothbrush and an old knife to create snow on this landscape.

Wednesday, July 1, 2020

Christmas Card Challenge - July - Polar Bears

Getting caught up on my Christmas Card Challenge.

July's challenge was polar bear and I decided to use my Cricut - Joy of the Season cartridge. It was cut at 1.5 inches and this time I cut the shadow in gold as well as the scarf. I put the some black ink in the ear, eye and nose.

I used gold star background card stock cut to 5.25 x 2.25 inches adhered to the top of the dark brown card. I then ripped a few snow banks from white card stock which were adhered over the first layer. 

The polar bear was adhered to the card front with 3D foam tape. I love how the shadow shows against the snow bank.  I punched the star from the same gold card stock used on the bear with the Creative Memories Sparkle punch.  It was adhered with a Bling Zot.

Wednesday, January 8, 2020

Polar Bear Card

I cut a few polar bears this morning to include in my exchange cards so I decided to add to my Christmas card stash.

I cut a piece of sparkly paper and adhered it to a piece of white card stock then trimmed the layer to leave a small border on the navy card base.

I ripped some snowbanks from white card stock.  I chalked the rough edges and the horizon line as well.

The polar bear was cut with the Cricut and the Joy of the Season cartridge.  I cut a navy scarf for him.

He is adhered to the card front with 3D foam tape.   I added a silver star in the upper right hand corner.

Monday, November 27, 2017

Card Club - November - Felt Tree

I started with the small white felt trees which were left over from this Christmas Card Club kit.

I added this swirly night sky designer paper onto a dark navy blue card base.

I ripped a snowbank which was adhered to the bottom of the card.

The tree is held in place with a tiny silver star brad.  The silver star sequin at the top of the tree is held in place with a silver tiny round brad.

The banner greeting was color printed and and trimmed close to the border.  It is adhered to the card front with 3D foam tape.

Here's the alternative color for this card kit.

It works beautifully as well.

Saturday, April 1, 2017

Christmas Card Challenge - April - Scallop Circle Purple

This is the card for my monthly blog Christmas Card Challenge.  The theme for April is Scallop Circle and Purple.

I started with a tall top fold card measuring 4.25 x 11 inches. I printed the greeting onto the card front and folded it at 5.5 inches. I then selected a thin die from the Spellbinder Nestabilities Scallop Circle set and cut a hole in the card front. 
I used my Tim Holtz Distress Stain background method to make the sky paper with purples and blues.  The colors used are Faded Jeans, Dusty Concord and a bottle which changed colors over time so it's a turquoise like color.  Ranger replaced the bottles but if I am not aiming for a certain color they do the trick.  I designed some triangle trees which I printed onto my background paper.
I cut the little house from white card stock at 2" with my Cricut and the Winter Woodland cartridge. I adhered the house next to the trees. I ripped the snow bank which I placed in front of the house.  This layer was then adhere to the back of the card front with double sided tape.  Once the card was assembled, I used a couple drops of the distress stains a drop of water and dipped a old toothbrush into and spattered the card front to add a bit of texture.

Friday, December 23, 2016

Nativity - Special Card Order

This is a large card which is a half sheet.

I started with the gold starry night vellum which I purchased in 8.5x11 package. I mounted it onto a navy card.  I added 2 gold star brads in the top corners.  I placed adhesive where the stable and snowbanks will be placed.

I chose my new nativity graphic.  I added a gradient background in the stable. I made the stable blue to coordinate with the card color.  I sized and printed it only white card stock and fussy cut around the edge.  It was then adhered to the vellum.

I ripped several layers of white for snowbanks in the front.  I applied Bashful Blue chalk to a couple of them and layered them getting shorter as I moved into the foreground.

I cut a star from sticker paper adhered to white card stock.  I used the Sizzix Star and Starburst die.  The star was adhered above the stable wit 3D foam tape.

I printed the greeting on white card stock and ripped the edges to repeat the edges on the snowbanks.

Monday, February 1, 2016

Christmas Card Challenge - Feb - Blue / Snow

Here's the card for my blog Christmas Card Challenge.  For February the prompts are Navy Blue and Snow.

I ended up with a warm dark blue so it may be teal instead of navy.  I wanted to create a night sky with snow falling.  I chose the Sizzix Softly Falling embossing folder which I inked up with TH Distress Stain in denim blue but as you can see it's not anymore.  More about that here. I chose a card that coordinated and I adhered it to the card front.  I ripped a snow bank from white card stock. I cut a white triangle tree which I embossed with a Tim Holtz Alterations Star folder then I adhered it to the card front aligning the bottom of the tree to the bottom of the snowbank.  I added a silver star sequin at the top held with a Bling Zot.  I added a few silver rhinestones.  Then 3 small pearly snowflakes held in place with tiny white brads. 

Submitting to Anything Goes Challenge at Weekly Christmas Card Challenges.

Sunday, May 17, 2015

Simple Birch Trio

I selected one of the backgrounds I created during my bubble decorating paper session and printed onto the front of my card.  I added a thin border in dark green.  I glued the Memory Box Birch Trio cut in white card stock over the background.  I ripped a piece of white card stock to create snow and a grounding for the trees.   I added a strip of SU Pool Party card stock across the snow bank. I stamped the greeting with a clear stamp and Baja Breeze ink.

Submitting this card to the following challenges:

Holly Jolly Christmas Challenges - Clean and Simple

Thursday, August 1, 2013

Christmas Card Challenge - August - Stickers

The theme for the Christmas Card Challenge for August is stickers.  This leaves it wide open for anything Christmas.  Trees, candy canes, snowflakes, words, and a bunch more of subject matter.  Go for it!!
I bought these sleigh stickers last Christmas because I knew what was on my challenge and they were in clearance for a good price  Stickers are not something I use regularly.  These sleighs are Martha Stewart. There are red and blue sleighs so I alternated the colors accordingly.  I found that they matched Stampin Up! Ruby Red and Soft Sky so I chose those colors for my card and background.  In keeping with SU I used the Northern Flurry folder on the background layer.  I created snowbanks with my Creative Memories wavy cutter.  I created the word accent with a stamp from Peddler's Pack with fit very nicely in the SU Artisan Label punch.  I stamped it in Ruby Red and used the marker to highlight the edges of the punchie.  I glued it to a strip of card stock about 3/8" wide in the same color as the card.  I flagged the ends with a square punch.  This accent is mounted to the card front with 3D foam tape.  Super happy with these. 

Friday, June 8, 2012

R2G Kits - Polar Bear

Working on adding more polar bear cards to my inventory.  I chose a white card.  I added a blue designer paper with swirls.  I made just a smidge smaller than the card.  I cut the polar bear with the Cricut and the Joy of the Season cartridge in white with a red scarf.  I ripped the snowbank to the bottom of the card.  I glued the polar bear over the snowbank.  I added a silver sequin star up in the top right hand corner held in place with a tiny silver brad. Check out my Christmas Card Kits page.

Friday, June 1, 2012

Cmas Card Challenge - June - Trees Focus

The challenge this month is to have trees be the focus of the card.  I cut the trees with the Cricut - Winter Frolic cartridge.  I cut them in 3 sizes from silver metallic paper.  I printed the greeting on the white card itself in black then trimmed the black background layer by hand to create the snowbank.  I added stars in the sky with a silver gel pen.
I made 6 of these.

Thursday, November 24, 2011

R2G Card Kit - Kid Cards - Pick Up Truck

I'm working on Ready 2 Go Card Kits for the sale this weekend.  I wanted some cards which would work for kids Christmas cards or Thank Yous for after the celebrations!  I selected the card to match the truck color.  I embossed the silver background with the Cuttlebug Polka Dots embossing folder.  I ripped a snowbank for the bottom of the card.  The truck was cut with the Cricut and the Just Because Cards cartridge.  I the truck in blue, red, yellow and green. The tree was cut with the "Paper Dolls - Dress Up cartridge in deep green cardstock. I added a Martha Stewart snowflake punch in the corner.  These should be fun for kids to put together.

Sunday, November 13, 2011

GG - Polar Bear

This card only had slight changes from the Greetings Galore class in November 2010
I used some textured Royal Blue card stock instead of Bashful Blue.  I splattered the card stock with Radiant Rain - Pearl Green in the same technique as in the earlier card in this set.  The Polar Bear was cut with  my Cricut - Joy of the Season cartridge.  The star is a small punch.  The snowbank was cut with my Creative Memories wavy cutter.  Very classic card and popular.  I had several orders for some of these card kits.

Sunday, September 18, 2011

Card Kits - Cmas - Polar Bear

I made some card kits for a friend on the weekend.  I made 5 designs.
This is a sketch I've used before. On this one I used navy blue card stock with white flecks which looks like snow falling.  The polar bear is Cricut which I glued down the scarf, added the eye and nose.  I ripped a piece of white card stock into a snow bank.  I added the yellow star in the sky. The alternative for this one is Bashful Blue for the card like this one.

Saturday, June 11, 2011

Christmas Card Stack - Wonder Snowman

I started by using the Tim Holtz Winter Wonder die to cut my snowmen from corrugated cardboard. I selected ivory with an ivory card and a kraft embossed layer for the other kraft on dark brown card with ivory embossed background. I used the Cuttlebug Devine Swirl folder. I trimmed the embossed layer and glue it down. Then I tied the gold ribbon around his neck. Then decide where he should be in relation to the snowbank. Once decided then just tack him down a bit with a bit of double sided tape. I added the tiny gold brad for his eye. I put a sequin on a tiny gold brad then place the gold fabric snowflake on his belly and made a hole with a push pin, pushed the brad through and spread the prongs on the inside of the card. I added the gold sequin star in the top right hand corner which is the object of his gaze. I cut snowbanks with my Creative Memories wavy cutter and mounted that with pop dots on each end.

Wednesday, June 1, 2011

Cmas Card Challenge - June - Chocolate Red Cream

This is a color challenge using Chocolate, Red & Cream. I started with a chocolate chip card. I printed my greeting on cream card stock. I printed 6 on 1 8.5 x 11. I used my Creative Memories wavy cutter to cut the greeting into a snowbank. Then I cut the red with the same wave. I put these two together and scotch taped them on the back. I trimmed the red to make the piece measure overall 4" tall. Now the piece is 5.25 wide by 4 tall. This is glued to the card front. I cut the snowflakes out of cream pearl cardstock with my Sizzix sizzlets. I placed them over the red and used a push pin to make the holes and used tiny star brads to hold them in place. I made 6 of these so my total cards is 38.