Showing posts with label card set. Show all posts

Thursday, July 20, 2023

Set of Cards

I made a set of cards with one single sheet of designer paper.  The design is by graphic45 - Couture Collection - Gorgeous - I agree it is a beautiful floral paper. Rich colors and a dramatic black background.  This paper measures 12x12 inches. Cutting 4 inch strips I ended up with 6 pieces for A2 cards. With the direction of the design all the cards were created in the portrait orientation.

Next I selected card bases for these cards.  With the colors in the paper there was lots to choose from.  Finally, I chose Old Olive, Lost Lagoon, and Dusty Durango.

For card 1 I cut the layer down from the top and flipped the piece to show off the blue striped backside. I then added a strip of orange card stock across the split.

I added a Decorative Label greeting mounted with 3D foam tape. A white quarter sheet insert finished the card.

For card 2 I did the same layout but put the stripes on the bottom this time.  I laid a length of So Saffron ribbon across the split.

The base this time is Lost Lagoon.

I layered silk flowers in warm tones and a small gold sequin onto a tiny black brad to create the floral accent which I mounted on the bottom left hand side.  The brad was pushed through the designer paper keeping all layers together.

This layer was then adhered to the card front with double sided tape.

A white quarter sheet insert was added.
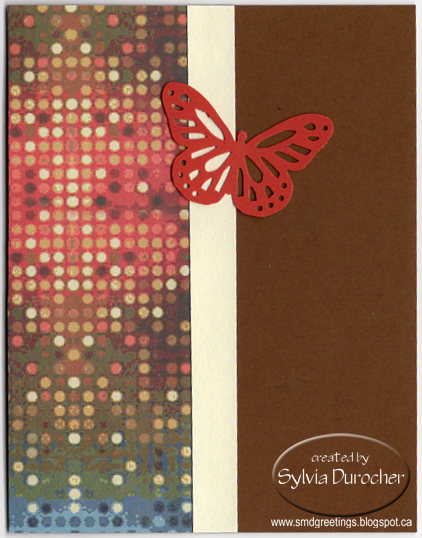
This is card 3.

Here I split the layer top to bottom instead of side to side. Once split I flipped the small piece and taped back the designer paper so I could handle it as a full piece.

I added a length of Apricot Appeal grosgrain ribbon over the split and taped the ends to the back.

I added a Dusty Durango butterfly accent on the bottom right side.  The butterfly was cut with the Sizzix Winged Beauties thin dies.  I used my steel plate to ensure all the tiny spaces were well cut. I wrapped black thread around the body of the butterfly and left the ends to be the antennae.  Adhered with double sided tape.

Quarter sheet insert completed the card.


Card 4 has an Old Olive card base.  

The designer paper was left at 4.00 x 5.25 inches.  

I wrapped a length of Baja Breeze ribbon across the middle and taped the ends to the back.  

I added a Artisan Label greeting with black letters which was adhered with 3 D foam tape over top of the ribbon on the right hand side.

A quarter sheet white insert completed the card.


Card 5 is similar to card three.

This time the ribbon is So Saffron which is wrapped over the designer paper top to the bottom with the ends taped to the back of the layer.

I added some Candy Dots to the left of the ribbon in pink tones to coordinate with the large flower near the bottom of the card.

A white quarter sheet insert on the inside.


Card 6 repeats the lay out of the DSP split with the striped paper on the bottom.  

A length of wide Tango Tangerine ribbon across the split with ends taped to the back.

I found 2 tiny turquoise blue buttons in my stash.  They are adhered to the ribbon with Bling Zots.

A white insert on the inside.

This makes a nice set of card with enough variety to be interesting.  Versatile in that some have greetings and others are left blank to used for any occasion.

Happy with this set which will given as a gift.

Monday, August 13, 2018

One Sheet Wonder - Card Set 4

Another set of cards on which I used this swirly pink burgundy designer paper.  Paper cut with the OSW1 plan.

On this card I changed things up a bit and trimmed the one piece to 4 inches wide added a coordinating piece at the top and bridged the join with a strip of blue card stock. 

Punched the butterfly with Martha Stewart Butterfly from the same color as the top piece of paper.

Adhered it to the card front with Bling Zot.


You see the long strip turned over on the card to the left and the full 4.25 piece used in the one on the right. 

One Sheet Wonder - Card Set 3

I selected different designer for this set.  Lovely tropical floral pattern in warm tones.

This was cut with the OSW2 layout out plan.  I chose this seafoam green card stock and pea green card stock for this set.

I adhered the paper to the bottom edge of the card and then added an ivory strip at the join.  I created the butterfly with the Martha Stewart Butterfly punch in pink card stock.  Adhere to the card front with a Bling Zot.


This landscape card got a pink butterfly and the portrait on the right a rust colored one.

Sunday, August 12, 2018

One Sheet Wonder - Card Set 2

Another set of cards made with the Disco Ball designer paper.  This time I used the OSW2 cutting plan.

I used Pea Green, Salmon and Brown card bases. 
The designer paper was cut into 2" stripes.  I did not want to cut off the blue end so I glued the strip to the card then trimmed the extra with scissors. 
I cut my 1/2 ivory strip in half and placed one on the top and bottom edge. I added a royal blue butterfly created with the Martha Stewart Butterfly punch.


On the left card I glued the strip on the left and used a rust colored butterfly.

On the right I cut the strip of designer to 4.25 inches. Placed it across the card and added 1/4 inch ivory strips of card stock along with a brown butterfly.

Saturday, August 11, 2018

One Sheet Wonder - Card Set1

I am making a set of cards for friends who have lost a loved one this week.

I am using the One Sheet Wonder concept.  For these cards I used my OSW1 layout.  I used a very versatile designer paper with a bunch of colors called Disco Ball by Recollections.

The layouts can be change as desired.  Here I have chosen landscape and placed my designer paper on the left hand side.  I am using ivory card stock strips to coordinate with the designer paper. Here I chose brown but I see that green would have worked well also. On the next set!
I was able to choose 3 different colors for my card bases because of the wonderful colors in the designer paper. I chose blue and salmon. For the bottom 2 I put a brown butterfly created with the Martha Stewart Butterfly punch.  On the first I chose blue for the butterfly.  They are held in place with Bling Zots.

Saturday, July 14, 2018

Blank Card Set

I made a set of cards for my aunt.  A funeral is a time where friends, service personnel and family are pitching in to make the arrangements.  Having cards handy makes it easy to express appreciation for the help.

In this set of cards I used a grey green card bases with a subtle floral designer paper in shades of green and grey.  The ribbon I used is called Knitting Ribbon.  It is beautiful soft ribbon about 3/8 inch wide. Love it.

I have use Prima Handmade Paper flowers as well with coordinating brads.


The flowers were peach, green, and shades of pink.  I have created a variety of designs with the flowers.

The other card has heart punchies in pink and white with small plastic pink flowers held in place with Bling Zots.

Tuesday, August 22, 2017

Glittered Thanks Card Set

I colored a several of these Spectrum Noir colorista card making sets with colorable glitter.  I had my eye on these for quite a while but they were to pricey.  These I found on sale for just over a dollar for 6 cards so I bought 3 sets.
 
Most of the flowers are glittered but I chose to only color the daisy looking ones and not the tulips ones. 

I used Stampin Up Watercolor Wonder Crayons and a couple other sets of watercolor to provide a variety of looks and colors.  I applied the color with a round brush.

This one to the left is quite soft in color and subdued in tone.

You will see from the ones below some pop with great color and some are monochromatic so I stuck with various shades of the same color.

I am not sure where they will be donated yet.

Friday, October 21, 2016

Card Set

I made cards for the family of the friend who passed away this week.  The funeral is today.

I used ivory, kraft and pink card stock on the set of cards as well as the same designer paper from the K&Company Designer Paper pad used on the sympathy cards in the previous post.

The adhesive borders had Tim Holtz Antique Linen applied to color the white background.  This is a DSP split card with the floral on the bottom and polka dots on the top.  I applied the adhesive border over the join.  Deep rose satin ribbon has been used on some of them.  Silk flowers & Prima handmade paper flowers held in place with brads.

Cards are always handy at this difficult time as many people are stepping up to the plate to get things done.  The lunch today required many volunteers to make sandwiches and squares.

Wednesday, April 27, 2016

Sympathy Card & Card Set

I made another set of sympathy cards to have a set in reserve when the need arises.

This designer paper is by Fiskars - Kimberly Poloson - Rose Garden.  The colors are very suitable to a somber occasion. On the sympathy card I chose a 4 inch square of designer paper with a color printed greeting in Early Espresso on a gray granite card.  I added a length of ivory satin ribbon and placed the ivory canvas butterfly along it's length.


I love the old crackle design on the other side of this card stock.  I chose several different colors of card stock to provide some variety. There was a natural parchment card, some grey granite, and a muted blue.  I was consistent with the 1/8" ivory satin ribbon and the canvas butterfly through out the set varying the layout and the orientation of the split in the designer paper.   The canvas butterfly is held in place with Zots.  The DSP split is 3.5 & 1.75 inches.

Saturday, April 23, 2016

All Occasion Cards - Canvas Butterfly


I made a set of cards for the family who are grieving the loss of a husband, father, and grandfather.

The colors in the paper allowed me to use several card colors (kraft, royal blue and sage green) to provide some variety in this set of very simple cards. They can be used as needed at this difficult time.
The designer paper was cut to 4" square then ripped leaving a smaller and a larger piece. The piece with the white paper edge was ripped again to remove the white paper edge.  I adhered the pieces to both ends of the card leaving the card color showing in between.
I adhered the canvas butterfly over this space held in place with Zots. The design is versatile in that it works in the wide or tall orientation.


Friday, February 27, 2015

"Winter Glory" Card Set

These Christmas cards were created with laser printed panel cards of this winter landscape which I was given. They needed to be refurbished and re-purposed to be appreciated.  I decided to make them into cards for the Christmas season.  I cut down the panels leaving all the edges straight. Once I had the dimensions I create a grey rectangle leaving a small border from the edge of the image.  I added a greeting in the bottom right hand corner. This was printed on white card stock.  Once printed, the image was adhered to the card front.  An insert was added inside with the sentiment.  I think they turned out really nice.

Again, these are packaged in a clear box in a set of 20. They will be donated to the auction in the fall.

Saturday, September 27, 2014

Rusty Star Wreath Card Set

This is another set of cards for the auction.

This is a wreath is my own design.  I have printed it in a warm dark green.  I have placed rusty stars onto it.  I added a great greeting in several fonts in the same colors in the wreath.  I added a great organza ribbon bow in a warm copper color.

The stars were diecut with the Sizzix Stars#2 die from copper card stock.

Yet, again in a clear box.

Thursday, September 25, 2014

Snow Angel Card Set

Another set of Christmas cards for the auction.  I started with a photo I took of a vintage snow angel Christmas decoration.  I added a night sky in warm tones then layered over it a texture background of falling snow that I designed. I added a snowbank on the bottom of the card with the "Peaceful Wishes" greeting layered over it.  I printed this onto ivory card stock.  I then added a matte gold star die cut with the Sizzix die.  This was added to the card front with a glue dot to add just a wee bit of dimension. Super happy with this one!


I then packaged the set of 20 cards in a clear square box.  I added a spacer just like the retail industry does which worked out really well. The box was purchased from a packaging store.

This looks great.

Ornament Trio Card Set

I made a set of these cards for a donation to an auction happening soon.  I made this set last year which proved popular.

I created the boughs from a real photograph of pine branch.  I drew the ornaments, the hangers, and the snow background.  The centre Love was printed, punched and mounted with 3D foam tape to add dimension.


The set contained 20 cards in a really nice clear box.  I made a spacer just like the retail industry does which works really well.  The box was purchased from a packaging store.

This looks great.

Sunday, September 14, 2014

HB Gift Card Set

Here's the set of cards I made for my niece.  She likes cards but with 2 little ones making them sometimes is a challenge.  I used the My Minds Eye - Indie Chic - Nutmeg "Hanging Out" Roses double sided paper. This is the flip side.  I use the Sizzix Framelits Die - Card, Royal Flip-its which as 11 pieces so a lot of options without using the flip part of the set.  Left - I layered a piece of the DSP onto a yellow card then die cut a hole in the center with one of the framelits.  I then cut the corresponding layers to create the accent. I placed a strip of brown card stock across the center then mounted the accent with 3D foam tape.  Added a small daisy punchie in the center.


Right - A brown card with a layer of DSP adhered to it.  Over that a strip of brown and then a strip of yellow onto which I stamped the HB greeting in brown.

Left - I started with a yellow card.  I used an edgelit in the set to cut the bottom edge of the DSP layer.  I cut a brown to layer behind the DSP one.  A strip of brown card stock with an accent again cut from the framelits in the set.   I put a yellow daisy punchie in the centre and mounted the accent with 3D foam tape.
Right - This an actual flip it card made with the set.  It's so easy to use these sets because it cuts all the pieces just the right size.  The card is cut from yellow then the 2 front layers were cut in the DSP.  Just adhere.  I cut the accent on the front with the different framelits in the set that are nesting in size.  The smaller brown piece is a frame into which I put a brown daisy punchie.

These framelits sets allow you to create cards very quickly!  A cool tool. I would highly recommend adding a set to your tool set.