I printed the SU! Designer Paper from the Eventful Digital CD. Old Olive with Marina Mist dots. I mounted the panel of DP to the card. I cut a piece of blue card stock was glued to the card front. I color printed the greeting then punched it out with the Decorative Label. I then punched one from the same blue card stock. I split it in half and mounted each half behind the greeting. The greeting was mounted over the blue strip with 3D foam tape.

Saturday, September 29, 2012
Card - Challenge - Chevron
I printed the SU! Designer Paper from the Eventful Digital CD. Old Olive with Marina Mist dots. I mounted the panel of DP to the card. I cut a piece of blue card stock was glued to the card front. I color printed the greeting then punched it out with the Decorative Label. I then punched one from the same blue card stock. I split it in half and mounted each half behind the greeting. The greeting was mounted over the blue strip with 3D foam tape.
Thursday, September 27, 2012
Card - Invitation Samples

Here's the samples they did not select. Check back later for their selection.
I selected a black card. I embossed a white layer with the SU Elegant Bouquet folder. I printed a 60 on to bottom right hand corner. I glued the white layer to the card front then applied several crystal rhinestones.

Here's the one they selected.

Card - Challenge - Polka Dots

I started with the designer paper, then selected the yellow card stock. I cut the DP in half and glued them top and bottom. I added a color printed greeting in the centre. I added 3 small red buttons with Zots on the right hand side of the greeting.
I managed to organize this summer so I was able to go to my storage container for elements, find greetings and pull out what I had for every greetings and Voila I had what I needed. Another piece used!!!
Wednesday, September 26, 2012
Card - Challenge - Thank You - Polka Dots

I started with the polka dot paper. I added the yellow card. I decided to divide the paper and cut it nearly in half and placed the smaller piece on the bottom. I added a red strip of card stock in the space in the middle. I chose a pumpkin orange piece for the layer for the greeting. I rounded its corners to repeat the circle theme. I choose a yellow button to put to the left of the Thank You. I applied some red ink to the edges to help it stand out.
Monday, September 24, 2012
Card Club - Incentive

I cut the flowers with the Cricut from various pieces of Designer Paper. I chose subtle patterns not to detract from the design of the flower. I chose the Cherry Blossom from the Picturesque Cartridge. I color printed the stem and dirt directly onto the card and glue the blossoms onto the card front. I'm really happy with the way they turned out.
Card - Thank You

The technique is nature printing which is essentially taking green leaves, applying color paint and pressing those onto paper.
I mounted these onto Kraft card stock. I have oak and aspen leaves here but I have done other leaves which will show up later.
Card Club - Sept - Handmade Paper
Card Club - Sept - Pear

Card Club - Sept - HB Label

I started with a Kiwi Kiss card onto which I glued a piece of Designer Paper leaving a small border. I cut the turquoise label with the TH Stylized Labels and them embossed them with the Cuttlebug Swiss Dots folder. I punched the holes on either side with the SU Slot punch. I strung a piece of white seam binding though the holes on the label and taped the ends to the inside of the card. I added a bit of double sided tape to the back of the label to keep it in place on the card front. I adhered the scallop circle color printed greeting to the label with 3D foam tape.
Card Club - Sept - Cool Paper Clip

How To: Use a Die like a Punch

I wanted to punch out this flower from Designer Paper but the shape I wanted was in a die. This was a challenge because I could not see the paper through the tool like I can on a punch. I worked it out with a bit of thinking about it. It worked really well.
Saturday, September 22, 2012
Card - Challenge - Sentiment Only

I made this card for the challenge at Holly Jolly which is Sentiment Only. I started with the greeting being color printed on vellum then heat embossed with clear powder. This works very well. I found some light and dark green designer paper to put beneath the vellum onto the white card. To hold everything together I used some red star brads. I added a red heart punchie in the top right hand corner.
Wednesday, September 19, 2012
Card - Challenge - Washi Tape


I made these cards for a card challenge on my internet group. The challenge is to use Washi Tape. I didn't have some in my stash so I searched the internet and found this Washi Tape Tutorial. I made tape with double sided tape and tissue paper. I used non stick craft sheet which worked really well!
I applied my tape to black card stock in a variety of directions, shapes and sizes. It needed something to unify the pieces so I sprayed the collage with Maya Mist Snowy White which provided just what I wanted. I cut the collage pieces with the TH Ornamental die. I selected 2 cards which worked with the colors on the collage. I applied a silver card stock strip behind the die then added a star in the same card stock in the top left hand corner. I added greetings in the bottom right hand corner which were applied to a SU Modern Label punchie then the accent was applied to the card front with 3D Foam Tape. The left one is Thank which was cut with the Cricut. Right is color printed greeting cut with the SU Word Window punch.
Tuesday, September 18, 2012
Card - Script Background and Fleur de Lis Accent


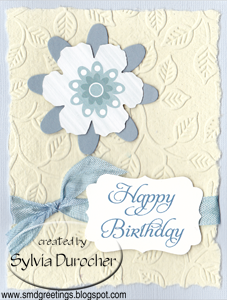
I made this sketch earlier and decided this was a versatile sketch so I made more in other colors. Pink, Blue and Yellow! I created the script background with some poetry I wrote a long time ago. I printed it in a color coordinate with the card color. Found some ribbon to match which is pulled through a slit in the fold. I cut the label with one of the SU Apothecary Framelits. I'm really happy with my purchase of these. I punched a 1.25" circle then layered a MS Fleur de Lis punchie onto it. This accent was then applied to the card front with 3D foam tape. Great versatile design.

Card - Teal - Thinking of You

Card - Exchange - Poetry & Fleur de Lis

Sunday, September 16, 2012
Photos - Canmore

I spent some time in the mountains with my sister recently. I wanted mountain pictures to add to my portfolio and decided Canmore may provide what I needed. We stayed at a bed and breakfast on the outskirts of town. We visited the Bow River, Gap Lake, the downtown area, the new developments with huge houses and the small towns around. The bottom picture is from our window when we awoke one morning. How cool is that! It was very cold and it was -5C went we got up our last morning. Frost on the car windows. We spent some time with 2 ladies from Australia which was very enjoyable. Thanks to our hosts Merv & Yvonne.
Card - Challenge - Christmas Stars

I started with a SB 2011 Heirloom ornament die which I cut in red card stock. I embossed the ornament with the Craft Concepts In Bloom embossing folder. I cut a Sizzix silver ornament hanger and added it to the top of the ornament. I added red crochet cotton to hang it over the dark green handmade paper background. It was embossed with Cuttlebug Leafy Branch folder. I added silver star sequins to the ornament and border held in place with silver star brads. I added a white strip of card stock punched with the SU! Eyelet Border Punch on both edges. This was adhered to the white card front.
Thursday, September 13, 2012
Card - Burgundy & Navy - New Job

I started with a burgundy card which is top folded. I embossed a piece of white card stock with SU Vintage Wallpaper embossing folder then trimmed it to leave a border. I wrapped a piece of navy seam binding across and taped the ends to the back and adhered it to the card front. I designed the greeting with a butterfly to signify the possibilities which are coming for her. I color printed the sentiment on white and cut it with one of the SB Smooth Oval Nestabilities dies. I cut a piece of the same burgundy card stock with the matching SB Scallop Oval die. I layered these and then mounted the element to the card front over the seam binding with 3D foam tape.
Saturday, September 8, 2012
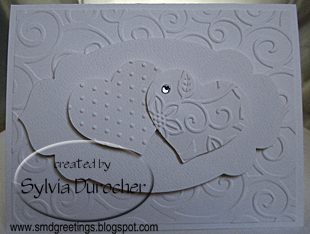
Card - Wedding - White on White

I decided on a white on white design. I started with a white card. I cut a SU Oval Accent die cut. Since it is really too big for an A2 card and I couldn't emboss it completely with the Cuttlebug Victorian folder I decided to trim it to the size I could emboss it. I left a tab on the top to fold over to the inside of the card. I then printed the sentiment on white card stock in Taken with Teal. I cut it with one of the Framelits from the Apothecary set from Stampin Up! I added small iridescent flower sequins to the top and bottom bumps then mounted to the card front with 3D foam tape.
Tuesday, September 4, 2012
Card - Bethlehem Star

Monday, September 3, 2012
Card - Challenge - Christmas Presents

I made this card for Christmas Cards All Year Round blog challenge. The challenge this month is "Christmas Presents". I cut the presents with my Cricut and the recently acquired Quilted Christmas cartridge. I cut the silhouette in Kiwi Kiss then the back in gold card stock. These were glued together. I selected a Ruby Red card cut to fit a #10 envelope. I created the white layer and color printed the greeting in Kiwi Kiss and Ruby Red. Trimmed it to size and adhered it to the card. I added some definition for the bows with a gold gel pen.
Saturday, September 1, 2012
Card - Challenge - Purple Green Orange

I started with a purple card. I cut the striped the paper with the SU Oval Accent Bigz Clear die. I then cut it in half and punched a hole in both pieces. Before I glued them in place I embossed a piece of pearl vellum with the Cuttlebug D'vine Swirl embossing folder onto the card then placed one piece on the top and bottom of the card. I placed an orange ribbon through each and knotted the ribbon and trimmed the ends. I cut a small purple flower and placed an orange centre which was mounted with 3D foam tape. I added a white die cut cut one of the Apothecary framelits. I stamped the greeting with a clear stamp in Only Orange ink. Brushed the edges of the diecut with Lavendar Lace ink. I glue it in place in the bottom half of the card over the Bigz diecut.
Christmas Card Challenge - Sept - Focus Words

Subscribe to:
Posts (Atom)