

Monday, January 28, 2013
Card Club - Jan - Washi Tape
Card Club - Jan - 6 Block DS DP

Card Club - Jan - DS Designer Paper Split

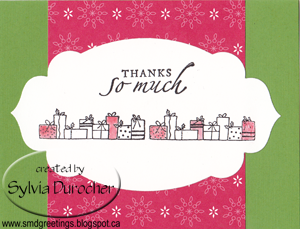
 I started with double sided designer paper cut to 4.00 x 5.25". Then I cut down the length at 2.25" then both pieces at 1.75" across the width. I flipped over 2 of the 4 pieces and glued them to the parchment natural card front. The border was created with the Stampin Up! Dotted Scallop Ribbon Border punch in deep brown card stock. I punched a SU! Modern Label in the same card stock. The greeting was color printed and punched with the SU! Word Window.
 Card Club - Jan - Gatefold with Square Accent

Card Club - Incentive Thank You

 I made these cards to fit smaller envelopes which measure 4 x 5 1/8 inches. I designed them with the Beau Chateau designer digital files. I created a smaller background of chicken wire in Soft Suede with a clear background. I added the Bee embellishment in Marina Mist and Soft Suede. I created a Word Window Punch digital and added my Thanks sentiment. I filled it with Very Vanilla with the sentiment to coordinate the color to the bee embellishment. I printed the cards onto Very Vanilla card stock.
Card - Card Club Incentive


Sunday, January 27, 2013
Scrapbook - Retirement Book of Remembrance

Saturday, January 26, 2013
Cool Tool - 12x12 drawers - Paper Storage

 I use these 12x12 drawer units for patterned paper storage. I have 2 units which gives me 8 drawers. One unit holds paper sorted by color. The other holds other paper like Christmas paper, Specialty paper like acetate, vellum, glitter etc, multicolored paper and one drawer for scraps of patterned paper. It works for me because I can see the paper. When the scraps drawer gets too full I go through it and purge. I bought the units at Walmart. The labelling is not too sophisticated and I should replace them with clear labels now that I have a label maker. One day soon.
Wednesday, January 23, 2013
Cards - Birthday in Greens

Left: The card is Certainly Celery with double sided designer paper by Stampin Up! It was cut 1/3 to 2/3 and the top piece was flipped over. I color printed the greeting in CC on Very Vanilla and cut it with a Spellbinder Ribbon Slider thin die. I placed it onto a piece of CC ribbon which was placed over the join of the 2 piece of DSP. The ribbon is pulled through a slit in the card fold and taped to the inside. I added a large silk flower and dyed a smaller one with Tim Holtz Peeled Paint Distress Ink. They are held in place with a vanilla brad.
 Right: I selected a dark green textured card stock. I selected some green DP by Basic Grey - porcelain arabella. I color printed the greeting and punched it out with the SU! Decorative Label punch. I punched another from the green cardstock. I cut it in half and mounted the halves top and bottom of the punchie. I added a coordinating gross grain ribbon.
Monday, January 21, 2013
R2G Card Kits - Woodsie Felts Cmas
 I created these cute card kits with felt shapes. Red moose, green trees and white snowflakes. I selected wood background Designer Paper from Rusty Pickle call Game Time. I printed the greetings on off white card stock in Chocolate Chip. The greeting is cut to 1/2 tall and 4 1/4 inches wide. I selected dark brown card stock onto which I glued the DP. I placed the Woodsie Felt shape near the bottom of the card and using a push pin created a hole through the felt and the card. On the moose I selected a place where his eye would be and inserted a brad which holds the felt in place. On the tree there is a hole at the top so I place a star brad there. On the snowflake I placed the brad in the centre. On the greeting I cut a flag end on the right and aligned the left to the edge of the DP and glued it down. I used a Zot to hold the button in place to the left of the greeting.

Wednesday, January 16, 2013
Card - Stampin Up Birthday

The colors are Only Orange, Tempting Turquoise, Green Galore, Passion Pink, Certainly Celery. After some serious internet searching I found it. Thanks.
Friday, January 4, 2013
Card - SU Thank You
Thursday, January 3, 2013
Cards - Christmas Thank Yous


Wednesday, January 2, 2013
Calendar - Vintage Photos

 I placed the workshop of Walter Edward Walker who was a master canoe builder and worked in the mid 1940's. The photo was taken at the Canadian Canoe Museum in Peterborough Ontario. The photo for September is the Gray Ghost - Goodyear FG-1D CORSAIR which visited the Edmonton Aviation Museum in 2010.
Tuesday, January 1, 2013
Christmas Card Challenge - Jan - Folds

January's theme is Folds. You can try gate folds, Z folds, Joy Folds, iris folding and twisted card to mention a few.
I chose a Joy Fold card. It is quite easy to make. I chose double sided designer paper so that the colors would coordinate well. The paper is by Basic Grey named Eskimo Kisses - rooftop. I chose a light blue card base cut 4.25 x 8.5 scored at 3". I laid the large piece of DP with the houses showing then turned a smaller piece over to show the blue and white swirls which I put on the small flap of the blue base. I cut my second piece of card stock from pink 3x8 folded in half. I added a 1.5x2.875 piece of the house paper on the left side and added a color printed greeting in coordinating colors. I added a small pink Sizzix heart embossed with Cuttlebug Swiss Dots on the left hand side to keep the flap closed. Check out this pic giving you a top view.

2013 Christmas Card Challenge
I'm having a Christmas Card Challenge every month in 2013. I find I get my Christmas Cards made in time and with much less stress when I make some every month. I will post my theme and my card the first of every month. Join me in getting Christmas cards done in good time for sending.
January - Technique - Folds - Tri-fold, Z Fold, Gate Fold, Joy Fold, Twisted Card, Iris folding
February - Accent - Buttons - Wooden, Plastic, Die-cut, Shaped
March - Focus - Hearts - Die-cut, Quilted, Punchies, Stamped
April - Technique - Coloring - Watercolor, Copics, Acrylic, Crayons, Stain, Markers,
May - Accent - Textiles - Fabric, Felt, Velvet, Ribbon, Tulle, Lace
June - Focus - Candles - Die-Cut, Stamped, Paper Pieced
July - Technique - Shaped - Mittens, Trees, Round, Scalloped
August - Accent - Stickers - 3D, Letters, Glittered
September - Focus - Christmas Foliage - Poinsettia, Boughs, Trees, Wreaths, Holly
October - Technique - Paper Piecing - Squares, Banners, Flags, Quilting, DP, Trees, Pinwheel
November - Accent - Chipboard - Diecuts, Letters, Ornaments, Snowflakes, Trees
December - Focus - Christmas Thank You - Cards ready for sending right after Christmas
Subscribe to:
Posts (Atom)