Showing posts with label stained glass. Show all posts

Saturday, February 25, 2023

Sylvia's Simple Shots

I've been waiting for this happiness since I returned the Sunrise Stained Glass Art piece of mine to the window in the dining room.

One day this week the sun was shining brightly despite the temperatures this week.

This is the image on the wall in the living room being created by the stained glass piece in the dining room window.  This is exactly what I was hoping to achieve with this piece of art.  Blissfully happy with this.

The dried flower arrangement are the left overs from the bouquet for Mom's passing in January.  The leaves have dried very nicely, the baby's breath is good, the freesias are slowly falling off but that is okay.


I am back to my regular areobics routine along with the exercises from the physiotherapist.  I expect had I got back into my regular routine this fall I would not had the problems I experienced with my knee but such is life.

What I have learned is that you can not store up fitness.  It is something you have to do regularly or you just lose it.  

I am grateful the lesson was not more painful than it was.  From January 6th to February 25 I am back to about 95% on both the knee and the back.  I spend 1 hour a day between areobics and strength building exercises.

It is good to being feeling myself again.


Yes, it was a cold one again this week.  It has to end sometime.

I have stayed in most of the week. I did have a few commitments I had to do but in little sprints it was okay.


This little and mighty machine came to live at my house this week.  I picked it up from its service on Thursday.

I will be doing an in depth post on this machine later.

I had a conversation with my niece a while back who is a bargain hunter and thrift store shopper.  She had purchased this one and as she had 2 others this one was up for grabs.

With my recent sewing projects one of these will come in very handy for my unPaperTowel project.

I want to make some reusable make up remover pads as well.

I have to get new thread into it before I can use it so that is the next thing.

Bring Her Home by David Bell is a book I finished early in the week. 

This was quite a thriller of a story with a few tense moments and a couple of turns which one is not expecting.

The 2 teenage girls Summer and Haley are missing.  The search finds one girl severely beaten and just barely alive and one dead.  They had been looking for 2 girls and 2 appeared so it was assumed they were the ones being sought.  

Later, we discover another girl was involved and parents grieving received a shock and now there is still one girl missing.

Bill Price, a recent widower, is looking for his daughter Summer.  Tiny clues start adding up to behaviors he could not have anticipated his daughter would have engaged in.  Summer is grieving the loss of her mother.   It was a very good book.

I made a trip to the ReUse Center on Friday and found some goodies.
Some quilted fabric for my sister who has been making casserole carriers
This tiny blown glass snowman is just the cutest. No chips at all.
From the plastic I collected I want to make toggles for the bags to wash make up remover pads in.  They need to be plastic because they will go in the laundry.  They are small pieces so it was recommended that they be washed in a laundry bag.  
The cardboard rolls are for the UnPaperTowel project. 
The piece of embroidery is a huge piece of linen.  Yes I checked with a burn test.  I would like to make use of the stitched segment in some what but not sure yet what.  Can it be incorporated into a blanket?  Maybe. There is 2 meters so the other half from the stitch segment would make nice dish towels.  We shall see. 

The Lucky One by Nicholas Sparks follows the tried and true formula for another successful story. His male are really good guys.

Logon Thibault find a photograph while he is on tour in Iraq.  The photo is a beautiful girl with a ferris wheel, 3 large pines and 3 marines in the background.  He experiences getting out of some pretty tight situations alive during his time with the marines. His best friend Victor believes the photo is a good luck charm that is keeping him alive.  After their tour is over and they are back in the USA they get together after a few years of trying to piece their lives back together after seeing combat. Victor suggests that Logan try to find the girl and thank her for keeping him safe. 

Logan finds the girl after a very long walk but does not disclose the reason he has arrived in Hampton.  He gets a job, they fall in love and then disaster strikes and the things he hid come to light.  It does not go well with the girls and he gets ready to head out of town once again.  Through a difficult situation he redeems himself in her eyes.  And as always they live happily ever after. 

Thursday, January 5, 2023

Sylvia's Simple Shots

I went for a walk on January 01 2023 with my aunt who needed to get out of her house for a bit.

The sun was shining and the temperature was decent.

We met at the Grey Nun's White Spruce Park which has undergone a renovation which has included improvements such as a outdoor classroom, a wetland overlook and more.

We were out for an hour at about 1pm. There were quite a few folks with the same idea but I think we were just ahead of the warmest part of the day.


My aunt hosted a brunch on Jan 2nd for her sisters and husbands.  I was one of two nieces included which was really lovely.

We had traditional meat pies (tourtieres) and her delicious onion pie which were gobbled up very quickly.

It was nice to catch up with my aunts. I picked up some art from one of my aunts to be delivered to family at our Family Christmas Celebration next week. 

The day was nice and the drive over was good.  

I stayed after the others left and helped her out with a few things and then we sat and had tea.

It was dark when I was headed home.

I put up my Sunrise Stained Glass Window which has been stored since early spring.

It was great that the sun actually shone and I could enjoy it's color on the walls.

I have missed these passed several months.

Made my day!


Monday, December 5, 2022

Sylvia's Simple Shots

The Second Sunday of Advent. 

The second candle is the Candle of Love.

God is LOVE!

The year has not turned out the way I planned.  I am grateful that getting together this year is safer.  

I look forward to seeing my friends which I have only been in touch with by phone, text and email.


Again, reading from the Greatest Gift by Ann Voskamp.

I will bless you. Abram leaves and takes his family to Canaan.  

You will be experienced as a blessing to the extent you have first experienced yourself as blessed. God is good and says I will bless you. Slow down, breathe, be to see the good.


Christmas decorating has commenced.  I am grateful that the box of Christmas decorations was not packed in the spring with the anticipation of moving.

I found the star wreath I put together last year.  I had hoped to change the decoration at the top but alas it will not happen this year.

This wreath hangs on the outside door where my neighbors can enjoy it.  We have quite a few in the building with Christmas decorations out.


The Secret Hour by Luanne Rice was finished this week.

A mystery story with parallels happening in the lives of the characters.

John O'Rourke lost his wife and now is juggling the care of his 2 children - eleven year old Maggie and fourteen year old Teddy. As a lawyer he is representing a man who is accused of killing several women in the area. The general consensus is that he his guilty and John catches grief, harassment, and threats because he is defending this man.
Kate Harris is dealing with the loss of her younger sister Willa, who just disappeared 6 months ago.  A recently found postcard has brought her to this small town from Washington DC. Her sister mailed the card from the inn on the edge of the ocean here. 

It was a good book with a twist at the end which brought the story full circle.

This is one of my favorite casserole dishes.  I received the dish for Christmas from my neice and it's just right size.

This recipe is Herb-baked Fish and Rice.

It is a quick supper when I am busy with crafts and don't want to spend a lot of time on cooking.

I just use whatever veggies I have on hand.  In this case it was cherry tomatoes and broccoli.  I add some lemon vinaigrette on the fish and coat with Parmesan cheese. Always brown rice.  Delicious.
My lastest version of a essential oil diffuser.  This one hangs on the rear view mirror of the car, on the Christmas Tree, or anywhere you want a bit of scent.

I am sure glad I bought these felt balls at my local craft store in October.  I went recently to see if I could purchase another and this Christmas the decor is pom pom garlands.  

I expect the trend will be something new next season so I just let go the idea of repeating this years concept and look forward to new things in the new year.

With my Sunrise Stained Glass Window packed away I decided to hang this bright snowman in the window instead.

He was with the Christmas box.  The sun was shining bright the day I took this photo and his nose glowed bright.

It is hanging in the dining room window where the east sun comes up so late at this time of year.

I am grateful that I can enjoy it for a little while in the mornings.


The gold geometric wreath has moved from the living room to the bedroom door to make room of the Wall Christmas Tree.

I just love this wreath so it hangs on the wall all year long.

Monday, November 8, 2021

Stained Glass Light

I have been working on very long projects recently.  A lot of problem solving also.

If you read my last post about the Sunrise Stained Glass piece I realized that I would not have the sparkle when I wanted it.

I set out to solve that problem I decided I needed a stained glass light/lamp.

I headed to the ReStore store in hopes of finding a vintage Tiffany type lamp which would create sparkle on the walls and ceilings.

The store had a few - one had amber glass - that's not going to work.  None where plug in lamps.  There was a great chandelier of clear glass but it was $100.

I was fortunate that my sister was with me and we revisited the lighting section.  


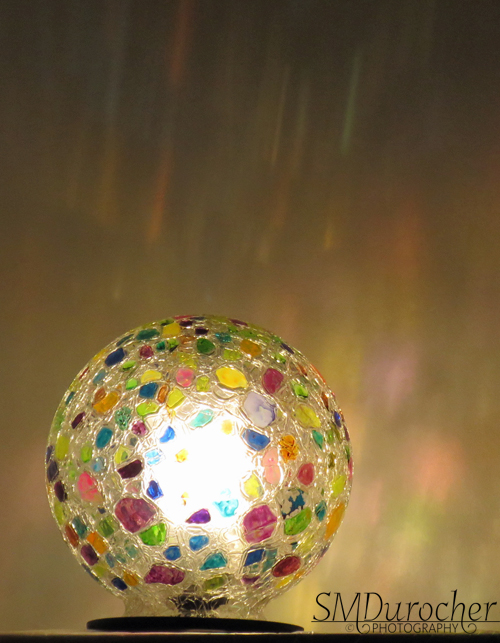
 I found a crackle glass light which would work.  The picture on the right is an example of the what I found. 

It was a swag pendant ceiling light with a crackle glass shade. The metal parts are much fancy than the one I bought.

I could not find a price so when I headed to the check out I mentioned that there was a 50% discount on in stock light fixtures.

He mentioned that he could not reduce the $1.00 price any further.  Wow!   I was thrilled.

The fixture metal support was antique bronze lacquered.

You can see in the photo on the left actual metal fixture which supported the crackle glass shade.

The wiring was cloth covered and the socket was ceramic/porcelain.  After a bit of research, it was like new in the 1950-60's.

The original had a incandescent light bulb but I decided that I would use an LED which produced no heat, especially in an enclosed shade.

I took the pendant lamp completely apart then I had the shade separated.

I spent a few days trying to figure out how I could convert the light in a lamp with a plug in and switch.

I decided that it had to be a desk lamp. 


This shot is with a small flood light fixture inside the shade.

That is the sparkle I am looking for!

This light is very directional, the light cord comes out under the shade which makes it unstable.

I was encouraged that I was headed in the right direction.

So, on my regular day out I headed to thrift stores.

There were a lot of lamps but some I could not take them apart easily, some were very tall, a few had an aesthetic that I liked.  I hesitated making impulse purchase despite I was very anxious to get something.


On the third store I found exactly what I was looking for.  An IKEA desk lamp with a very large glass globe shade with the perfect base.
It was $10 but considering that the shade cost me a dollar I splurged and paid the price.

The base has 2 prongs on very strong springs which fold toward the bulb and release outwards inside the shade to keep it in place.   

It had a plug in cord with a switch on the cord.
Here, I have colored several cells on the crackle shade with Sharpie markers.  

That is starting to look like what I really wanted.

I was trying to decide whether I would leave half clear and half colored.

The Sharpie markers I had did not have enough color options so I investigated the liquid acrylic paints I had on hand.


Here you can see the prongs on the base which hold the shade in place.

Now I have found the 40 Watt LED Clear Light bulbs.  They were stored behind a lock at the department store.  It was about $10 for 2 bulbs so I'm not sure why they were locked up.

Now with the light bulb in the base it was time to put the shade on.


See how the top light pattern is very linear.  That is because of the yellow light filaments in the clear light bulbs.  All clear LED lights them. 

I wanted something softer and smoother.   Now I needed a clear diffuser to soften those lines.

I hunted around my photo studio because I have collected several materials to use as diffusers over the years.

I found what I was looking for.


I think it is plastic that one might use to line kitchen cupboards.  It is pebbly and textured with little round knobbies and quite clear other than the texture.  It worked to diffuse the lines very nicely. 
Here's a shot of the set up for painting the cells on the round shade.

I chose colors that I liked.  I decided to leave the crackle lines between the cells clear because it would be a pain to paint and it provides space between the color on the wall when it is shining.

I left it over night but some of the colors were still not dry.  I ended up getting some on my fingers when I touched the shade to get it on the lamp base.

I don't know if they will every dry.

It is in place and I don't  have to touch it again till I have to replace the bulb and with 10,000 hour life time that will be a while.


It is very magical.  I love it.

The linear colored shadows on the top are where the diffuser is open at the top.

Such is life.

I set it up in my bedroom.  There is light on the 2 walls and the ceiling.   I can see it from my bed so I can lay there and enjoy it.

Now what would be perfect is if I could go to sleep with it on but it would go out on it's own.

That would mean a timer.


I was all set to pay $20 for a timer but today at the thrift store I found one for $4.

I checked it to make sure it worked and took it home glad to pay that price.

Now I can go to sleep with sort of the northern lights every night.

Except tonight the post took me so long that I missed the 10-11 o'clock time frame I had set.


Wednesday, October 27, 2021

Stained Glass - Sunrise

I've always wanted a stained glass piece for my window and thought it would be a nice retirement gift but it did not happen.  So I decided that I would pursue the idea and see where it led.  In my mind I see a colorful image casting beautiful colors on the wall and ceiling, almost sparkly.

First, I had to decide what image did I want?  Sunflowers are a favorite but I chose a sunrise as it represents a new beginning, hope, and a look to the future.

Second, research as to what a piece would cost, which window would work best, and would it do what I wanted.

Third, a trial run - how? I found a site that provided a video on how to create a piece of faux stained glass art and a few steps with easily found supplies. At Art Emporium the Faux Stained Glass video used basic school glue and acrylic color to make an art piece.  

Frame-  I found a white frame in my stash that did not have a mat and was quite large measuring  16.5 inches square so it likely would not be used in my photography.  It also had words on the glass that I removed with a razor blade.  Cleaned the glass thoroughly.

I needed some original art now so I browsed online sites with stained glass sunrise projects and after looking at hundreds I started to have an idea what mine would look like.  I did not want the pieces to be too bulky or too simple.  Remember I want lots of color.  


I drew the first sketch - sun off center, water and hills in the foreground.  I did not want straight lines like in the little one drawn below the sketch. 

This one was drawn at 7 inches square.


I traced it onto not the best watercolor paper and used my Stampin Up Watercolor  Wonder Crayons to color it.  I loved the colors but I stumbled with getting a variety of shades of green in the hills.  Of course, a real stained glass piece will not be a shaded as this one.

I asked a few folks for some feedback. 

I recognized that I had a hard time drawing the secondary rays on the left hand side.  Someone suggested that I copy the image and put then flip it so I could roughly follow what I did on the right on the left.

The hills were too similar and did not have enough pieces.

Ok, I can work with that.


So with that feedback I started on the second sketch.  This one was also at 7 inches.  

I now had light yellow pieces on the left hand side as well and more pieces in the hills.

I marked out the which rays would be Orange, Yellow and Light Yellow.  I wanted green blue and blue in the sky pieces.

Happy with that so lets move on.


Now it had to be enlarged to fit the frame I described above.  The glass could not be removed from the frame so I would have to be painted and leaded in place.  Because of that I chose to keep the design from going all the way to the frame.  That meant I did not have to touch the frame with the leading.

I enlarged it to 14 inches square and decided to put a frame around the edge which would leave about 1/2 inch between the wood frame and the lead frame on the glass.  Excellent.

Another suggestion was made that I paint it in the colors I was planning on using in the final piece just to be sure I was happy with it and still had a chance to adjust if needed.

So I traced the 14" piece onto some Bristol Vellum heavy card stock which was leftover from an art class I took years ago.  It had to be pieced together just like the sketch was earlier, to be large enough.

I sampled the liquid acrylic colors I had and made some selections.

The colors chosen are listed below:

Nick Bantock - Chrome Yellow, Deep Turquoise, Prussian Blue, Sap Moss Green, Chartreuse

Daler-Rowney FW Acrylic Inks - Flame Orange, Rowney Blue


Here's the Bristol Vellum piece all colored in. The yellows in the first row of rays are not all the same color.  I was just enjoying the process.  

I will be able to mix colors in the final product as well.

Of course, it will be more watercolor in tone than a glass piece will be.

I am happy with the hills this time in shape and color.

I used a Sharpie black marker with a fine tip to do the black leading on this piece.


Now I can get ready to transfer the image to the glass in the frame.

I placed the frame over the painted piece of Bristol Vellum and taped it carefully in place.  I will be putting the black leading on the glass surface on the inside of the frame. 


I chose Pure Black by Folk Art for the acrylic paint.

I reused at glitter paint bottle with a fine tip.  The black leading is mixed 1 part black acrylic paint and 4 parts white glue.  Test it to be sure it flows nicely so you can easily draw your lines.

I traced the black lines on the glass following the  drawing above.


You will see from the photo on the left that I put the art on my light table so that I kept the composition in the same direction as the original so when I flipped the frame back to the front it would be same as the original art.

Once the black leading was applied it needs to dry completely before you paint your color.  The video recommended overnight.  I painted my lines in the early morning and by the late afternoon they were dry and I could move on to the color.  The fun part was beginning.


I used some condiment cups to mix up my clear glue and acrylic color.  A cup for each color.

I applied the glue with a small wide craft brush and made sure I rinsed thoroughly before moving to the next color.

Then I followed my color chart from earlier and painted the sun and up then from the horizon line down to keep my hand and fingers away from my finished work.  

I let that dry over night.   


I discovered that I missed the top right most space when I was painting.  I did paint that several days after it was hung.


The next morning all was dry so I put the eye screws in the top middle of the width of the frame.  I chose wire to ensure it could carry the weight.  I have a second curtain rail so I slid a hanger onto the rail and screwed it tight. I then placed a carabiner between the wire and the hanger.  

I hung it in the window and waited for the sun to shine.  It took 3 days to have the sun shine and for the colors to be on the walls of the living room.

I was not anticipating it being so random as to when I would see the colors sparkling.

Of course, looking out it looks really nice but when the sun shines it is great. 


Another down side is that the sunshine only shines for a limited time through the window and the stained glass.  So I have to be around and paying attention to see the sparkle for the 10 minutes it is on the wall before it moves off the the book case.

In this photo the image is half on the wall and half on the side of the book case.

It took over a month from start to finish.  

The costs in materials was minimal. School glue on sale in early September. Liquid acrylic I already had. And my time.

Thanks to the artists who provided feedback and support during the process.

This was a great learning experience. Drawing, mixing colors, and sticking with it.   The biggest thing I learned is that I want sparkle all the time or when I need it not just when the sun shines in the window.  I am so glad I did not invest hundreds of dollars to learn this lesson.  I will enjoy it when the sun shines.

So, I have started another project to get the sparkle all the time or at least when I want it!  More to come on that project in days to come.

Monday, October 18, 2021

Sylvia's Simple Shots

The colors this fall are amazing.

Caught this vibrant orange maple leaf at the park on Friday.

It was perfect and the light was making it glow.  

We hardly ever get this kind of color in our fall leaves in the west of Canada.

I was thrilled to capture this one.  I did not even think to pick and press it.  I hope others enjoyed it because I chose to leave it behind.


The plants in the north window are doing so well. 

The spider plant is getting ready to produce flowers and propagate.  I expect these could become babies.

That must mean it is happy!  I am remembering to water it regularly and I gave all the plants fertilizer the other day.


I was given another African Violet by my sister.

I managed to get it to hang in the north window.  It is on the small hanger as the spider plant I just mentioned.

She gave it to me about a month ago now.   I do remember to water it from the bottom.  I will keep it away from the cold window in the winter.

I hope this one does better.

I used to able to grow these years ago and have flowers on them so that is what I am aiming for again.


I finished this book last week.  The Dance by Dan Walsh and Gary Smalley.

Marilyn is married to Jim Anderson, a successful businessman. After 27 years of marriage, Marilyn has had enough of feeling unloved and neglected. She wants to experience some measure of happiness before she's too old to enjoy it, even signing up for dance lessons, something Jim would never do, not even on their wedding day.

The dance is a metaphor for the relationship she has with her husband and the physical dance she so would so much enjoy doing with him.

They both meet older and wiser mentors who help them negotiate this crossroads in their marriage. 

I was glad it was the first book in the Restoration Series so if I chose to follow the series I am at the beginning.  I will not be chasing down the next books but we will see if another shows up sometime.

I finished this book this weekend.  The Return by Nicholas Sparks.

The story of an injured Navy doctor -- and two women whose secrets will change the course of his life. Trevor Benson never intended to move back to New Bern, North Carolina. Having been injured in Afghanistan and having inherited his grandfathers cabin he decides it's as good a place as any to figure out his way forward.  It holds wonderful memories of his childhood.

Natalie Materson is the deputy sheriff and Callie is a quiet, hard working teenager who lives in the trailer park up the road from the cabin.

A crisis triggers a race to uncover the true nature of Callie's past, one more intertwined with the elderly man's passing than Trevor could ever have imagined. In his quest to unravel Natalie and Callie's secrets, Trevor will learn the true meaning of love and forgiveness . . . and that in life, to move forward, we must often return to the place where it all began. 

I have been working on this project for several weeks.

I drew the original and did a test watercolor of it in this post.

Once I had decided which frame I was going to use I needed to enlarge it as well as make some design improvements.

Then it was suggested that I color the large one with the colors I planned to use in the final project.  That was completed this week.

I then had to transfer the design to the back of the glass.  You can check out this video for the instructions for Faux Stained Glass featuring Elmer's Glue.

The "leading" took less time to dry than I anticipated so I finished it yesterday and hung it with the hope of seeing the sun through it this morning.  Disappointed.  Overcast and cool all day so far.  Maybe tomorrow.

I hope to see the magic on the walls when the sun shines.

Progress is bring made on the Wall Christmas Tree as well.

I purchased a photo shelf for the space where the tree will hang.  The ring will be bolted to the shelf then the tree will hang from there.

I found the perfect s hooks at Ikea with one end bigger enough to go over the branches.

The star will also have to be painted gold because right now it is green.

Good thing I started in January. 

It will be ready to hang in early December.


The Flickr Macro Mondays Challenge this week was "smoke".  Steam was also allowed.  It was very challenging photographing something that just disappears so quickly.  

After check the group there are a few things that last a little longer - namely incense.

You can check out my Photostream (SMDPics)to see the shot I submitted.