What you do to manage your Cricut projects? Leave me a comment with your insight into the process.

Tuesday, May 31, 2011
Cricut Projects - How do I manage the information?
Card Club - Blue Bird

 I started with this great blue bird. It's really a post it note I bought a Michaels a while ago. I selected a white card with designer paper that coordinated with the tone of the blue in the bird. I trimmed that and glued it to the card front. I cut the leaves and the branch with the Cricut - Straight from the Nest p.42. It allows you to cut the branch then you can cut the leaves seperately in a different color and then glue them over the ones cut with the branch. Very cool! I placed my bird over the 3rd leaf on the branch. Some of the girls turned the branch around and placed the bird in the dip on that same end of the branch. Works well. I cut the wing with the Cricut - Create a Critter p.45. Once cut I embossed it with the Cuttlebug Devine Swirl folder. I glued the wing to mirror the sweep of the bird's tail. A beak defined with a white gel marker. A white brad for the eye. I used this in my All Occasion Class in April with a different sketch. Check it out. The Cricut Create machine allowed me to Auto-fill a full 6x12 page of wings. Cut 23 in one shot. That comes in handy with classes.
Card Club - Jumbo Flower

 I started with an off white card to coordinate with the dots in my polka dot paper. I trimmed my paper and glued it to my card. I cut the flower with a QuicKutz die. It cuts all three pieces in 3 different colors. In the end I chose blue, white and yellow because the red in the flower did not match well with the background paper. I embossed the large flower with large polka dots and the centre with the small Swiss Dots folder. The leaf was cut with the Cricut - Create a Critter p.61. I taped all my flower pieces together on the back before I adhered it to my card. One could put double-sided tape on the card then lay the pieces one at a time onto it starting with the centre. Some girls added white gel marker detail to the leaf. I've added a sample with the white card and white gel marker.
Card Club - Damask Button
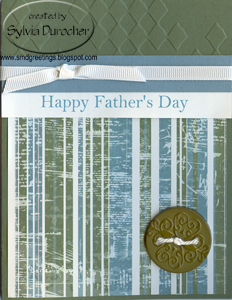
 This one was the Father's Day option. I started with always artichoke card and embossed the top 1/4 with an Cuttlebug embossing folder. I cut my designer paper to 4x4" and glue it to the bottom half of the card. I layered my greeting and the blue accent strip together then glued these both to the card between the embossing and the DP. I placed a slit in the card fold with an Exacto knife just wide enough to allow the ribbon to be pulled through. I placed the ribbon across the card, leaving enough ribbon to tape the ends to the inside card I cut the leftover off (about 2"). Once the secured on the card just tie a knot with the same piece onto the long piece and it makes a quick bow very easily. I put white cotton yarn through the holes in the button then applied a Zot to the back and mounted it in the bottom right hand corner. I offered a Happy Birthday greeting with this set.
I also made a kit with cranberry cardstock with floral paper for those that did not want a Father's Day card.
Card Club - Lady Bug

 We had our last Card Club of the season last night. We had good discussion and got our cards made.
I started with the lady bug accent I purchased a while back. It combines dark pink, light pink, kraft and an oatmeal color. So the kits reflected those colors in it's various parts. Some kits had light pink cards, some dark pink like this one, some kraft.
I cut a piece of light pink cardstock to 51/4x 2 1/8" and embossed it with the Sizzix Tropical Paisley folder. I then cut a scallop border with a border punch. The glued the scallop border to the embossed layer so I could position it where I wanted then glued it to the card front. I then folded my ribbon in half and placed the fold over the place where the light pink, kraft border met and I stapled it. Fold the ribbon in half then trim the ends you will get this nice v effect. I then mounted my lady bug accent with 3D foam dots to raise it above the staple. Glued my insert to the inside card front.
Wednesday, May 25, 2011
Card Two - CST Challenge #2 - Sketch
 Same sketch from the challenge blog. This time I wanted a more feminine look. On a white card I placed a layer of designer paper with large polka dots. It had this bright green on the back. I found ribbon to match this green. I chalked the edge of the color printed greeting to coordinate. Placed the ribbon and taped it to the inside of the card front. I glued my greeting and placed 2 silk flowers with a star brad in the bottom right hand corner.
I'm happy with this one too!
Card One - CST Challenge #2 - Sketch
 A challenge blog was selected for this one. It needed a text panel and an accent.
I wanted to make a masculine card so I selected my designer paper accordingly. I put the striped paper on the white card. I created my accent with the greeting onto artichoke paper, then the green gross grain ribbon glued to the celery solid layer. This was then placed on the striped paper and the ribbon was taped to the inside of the card. I put white thread through the holes in the white button and adhered it to the card with a Zot.
Quick and easy.
Card Two - CST Challenge #1 - Button
 I selected the same ivory cardstock and designer paper as the previous card. I added a dusty blue in the scallop border and the 1 3/8" layer for the greeting on this one. The same plum purple button with a damask embossing makes a great addition.
Card One - CST Challenge #1 - Button
 The challenge I chose was to make a card with button on it. I bought these buttons at Michaels at Christmas time. They came in olive green, royal blue, mustard, and this plum purple color.
I found this coordinating designer paper and mounted it on an ivory card with the scallop border from Die-namics in the plum color. I added the celery twill tape. I punched a 1 3/8" circle from the plum cardstock and the color printed greeting I smudged with chalk. I put some plum colored thread in the holes of the button then mounted it on the card with a Zot.
Wednesday, May 18, 2011
Sympathy - Embossed Floral
 I used the Cuttlebug floral embossing folder on a piece of white cardstock and trimmed it. I glued it to a peach card. Added a gross grain ribbon in peach. You need a slit in the fold to pull the ribbon through and tape to the inside. I designed the circle greeting punched with 1 1/4" circle and punched a 1 3/8" circle to layer. Used Zots to adhere the greeting to the card. Quick!
Sympathy - Embossed Leaves
 I've needed several sympathy cards in the last few weeks. I decided to make a few ahead so they ready when I needed them.
 I used the Cuttlebug leaves embossing folder on quarter sheet of white cardstock. I trimmed it and glued it to the green card. I couldn't find green ribbon to match the card so I settled for white twill tape. I designed the circle greeting, color printed it and punched it with the 1 1/4" circle punch and mounted to a 1 3/8" circle of the card color. I used Zots to keep the greeting in place. Pretty quick.
Saturday, May 14, 2011
Gift Card Holders - a Tim Horton's Break
 I got together with a couple of friends tonight to make gift card holders for those soldiers who go over seas to help, support and put themselves in harms way. We did a bit of fundraising and had enough cards for a unit serving in Afghanistan. I hope they know how grateful I am for what they do. We put Tim Horton's gift cards in these which will provide for a bit of a break.
Be safe, keep your head down and come home! Thank you and God bless!
I color printed the greeting and punched it out with the Stampin Up 1.25" circle. The black is a the 1 3/8 circle punch. I cut the holders 4"x5.5". I scored at 1.5" and 4" which is efficient use of 12x12 cardstock. We then folded the slighter large flap up and stapled it down on both sides. Slipped the TH card inside and applied adhesive to the back of the greeting and used it to keep the flap closed.
Wednesday, May 4, 2011
Christmas Card Classes
 As most will know I challenge myself to make Christmas cards all year long. To help others get their cards made in plenty of time I'm offering several Christmas Card Stack classes in June 2011. If you are interested, you can click the link on the right named SMDGreetings on the list of sites I like to visit and follow the Card Stack link or you can click here my website for details.
 Please be in touch if you are interested. If you can't attend and would like to have a card kit to make on your own let me know! Instructions are incuded and just basic tools are required.
Tuesday, May 3, 2011
Card - Embossed Sunflowers
 I love sunflowers which would explain why I had 2 of the same card in my bucket of cards I've received over the years.
I was inspired by a card I received in my exchange group. Here's the card Therese sent. I decided to use my Cuttlebug Oval frame embossing folder. I cut my recycled commercial card to just smaller than the card front. Placed it in the embossing folder and as the folder is translucent you can see where the main image will fall and adjust accordingly. Ran the sandwich through the Big Kick. While the card is still on the embossing folder use sand paper to rub the high parts removing the color leaving the white card color. Then, I found a complimentary card in a blue green color. I added a yellow gross grain ribbon across then glued it to the card. I added a Spellbinder embossed butterfly and a muted orange color. I added a head and body with a black marker.
This is a great technique. Check out your stack of embossing folders and received cards you are willing to part with and have a try at this! Works great.
Sunday, May 1, 2011
Cmas Card Challenge - May - Reason for the Season
 Jesus is the Reason for the Season
I chose this rubber stamp from Stampendous - Reaching for the Star. I stamped it with clear embossing ink on black card stock and gold embossed it. I trimmed the piece square on 3 sides and cut the bottom along the shape of the straw. I selected a black card and mounted smooth gold paper to cover the most of the front. I designed the greeting to fit next to the stamped image which about 3.25"x3.75". I printed "O Holy Night" on vellum in a nice font. I managed to get 6 on one page. I used deckle edge scissors to trim the left and right sides leaving the top bottom straight. I added a small gold star in the O to hold the vellum in place as I prefer not to use glue or tape on vellum.
Cards 6
Total to date: 32
Subscribe to:
Posts (Atom)