Friday, February 26, 2021

Christmas Card Challenge - Feb - Watercolor Cards 2

Here are the next 4 cards in this watercolor challenge.

I lightly drew the shapes with watercolor pencils. I then used red watercolor to paint this trio of elliptical ornaments.  The 140lb watercolor paper was taped down to a piece of glass and allowed to dry taped down.

Once dry, I added the black lines with a thin permanent marker.  

I then added spatter with gold liquid acrylic color. 

I mounted this on a dark card base.

This card is a round  ornament in fuchsia color.

I added a string where it hangs and a tiny bow. I added some pearl liquid acrylic to the sections of the shape.  Spattered with fuchsia color.

The greeting is from the Stampin Up Good Greetings set in permanent black ink.

I really loved the snowbanks I created in this composition. 

I added a twig tree with the black marker.

Stamped the greeting on the lower right hand quadrant.

This wreath was created with light and dark leaves. Remember to keep them in the same direction.

I added black outlines on the leaves and a bow at the bottom of the wreath.   

Stamped greeting above the wreath. 

Spattered with red watercolor.

Wednesday, February 24, 2021

Christmas Card Challenge - Feb - Watercolor Cards

I decided to try watercolor cards for my February challenge.

I watched several Youtube videos from Maremi Small Art.

She has several at the beginner level.  It seemed pretty easy so I gave it a try.  I chose to tape down my Cotman 140lb Watercolor paper to a piece of glass before I started.  I painted my color then allowed them to dry still taped down.

I cut them down into individual art pieces measuring 3.75 x 5.00 inches and added the black lines with a permanent fine tip marker. I stamped the Christmas Greeting from the Stampin Up Good Greetings set.

I adhered the watercolor piece with double sided tape to a coordinating colored card base.

I chose various color to spatter the small pieces of art. 

For the first one I chose a lavender card base with black spatter.

I did draw a rough outline with watercolor pencils before I started applying watercolor with a brush.  I picked up this tip from another video I watched and it was a great idea.

For the card on the right I chose a ultramarine blue card base for the yellow star watercolor image. 

On the tree card I used gouache (opaque watercolor) for the red balls because mixing red with green watercolor would have yielded brown ornaments.  

I used the same green for the spatter then a nice red card base. 

On this next card I painted a round ball which I turned into an ornament.  

I added the hanger and string with the black marker. Then patterns onto the ornament itself.

I added copper accents to the patterns I had drawn with the marker.

I added quarter sheet inserts with a seasonal sentiment.

I have made another set of four but they have not been turned into cards yet.

This was a lot of fun but harder than the videos make it look.

Monday, February 22, 2021

Pastel Background into cards

I made this background the other day for a photo challenge because it was too cold to go outside and take a horizon photograph.

This is the first time I have used chalk pastels in recent years.  I quite enjoyed it.  They blend beautifully.

This piece was a half sheet measuring 5.5 inches T by 8.5 inches Wide.  I did have to spray it with fixative to ensure the pastels did not rub off.


I made 2 cards with this background.

For the one on the right I cut the background to 4.00 x 5.25 inches and adhered it to a white card with double sided tape.

I then cut a tree with the Sizzix Pine Tree small from black card stock and adhered it to the pastel layer with quick dry adhesive.

I applied a bit of pastel to the piece of brown card stock.  I ripped the top edge and trimmed it to the bottom of the background layer.  Before adhering it I crunched it up to give it texture to represent a rough and rock foreground.  It was adhered with double sided tape.


On this card and chose to you the background in the other orientation which makes it an abstract.

I cut the greeting in black with the Memory Box Thanks thinlit which adhered to strip of vellum. This was then adhered to the background with black eyelets inserted with my Crop a Dile.

I added the exclamation point by hand cutting it and adhering it with quick dry adhesive.

These are going to my sisters!

Thursday, February 18, 2021

Photo Cards

Using some of my photographs, I created a few all occasion cards for my card box so I can quickly add a greeting and put them in the mail.

 This is a gorgeous red poppy taken at the community garden.


The pink on the right is Summer Wine Nine Bark.


This is Orange Million Belles in a tiny ceramic pitcher taken on the fence along the trail in the river valley.


These are A2 (4.25x5.5 inch) heavy 110lb card stock.


Monday, February 8, 2021

Sylvia's Simple Shots

I took this photo at the bird feeder when it was still decent temperatures -12C.   

It is a Downy Woodpecker getting seeds and fat to stay warm.  I have to say I don't know how they do it.

As you can see it is now Crazy Cold and will last for another 2 weeks they predict!


This is a story about Martha Connolly who lives in Liverpool England in Court 5 very near the docks where her husband goes everyday in hopes of getting some work.  It is 1938 and the Great Depression has caused great unemployment and poverty. They live in squalor, cold, with little food and means to earn wages.  Her and Patrick live with 8 of their 9 children in one room.  One of the girls has gained employment in a large house and sends a bit of money each month. Brian, the oldest son works and contributes as well. Martha sells rags at the market. The young ones follow the coal cart and gather the bits that fall off for the range which provided heat and the ability to cook. The photos on the right show the courts.

The other timeline is 1965 where Martha as fallen, was hospitalized and now is placed in a seniors residence where residents are expected to be quiet, not make a fuss, and stay in bed. She is now alone with no husband or children. No one comes to visit and she is lonely and sad. She shares with the staff when they come to the room she shares with 4 other women. They are not very engaged so it is very isolating.

Eventually, Martha is reunited with her youngest referred most often as Number Nine whose real name was Jamie who is now a priest.  She lives with him in the presbytery.

I have been doing a lot of sewing this week.   I have already posted the blanket for the car.

This is a set of bags for the car.  The largest bag in the upper left corner holds my winter or summer gear depending on the season.  The tall skinny and Bento Bags are for other things which need to be stored in the car on a temporary basis.

The small bag on the bottom left holds the other bags until they are needed.  

They are made from black microfiber which is polyester so will last a long time and wear well.

I received this late Christmas card from a friend who moved away a few years ago. They normally don't send cards but since this was not a "normal" year they decided to do this year.  It did my heart good to get it in the mail last few days in January.  

On my day out on Monday I stopped by the hardware store to purchase some C-Clamps.  

I have used them now to secure the lamps on both sides of the photo studio.  The lamps have been known fall and then I have lost a valuable light bulb so they were worth it.  

Eventually I want to make a backdrop holder for the studio which will be secured by clamps as well.

I am happy with the progress I am making with the studio.


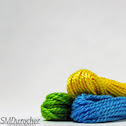
Vibrant Minimalism is the challenge at Flickr Macro Monday this week.  This is one of the shots I took for it. You can check out my photo stream (SMDPics) to see the one I submitted.

I am sharing with Angie who hosts Mosaic Monday #117 and Mersad who hosts Through My Lens #278.

Saturday, February 6, 2021

Sewing - Car Litter Bag

I decided to make a new car litter bag holder.  The one I have been using was the very first one I made.

I used some really nice blue butterfly cotton fabric on the outside and some of the leftover black from the car blanket.

You can check the instructions in this post.  I originally designed them as thread catchers for the craft room.

This fabric bag has 2 ties to secure it and holds a used yogurt plastic container.  I store extra bags in the bottom.

It`s been a full week of sewing.

Friday, February 5, 2021

Sewing - Car Blanket

I decided to make a new blanket for the car.  In case of emergency it would be good to have a good blanket with me. 

I was out on Monday so I went to the thrift store to purchase what I thought I needed.  I bought the navy fleece blanket and the black cotton sheet for the other side.

The fleece blanket is really too small for an emergency blanket so I googled and generally these blankets are 60"W x 84"T.  The old blanket I had in the car was that size so I decided that I would use it as a base.  It was the first bedspread I made in my twenties.  It was threadbare and very worn.  It would work well as a substrate for the fleece.  

The navy fleece would do the bottom half so I went into my stash of fabric and found a piece of white which would do nicely.  I stitched the 2 pieces of fleece to the old blanket. I did just lines on the navy but I decided to be more creative with the quilting on the white.


I did random geometric shapes.  Circles, triangles, zigzags, etc.  Some quilted the white to the base and others were added when I quilted that to the black backing.  

The back is a cotton sheet in black from IKEA.  I cut it generous in size.  That was fortunate because I was able self bind the edges by bring the black to the front and sewing it down. 

It was trimmed to 1.5 inches then folded over to the front and sewn down.


The final size: 59" x 75" inches.

This is a really nice substantial blanket which will be great for the car.