Showing posts with label Bigz. Show all posts

Saturday, October 11, 2025

Cards - Charity - IWin

Dipping into my commercial decorative paper stash I found this warm tone piece of card stock.  

These colors strike me as More Mustard and Always Artichoke but I am only guessing.

I cut the piece down and adhered it toward the bottom of the A2 Summer Sun card base.

I cut the small butterfly with the Stampin Up Beautiful Butterflies Bigz die. I added a body and antennae in black. Adhered to an Always Artichoke tag cut with the Sizzix Tag Set die.

It was mounted to cover up some purple color on the left hand side. I trimmed it as needed to stay within the card edge.

I added a sage colored ribbon on the tag.  The greeting was stamped with a clear polymer stamp which I don't have credits for, with Always Artichoke ink.

This card is in the landscape orientation.

Same Summer Sun card base in the A2 size.

I added a couple of strips of Always Artichoke card stock leaving a small gap between them toward the bottom of the card.

I cut the medium butterfly from the same paper as the one above. I added a black body and antennae.

The greeting is the Modern Label and Word Window that I have used before.

White quarter sheet insert and white envelopes.

I started by cutting the large butterfly from book pages from a book that fell apart recently.  I managed to finish reading it at least.

I chose a Crumb Cake card stock which is a kraft color which I rubbed with SU Tea Stain ink pad.  I added a strip of Soft Suede embossed with a Cuttlebug folder. It was adhered to the right of center.

I added the large butterfly with a black body and antennea over the embossed strip.

I adhered the Word Window greeting which was stamped with a SU small stamp.


A landscape (wide) layout for this card with the same large butterfly cut from a book page. Distressed with the SU Tea Stain ink pad. A black body and antannea.

A stip of Soft Suede embossed with the Swiss Dots folder mounted in the center of the card. 

Adhered the butterfly and stamped the greeting in the bottom right hand corner.

These will all sit under books for weight over night and will be ready in the morning.


Wednesday, July 5, 2023

Die - Decluttering and New Work Station

 All my die cutting stuff has been in storage for a year and half.  I knew that I wanted to get rid of a lot of them so I decided to unpack the 10 boxes and make the hard decisions.

My sister helped me as she was going to chose from what was left and was willing to liquidate the rest.

I brought 4 boxes home out of 10 which was really good.  I had worked out how I was going to set up the station when I got home.  I set up the shelving unit on July 1st. 

We had scoped out some clear containers at Dollarama while I was at her house. Once I looked at what I had brought home and purchased a few more.  These were all original thick dies so they are really heavy for plastic containers.

The containers had feet and the shelving has gaps between the boards so I needed something to on the shelf to allow the containers to slide.  

I dug into my plastic placemat stash which were just the right depth so I needed 2 to make it wide enough for the shelf.  I used clear packing tape to join them and that solved that situation.  The placemats sometimes have textured surfaces so I had to turn them upside down so the smooth side was facing up.


I had to do the same thing for the diecutting shelf where I was putting my Big Kick machine.  I used some wonderful yellow striped ones and again taped them together. The machine has feet which may be a problem with the gaps and I don't what to lose small pieces of paper in the gaps.

There is lots of room on the shelf for my work light, a small garbage can, and a wooden box that holds my spacers and cutting plates.  These need to be close at hand everything I cut something.

I love the yellow stripes on the work surface.


Generally, the thick dies in either original or Bigz size fit in old style CD storage containers.  I had these wooden storage boxes from IKEA and the dies fit in perfectly. Luckily most of them were empty so that was a win.

I have not labeled all the drawers yet but I will. One drawer contains the amount of embossing folders I kept.

The wood boxes are much sturdier than plastic but I still have to be careful  I used to store dies in plastic pop crates which were very sturdy.


The red drawers will hold thin dies which are stored in CD cases.  Those have not been unpacked yet.

The black case was designed for the Sizzix original dies so that is where they are stored.  I have a really hard time using stuff I can't see so I may have to put die cuts on card board and hang them in the space to at least remind me what I have.

The second shelf has the small yellow and green dies and sizzlets, and movers and shaper dies in clear containers.

I am using this translucent corrugated plastic sheet from IKEA on my die cutting work shelf to provide a neutral background for taking photos of my cards for my blog.

The plastic is stored on the top shelf above the red wicker baskets when not in use.

Here you can see my grey IKEA lamp in it's super heavy white base which sits on the left.  The shelf is by a window but there will be times that I need a light to work.

The wood shelf is from IKEA as well is was called STEN when I bought it 20 years ago.  The shelves are 11 inches deep and about 33 inches wide.  With the cross brace on the back it make for a very stable work surface.  Strong enough to hold the weight involved with storing these dies.
Here's my die cutting work station.  There is still some space on the bottom shelf which I am not planning on filling.

It works really well and I am so happy to have it back.  It may have to be dismantled if I move this year but at least is way more manageable.  Now it lives in the craft space which is wonderful.

The dies I did not keep were gone through by my sister, then my niece and the rest will go to my sister who runs a daycare.  There are about 30 dies going to her.

They will have good homes and I have just so much less to manage.  Many dies I had purchased when I was running card  making classes and card club.  Many suited that situation but I no longer need them as I don't do classes anymore.  I am retired.


Wednesday, August 1, 2018

Exchange Cards - August

I cracked the seal on this die this morning.  It has been years since I purchased it on sale for a good price.

I chose a pink card for this bright and cheery embossed designer paper.  I adhered the DSP to the card front leaving a small border.

I cut the flower from black card stock.  It is designed for a larger card so I had to cut down the stem to fit my A2 card. I glued the flower then adhered the stem below then cut off the extra leaves and stem to the card edge.

I added a yellow handmade paper by Prima to the center of the flower and held it in place with a tiny black brad.

It would make a punchy birthday card.


For this card is chose a piece of designer paper by Basic Grey.  It features several colors and I chose a light blue card base for this paper.  It was cut to leave a small border and adhered to the card front.

I glued the flower and the stem to the designer paper and trimmed the stem to the edge of the card.

I placed a pink Prima handmade paper flower in the center held in place with a tiny blue brad.

These are off to my card exchange partners for August.


Friday, May 1, 2015

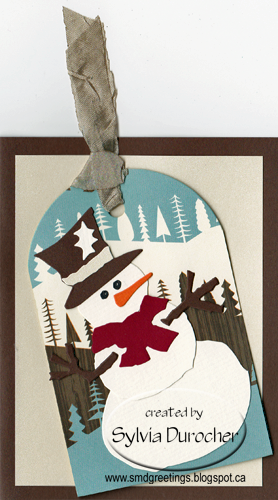
Christmas Card Challenge - May - Snowman - Paper Piecing - Tag

Here's my card for the Christmas Card Challenge for May which is Snowman, Paper Piecing and Tag.  

I chose the Tim Holtz Assembly Snowman Bigz die which made the paper piecing very easy.  I selected the background designer paper first.  It's American Crafts - Campy Trails.  I got a real winter feel from this paper so thought it went well with the snowman.  As a background to the tag I placed a piece of cream pearl card stock, cut to leave a large border all the way around. I decided to use the Jumbo Crescent Tag from Sizzix and cut it from the designer paper.  The paper has a warm white in it so I chose a warm white card stock to cut my snowman. The band on the hat is the same cream pearl card stock. Brown for his arms, a deep red for his scarf and orange for his carrot nose. I drew the eyes in with a black marker. I was tempted to put something on his belly but resisted.   I used quick dry glue from Scotch to assemble the pieces of my snowman.  I glued him to the large tag.  I added a soft seam binding in a complimentary color.  The tag was adhered to the card front with 3D foam tape.

Have you started your Christmas Card stash?  Today may be a good day.  I hope this card provides some inspiration for you to start or continue.  Leave me a comment if you have started!

Saturday, June 7, 2014

Christmas Stack - Winter Skate

Like this one!  I used the Tim Holtz Bigz Ice Skates die to cut the skate from heavy white card stock. I would recommend heavy card stock. I chalked the heel with black and painted the skate blade with silver acrylic paint.  I chalked the lace area and cuff with teal chalk to coordinate with the card color.  I put red laces on the skate and tied a knot and trimmed the ends.  See the next post below for detailed instructions. I spritzed the teal card stock with Maya Mist Iridescent Pearl. I cut a Stampin Up Top Knot die cut from decorative paper then I cut it straight across on the point.  This was glued even with the top of the card.  I color printed the greeting then punched it out with my 2" oval punch.  I then cut a scalloped oval with the Spellbinder Nestabilities #3 in the small set from red card stock.  The greeting was layered onto the scallop oval then this layer was adhered over the top note with 3D foam tape.  The skate was adhered below the top note on the card front with 3D foam tape.

Sunday, February 2, 2014

Card - Wax Crayon Paper Flowers

Here's the card I made with my wax crayon paper from yesterday.

I cut the paper with the Sizzix Flower Layers #10 Bigz die.  I printed my nature poem onto white in blue.  I added the stem and flowers I designed over the script background.  This layer was color printed and trimmed to leave a small border.  I mounted it onto a medium blue card.  I placed my blue wax paper flower to work with the stem.  I added a white then a yellow silk flower and held all the flowers to the card front with a small white brad.  I made a hole for the brad with a push pin. I'm really happy with the way the card turned out.

I may have to use this idea for card club!!!  Great idea for earth day crafts.

Thursday, March 7, 2013

R2G Card Kit - Felt Daisy

Here's another Ready to Go Card Kit. 
Here's a very simple card.  I matched the card to the color of the felt daisy.  The other colors in the kit are yellow and red daisies.  I found some green designer paper to cut with the Sizzix Bigz Frame Back Ornate #8. I cut the white circle backing the daisy with one of the circle Nestabilities.  A tiny white brad holds the daisy onto the circle.  I wrapped the white seam binding around the card front across the label leaving the ends free. I then adhered the daisy accent in the center of the label.  With the ribbon now secure I tied a knot and trimmed the ends.  I struggled about adding something else such as embossing or faux stitching but decided against it as I wanted a simple card.