Showing posts with label Beau Chateau. Show all posts

Wednesday, April 17, 2024

Sewing Project - Wine Bottle Bag - Beau Chateau

This fabric was designed and sold through Stampin Up years ago.  This design is called Beau Chateau and the colors are Very Vanilla and Marina Mist.

This time I decided my accent ahead of time. I dug through my Stampin Up card making supplies and found some scallop edge ribbon in Maria Mist.  The wide grosgrain ribbon is ivory and was in my stash.

I laid the narrow blue ribbon on top of the ivory and ran a line of wavy decorative stitching across the width of the fabric with ivory thread.  This was my first line of stitching to quilt the flannel to the outer fabric. Then added 2 more lines of the same stitch above the ribbon running width wise.  I then ran 4 lines of the same stitching vertically going from the ivory ribbon to the base of the fabric. With that I had quilted the outer fabric.

I chose a thin ivory polyester fabric for the lining of this bag. Had to take it easy with the hot iron.

While the slit was still open in the lining I added the white button.  I tried to find a blue one that would match with no luck.


For information on "My Bag" line:

Monday, January 28, 2013

Card Club - Incentive Thank You

I created these Thank You cards for some of the girls who signed up for Card Club.
I made these cards to fit smaller envelopes which measure 4 x 5 1/8 inches.  I designed them with the Beau Chateau designer digital files.  I created a smaller background of chicken wire in Soft Suede with a clear background.  I added the Bee embellishment in Marina Mist and Soft Suede.  I created a Word Window Punch digital and added my Thanks sentiment.  I filled it with Very Vanilla with the sentiment to coordinate the color to the bee embellishment.  I printed the cards onto Very Vanilla card stock.

Thursday, September 27, 2012

Card - Invitation Samples

I had a couple approach me to design some invitations for their 60th wedding anniversary which is the diamond anniversary.
Here's the samples they did not select. Check back later for their selection.
I selected a black card.  I embossed a white layer with the SU Elegant Bouquet folder.  I printed a 60 on to bottom right hand corner.  I glued the white layer to the card front then applied several crystal rhinestones.

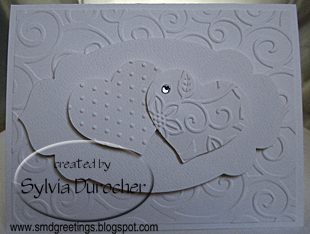
This card was a white on white concept.  I started with a white card and added a layer embossed with the Cuttlebug Devine Swirl folder. The next layer was cut with one of the SU Apothecary Framelits onto which I layered 2 die cut hearts which were embossed with Cuttlebug Swiss Dots on left and Craft Concepts In Bloom on the right.  I added a crystal rhinestone on the left heart.  The framelit die cut and the hearts were raised with 3D foam tape.

I chose ivory card stock for this one.  I printed some SU! Designer Paper from the Beau Chateau series. I slipped a Cuttlebug ribbon slider in Marina Mist onto the ivory organza ribbon and wrapped it around this layer and taped the ends to the back. I added a crystal rhinestone heart onto the centre of the ribbon slider.  I color printed the "invitation" on ivory card stock and cut it with another SU! Apothecary Framelit.  It was mounted to the card front with 3D foam tape.


Here's the one they selected.

I started with a dusty lavender card.  I embossed a white layer with the Cuttlebug Rebecca embossing folder and trimmed it to leave a tiny border.  I cut a lavendar scalloped oval with a Spellbinder nestabilities.  I color printed the information in lavendar onto white card stock then cut it with the corresponding smooth ovals in the SB nestabilities. These were adhered to each other then the element was mounted to the card front with 3D foam tape.

Thursday, August 23, 2012

Card - HB - Blue Damask

I made this card with SU! Beau Chateau Designer Paper.  I used a Marina Mist card onto which I layered a piece of damask in Marina Mist and Very Vanilla.  I placed a piece of Marina Mist taffeta ribbon along the length of the damask piece and taped the end to the back. Then, this piece was adhered to the card front. I cut the color printed greeting with the smaller of nested QuicKutz oval die and the deep blue green card stock was cut the larger oval die. This was mounted over the ribbon with 3D foam tape. I then tied a short piece of ribbon above the greeting.