
Showing posts with label scrapbook paper. Show all posts
Showing posts with label scrapbook paper. Show all posts
Saturday, March 12, 2016
Paper Crafting Garage Sale
Come and check out the sale today.
Scrapbooking/Cardmaking Garage Sale will be held at
Monday, December 12, 2011
Gift - Card Box

Thursday, November 24, 2011
Calendar - Inspirational Words

Thursday, November 25, 2010
Card Kits - Snowflakes
 I've used the large clear snowflake with some turquoise snowflake scrapbook paper in the back ground. It is held in place with a glue dot. I have mounted it on a white card. The background paper was ripped to leave a space of white card. I wrapped a piece of organza ribbon around the front of the card and knotted on the front.
Sunday, September 19, 2010
Cards - SCB Paper Strips
Wednesday, September 1, 2010
Cmas Card Challenge - Sept - Stars

September's theme is stars. They can be bright, shiny, glittery; over a nativity, leading wisemen; single or in a bunch. They can be traditional colors such as gold, silver, copper, yellow, or not. Here's the card a designed for this challenge.
I found a pattern in Paper Creations Magazine - Winter 2008. The piece of striped scrapbook cardstock is 3.5X4". I traced the half star on the back with a score line down the centre. I cut out the half star and was able to open the star. Using a full sheet label I cut a piece large enough to cover the cut star. It helps if you have a split in the release paper somewhere on the star. I glued that piece of label, paper side down on the back of the striped paper with the edge following the centre and covering the cut star. You have to make sure you glue it down very well all over. I would recommend pressing it a bit. Then I cut the label through the cut cardstock. Now when the star is flipped forward you see the release paper. Turn paper over and remove the release paper from the rest. Add a piece of doublesided tape along the fold and lay the piece of paper over the star hole. I then removed the release paper from the star and applied MS Green Agate glitter to the sticky star.
 This image shows how it matches the glitter in the card stock really well. I glued a strip of the same paper below the striped rectangle and stamped my greeting in chocolate. Then this whole rectangle was glued to a chocolate brown card.
I made 6 of these cards.
Total cards to date: 83

Sunday, April 11, 2010
All Occasion Stack Class - Daisy Squares
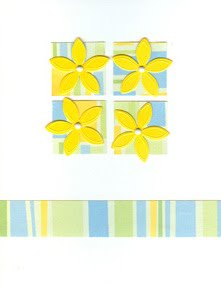 I used several different SCB papers that included the yellow to match the wedding confetti daisies. The squares were punched with a Marvy punch. The squares were glued to the card. They could be arranged in several patterns. I placed the daisies over the squares and create holes in the daisies/square/card with a push pin. Insert a tiny white brad. Trim the SCB paper strip and glue in relation to the layout of the squares.
All Occasion Stack Class - Circle Collection
 The inspiration for the card comes from the Go to Sketches magazine. The SCB paper collection is a retired StUp! set. It is a double sided paper which provided the variety of pattern needed for this design. I created the greeting in Corel Draw which allows me to print it in any color I want then I punched it out with the 1" punch. I cut the SCB paper circles with the smallest one on the Sizzix circle die. Simple but effective design.
All Occasion Stack Class - Flower Tag
 I started with the ribbon for this card. I found scrapbook paper that work well with it. The SCB paper was trimmed and glued to the card. The ribbon is slipped into a slit in the fold of the card and taped to the inside of the card on both ends. The tag is a Sizzix tag die which was layered onto black cardstock and trimmed around with scissors. The flower is a StUp! punch done twice in SCB paper and pink card stock. The flower had a 1/8" hole punched for the rivet. Once complete, the tag is hung onto the ribbon with a length of white cotton thread.
Tuesday, March 23, 2010
Card Club - March - Monarch Butterfly
 This a great looking card. It has different fold in it. The card stock paper is cut 11 x 4.25" then scored at the 5.5 then again 8.25 which is halfway on the card front. I folded the short flap back onto the front towards the centre fold. I cut the scrapbook paper to the card front with a small border. I then glued the rectangle onto the small flap first then turned the card over and trim it even with the fold. Now the leftover is glued to
 the card back which creates a full rectangle on 2 levels. The black layer was designed to leave a even border all the way around. The gold paper was trimmed to just a bit smaller. This layer was then glued only on the left side an attached to the small flap. The butterfly was adhered to the gold layer with a Zot. Check out the right hand picture to see the fold.
Card Club - March - Ribbon Slider
 This paper was purchased as coordinating scrapbook paper. The card stock is a nice neutral beige color. I cut the paper to the card front size then cut both sheets at 1.5 inches then just swapped the patterns. I placed a slider onto the red ribbon with a heart punchie as an accent. The ribbon is placed over the join between the papers and taped to the inside. I offered a red apple as an alternative punchie shape. We had several color options in this design.
Wednesday, March 25, 2009
Dollarama - Glitter Copper Paper
 Check out this wonderful copper glitter paper. It's really nice. I managed to get 3 packages. They had a coordinating stripped in the same colors but it was metallic and not glitter. I could not resist but I'm not really sure what I will do with it. The pattern is large for card making. Maybe I'll do something in my 12x12 frame for my craft room.
Check out your local Dollarama!
Friday, February 20, 2009
Scrapbook Paper

I have found some really nice 12x12 scrapbook paper lately. Packages of 25 sheets. I know that's a lot of the same pattern. It works for me. After talking with my sister across the country different patterns are showing up in different cities. I have found the stripe and another just the other day in brown and beige tones with flash card letters.
Check out your local Dollarama store and share with your friends.
Subscribe to:
Posts (Atom)