Showing posts with label smooth circle. Show all posts

Sunday, July 10, 2016

Welcome Card

We are welcoming a new family to our church this morning and I made a card for the occasion.

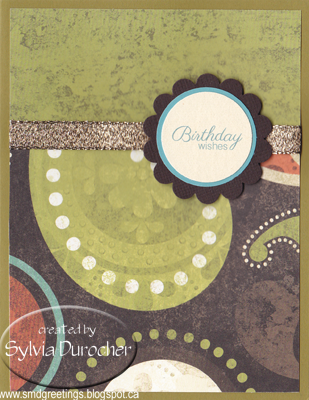
I started with a dark brown textured card.  I added a piece of red cotton ribbon across the card just above the middle and taped the ends to the inside.  I cut a medium blue scallop circle with Spellbinder Nestabilities then its corresponding smooth circle in white card stock.  These were adhered together to create the first layer.
I created a second smaller scallop circle with deep red and white.  I cut the greeting circle with my Creative Memories cutter because aligning SB Nestabilities is difficult.  I used a plastic canvas circle to align my paper piercing circle.  I glued the greeting to the red circle then added the handmade paper blue flower on the right side with a mini brad.  I then took a length of red cotton ribbon and created a flag off the bottom right hand side.  I matched these with card stock flags from the same card stock as the first scallop circle.
Both scallop circle elements were adhered with 3D foam tape.  Check out this post for the cool tool plastic canvas.

Thursday, March 10, 2016

Thinking of You Sunburst

I made this card for a lady who has significant health issues.  Her name came across my desk this morning and I thought I should just send a card to let her knowing I'm thinking about her.

Can you guess I love my Stampin Up Sunburst Thinlit?  It makes bright cheery cards fast and easy.  I had cut the designer paper to 4 inches so I needed a layer that wide to make it work.  I added 4" the green layer onto the warm yellow card then I I adhered my bright sunburst.  I created a sentiment accent with Spellbinder Nestabilities Large Circle Set - 1 scallop circle and 1 smooth circle then the greeting which was color printed and then punched with the 1 3/8 inch circle from Stampin Up.

I hope it finds her well.

Wednesday, March 2, 2016

Sunburst Birthday Wishes

I purchased the Stampin Up Sunburst Thinlit during Sale a bration. I love this die!! Makes a great looking card in a hurry.

I chose a navy card and cut a scalloped circle with my Spellbinder Nestabilities Large Circle Set No.2 from the center from the same card stock.  I cut the sunburst from yellow designer paper.  I quite sure it's by Basic Grey. I designed a large circle greeting and printed and punched it out with the SU 1.75" circle punch.  I wanted something between the card and the sunburst.  I decided on vellum. I printed a bit of texture onto the vellum, heated some gold embossing powder then trimmed to leave a small border. Adhering of these layers was challenging because not wanting the glue to show through the vellum and the rays on the sunburst.

I've checked out samples on line and the next time I use it I will make it with another color.

Monday, February 22, 2016

Card Club - Feb - DS Split

This is a designer paper split using coordinating double sided paper. I selected paper from Fancy Pants - Fancy Free collection - Tradition.  I cut the DSP to 4.00 x 5.25 then cut it at 3.5 inches.  I turned the smaller piece over and tape them back together with tape.  I placed the gold metallic ribbon over the join and taped the ends to the back. The laye was then adhered to the card front as a single piece. This is a great versatile design because it can become a tall or wide card.  I used the SU circle punches to create the greeting. I assembled it by adhering the 1 1/4" circle to the 1 3/8" circle then to the scallop circle.  The scallop is attached to the card front with 3D foam tape.

The second card features paper from WeRMemory Keepers - Urban Window Collection - Boho Chic Funky Fix. This one was put together in the portrait orientation which contributes to the design's flexibility.

Sunday, May 31, 2015

R2G All Occasion Stack Kit - Porcelain Prints

Here's another Ready 2 Go All Occasion Stack kit. 
I chose Stampin Up Porcelain Prints DSP which offered a good variety of colors.  The cards are Wild Wasabi, Bayou Blue and River Rock.  The greetings are on Very Vanilla and cut with SB smooth circle Nestabilities at 2 3/8 for the solid and 2 1/8 for the greeting.  The greetings were selected from the Wetlands, Teeny Tiny Wishes and Wonderful Wings stamp sets.  The colors chosen coordinate with the card colors (BB, RR, WW). I chose greetings for the more challenging times in life when a softer design and paper works best.

The DSP was cut to 4" squares.  I adhered a piece of Very Vanilla Satin Ribbon to the edge of the DSP and adhered the ends to the back.  This layer was adhered to the card front in either the wide or tall orientation.  The greeting was adhered to a solid accent circle in a coordinating color. 

This kit is available for my June class.

Tuesday, May 26, 2015

Wedding Invite Final Design

Here's the design my friend chose for her wedding invitation!  It's a white and silver design.  I started with a white card.  I embossed a slightly smaller white layer with the mpress Karen Frame folder.  I tied a piece of silver cord around this piece just below the embossed circle frame. This layer was then adhered to the card front.  I then die cut a smooth circle from vellum with Spellbinder nestabilities.  I punched hearts from non shed silver glitter card stock.  I used the Stampin Up Sweetheart punch.  I adhered the first one on the left then adhered the right one with 3D foam tape. I now applied adhesive on the back of the vellum where the hearts covered it and adhered the layer to the center of the embossed frame.  The insert was customized with her information.
Check out the other designs here.

Sunday, April 12, 2015

R2G Card Kit - SU For You Scallop

Another couple of kits for tomorrow.
I started with a Stampin Up Night of Navy card.  I cut a piece of Prints Designer Paper in the same color to 3"T x 4" W.  I cut a piece of white card stock to 2.25"T x 4" W.  I embossed this piece with the Cuttlebug Swiss Dots folder.  I then tape these together and trimmed as needed to create a layer which leaves a small border.  I created a strip of olive paper .75"T x 4"W, which I adhered over the join of the embossed/DSP layer. I then assembled my greeting by adhering the greeting to the olive circle then that to the scallop circle.  I cut a piece of 3D foam tape in half lengthwise and placed behind the scallop.  Removing the release paper I attached the greeting over the olive strip on the left hand side as shown. 
The other color in the kit is Rose Red.

Friday, March 27, 2015

50th Wedding Anniversary Invites

I completed the order for these wedding anniversary invitations today.  The request was yellow with a bit of turquoise and 50 should be included.
I started with a yellow card.  I embossed a white layer cut to 4 x 5.25 inches with the Cuttlebug Juli's Garden folder.  I pull a piece of turquoise ribbon with a silver accent across this layer and taped the ends to the back.  This was then adhered to the card front.  The scallop accent was created with a Stampin Up Scallop circle punch in the same yellow as the card, then a 1 3/8" circle punch, then a 1.25" punch with the 50 color printed on it with a yellow circle.  I then added a rhinestone heart over the 50. This accent was adhered over the ribbon with 3D foam tape. The insert was customized with the invitation information.

Saturday, February 28, 2015

Sympathy - Sketch

I made this card for a friend who lost her Mom this week.

I started with a Stampin Up Groova Guava card. I stamped it with Script Background Builder ink Blush Blossom craft ink and clear embossed it. This provided a subtle texture I wanted. I paired this with a Sahara Sand DSP of small flowers.  I made a banner from SS stamped with the same background in the matching ink.  I created the ends with my 2" square punch.  I don't have a SU sympathy stamp so I used the one I have from Stampendous.  It was stamped in Blush Blossom and clear embossed.  Cut with smooth circles in SB Nesties 2.5".  Then I cut a 3" circle from GG onto which I layered my sentiment. This layer was adhered to the card front with 3D foam tape.

Submitting this card to Fab Friday Challenge 58.

Tuesday, February 24, 2015

Beauty & The Beast - Thank Yous

I made a couple of these cards to thank my sister and the lady responsible for the tickets for The Beauty and The Beast.  I'm grateful for the opportunity to see live theater and it was a great performance. Check my original posting here.

I started with a royal blue card which I stamped with one of the Stampin Up Itty Bitty Backgrounds in a royal blue ink.  I photographed the rose which everyone in the audience received.  I applied a couple of photo filters and printed and cut it out with one of the smooth round SB Nestabilities.  I cut a piece of white in the corresponding scalloped circle nestie.  I rubbed the edges of the smooth circle with the same royal ink pad. Once glued together I adhered the element to the card front with 3D foam tape.  I added a red cotton ribbon across the bottom 3rd of the card.  I put a slit in the fold so I could pull the ribbon through and tape both ends to the inside of the card. I used a printed sentiment from my stash and rubbed the edges of the SU Decorative Label punchie.  It is also mounted with 3D foam tape.

Sunday, January 18, 2015

R2G Card Kit - Valentines - Owl Heart Circle

Do all Valentine's card need to be pink or red?
I don't think so.  I found this blue and green round tag freebie at Poppies at Play.  I sized it to 2" and cut it with one of the smooth circle Spellbinders nestabilities.  Then I cut a heart circle frame with SB - Heart Circles nestabilities which was perfect for the 2" circle.  I added a 2" strip of black card stock layered onto a wider strip of white card stock.  This was placed onto a blue card.  Once the owl greeting was adhered to the green heart circle it was adhered to the card front with 3D foam tape.  I thought the sentiment was great!