Showing posts with label Ikea. Show all posts

Saturday, October 11, 2025

Sylvia's Simple Shots

 The Egret at the pond is providing a nice distraction.

Apparently, it comes to the pond in the fall and stays for about a month to six weeks.


Still islolating with this illness. It means things are getting done at home so I am grateful for that.

I bought is thermometer back in September.  I finally worked out where to put it on the patio.  I did move it once because it was being affected by the sun.

Now, it is protected so I know what the actual temperature is when I get up.

It helps me know how to dress for my morning walk which I am still taking early. I wear my mask while in the building then enjoy the fresh air outside.

The Sonf of the Silk Road by Mingmei Yip is the book I finished this week.

Lily Lin grew up in Hong Kong and was captivated by photos of the desert - long lonely vistas and sand dunes.

She now lives in New York and is struggling to finish her graduate degree. One day she receives an astonishing offer from an aunt she does not know. Take a trip to China, complete some tasks and then receive a million dollars. She decides to do it.

She prepares by letting friends know she will be away. The married man she has been having an affair wants to know all the details which she does not provide. She researches the trip, where to fly to, where to stay, what the culture is like. 

I found the culture very different. Her way of thinking and relating was interesting.   It was an okay book.


I bought this table cloth in the summer at Ikea. 
I chose a warm grey because I was not sure the navy blue was going to work. SVARTSENAP is 100% cotton, measures Length: 240 cm (94 ") Width: 145 cm (57 ").

I am working towards being well enough to host my family in this new to me home.  I had to cancel my first date.

It need some trimming to fit my table.  I removed some from both the length and width.

I am very happy with the result.


I spent some time in the craft room.

I used the saran wrap and salt techniques to add texture to my 140lb watercolor paper.

Cards will be forthcoming.


Saturday, March 1, 2025

Sylvia's Simple Shots

My niece was visiting for a couple of days.  

She it the ReUse Center before she arrived at my house.

We grabbed a bit of lunch then hit the thrift stores.

On the second day we took a walk at the St. Albert Botanic Park. I was expecting the paths to be cleared but they were not. It was very icy and not much fun. We took the street to come back to the car.

Then headed to Goodwill.

I decided that I wanted new mats for the front door.  This time maybe grey instead of navy considering the new grey floors.

I headed to IKEA and found some that would work.  I bought 3 which put 2 at the door and 1 cut in half for the shoes across next to the small bench.  Always great value.


We headed for my favorite Vietnamese restaurant Dang Good and we enjoyed our meal while we combed through some of our thrift haul.

Headed home to check out the rest of our goodies.


The Firebird by Susanna Kearsley was the book I finished this week.  

Nicola Marter has a gift. When she touches an object, she sometimes sees images, glimpses of those who have owned it before. She works for London dealer in Russian Art. 

Margaret Ross, the owner of a small wooden carving of a bird called the Firebird comes to have it appraised. It has been in her family for 300 years and claims that it was given to her ancestor by Empress Catherine of Russia.  She cannot prove it but Nicola sees its past.

Nicola meets up with Rob McMorran in Scotland who she has known for a while and loves. He has a similar gift so they decide to collaborate on the search for origin of this small wooden bird carving. They travel to Russia and by touching many things including walls they trace the object. Will it work out?
Another great read from this author.

We do love our Asian food.

We met my other sister in Sherwood Park to have Korean food for supper before my niece headed south.

We sorted out Tupperware orders and had a great visit.


Tuesday, September 10, 2024

Stitching - Exercise Mat

With the floor being installed I decided that I would need a mat to do exercises in the living room.  The floor is hard and provides no cushioning.

I researched options and found a large rug at IKEA which was 100% cotton and a color I could live with.  I had bought a yoga mat from my sister who had purchased it for a class and never used it again.  That provides the non slipping base for the rug.  I only do walking videos so there is not much impact exercises.

It is about 5 x 7 feet in size so doubling it up with the yoga mat would provide 3 layers of cushion.  That should be good.


I did try it for a few days until I was convinced that the idea would work.

It would really need to be solidified into a single piece now that it was folded because there were open edges which presented tripping hazards.

The blue yoga mat is just a bit smaller than the mat which is okay.

It really sticks to the floor so keeps the mat in place very well.

It is big enough to do my floor exercises and the cushion makes those comfortable.


I clipped the folded edge first for stitching.  That way any adjustment can be made on the open edges if needed.

I laid the hemmed edges opposite the fold next to each other instead of over each other to make that edge smoother.

I chose some heavy 100% cotton crochet cotton for the stitching. It is Clark's Anchor Cronita size 10 in Turquoise to add a bit of color to the mat.


I am so grateful for what I have learned on my slow stitching journey this year.  These experiences gave me confidence to know I could do this.  I found a heavy needle in my stash. 

I used a back stitch which doubled up the stitching on the back.  Hopefully that will wear better than single stitch.

Now there were a lot of inches to go about 250 of them so it was going to take a while.

The weaving of the thread was quite open considering the size of needle I was using.  The weaving was very even so I could just follow the edge of a row.
I made crosses at the corners to really tied down those thick corners.

I am very happy with my even stitching.

The turquoise color is great.


It took about 8 hours of stitching to go all the way around.

It feels and looks great!


I found a piece of webbing and a clasp to make a strap to keep it closed when I roll it up every day when I am done.

This clasp just traps the webbing in a clip on both sides so no sewing was required.

I am amazed sometimes at what I have in my stash.

It was exactly what I needed.


Everything needs a home at my house so I placed a basket on the bottom shelf of my IVAR shelving unit to hold the mat and my indoor exercise running shoes. 

That works very well tucked away in the corner of the living room.

A two week project but bodes well for regular exercise with  my walking videos now that fall is here and the temps will be cooler.


Friday, June 21, 2024

Laundry Closet Update

Now that the Laundry Center was installed I was excited to get the shelving back in and get its stuff that has lived in the living room since May 4th.  This is the shelf that the old dryer sat on for a very long time. I added the 2 shelves I had removed from above the old washer into this unit.  I added the cross bar now that there was not another unit to support it. Now will it fit?  I only realized after I had the shelving unit in that I should run the washer and dryer to ensure there are no leaks.  Fortunately, no leaks!  So I carried on with the rest of the job.

I knew that the green tape on the floor indicated that the shelf was suppose to fit. The extension cord for the light had to be plug in before the shelf when in. It was a perfect fit!  I guess the time invested in planning paid off.  With the built in space at the back of the closet - the dryer vent, the electric plug 240V, and the extension cord in the 100V outlet all fit comfortably. The unit only uses the 240V plug.


The closet doors were hung back up on May 14th but had been sitting to one side because the old washing machine was sitting in the hall because of it leaking water.  The rails in which the closet doors slide had large headed screws which made it difficult to slide the doors back in place.  I purchased some lower profile head screws and replaced those to make life easier the next time the doors need to be moved.  I do need a stool to see to the bottom of the dryer so I will borrow the one from the kitchen.

Putting the pretty things back in! I put the Trofast organizer, the front hall mirror that my Mom made for me and art on the photo shelf above.   Now the front hall feels back to normal.

The dryer door just clears the closet doors.  It is close but it works!

The fact that the laundry center only uses the 240V outlet meant I could plug in a light for the closet.  Before I had to use the front hall closet to light the space.

I put in a bright pink extension cord in the 100V outlet before the shelves went in.  I zipped tied it to the shelf standard so it will keep the cord off the floor and easily accessible.

I purchased a light fixture at the thrift store which I could secure with screws to the shelf.  I replaced the light bulb with a small compact fluorescent which does not get hot.

With the short goose neck the light easily moves from the shelf side to the laundry center side.  Like it was made to sit the situation. Means I don't have to have the front hall light on as often. 

The pop crates were part of the storage solution in the previous laundry closet set up.  Now I had to reconfigure things to work with new set up.

I gained 2 shelves where the dryer sat before.  All the necessary contents were returned to the closet.

*Laundry Supplies - detergent & dryer balls
*Bathroom Supplies - TP, Kleenex, towels and facecloths, 
*Paint Supplies - brushes, rollers, trays, paint cans, drop cloths
*Planting supplies - gloves, small pots, plant food, etc.
*Electrical Supplies - light bulbs, extension cords 
*Plasticware - casserole carriers, popcorn bowls, Tupperware trays, etc.
*Soda water

The bathroom supplies are much closer at hand than before, the casserole carriers are up high because I don't use them often.

Hand towel hangs on dryer with suction cup hanger.

Sunday, October 8, 2023

Calendar - Countdown - Four More

Cool Snowman Countdown Calendar featuring the scene I created and photographed. 

On this 4x6 I added the "Days until Christmas" and the star digitally onto the photo that I took.

The birthday side features bright red polka dot designer paper with silver metallic balloon punchies with black strings.

This one got a black dry erase marker.


On this Green Red Ornament countdown calendar I used a red ornament on a green background with a pine bough.  I created this digital composition a few years ago. I created all these elements myself.

I added the star and the words digitally above the ornament.

The birthday side has some beautiful blue paisley designs with olive green and chocolate brown sprinkled around the shapes.

I chose the green dry erase marker for this calendar.


The calendar features a Bethelehm collage that I created on artist board. I painted the board a medium blue.  I then ripped cardstock paper that I had painted in deeper tones of blue.  The paper was also embossed with the Swiss Dot folder.  The darker pieces were adhered onto board leaving the blue color show in between.  
The Bethelem buildings a a similar design to my Simple Bethelehem.  They were traced, cut from card stock, painted with silver domes and lit windows. The bottom third was cover with crinkled paste paper in deep blues and purples. The silver band of metallic card stock was cut with the Creative Memories Decorative Trimmer and adhered over the collage.

I did have to manipulate a photograph of this artwork to make the silver band wider to allow for the words and space for the numbers.  

The birthday side is a piece of wonderful floral designer paper with purple and yellow flowers and yelllow bees. This calendar was paired with a purple dry erase marker.

Warm Snow Angel count down calendar was made with the photo shoot I did the other day.

I added the words "Days until Christmas digitally before having the 4x6 printed professionally.

The birthday side is a colorful wirly swirly designer paper featuring many colors.

I paired this calendar with an orange dry eraser marker.

These are ready to go!

Calendar - Countdown - Simple Bethlehem


Frames: I used discontinued Tolsby 4x6 frames from IKEA for this calendar.  It the past I have packed these in plastic and decided not to this year.  That created some issues to overcome - mainly how to store the marker and ensure it does not disappear while on the craft table.  I created a clear plastic loop which I adhered to a piece of white 4x6 card stock with clear tape.  I then used silver glitter washi tape to make it pretty and visible. I also used a piece of clear tape to hold the marker to the frame until it is purchased. I had thought of using bubble tea straws for the loop but I mislaid them so I had to just move ahead. With the new by-law these may become a thing of the past.

Markers: The first set of markers I purchased did not have erasers included.  I spent a day spinning ideas about making dry erase board erasers and just decided to buy markers with felt erasers attached. Having to do it again I would have searched for all black markers. Maybe that is not so much fun for the kids which is the whole point.

Images:  I have designed quite a few digital Christmas cards in the past so that was pretty easy to mine my archives to find images.  Also did a photo shoot of Christmas images you can see here. Birthday is a completely different story so I just resorted to using scrapbook designer paper with banners for that side.

Tags:  I made up 2x2.75 inch tags that document the way to use the calendar. I attached the tag to the base of the frame since I decided not to enclose these in plastic.

The Bethlehem image used here is one I created digitally a while ago.  It has been created with a light blue oval background. I have used it in several projects over the years.  Here I designed a 4x6 photo with the digital Bethlehem add the words "Days until Christmas" then had the photo printed.  The challenge is to have a place light enough that the numbers will show up. The birthday side is bright designer paper in red with royal blue balloon punchies with black strings. 

Wednesday, July 6, 2022

IKEA Hobo Stove project

I am planning a bit of camping soon and last year I did not get around purchasing to a stove for cooking.

I was not comfortable storing propane or butane in my car where I was sleeping. So, I decided to do some research.  

I discovered several you tube videos documenting the making of an IKEA Hobo Stove using an Ordning Utensil holder.  It is made of stainless steel and very available at thrift stores.  It serves as the fire box for the stove.  I think overall the supplies for the stove ran about $10.  Mark Young in Nova Scotia has several good videos.


I needed a base which raised the hot box to allow air to flow from the bottom and prevent coals and ashes which may fall through to the ground.  

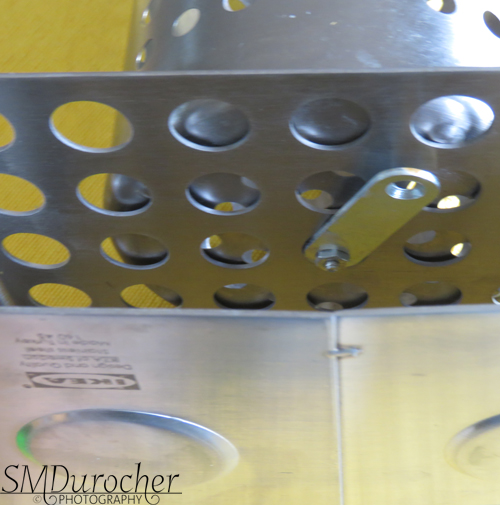
This is an IKEA Ordning food warmer which is designed to work with tealights. It raises the fire box about 1.5 inches and provides protection from falling coals and ashes.

With holes in both pieces I just needed to connect both pieces.

I used a short bolt and nut with washers on both sides. I small washer on the inside the fire box and a metal plate on the bottom in the ventilation space of the warmer.

Now I needed  away to elevate my cooking vessels above the top of the fire box which provide ventilation at the top and a way to add wood to the fire box.

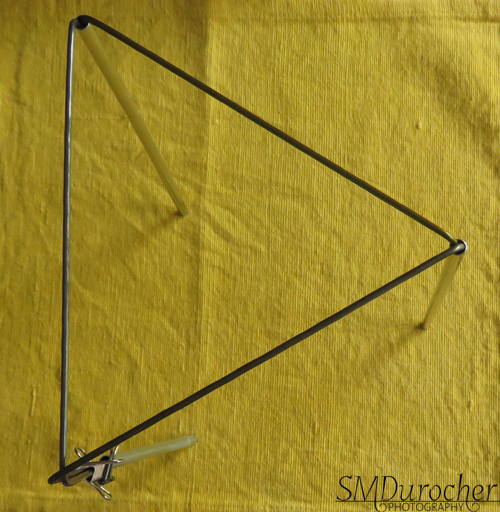
One of the videos by Charles documented the process of a triangular support for his veggie steamer stove.  After trying several options which did not turn out I decided to give this a try.  


I had bought 2 stainless steel drinking straws so I combined those with lengths of wire hangers cut with my home pliers and a little persistence.  

I straightened the wire then put it in the straw and made the first bend.  I made the triangle about 6 inches on each side then put the other end in the next steel straw and cut the end of wire to the bottom of the straw.  

Repeated this 2 more times but I need another straw.  I was lucky to find an aluminum tube yesterday that will do the job.

It supports my cast iron fry pan, my stainless steel water kettle and my camping pots. 

It is great because it folds down flat and is easy to store. 

You can see the 2 pieces in the image above.

I needed a bag to store the stove and chose a black bag because the stove will get dirty with soot in the process of making the fire. 

It holds the stove, the tongs, the cooking triangular support folded, the pellet holder and maybe even the saw.  I used a couple of the leftovers from the wire hangers to make skewers which will allow a support for alcohol fuel as well.  I saw several fondue burners at the second hand store the other day which would likely work well.  More immediate than wood.

This stove can burn wood pellets as well.  I bought a stainless steel sieve with a handle which fit perfectly in the fire box. The handle prevents the pellets sitting on the sieve from dropping down too far in the firebox and makes removal easy.  Pellets can be purchased at several stores.

The triangular cooking vessel support works well with this option too.


Now I need a bit of wood and fire starter.

On my regular walks in the river valley I collected small pieces of dead fall wood. They have been sitting on the balcony to dry out and letting any bugs around time to leave.  The firebox is 7 inches tall so today I just broke the pieces that length.  I found a plastic bucket which will store pieces that tall.  

I bought a small saw in case I need to trim longer pieces into shorter lengths.  Of the wood I collected I was able to break most of them with my hands.  There were 2 that needed the saw.

I have no idea how many fires this much wood will make.  In campgrounds I will likely be able to gather more wood if I need it.

I gathered a few supplies to make fire starters.

Dryer lint, shredded paper, toilet paper roll strips, and some wax.

I stuffed the rings of toilet paper roll with paper and lint.  Dripped melted wax on top of the stuff all contained within the small roll.  I hope they work well.  There were several recipes recommended.  I will keep you posted about how it goes!

Monday, September 7, 2020

Sylvia's Simple Shots

I am so grateful that frost has not yet arrived and the blooms as still in beautiful condition.

I found these pretty pink blooms yesterday morning.  They are Foxglove - Pink Panther. What a great name.

I love that I have pink bokeh in the background as the bed was in full bloom.


I recently finished reading this book. Death Comes to Pemberley by P. D. James.  I have read most of Austen's books and watched most of the movies so the backdrop of this story was familiar.  The Bennet sisters and their families.  I love old English historical novels so this was a real pleasure to read.  There are rabbit holes to go down, and it does not get fully resolves till the very end. 

On Tuesday I did a big grocery shopping trip to get ahead of whatever result will happen with Covid 19 and the schools reopening here on Wednesday.  

I managed to get 2 large containers of blueberries so they are now in the freezer for the winter serving on my rolled oats.


I finished the new lampshade for the sewing area this week.  It provides light on the right hand side of the sewing desk and on the craft table I will use for cutting.  

The light switch is very convenient at the level of the top of the desk. A Hemma light cord kit from Ikea.

You will recall that I revamp the other light in this room here. 

I made Chokecherry Syrup yesterday.  I had picked fresh ones on Friday morning. I decided that since I confused the ones in the freezer for saskatoon berries on my cereal last week maybe I should be doing something with them.

I added the frozen to the fresh and made Chokecherry Syrup.  I made the syrup by boiling them and then pressing the juice through a strainer. I added sugar and a bit of lemon juice.

I processed the jars in a water bath.

I managed 3 small jars but it will add a bit of variety to Highbush Cranberry and Maple syrup for pancakes!

Flicker Macro Monday Challenge this week is "Footwear". The macro on the right is the buckle on my summer sandals. You can check my Photostream SMDPics to see what shot I submitted.


I am sharing with Angie who hosts Mosaic Monday #95

and Mersad who hosts Through my Lens #256.

With temps at only 4C this morning frost is not far away.  I will enjoy the next few days.


Thursday, January 30, 2020

Sewing Project - Quilt 5 - IKEA Fabric Panel

I finished the companion quilt from the IKEA cotton panel of kid design.

Finished Size: 38.5" W x 44" T

Front: IKEA fabric panel

Backing: Caramel textured cotton fabric

Batting: Fleece

Binding: Striped cotton fabric

Quilting: Followed the stripes across the quilt.

Applique: Star from warm yellow fabric with ivory thread.


The backing fabric is opaque enough to hide the red color of the fleece inside.

The binding was leftover fabric in bright cheery colors similar to the front fabric.  It was cut to 2.5 inches.  You can check out this video for binding how to. Fool Proof Quilt Binding.

I pinned the layers together with small safety pins before I ran the lines of quilting across the front.  I chose ivory thread to hide it as much as possible.

I then squared it and applied the binding.  It will make a child a nice quilt to help them through a difficult time.

For the batting in between the front and back I used leftover pieces of fleece from this Pot Protector Project.

Lessons Learned: I decided to make my last seam along the binding. I ironed the binding at pinned it before making my last seam thinking I would have a better chance to catch the back layer but I did miss a few spots - more than I expected.  I will work on that.