Showing posts with label fiber. Show all posts

Saturday, September 21, 2024

Sylvia's Simple Shots

 I took this at the St. Albert Botanic Park.  I just adjusted the contrast on this shot but I think it looks painterly.

The dahlias were in fine form with many, many blooms to photograph.


I took a visit to the Little Blue Fiber Studio that I learned about from my niece who heard about it from my sister.

I understand my sister took a needle felting class at the studio some time back.

It has yarn, roving, classes, knitting needles, felting needles, Sashiko thread, and books as well.

I did restrain myself and walked away with no purchase but I will return for roving when I solidify my idea for a future project.

My neice brought the matching chair for the yellow one I've had for quite a while.

I am happy to have a conversation corner in my living room with comfortable chairs.

A bit of light to read by if I choose and a table to hold my cup tea.

Thanks for bring the chair!


I have enjoyed African Violets all summer long.

Being in the east window has agreed with this plant.  I should get another one - just thought of that.

It also gets a grow light for a few hours in the morning.


This is the fountain pen I found at the ReUse Center last week.  It is by Creeks n Creeks and has "Les feminnins de Creeks" written on it's side. 

My research on line seems to indicate it is a  a small French school fountain pen from the late 1980s and early 1990s.

It averages about $50 on line so I am very happy with this find. It is a cartridge pen so I will have to check out where to find those.

I checked on line and found out it takes an international standard fountain pen ink cartridge.

Staples only sells these on line so I could order through the store have some brought in.  I checked with Delta Arts - they had no stock and have been working to get some in from Shaeffer but not been successful yet.  I will check back. 38mm or about 1.5 inches long.

I discovered that I could refill the empty cartridge so that is what I did.  I cleaned the cartridge and the nib thoroughly.  I had a bottle of ink I bought last year for my dip pens so I used that.  The syringe is leftover from dental surgery.  It all worked very well.

Love it!

I needed to put my metallic watercolors into a water proof container.  I found this chocolate box in my stash so I repurposed it.  I discovered that they live in full watercolor pans which is great.

They fit nicely in this box.  The domed lid makes it a bit bulky but for the time being it will do.

I used some large glue dots in the bottom of the box to keep the pans in place.

I have documented the colors here since I will recycle the cardboard box.

I don't think I will ever concern myself with the actual color names.


Seven Blessings by Ruchama King

Story of romantic relationships in the Jewish culture.  Follows several couples and their matchmakers.

Beth is the central character who is 39 years old and really wants to marry but is not finding a mate.

She is recommended several men and dating taking place but there are problems.

I confess that I don't know much about the Jewish culture.  I found the culture was very complicated and there are many rules.

Not a great read.  In the end there is still no marriage. Disappointing.


Saturday, May 25, 2024

Sylvia's Simple Shots

I decided to have flowers on my balcony this year.

I bought some frilly blue pansies and some larger regular yellow ones.

I have added some dill, basil and parsley as well.


I dropped by my sister's house with a box a paper we had rescued at Trash to Treasure.

Her and her daughter were working on a barn for the back of the float she was placing in the local summer parade.

It is going to be very cool!


I had a nice visit with a friend who recently lost her husband.

They had sold the house and rented an apartment they hoped he could return to following a lengthly stay in hospital. He was advised that would not happen and he was going into long term care. He quickly declined and passed away.

She invited me to her new home and we had tea and a wonderful catch up visit.

We headed out to Joey's for supper that evening.


My aunt and I visited the exhibits at the Harcourt House gallery this week.

Caitlin Thompson is a fiber artist that recycles natural fibers from thrifted shawls, scarfs, etc into works of art.

She dyes the fabric, does fabric collage and embroidery in her art pieces.

Lovely show.

We had Vietnamese food for lunch in a nearby restaurant - Saigon Taste.

I had a quick trip to Calgary this weekend.  I picked up my sister on the way. 

We dropped plants to both of her children. Had a nice visit with her son's family and checked out the garden and caught up on things.

We brought lunch to my niece who has been working hard to support her family and the extended family and needed a few hugs.

We went for walk to the local mall for a few groceries for supper and then headed north.  

It was just the girls and we had a great visit.


Sunday, April 11, 2021

Exchange Cards

I have rejoined my greeting card exchange group after not participating last fall due to my health issues.

I used the 3D Painted Texture Embossing Folder from Stampin Up on a piece of mottled purple card stock.   Trimmed to 4.00 x 5.25 inches.

I punched half holes on both side about 2" up from the bottom and wrapped a piece of heavy yellow thread around the layer and knotted it to the front. Trimmed the ends.

I adhered that to a dark purple A2 card base in the portrait orientation.  

The focal element is chalked and cut with the Spellbinders Nestabilities - Small Deckled Rectangles thinlits.  I used Stampin Up chalks and a Qtip to apply the color.  The images are from the Stampin Up Blossoms Abound set.


I used the same card stock base and embossed layer on this card.

For the focal element I used the Stampin Up Blessed Easter Tulips.  Again, chalked with SU colors.

I used a piece of warm purple fiber to tie around the embossed layer.  

The half circles were punched with an 1/8" punch.  Trying very hard to only use half otherwise it looks a little funny.

The focal elements were adhered to the card front with 3D foam tape.

Loving the new embossing folder.

Using what I have - the Deckle Edge Rectangles I have seldom used and I am really liking this use.

Tuesday, April 16, 2019

2019 Cardmaking - CH - Class 4

I had a class tonight with the ladies at Compassion House.  I am using the Tropical Note Card stack kit.

The accent layer is glitter paper which has been painted. It was cut with the Tim Holtz Cabinet mover shaper.

The yellow was cut with the TH Cabinet die.  I added a circle punchie layered with a Stampin Up Five Petal Punch and held in place with a yellow mini brad.

The yellow layer was embossed.  I added a length of yellow fiber. 

I decided to add greetings to this set. The greeting was color printed on ivory and punched with the Stampin Up Large Oval punch. It was mounted with 3D foam tape.


The greeting on the blue one is the Stampin Up Modern Label punchie.

The purple greeting was color printed and punched with the SU Modern Label punchie.

These were printed on white & turquoise card stock respectively.

I brought this kit as well and we made most of these as well.  Great stash busting session.

Check out the details with these links Eiffel Tower  Butterfly   Bee & Flower

Tuesday, March 20, 2018

Ready 2 Go Stack Kit - Tropical Note Cards

I used decorative paper I made here.

I chose a turquoise card base.

I cut a yellow die cut with the Tim Holtz Cabinet Die then embossed it with the Cuttlebug Victorian embossing folder.  It is adhered to the card front aligning the bottom, left and right hand sides.

I aligned the yellow circle to the curve of the color coordinated smaller die cut which was cut with the Tim Holtz Cabinet Die Mover Shaper. Then I added the card color blue five petal flower punchie made with the Stampin Up Five Petal punch and then the silk flower.  Use a push pin to make a hole through those layers then place the yellow mini brad through it and press apart the prongs on the back of the smaller diecut. Wrap the yellow fiber around the accent below the circle, knot and trim the ends. Cut the 3D foam tape square into 5 pieces.  Place a piece in each of the four corners and one on the curve of back of the element you just created.

I have included orange and purple ones as well.


Monday, October 23, 2017

Card Club - October - Glitter Star

I started with the polka dot decorative card stock which was trimmed to leave a large border and adhered to the front of a red card.

I cut the stars with the Sizzix Star #2 die which cuts one large star.  I used POW glitter card stock in silver and gold for the stars. The star was adhered to the polka dot layer.

I decided placement of the red star and used a push pin to create a hole in the card front. I then cut a length of white glitzy fiber. I wrapped onto the prongs of the red star brad and press those through the hole and pushed the prongs apart inside the card. Trimmed the ends of the fiber to length with scissors.

Card Club - October - Elegant Thank You

I love the elegance of this card.  I recycled a commercial thank you card  in gold and ivory for the greeting.

I wrapped a length of coordinating fiber around the greeting and tied a knot. I then adhered it to the light blue card front.

I added 2 gold flower sequins on the right and left of the greeting held in place with tiny blue brads which coordinate with the card color.

This kit has blue and pink cards.

Thursday, June 1, 2017

Christmas Card Challenge - June - Green/Triangle

The challenge this month is Green and Triangle.  I found a green and red designer paper by A2Z Essentials Pollinate Collection - Burst.  This paper was cut into triangles measuring 5 tall x 2 inches wide.

I chose a hunter green card.  I added an light green embossed layer.  It was embossed with the Starry Night Background Sizzix Tim Holtz Alterations Embossing Folder.  

I added a red sequin star at the top of the tree and 3 gold sequins spread around the background.  I added 3 wraps of red cotton fiber which is knotted on the front.

The triangle tree is mounted to the card front with 3D foam tape over the red fiber.  

I added a coordinating Stampin Up Word Window greeting in the bottom right hand corner.
64 Christmas Cards in my box today.

Monday, January 25, 2016

Card Club - Jan - Felt Buttons

This is a cute and playful card.
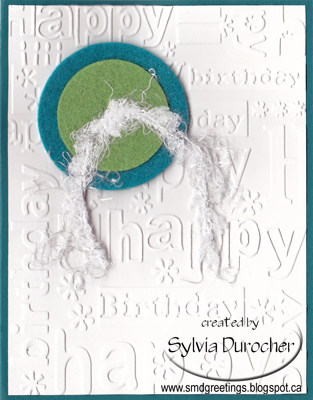
I selected 2 felt buttons in 2 sizes, the large in teal and smaller in green.  I tied them together with white shimmery fiber.  I then added a Zot in the back.  I selected a dark teal card.  I cut my white layer to 4.00" x 5.25" and then embossed it with the Cuttlebug A2 Happy Birthday folder.  I glued the greeting embossed layer to the card front then adhered the felt button accent in the top left hand corner.


Some kits have the pink and purple version of buttons as well as the Cuttlebug A2 Thanks Words folder.


Monday, September 15, 2014

Cards - Autumn Thanks

I started with the autumn pumpkin digital file from Graphics Fairy.  I color printed it then aged it with a bit of Tim Holtz Antique Linen Distress Stain.  This card has a different layout because I forgot to use my Magnetic Platform and the die moved on me so it cut crooked, so I had to use the die cut instead of the hole. I layered the pumpkins onto dark green card stock and adhered it to the bottom of the card. I cut the greeting with Memory Box die.  I applied tape runner adhesive to the Thanks die cut and placed it above.  I managed to find a piece of deep yellow fiber in my stash and wrapped it around the card several times and knotted it. Trimmed the ends.

I made these cards for my on-line card exchange. I'm also submitting to Come and Get It Card Challenges which is to use an autumn digi.


Saturday, July 12, 2014

AB Royal Museum - Western Threads

I visited the Alberta Royal Museum recently specifically to see one of their feature exhibits called Western Threads. This exhibition brings together the remarkable work by members of the Focus on Fibre Art Association, the Heritage Rug Hookers of Saskatoon and the Studio Art Quilt Associates, Western Canadian Branch.
Over 100 fibre art pieces are featured in the Western Threads: Contemporary Fibre Art exhibition.


One of the arts presented were Fabric Postcards.  There were quite a few of them and I chose 3 of them to show here.  They say we can get involved!
Here`s a link to how we as Albertans can make a fabric postcards and mail it to the museum and they will put it on display!  Here`s more details.


Here`s a sampling from each of the groups participating.  The quilt in the top left is called `Not so black and white`by Cathy Tomm - Leduc.  The Grain Elevator rug on the top right is called `Winter Solitude`by Ian Hague Regina Saskatchewan, and the bottom right hand is `Roundabout`by Dianne Kyrs.  The picture to the left of this one is a close up of a acrylic flower she had put on one of the circles. It had all kinds of  embellishments.  Very cool!

A great afternoon!  I enjoyed myself thoroughly. Check it out if you have a couple hours. On this display till August 4 2014.

Tuesday, October 1, 2013

Christmas Card Challenge - October - Paper Piecing

The challenge for October is paper piecing.  I considered punch art which would work, other options are Squares, Banners, Flags, Quilting DP, Trees, Pinwheel and I'm sure you will come up with an idea for your cards.
I chose a star for my paper piecing element.
Star: I chose this star which is an original Sizzix die. I selected complementary colored Designer Papers. I cut all 5 layers of Designer paper at the same time. I would suggest labeling the back of each point with a number 1-5 on all 5 stars to help with the putting back together process in a few minutes. I held all together with a couple of bull clips then I worked out where the centre of the star was, then I cut out to each V with an exacto knife.  I punched 5 large circle (1.75") to glue the stars back together on.  Now place your five circle out and take the 5 points from the first layer and placed them in their 1 to 5 order.  Place the next star on the five circles keeping your numbers in order.  Continue till all 5 stars are now on the 5 circles.  Glue the centers of the star onto the circle. 
Background:  I made a stamp pad with a paper towel moistened with a bit of water and household bleach.  I chose medium to dark blue card stock and cut it down to leave a small border.  I used the Stampin Up Itty Bitty Background stamp and stamped the cardstock with bleach.  This lightens the card stock.  I then stamped the same piece with a dark navy ink pad to provide some depth to my night sky. This was glued to an ivory card.
Greeting: I cut the greeting with the Sizzix sizzlet alphabet - Bounce from ivory card stock.  This was glued down with instant dry adhesive in a bottle with a pointed tip.
Button: I added a ivory button to the centre to which I tied some navy fiber.

Wednesday, February 8, 2012

Card - Challenge #37 - Red and White

I made this card for a challenge to use Red and White.  I started with a Real Red card and added an embossed white layer on which I used the Sizzix Tropical Paisley folder.  I found some fiber and added a trellis feeling by wrapping it around the white layer.  I glued this down to the card front.  I added a red felt flower on the left hand side with a tiny white brad. I created a border punch tag onto which I stamped the greeting and then I rubbed the ink pad around the edges and added some smudging.

Friday, October 1, 2010

Cmas Card Challenge - Oct - Wreath

Christmas wreaths could be foliage, twig, or balls. They could be green, red, or metallic. They can be stamped, punched, or die cut. Of course, they can be made many other ways so use your imagination!
I chose origami as my technique and moss green as my color. I found a sample of this wreath in the Split Coast Stampers gallery. The directions provided made a wreath too large for a card. The original paper dimensions were 3"x5" and I brought mine down to 2"x4". They were quite time consuming to make but well worth it. I used giftwrap weight paper. Once complete I taped the back side with regular tape to keep it from coming apart. I then wrapped the wreath with a coordinating fiber and left a tail where I knotted it. I placed a layer of scrapbook paper in stripes of burgundy, moss green and gold on a cream card. I used double sided tape to adhere the wreath to the card. I found a satin ribbon which matched and placed it below the wreath across the card. I added a greeting using Stampin Up! nesting oval punches and foam tape. The greeting is stamped in a soft green.

I made 6 of these cards. My total so far is: 89.

Tuesday, April 27, 2010

Card Club - April - Reused Book Pages


I have to say that I resist tearing apart books but sometimes they are beyond functional and reusing the pages is a good earth friendly idea.

The tag was cut from an old book page with the Sizzix large cresent tag die. I stamped the large U then embossed it with black detail powder. Really makes it pop. The greeting was printed on the same paper that was used behind the tag. The word was trimmed and tucked above the U. I added some black yarn. Remember to put the fiber on the tag before gluing it down to the card.

Saturday, January 16, 2010

Cmas Card Challenge - January - Snowflakes

The options for snowflakes are endless. Check your supplies for brads, stamps, 3D, die cuts, embossed, printed paper and I'm sure a lot I've not listed. Dig deep and see what turns up.

Here's my card.
I cut my cardstock along the 11" then scored in half and used it with the fold on the left to make a landscape card. I have used the Cuttlebug Devine Swirl embossing folder on the top right hand corner. The greeting is color printed on white. I ripped the top edge and aligned it's top and bottom edge to where the embossing ended. I punched a one inch hole and wrapped coordinating angora type fiber around it and tied a bow. I then placed double sided tape on both ends of the white and placed on the front of the card. I placed the brad in the centre of the hole using a push pin to make the hole. I had to trimmed the card again to ensure even edges because the embossing changes your card stock a bit. Total Christmas Cards made: 2


Therese's card - http://tmalakart.blogspot.com/2010/01/challenges-christmas-card.html

Sunday, June 28, 2009

Christmas Stack Class - Gingerbread

This class was requested by some of my card club girls who wanted a head start on their Christmas card making. I'll have another class in the fall with new designs. The Gingerbread man is a Sizzix die cut. The decorative paper is Christmas giftwrap. The twill tape greeting sold on a roll was applied with heat and bond. The white frosting is a gel pen on this sample but for the class I brought a Galaxy Marker - Milky Way White with a broad point which did a super job. The red paper background was a bonus because I didn't have to cut extra red paper to ensure the hearts were red (an extra step I've done in the past). The fiber on the spine is red cotton with a gold thread.

Saturday, May 2, 2009

All Occasion Card Stack - Masculine cards


We need cards to those special guys in our lives. This series of cards tended to the more masculine colors. Earth tones in blues, browns, and deep colors. The decorative paper is subtle but deep in color. A little color coordinated fiber on the brad added a bit of dimension. The greeting is printed on vellum and punched with the STU! 1.25 punch with a match cardstock circle in 1 3/8" below it. The greetings was the challenge as the circle is a bit on the small side. I brought a few extra so the ladies could have cards that they could use.

All Occasion Stack Class - Daisy with button

On this card the daisy was color printed onto the card itself. A strip of paper was ripped and then glue to the left hand side. The fiber is wonderful in it's texture and sparkle. I used a Zot to adhere the button to the centre of the flower. The color options were only limited by the color of buttons I had. I guess one could have decided to put all yellow buttons then the color options would have been greater.

Monday, April 6, 2009

Card for DAD - denim pocket

Perfect card for Dad. The pocket is a Sizzix die which I cut from denim scrapbook paper. The checkered background paper matched very well. The trick is to make sure that you only glue the edge of the pocket so that the tag can be inserted. Glue the little red DAD tag between the pocket and the decorative background. Insert the brads on each corner. The tag can be used to add a special greeting to that great guy.