Another Gift Card Holder still using the Stampin Up Card Base Pop'nCuts die. I cut this one from a Dill card stock. This time I used the Sizzix Pop 'n Cuts Magnetic Insert Die - Suitcase, 3-D (Pop-Up) for the inside. I cut a piece of designer paper with triangle trees on it. It was trimmed to 9 inches tall and 4 inches wide. I trimmed the suitcase handle off with scissors. I chose this insert die because it was so close to the size of a gift card. The gift card is held in place with a Zot.I've added a sticky note for my sentiment which will allow it to be reused.
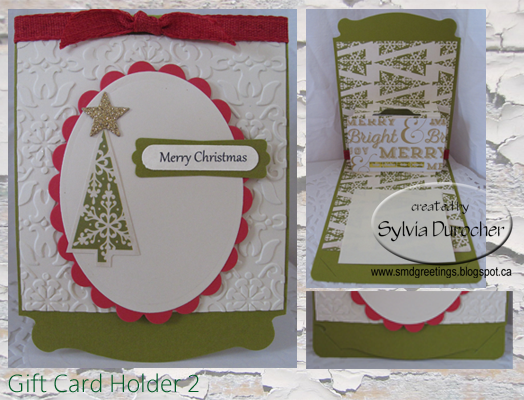
The front has a piece of ivory card stock embossed with the Stampin Up Vintage Wallpaper folder. I adhered that to the card front then added a red cotton ribbon along the fold. I cut a red scallop oval with Spellbinder Nestabilities then a smooth oval with the corresponding die. I cut a triangle tree from the scrap of the designer paper. Added a gold glitter star cut with the Sizzix Star die. A SU Modern Label punchie with the Word Window greeting punchie. Not sure the straight edge of the embossed layer is the best but I will continue to tweek the design.
Again, the fact that the card keeps itself closed with the tab/slot is great.
Showing posts with label Vintage Wallpaper. Show all posts
Friday, December 18, 2015
Thursday, March 19, 2015
Card - White and Green Challenge
I started with a Stampin Up Wild Wasabi green card. I embossed a piece of Whisper White with the SU Vintage Wallpaper textured impressions folder. I painted the centers of the embossed images with a water brush dipped in a drop of WW ink. I painted the dots in the embossed layer with a silver paint marker. I stamped the greeting with ink coordinating with the card. The stamp is from the Greetings of the Season stamp set. I punched it with the Decorative Label punch and offset it with a silver one. I put a WW stitched grosgrain ribbon across the bottom 1/3 of the embossed layer and taped the ends to the back. Mounted the greeting with 3D foam tape.

I'm submitting this card to the Stampin Celebration Challenges: Inspiration Photo.

I'm submitting this card to the Stampin Celebration Challenges: Inspiration Photo.
Labels:
challenge,
decorative label punch,
embossing folders,
green,
NOEL,
ribbon,
SC,
silver,
stitched ribbon,
SU,
SU Style,
Vintage Wallpaper,
white
Monday, August 25, 2014
Simple Christmas Angel
I made a few of these for my own Christmas card box as it is not as full as it should be at this time of year.
The card is Stampin Up True Thyme. The wings were cut in brushed gold with the SU Elegant Bird die and embossed with the SU Vintage Wallpaper embossing folder. The skirt was cut from SU Holiday Thyme DSP. The head is a 1" circle punchie in Very Vanilla. The greeting was stamped in Always Artichoke with the MC from the Come to Bethlehem set on Very Vanilla. It was clear embossed. It was then punched out with the SU Modern Label punch. Another punchie of the same shape was made from the same color card stock as the card. This punchie was split in half lengthwise, the centre bump at both ends was snipped off and they were adhered behind the greeting offset top and bottom. The greeting and head were adhered to the card with 3D foam tape.
This is submitted to Hazel's Christmas Card Challenge - Anything Goes.
Wednesday, January 29, 2014
Card - Victorian Stripes
Here's another no greeting card. I cut the coordinating paper with the top being 3.25" x 4" and the bottom being 2" x 4". I tape these together at the back so I could handle it as one piece. I glue it to the Stampin Up Groovy Guava card front. I embossed the River Rock card stock band with the SU Vintage Wallpaper folder. I adhered it over the joint of the designer paper. I used a push pin to create a hole for my brad and placed 2 silk flowers on the left hand side held in place the a coral brad.
Labels:
coral,
Designer Paper,
DSP split,
floral,
green,
Groovy Guava,
no greeting,
pink,
silk flowers,
stripes,
SU,
Vintage Wallpaper
Monday, June 24, 2013
R2G Card Kit - For You Scallop
Here's another card kit. In the past, I always kept these elements together on the Stampin Up! Punch Bunch For You Flower scallop punchie. I have seen several examples of separating them and I like the look much better. I combined different flower colors with Kiwi Kiss for the stems and centers. This card is in Pretty in Pink. The card, the scallop punchie and the flowers are the same color. The white layer was embossed with the Stampin Up Vintage Wallpaper folder to about 3/4 of the layer. I added 1/4 in grosgrain ribbon in Pretty in Pink just above the embossing and taped the ends to the back. This was then glued to the card front. The scallop accent is the For You punched with the 1.25" circle, Kiwi Kiss in 1 3/8" and the scallop matches the card color.
The kit includes Pretty in Pink and Perfect Plum.
Thursday, September 13, 2012
Card - Burgundy & Navy - New Job
I made this card for a friend who is moving to a new job! It's exciting for her and sad for me because I will see her less often.
I started with a burgundy card which is top folded. I embossed a piece of white card stock with SU Vintage Wallpaper embossing folder then trimmed it to leave a border. I wrapped a piece of navy seam binding across and taped the ends to the back and adhered it to the card front. I designed the greeting with a butterfly to signify the possibilities which are coming for her. I color printed the sentiment on white and cut it with one of the SB Smooth Oval Nestabilities dies. I cut a piece of the same burgundy card stock with the matching SB Scallop Oval die. I layered these and then mounted the element to the card front over the seam binding with 3D foam tape.
Labels:
blue,
burgundy,
embossing folders,
navy,
nestabilities,
SB,
scallop oval,
seam binding,
SU,
Vintage Wallpaper,
white
Subscribe to:
Posts (Atom)


