Showing posts with label coaster. Show all posts

Sunday, September 8, 2024

Stitching - Embellishment of Linen Coasters -Sashiko

I decided to do some tone on tone textured stitching on this mustard colored set of coasters.

I used some heavy cotton thread that color matched pretty well.

This is Sashiko stitching which went very well with the needles I bought a few days ago.

It is just basically running stitch trying to keep the stitch very even.

I did my best.

With the overall pattern it does not create bulk in the center of the coaster.  It is stitch that runs through the coaster so the back side is the same.

Another set done.

Friday, September 6, 2024

Stitching - Embellishment of Linen Coasters

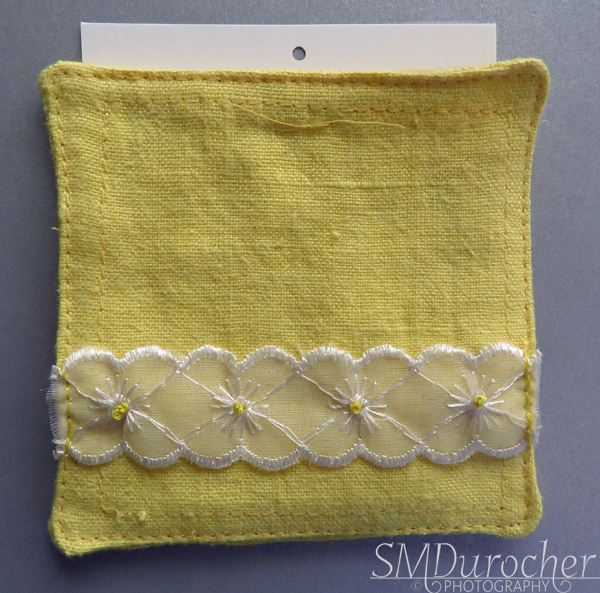
I am working on ideas to embellish the linen coasters I made last year as I did not sell one set.

I found some lace in my stash and the pattern fit nicely on across the coaster.

I used lemon yellow embroidery thread and stitched it along the edge and did French Knots in the center of each flower.  

I added the lace to both in this set. 

Is rick rack too tacky? Double sided might work but again thicker than I would like. Single sided?


Here are a few things I am trying to see if they will work for the embellishing of the coasters.

I just did needling weaving on my slow stitch challenge but that is too much with trying to keep both sides pretty.

The yellow is just doing a bit of embroidery but I need to not pierce through the coaster.  I am investigating simple blackwork stitches.

I am looking at felt but it just does not feel like the same level of material for linen plus it is quite thick and would likely have to be strategically place not to interfere with your drinking vessel on the coaster.

I will post my progress as I go.

Sunday, June 16, 2024

Slow Stitching - Kite Coaster

I made this coaster for my sister who is celebrating a birthday.  

She likes to fly kites so I decided to put one on this coaster.

I cut a 4x4 inch foundation fabric. I cut my blue sky piece and then my felt pieces for the hills in green.  I cut a cloud. These pieces were basted to the foundation layer. Then stitched with a running stitch and a coordinating embroidery floss.

I cut a piece of interfacing for the kite and then cut the 4 colored quadrants and stitched them onto it. Once complete I stitched it to the coaster and added the kite tail. 

I chose a white felt for the back, white embroidery floss and the blanket stitch to hold the front and back layers together. 

Sunday, December 2, 2018

Photo Coasters


With the poor results from my last sale I decided that I needed to expand my products with my photography as cards and calendars are not as sought out as they once were.  After a lot of thought, tossing and turning in the middle of the night the idea of photo coasters came to mind.

With a bit of research on-line and digging through old craft supplies which I kept through the de-stashing this summer I found Chipboard Coasters.  Being square they pair up really nicely with the 4x4 photos I have designed for photo calendars.

Digging through what I had on hand a put together several sets.  It was a long process as 3 times one has to wait while things dry and press.   I am very happy with the end result.


I backed the coasters with fleece because that is what I had on hand, it does not ravel and is easily cut with scissors or a rotary cutter.

Monday, November 5, 2018

Mosaic Monday - Recently

Bound by Rachel Hazell arrived today!  It is a book on book making and I am very excited to read it cover to cover then provide a review and make some of the projects in it.

Keep an eye out here on my blog for further posts of projects.

I have dabbled in book making but this book provides detailed instruction based on a quick perusal of it.

I love the handmade decorative paper she has created for the book covers.   If you follow this blog you will know that I love to make my own decorative paper.


I finished my second Kate Morton book today.  A friend gave me this book a month ago knowing how much I had loved The Forgotten Garden I read this summer.  I read The Lake House amidst preparing for a large craft sale which ran the few days so my full attention was not on my reading.  Fortunately, I own the book so I will be able to read it again in the new year when I have more time.

Again, this story runs in 2 time periods the 1930's and the 2000's and involves a beautiful property in Cornwall England.  A young boy disappears and at the time the mystery is not solved as not many clues are found.

A detective in London is given an opportunity to take up the solving of the mystery.  Fortunately, one of the key persons at the Lake House in the 30's is still living but it will take her cooperation to get to the bottom of it.

It has a great ending!

I am working my way through this journal from one of my favorite authors Ann Voskamp.

I have read the book this is based on "The Broken Way".  It did not resonate with me as much as her earlier book 1000 Gifts did.

I am always interested in seeing things from a different perspective and working on my self improvement.


The sale on the weekend was successful in raising a good some of money for missionaries over seas.

It helps a lot when most of the items being sold have been donated so the funds are pure profit.   I purchased a set of wooden coasters from one of the other tables.  They will be useful in my photography.

I purchased some glass beads from a lady at another table. 

They have 925 imprinted on them which implies sterling silver cores.

I thought I got a great deal but it turns out I paid the going rate for them.  I bought them because I liked them and they will be a great addition to my macro photography so everyone is a winner.

I love the scissors charm as I have added sewing to my balliwick of skills this summer.

I did sell several sewing projects so I am very happy about that.


Joining Mosaic Monday #1 hosted by Angie at Letting Go of the Bay Leaf.  She is the new hostess for the photo linky.  The hours are better now so I may be able to participate regularly again.

Monday, January 8, 2018

Good Blues

I have been adding to my collection of blue and white.

I found this blue & white shoe at a thrift store.  During a visit to an antique mall the same day,  I found a similar vase which was identified as an ivy planter.

I am planning at to create a 2019 photo calendar with my blue and white collection.  I have dishes and decorator items in blue, blue and white and white which will provide plenty of still lifes.  Look for the calendar later this year.


This is a lovely glass coaster in true blue to royal in an ombre pattern.  Love the bubbles in the glass.  It will work as a coaster or hot spot for a teapot.


I found this great bag at the thrift store which of course worked really well in my kitchen.  It is about 6 inches wide and 12 inches tall.  Since the update to the kitchen last summer I have not had a place to store medium sized plastic grocery bags.  I have placed it on my stove handle.
I use the large plastic bags in my garbage and I have a drawer to store those.
I see during my visit to a large chain store this weekend that they are now charging for plastic bags.  I have been using reusable bags for groceries for over 25 years.

A Christmas gift of yellow and navy blue & white tea towels.  Love it!


A true blue canister which matched my dishes came home with me. It now holds my Chai Tea bags in the tea corner.


This great blown glass ornament in the deep blue color which matches my blue and white collection.  It was in the Christmas ornament section but it will live with the rest of my collection.  It will no doubt appear in my 2019 calendar.

I have been looking for a teapot to go with my true blue dishes.  I found this one recently.  Color wise it is perfect match.  You will note that it has a matte finish where the dishes have a shiny finish but variety is the spice of life.

With 8 in my collection I am done buying teapots!


Sharing with
Mosaic Monday #67 hosted by Maggie at Normandy Life


Monday, November 21, 2016

Christmas Card - Gold Ornaments

I started with a 4 inch square die cut featuring gold Christmas ornaments.  The colors are grey blues, vanilla and gold.


I chose a half inch organza ribbon in gold and vanilla and a blue grey card.

I punched slots in the square 2 at the top and one at the bottom.  I threaded the ribbon through the top bottom behind back to the front at the bottom up the back on the inside of the card, back to the front down into the top slot and tied the ribbon in a square knot.  The ends were trimmed with scissors.

I added a fabric vanilla snowflake in the top right hand corner with a Zot.


Wednesday, November 2, 2016

Coaster Calendars

I've created another version of my Coaster Calendar for the sale on the weekend.  I chose verbs.  I hope this inspires others to action.

These make great gifts for friends, teachers, a girlfriends exchange, or special people who live far away because they are easily mailed.  Imagine the pleasure of opening a Christmas card to find a small gift inside.

I chose 4" coasters to which I glued 4.25" squares of designer paper.  I chose light to medium colors to allow my action verbs be visible and easily read.  Once pressed and dry I trimmed the designer paper to the edge with scissors. I then used a sanding block to soften the edges.
I designed the action verbs to be 2" by 4".  I printed them on vellum so that the designer paper would still show through when placed above the calendar.  I printed them in black on the color printer and clear embossed them.  I trimmed the 4.25 to 4.00 inches and then corner round punched the 2 top corners to repeat the round corners of the coaster.  I taped the vellum where the calendar would cover it.  I did add a bit of vellum adhesive in both top corners.

To make the calendar, I created the calendar in software, printed it on 8.5x11 paper, cut it into small pages, stapled the pages to a backer then adhered the backer to the front of the coaster.  I added a black eyelet at the top to provide a hole to hang the calendar and secure the vellum.  I used my Crop-a-Dile to set the eyelet.  It's perfect for the job.
I have added a magnet to the back so they can stick to the fridge or a file cabinet.


I included a credits label on the back.

Sunday, October 26, 2014

Coaster Calendars 2015

I'm here with Coaster Calendars for the November 8 2014 sale. These are a nice gift.

Coasters covered with designer paper then pressed while drying to make sure they stay perfectly flat.  I added vellum sentiments cut with the Stampin Up Apothecary Framelit.  I added a small calendar with double sided tape.

Wednesday, November 13, 2013

Calendars - Coasters

More stuff for the craft sale on Saturday, Nov 16th.  Today it's Coaster Calendars.

I took chipboard coasters 4" square and covered them with designer paper.  I left the paper bigger than the coaster and pressed them over night.  The next day, once the glue was well dry, I trimmed the paper to the edge of the coaster with scissors.

I printed the small calendars and stapled them to a piece of scrap card stock.

I then designed my vellum quotes, printed them and cut them with scissors or the Stampin Up Apothecary Rectangle framelit.  I then punched a hole in the top centre with the Crop-a-dile. I double sided taped the small calendars to bottom centre then I mounted the vellum with tiny black brads.  I added a magnet to the back so it can be put on a file cabinet or any metal surface.

Saturday, December 29, 2012

Calendar - Coaster with SU DP

I made this Coaster Calendar with SU! Winter Bright Designer Paper.  I used the stripes paper glued it to the coaster and once dry trimmed around the edge.  I added a Pretty in Pink gross grain ribbon across the width then the Real Red stamped Joy ornament. 

The colors in this DSP is: Bashful Blue, Pretty in Pink, Real Red, Whisper White, Wild Wasabi

Wednesday, October 24, 2012

Coaster Calendars - Vellum Sentiments - More

I made a lot more coaster calendars. Here a few more of the different ones I made.  I made some golf ones, some friendship ones as well as general ones.  You will see on the purple friendship one I designed some sentiments in ovals.  The down side is they had to be cut by hand so I only made a few of them.


Tuesday, October 23, 2012

Coaster Calendars - DP - Vellum Sentiments

 Still working on coaster calendars. I've taken a different direction. These I have pasted Designer Paper paper to the front and trimmed to the edge.  I took a long time and several rabbit holes before I settled on this way to present the sentiments. Really happy with these!  The sentiments are printed on vellum and cut with one of the Apothecary Framelits from Stampin Up! which makes it super easy! Then I attached to the front with 2 tiny black brads. In some cases I have chosen DP that relates to hobbies like sewing, quilting, music and golf which help me reach these customers. I've put a hole in the top centre and a magnet on the back which should work for most people.

Friday, October 19, 2012

Coaster Calendars

 Here are a couple more Coaster Calendars. I am getting ready for a craft sale on November 3, 2012 so the pressure is on.
The one on the left is TH Crushed Olive Distress Stain with some Not Quite Navy ink again with the stamped word.
The right hand one is Sienna re-inker applied with a bit of alcohol to dilute applied with a foam brush.  I stamped the flower by Magenta in Bravo Burgundy then added a bit of color with watercolor.  Tied with coordinating ribbon.

Thursday, October 18, 2012

Letterpress Coaster Calendar

My first attempt for a letterpress coaster calendar. I used TH Tattered Rose Distress Stain on the calendar first.  I ended up with applying some navy ink because I had a bit of an accident with the pad so I added more to work the color into the calendar. I needed a craft-pigment ink for the letterpress so I selected Not Quite Navy.  I used it for the letterpress and stamped word. I tied the calendar together with coordinating satin ribbon. Letterpress is very cool!  I created the calendar and stapled it to a piece of cardstock then glued the cardstock to the coaster!

Tuesday, December 20, 2011

Calendar - Round Coaster

I made this calendar for a friend.   I used some retired Stampin Up! Designer Paper which I glued to the round coaster and pressed.  Once completely dry I trimmed the paper to the edge with scissors and sanded the edge smooth.  I produced the calendar on a single sheet and trimmed it down into 12 small sheets.  I stamped the greeting in Brilliant Blue with a clear stamp. I added the white flowers with a large blue brad in the center.  The flower element is attached with 3D foam tape. I added sheet magnet to the back.

Sunday, October 2, 2011

Calendars - Coaster

I made several of these coaster calendars for my Card Club members who signed up for the full semester.  I started with round coasters to which I glued decorative paper.  These were pressed overnight to ensure good adhesion. I produced the calendar in publisher and then cut it down to 12 small sheets.  I stapled those to a piece of cardstock which was glued to the calendar.  Then I decorated them with words, punchies, brads, buttons, and such embelishments.  I'm happy with the way they turned out.  I put sheet magnet on the back so they will stick to file cabinets, etc. in a crafter's area.