Showing posts with label stitching. Show all posts

Tuesday, September 8, 2026

Sewing - Free Motion Stitching

I brought this box of sewing machine accessories home from the ReUse Ctr last week.

After a visit with my aunt on Saturday where she mentioned she would like to try free motion stitching I say I would check the box and see if there was a darning foot.

There was! 

Would it work? She had a Singer machine and some of the accessories were Singer. They connected differently than my Bernina machine.

I decided that I should at least try free motion stitching myself before I offered to help her.

I had a darning foot for my machine. So I watched a few videos. 

Then I dug into my box of scraps and prepared a sandwich of a foundation layer, a piece of cotton batting and then scraps on top to make something pretty.

I started with small pieces that if they worked out could be used for stitched cards.

It is very different.  It will take a bit of practice to make the stitching pretty.

I have enjoyed the process and the backgrounds have worked out well.  I learned I should start bigger and trim later as the stitching does shrink the piece.  Grippy gloves would really help.

Well, here are the four pieces I managed over several days.

I have trimmed the pieces to card front size and added slow stitching elements and they will become cards.

The color coordinating of the scraps is a very time consuming process.

It was very exciting to do something new.

I did spend a morning with my aunt and we did get the darning foot from the box onto her machine and she did a bit of testing to see if it would work.
She is happy and looking forward to experimenting.


Monday, July 20, 2026

2026 Slow Stitching Project - Page 28 - N2 - Notan and Navy

Working on the slow stitch project hosted by K3N Cloth Tales for 2026.  We are working through the alphabet A-Z. We are working on the second prompt of the letter N.

This one came together so much faster than the last one.

I chose yellow and Navy which is one of my favorite color combo's.   The prompt was Notan which is a Japanese design concept that translates to "light-dark harmony". It focuses on the balance and interaction between positive (light) and negative (dark) spaces.

I cut 2 piece of fabric the same size then traced a circle in the middle and cut it out. Switched the pieces into the other space and stitched them to my white book page.

Love it!

Thursday, March 26, 2026

Fabric Flower - White Tulle with Hot Pink Accents

I made a flower to coordinate with my Hot Pink Vase Wrap.

The white tulle was cut to .75 wide and 4.5 inches long.  I put 65 of them onto a 1.75" metal ring with half hitch knots. Then I added 5 hot pink lengths of frilly yarn. That took a long time.

I punched a 2" heavy cardstock circle to create the support for the wire stem.  I stitched the gold twisted wire onto the card stock.  

I then placed a layer of batting and the hot pink cotton fabric to create the center of the flower.  I stitched these layers from the back with heavy thread over the covered ring. 

I then stitched a hot pink fabric circle on the back to cover the wire and stitching. 

Wednesday, March 25, 2026

Bouquet - Embellishments

I added some stitching to the first bouquet Vase Wrap.

I chose alternating running stitching in red along the height of the vase wrap.

Gives it an additional touch of red to highlight the color of the flower.

You can see the bouquet here


On the second Vase Wrap I stitched around the flowers on one of the fabric strips.  I added some yellow running stitching along the edge of that strip as well to work in the yellow color of the flower.

You can see the bouquet here.


On the 3rd bouquet I added some color to the edges of the organza flower with Peel Paint Distress Stain.  It provides a bit of definition to the flower and works with the color of the vase wrap.

You can see the bouquet here.


Tuesday, September 9, 2025

Card Making - Sets Continue

I switched the designer paper to Well Worn which gives me masculine cards for variety.

These a DSP Splits which means I cut the designer paper to 4.00 x 5.25 inches then cut again at 3.5 inches.  

This designer paper is double sided so I can just turn the small piece over and tape it on the back scotch tape and I have the same size layer to work with. on the left I add a piece of Crumb Cake card stock and a strip of Not Quite Navy.  I used my square punch to punchout some square to repeat the pattern on the left hand side of the card. I then glued a few of the small punchies on the right hand side with Bling Zots. 

Another set of cards with theWell Worn Designer Paper Set.

I cut the designer paper to leave a small border on the Crumb Cake card base.  On th left I created an accent with the Tim Holtz Bracket die in Cajun Craze, then a strip of Crumb Cake then a strip of Not Quite Navy.  I adhered these the added 3 holes. I strung some shiny cord through them and knotted it at the center front. I added a star brad through the center hole.  This accent was then adhered to the card front. On the right, I created an accent with a piece of So Saffron card stock riipped on the right. Added a strip of Cajun Craze and a narrow strip of Not Quite Navy.  I then poked holes on either side of the navy and using a large needle stitched the criss cross pattern over it with yellow yarn. 

Again, A2 size with white quarter sheet inserts and white envelopes.

Friday, October 25, 2024

Slow Stitching - No. 043 - Sensory Stitching

K3N Cloth Tales Slow Stitching Challenge 2024.

Week 43 - Sensory Stitching

This week's focus is using our senses when stitching.

The sense of touch as we are stitching. How does it feel when the needle and thread goes through different fabric? Elements to excite our sight as we see our piece. Do we hear the needle as it goes through stiff fabric?

I chose a black fabric with a hint of herringbone texture to it.

I added the couched yarn, the button, the pom pom trim, the lace, the corduroy and the netting for my fingers. 

The button and colors for my eyes. 

The taffeta fabric below the button certainly engaged my ears as the needle went through that fabric.  Also there was printing on the piece of white tone on tone fabric in the bottom left hand corner and as I put in my seed stitches it was more difficult to push through the printed areas.

Saturday, September 28, 2024

Sewing Project - Adjustable Bookmark

I have been thinking of making some bookmarks for the Christmas sale since we share the space with the library.

With a bit of research, I found a few features I would like to incorporate. Adjustable and a pocket for a writing instrument.

After some measuring, I decided to make the it wrap around the book with an elastic and a couple of buttons for adjustment.  A pocket could be placed on the front and maybe some stitching could be included.

I cut 2 pieces of fabric measuring 3"W x 21" T - one patterned one solid.  I decided to use elastic from old face masks. I cut a piece of mustard fabric for the pocket. The buttons and embroidery need to be added before sewing.  The pocket needs to be sewn on the front of the bookmark. 

The elastic was pinned in place at the opposite end from the pocket. Then, I sewed all the way around the long strip leaving a slit to turn it inside out. I trimmed the corners, turned it inside out, pushed out the corners with a chopstick and pressed it flat.  I then top stitched all the way around. It was very difficult to do the buttons and embroidery after the pocket was sewn on.

Notes: 

  • The pencil pocket is too tall and could be narrower. 
  • Stitching and button(s) need to be done before assembly.
  • This is a hard cover book so the overall length of the bookmark could be shorter to accommodate smaller books.
  • I will use this one and implement improvements to future versions
  • The mask elastic may too soft.

Tuesday, September 10, 2024

Stitching - Exercise Mat

With the floor being installed I decided that I would need a mat to do exercises in the living room.  The floor is hard and provides no cushioning.

I researched options and found a large rug at IKEA which was 100% cotton and a color I could live with.  I had bought a yoga mat from my sister who had purchased it for a class and never used it again.  That provides the non slipping base for the rug.  I only do walking videos so there is not much impact exercises.

It is about 5 x 7 feet in size so doubling it up with the yoga mat would provide 3 layers of cushion.  That should be good.


I did try it for a few days until I was convinced that the idea would work.

It would really need to be solidified into a single piece now that it was folded because there were open edges which presented tripping hazards.

The blue yoga mat is just a bit smaller than the mat which is okay.

It really sticks to the floor so keeps the mat in place very well.

It is big enough to do my floor exercises and the cushion makes those comfortable.


I clipped the folded edge first for stitching.  That way any adjustment can be made on the open edges if needed.

I laid the hemmed edges opposite the fold next to each other instead of over each other to make that edge smoother.

I chose some heavy 100% cotton crochet cotton for the stitching. It is Clark's Anchor Cronita size 10 in Turquoise to add a bit of color to the mat.


I am so grateful for what I have learned on my slow stitching journey this year.  These experiences gave me confidence to know I could do this.  I found a heavy needle in my stash. 

I used a back stitch which doubled up the stitching on the back.  Hopefully that will wear better than single stitch.

Now there were a lot of inches to go about 250 of them so it was going to take a while.

The weaving of the thread was quite open considering the size of needle I was using.  The weaving was very even so I could just follow the edge of a row.
I made crosses at the corners to really tied down those thick corners.

I am very happy with my even stitching.

The turquoise color is great.


It took about 8 hours of stitching to go all the way around.

It feels and looks great!


I found a piece of webbing and a clasp to make a strap to keep it closed when I roll it up every day when I am done.

This clasp just traps the webbing in a clip on both sides so no sewing was required.

I am amazed sometimes at what I have in my stash.

It was exactly what I needed.


Everything needs a home at my house so I placed a basket on the bottom shelf of my IVAR shelving unit to hold the mat and my indoor exercise running shoes. 

That works very well tucked away in the corner of the living room.

A two week project but bodes well for regular exercise with  my walking videos now that fall is here and the temps will be cooler.


Sunday, September 8, 2024

Stitching - Embellishment of Linen Coasters -Sashiko

I decided to do some tone on tone textured stitching on this mustard colored set of coasters.

I used some heavy cotton thread that color matched pretty well.

This is Sashiko stitching which went very well with the needles I bought a few days ago.

It is just basically running stitch trying to keep the stitch very even.

I did my best.

With the overall pattern it does not create bulk in the center of the coaster.  It is stitch that runs through the coaster so the back side is the same.

Another set done.

Saturday, September 7, 2024

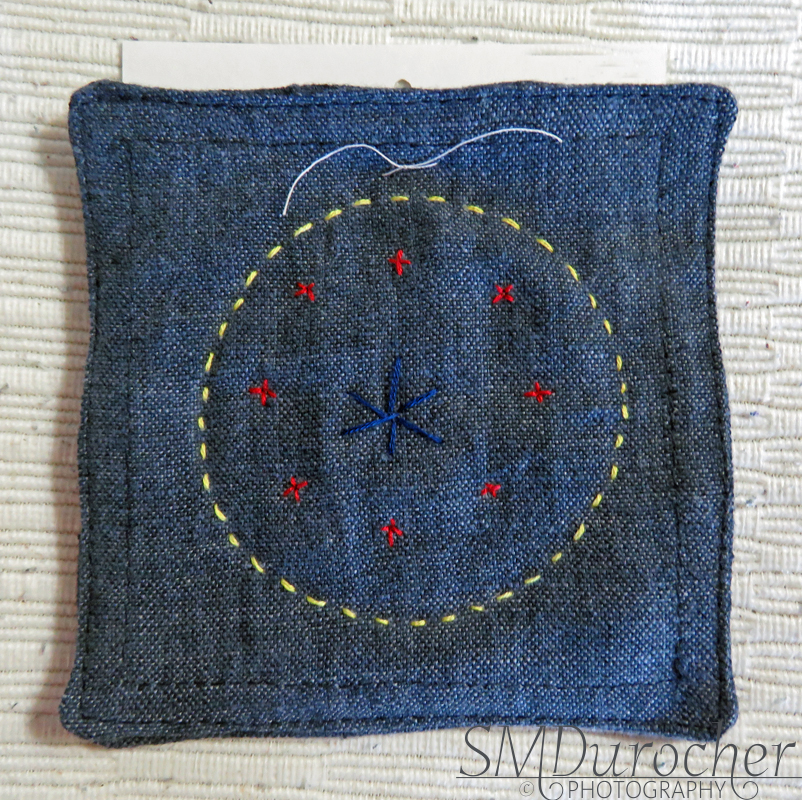
Stitching - Embellishment of Linen Coasters

For this set of coasters I decided to use stab stitch in other words just pushing the needle straight up and down in hopes of duplicating the pattern on both sides.

I pulled my knot through the 2 side seams into the middle between the layers. A bit tricky. 

I started with the little red crosses which I positioned based on a 4" stencil.  

Then I chose a round object and aligned as best as I could and then stitched in running stitch all the way around in yellow.

I chose a navy thread for the center star.  It was harder to align perfectly.

Monday, June 10, 2024

Slow Stitching - No. 024 - Crazy Patch Work - Stitching

I worked on the stitching all week because I knew it was going to take some time.

Week 24 - This is part 2 of the Crazy Patch Work challenge from last week.

I worked all week because I knew it was going to be a lot of work to get all the stitching done.  I added 3 accents pieces - a bead, a button, and yellow double holed thingy.  Then there is lace, rick rack, and gold cording.

I used French Knots, Seed Stitches, Couching Stitch, Cretan Stitch, Sheaf Stitch, Chain Stitch, Running Stitch, and Stem Stitch. This project increased my comfort zone with using different stitches.  The Elegant Stitches book was very helpful. 

The color scheme was totally based on the center piece of fabric.

Friday, November 2, 2018

Thank You Cards - Pink Heart

This is a recycled card.  I cut the main element from the original and reused it.

I layered it onto a piece of purple and then punched small daisy flowers from the cutoffs.  I placed them below the main element and held them in place with pink brads.

The purple layer was adhered to the card front of a pink card.  The insert inside is blank.


Another card with the same heart element.

I ripped right edge and mounted it on a brown card stock layer.  It was adhered to the front of a pink card aligned to the right hand side. 

I added some stitching in brown thread on the left hand side.  Placed a pink handmade paper flower in the wide opening held in place with a pink brad.

These are headed to my Thank You Card box.

Saturday, March 25, 2017

Tea Cup Coaster Project

There are three of us working on Tea Cup Coasters for the Mother Daughter event our womens group is planning for May.

We have shared fabric and lace and the sewing machines have been whirring.

The original pattern for these can be found at The Enchanting Rose blog where Stephanie has posted the details. Follow this link. UPDATE:  You can find the pattern here.


We are using fusible interfacing which is a bit heavy and I was concerned about trying to turn that over in the seam.  One of the other ladies offered the suggestion of making the interfacing only the size of the finished cup.  That is working wonderfully.  So I cut my fabric to 5 inches, cut my interfacing to finshed size, fuse it to the wrong side of the front piece.  I then sew the lace which provides a mechanical connection between the fabric and interfacing should the glue release over time.  I add my handle, sew around, turn it over, iron flat.  I then start my over stitch in the lace where the join will not be obvious. Go all the way around. Done!


I am working on a small tag to go with these that will encourage those using the coaster to encourage someone who comes to mind and heart while they drink their tea.

Our count is 54 and we are aiming for 80.  Over halfway there.


They are so cute!!


Sharing with the following:

Bernideen's - Friends Sharing Tea

Ruth - Tuesday Cuppa Tea 


Have a great day!

Saturday, April 4, 2015

Card - HB Buttons

A birthday card for a beautiful little girl who is celebrating later this month.  I will see her this weekend so I got the card ready.
I printed the greeting and colored it with pencil crayons.  I chose primary colors - red, blue, pink, green, and yellow.  I added 5 large buttons held in place with large Zots.  I added the stitching around the buttons with a black marker.

Sunday, May 26, 2013

Challenge - Off the Edge & C4C187

I started with a heavy white card which I splattered with Kiwi Kiss ink on a wet foam brush.  I dried it with a heat gun.  I had colored the large middle HMP flower with the same Kiwi Kiss ink and dried it with the heat gun.  I inked up the Stampin Up Print Pattern background stamp with an old somewhat dry stamp pad.  I stamped it off the edge of the top of the card and got this subtle diamond shapes.  I really like it.  I stamped the SU Happy Birthday greeting 3 times across the bottom again going off the edge of the card.  I stitched the flowers onto the card front with crochet cotton through the cute yellow buttons I put in the centre of the flowers.   I'm submitting this card in the Come and Get Card Challenge - Off the edge and Crazy 4 Cards Challenges - no patterned paper C4C187.

Saturday, October 22, 2011

Card - Challenge #23 - Stitching

I made this card for the CST challenge which was stitching.  I decided to add real stitching.  I found this pattern on line.  I chose white thread on black card stock.  It takes a long time to do this.  I added some silver flower sequins held in place with silver tiny brads.  I chose a Old Olive card with a pink layer onto which the stitching layer was glued. I used lots of double sided tape.  I will press it under books over night.