

Tuesday, December 29, 2015
2016 Scripture Calendar
Monday, December 28, 2015
Mosaic Monday - Glass
 Glass is one of my favorite materials. Over the last week I have had the following pieces come across my path. The left is stained glass windows at a church and the smaller one is the colors appearing on the wall inside. I love my little blue stained glass nativity. I received a glass Christmas tree onto which small ornaments are placed. That is very cool. During a Christmas Eve activity where items are wrapped in newspaper and those in attendance unwrap the treasures, stealing 3 times is allowed. I stole this glass globe paper weight from my brother. I managed to keep it till it was mine. You can see the reflection of the light in Australia. Very happy with the new addition.
Submitting to Mosaic Monday hosted by Judith at Lavender Cottage.
Friday, December 25, 2015
Merry Christmas to You!

Merry Christmas to all!
Wishing you all the joy, peace and hope of the season!
Monday, December 21, 2015
Mosaic Monday - Getting Ready

Submitting to Mosaic Monday hosted by Judith at Lavender Cottage.
Sunday, December 20, 2015
Gold & Burgundy Nativity Panel Card

As mentioned earlier, this is a 5x7 panel card with a 4x6 photo adhered in the center of the frame printed on the front of the panel The image is a nativity I photographed several years ago to which I applied a filter to soften the image a bit. I also applied a photo edge in white which provided an uneven edge to the image which I think works well. It had lovely velvet curtains in the background so I chose to repeat that color for the frame on the front.
The back of the panel was customized with a scripture verse, a sentiment and the name of the couple.
Saturday, December 19, 2015
Gift Card Holder - Smaller Pop Up
 Another gift card holder. I tried making the pop up smaller 4" W x 4.75" T. It helps because there is less to match up but I'm not sure if it's the final one. I chose double sided paper from Creative Imaginations. Design by Helen Dardik. There are light blue stars on a dark blue background on one side and the other has white and red stripes with a 6x6 of white hearts on same dark blue. I cut the base with the Card Base Pop 'n Cuts die from Stampin Up. Then I placed the Sizzix Pop 'n Cuts Magnetic Insert Die - suitcase and placed my heart paper on it and ran it through the Big Shot. I folded it in the right places then trimmed the handle off with scissors. I adhered it onto the fold. I wrapped a piece of red cotton ribbon onto the join and tied it in a knot on the front. I took the scrap from the 12" length and trimmed and placed at the top of the card front. I added a light blue greeting below the striped piece. I had flagged the right hand end with the SU Banner Triple punch. Again, I tucked the tabs into the slots to keep it closed. The gift card is held in place with a Zot.
Challenge Card - Paper Garden

For my card I started with an olive green card. I chose the BoBunny Blitzen Sentiment paper which coordinated well with it's vintage feel. I chose to repeat the word idea and decided to cut a word for the accent. I wanted to highlight the warm blue color in the DSP so I chose Stampin Up Blue Bayou card stock. I cut an oval with the SU Sizzix Ovals die (retired). I then aligned it with the Tim Holtz WISH Mover Shaper magentic die and cut the word from it. I then cut an identical oval from ivory to back it. I adhered these together with quick dry adhesive. I then cut a scallop oval from warm red card stock with the Spellbinder Nestabilities - #4 from the small oval set. The wish accent was glued to this layer. I applied 3D foam tape to the back. I cut a piece of the same card stock as the card to 4.25 x .75 inches. I placed 3 lengths of ivory cotton thread across it and taped the ends to the back. I then adhered it to the card front. I adhered my WISH accent over the strip aligned to the left. I tied a trio of short lengths of ivory cotton in the space I had left next to the red scallop oval. I trimmed the thread ends even.
Check out the cards submitted and vote for your favorite.
Friday, December 18, 2015
Gift Card Holder - Version 2
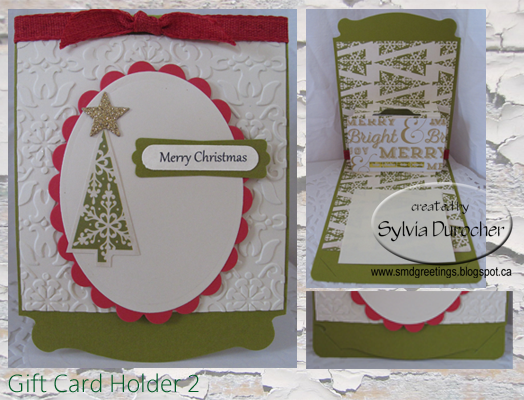
The front has a piece of ivory card stock embossed with the Stampin Up Vintage Wallpaper folder. I adhered that to the card front then added a red cotton ribbon along the fold. I cut a red scallop oval with Spellbinder Nestabilities then a smooth oval with the corresponding die. I cut a triangle tree from the scrap of the designer paper. Added a gold glitter star cut with the Sizzix Star die. A SU Modern Label punchie with the Word Window greeting punchie. Not sure the straight edge of the embossed layer is the best but I will continue to tweek the design.
Again, the fact that the card keeps itself closed with the tab/slot is great.
Pop Up Gift Card Holder

For this one, I used the Stampin Up Card Base Pop'n Cuts Die. The card stock is River Rock with Holiday Thyme designer paper cut with the Top Note die. I added an Ornament punchie stamped with the Delightful Decorations ornament in Cherry Cobbler on Very Vanilla. I added a bit of Cherry Cobbler twine. I created the dip in the pop up with the Word Window punch. I added a piece of DSP which matched the front then a sentiment from the Festival of Trees stamp set. I followed up with the rest of the sentiment on a piece of Very Vanilla which I cut again with the Top Note.
I love the way this card closes with the tabs in the slots.
Community Christmas Concert

There were several songs from different cultures and in different languages. Unity with diversity is what is all about.
It was very good. There was a drime which was young people doing a bit of drama to a song about Ebenezer Scrooge which I think was a great addition.
We were discouraged from taking pictures which is too bad because these a most school choirs and all the parents are really proud of their kids.
Monday, December 14, 2015
You Don't Have to Work for Christmas Freebie - Ann Voskamp

This is one of Ann's free resources available on her website. A Holy Experience. She has several really good books. I have her on my blog roll so check out her website if you like.
Monday Mosaic - Busy Weekend

Sharing at Mosaic Monday hosted by Judith at Lavender Cottage.
Wednesday, December 9, 2015
Christmas Cards - 5x7 Panels
 I received a last minute Christmas card order. These are two of the three
options I presented. They are 5x7 panel cards with a 4x6 photo placed
in the center of the frame.
I received a last minute Christmas card order. These are two of the three
options I presented. They are 5x7 panel cards with a 4x6 photo placed
in the center of the frame. For the one on the left I used my Alphabet Photography with JOY to the World featuring burgundy accents in the frame around the letters, in the words of the greeting and the printed frame on the panel front.

For the one on the right I designed a Christmas sentiment with a selection of words and graphic elements. I added color with a yellow star, the burgundy JOY and the green in the Christmas. It is very graphic and will not be everybody's cup of tea.
The back of the panels were customized with a scripture verse, an appropriate sentiment and the couple's name.
I will reveal the one they selected a little later.
Monday, December 7, 2015
Mosaic Monday - Recent Buys

Submitting to Mosaic Monday hosted by Judith at Lavender Cottage.
Thursday, December 3, 2015
Winter Wishes

This is my own decorative paper made with the Stampin Up! Harlequin Diamond background stamp. I dipped it in wet reinker in the green pink variations, then stamped it on white card stock. I added a green grosgrain ribbon across the bottom third. I created the greeting with a color printed sentiment punched with the large oval then layered onto the SU Decorative Label punch. This all adhered to the deep pink card.
R2G Card Kits - SU - Wonderful Wreath

This set has a Stampin Up True Thyme card base. I used the Wonderful Wreath Stamp Set with the wreath in True Thyme. The greeting in Riding Hood Red. I added a RHRed Tafetta Ribbon bow held in place with a Zot. This is such gorgeous ribbon, it ties beautifully and lies flat which makes a card which can easily be mailed.
R2G Card Kits - SU - Festival of Trees

This kit has a Ruby Red card base. I cut the greeting layer to 4.00W x 5.25T and created it with the Festival of Trees Stamp Set. The tree outline is included on this layer. I provided a white triangle tree cut to 2 7/8 W X 3 7/8 T onto which strips of Certainly Celery card stack was adhered. Once I was happy with I just trimmed the green to the edge of the white triangle with scissors. I adhered the strip tree onto the card front using the outline printed on it for alignment. The gold glitter stars were cut with the Sizzix Stars#2 die. I trimmed the pot with scissors leaving a small border all the way around. I adhered sequins on my tree then added the gold glitter star and the red pot with 3D foam tape.
I provided plenty of green strips and sequins to meet any kid's desire.
Wednesday, December 2, 2015
Card Kits - SU - Pink Owl

I started with the Stampin Up Owl Occasions stamp set and did him in Pretty in Pink. The branch is done in black and the greeting from the same set in both colors. I added a black triangle hat which was cut 1" W and 1.25" T then embossed with the Polka Dots folder. I added a pink button at the top of the hat, held in place with a Zot. The wiggly eyes make this card. They are held in place with Bling Zots.
Submitted to Christmas Card Challenges - Anything Goes
Cards - Exchange Group - December

I chose a brown card to coordinate with the pine cones in the designer paper. I cut the piece of paper to 4.00 x 5.25 inches then cut it again at 2.5" crosswise for this landscape (wide) card. I put a red cotton ribbon across the fold and taped the ends to the back. I adhered this layer to the card front. I stamped the greeting in Real Red with the Stampin Up Perfect Punches Stamp Set. It was adhered to the card front with 3D foam tape.

Advent Begins - "Christ"mas is coming

I so enjoyed my Being Present for Christmas class this fall. I now have the book The Greatest Gift by Ann Voskamp to read every day.
I have Cinnamon Vanilla in my wax warmer which fills my place with a festive scent.
I also have several versions of other versions of advent calendars.
Tuesday, December 1, 2015
Mosaic Monday - Christmas Wreath

There is a bird, an apple, a pear, a poinsettia and pine cones.
And Christmas begins after celebrating the first Sunday of Advent.
Submitting to Mosaic Monday hosted by Judith at Lavender Cottage.
Saturday, November 28, 2015
Miniatures Show - Nov 28 to Dec 16 2015

I have my 8x8" mixed media collages in this show. Of course, my 2016 Photo Calendars are still for sale as well as my greeting cards. Drop by during the next few weeks, browse the art and cross off a few names off your Christmas list.
Friday, November 27, 2015
Turquoise Snowflake

Wednesday, November 25, 2015
Christmas Letterheads 2015
I've designed 2 new letterheads for the upcoming Christmas letter writing season. Do you choose to do a letter instead of cards? These are digital files which will be emailed to you as a 8.5x11 pdf. You would print the letterhead onto the paper then print your letter onto the sheet. You can see all the options available here.

I designed this with fonts and colors.

This one features a Madonna and Child from Pixabay
Card - Exchange Group
 I made these cards for the ladies in my monthly exchange group. I used this snowman sticker on this card. I started with a blue card onto which I added an embossed red layer to the card front. It was embossed with the Sizzix Flowers folder. I cut a white layer with the Spellbinders Label 22 die onto which I applied my snowman sticker. I added a banner greeting which was color printed then I punched the ends with the Stampin Up Banner Triple Punch. It was adhered with 3D foam tape.
Tuesday, November 24, 2015
SU Festival of Trees - Folds

The designer paper is Stampin Up Be of Good Cheer. The card is Cherry Cobbler. The card front is scored at the half way point and folded back to the left. A piece of DSP is applied to the flap. The square accent is done with the Festival of Trees stamp set with the polka dot tree and the first half of the greeting on the front and the rest on the inside. The sentiments are done on layers are Very Vanilla.
Christmas Snowflakes - Large Greeting

The greeting is printed on the white layer which is adhered to the card front. I then punched black snowflakes with a punch from Emagination Crafts Corp. For the center one, I layered a medium white confetti snowflake and a small confetti one in an iridescent color onto the black all held in place with a tiny black brad. This was repeated on each side above the greeting.
Monday, November 23, 2015
Card Club - November - Watercolor Ornaments

Winter arrived yesterday, so our numbers were smaller than usual but we spent time after card making having tea and cake. It was great. The drive home was not.
Card Club - November - Cute Snowman

He sure is cute!!
Card Club - November - Christmas Tree DSP Split


The DSP had two color variations some with green trees and the other with grey trees. I chose a grey card and I had to come up with a different accent for the grey paper so I chose a silver snowflake held in place with a tiny gold brad.
Card Club - November - Joy Pennant

Today, is Card Club and we are making Christmas cards. This is a double class which means 8 cards.
I started with the white felt pennant through which I strung the Christmas plaid ribbon in traditional red and green colors. The ribbon is wrapped around the card front and tied at front in the middle. I colored printed the greeting on vellum and clear embossed it. I positioned it with the O of JOY in the center of the bottom half of the pennant. I then, held the vellum in place with a gold glitter star in the center. The ends are trimmed as desired.

I chose red and green for card colors for these cards and the ribbon works well with both colors. The color on the vellum was alternated as well based on the card color.
Sunday, November 22, 2015
Christmas Card - Madonna

The image of Mary and baby Jesus was soft and lovely. I printed it on the card front with a taupe border. I added a Crumb Cake greeting from the Stampin Up Come to Bethlehem stamp set cut with the Bitty Banner Framelits. It is adhered to the card front with 3D foam tape.
It's a lovely card.
Christmas Cards - Gentle Peace - Stained Glass


Nativity - Aphothecary Framelit

Friday, November 20, 2015
CAVA Photo Calendar Exhibition

The reception is tonight at 7:00 pm. I will be featured along with 3 artists, Ute Rieder, Sylvia Grist, and Laura Watmough.
It's very exciting and I'm looking forward to seeing a few familiar faces and many new ones. This is good exposure to new people.
My calendars will be for sale.
Thursday, November 19, 2015
Be Present for Christmas - Lesson 7 - God in the Manger
Today, we focus of the babe in the manger. Jesus is born.
The suggestion was made that we make thank you cards. Some are still working on advent calendars so I changed my plans and made simple thank you cards. I used the cards available at the local arts and crafts store. I then selected some Christmas and non Christmas frame images to surround the greeting at the center of the card. I made 2 of each design. The images were selected from Clker and Graphics Fairy.

We started with gratitude and we end with gratitude. God comes quiet... The victory is won. All of conquered heaven and grateful earth echo and throb tonight with the heart cry of the God-Child. I did it for love.
The greatest Gift laid into our empty hands... Grace is weightless.
We have had a very good class. I have learned a lot and I believe the ladies enjoyed it as well.
Have a stress free Christmas season. Today was the first snow for us so it's starting to look a lot like Christmas.
 I'm selecting my lessons from The Greatest Gift by Ann Voskamp.
The book provides 24 lessons for each day of Advent of which I have
chosen 7 for this class. We will have readings, questions, discussion,
and an activity each week. I handed out this freebie from Ann's website. You don't have to work for Christmas.
I'm selecting my lessons from The Greatest Gift by Ann Voskamp.
The book provides 24 lessons for each day of Advent of which I have
chosen 7 for this class. We will have readings, questions, discussion,
and an activity each week. I handed out this freebie from Ann's website. You don't have to work for Christmas.Wednesday, November 18, 2015
Decorative Paper - Christmas Cards

 The blue one I stamped in Taken with Teal and mounted it on a teal card. The other was stamped with Handsome Hunter and mounted on a dark green card. I used Craft ink so that I could emboss it before it dried.


Another watercolor square with a gold glitter star cut with the Sizzix Stars die. This element is placed over a blue layer which was embossed with the Cuttlebug Swiss Dots folder. Again, on a kelly green card.
Decorative Paper - Christmas Cards


 For the red green card I cut a piece of green paste paper. Trimmed it to fit the bottom of the card and added a poinsettia designed with the Stampin Up Five Petal punch in red and gold. The center is a flower sequin held in place with a tiny gold brad. I added a green sequin to the dot on the J which is a gold brad.
For the card on the right I cut a piece of soft green bubble paper and adhered it to the bottom of the card. I added a single gold brad for the dot on the J. I punched the Stampin Up Medium Snowflake in the same paper then punched the Ornament punch around it. I added some cream and gold ribbon to the hanger.
Subscribe to:
Posts (Atom)