Showing posts with label tag. Show all posts

Thursday, April 3, 2025

Cards - A2 - Serendipity Paper

I created a 8.5 x 11 sheet of serendipity paper when I created cards with the origami paper this week.   

I cut it into 4 pieces to make the best use of it.  That means A2 cards.

I started with So Saffron card base to measure 4.25 x 5.5 folded.

I adhered my collage paper to the front leaving a small border. 

I cut a strip of the same card stock and added a length of Early Espresso grosgrain ribbon.

I added Spellbinder charm die cut hung with ivory crochet cotton.

A white quarter sheet insert and an ivory envelope.

For this card I chose the same yellow card base and adhered the piece of collage paper to the front leaving a small border.

I added a length of Early Espresso card stock across the landscape (wide) card in the top half

I cut a Sizzix Primitive Star with the yellow medium die. It was mounted onto the brown strip with 3D foam tape.

A white quarter sheet insert and ivory envelope.

I was lucky to get 50 of these envelopes at the thrift store this week for $2.00.


Another wide card.

The card base is Early Espresso and the collage paper was trimmed to leave a small border.

I added a card stock strip of brown and topped with a narrower strip of So Saffron card stock.

I punched a pine tree from dark brown card stock and adhered it with Scotch Quick Dry adhesive on the left hand side.

A white quarter sheet insert and an ivory envelope to complete the card.


The fourth card in this series made with serendipity paper.  I used origami papers 3x3 collaged to card stock.  

I chose a ginger colored card stock and adhered the trimmed collage paper to the front.

I added a strip of the same card stock to the front once I had added a length of dark brown grosgrain ribbon across it.

I hung a square charm cut with Spellbinder die set.

I added a white insert and an ivory envelope.

Not my normal color scheme but they worked out well.

Thursday, April 25, 2024

"My Bag" Tag Process

I have been thinking about this idea for a while.  I have made many bags in the last few years. Several for myself, others for gifts, still others to donate to good causes. Some are for shopping, some for carrying books, and the latest for wine bottles. They are well finished, made to last, functional and look nice. 

I would like for those who use my bags to think of them as their own special bag.  It protects their stuff, makes carrying stuff easier, it is unique and easily recognizable at a social event when it is time to head home. 

After some brainstorming, I decided to attempt making tags for the bags I make.  I still have a supply of shrink plastic from card making days.  That should work.  Well this has been a process. 

My first ones were "tiny".  After I had the size down and asked for feedback. It was suggested they have round corners, be sewn with white thread to match the plastic better, should have 4 holes and maybe the edge of the bag would be better. The last photo is the model I am going with. I will put them on all my bags in stock and going forward. Size is 2"x1.25 with four 1/8" holes before shrinking.


I made a paper tag to explain my intention with the the making of the bag and how I hope they will use them.

A pretty shopping bag that you don't forget in the car when you go grocery shopping.  

Using a wine bottle bag at your next get together making bring a bottle easier and remember its your bag so bring it home.

A book bag to protect your book when you commute to work, take a trip, or take it to the park to enjoy the sunshine.

A book to hold your organizer/planner/daytimer and those essential things you need when you are out and about. 

A project bag to hold the pieces of your latest craft project. 

A lunch bag to bring your meal at work, at a sporting event, or at the park.

I am sure there will be different bags in my future.

Sunday, October 15, 2023

Sticky Note Holders - 3 Sets

I made 3 sets of Sticky Note Holders with my photos on the front.  You can check out the process in this blog post.

Here is the green set.  I chose the red poppy, a yellow warbler, a beetle and a red wing black bird for this set.

The designer card stock has very little pattern.

I did have enough leftovers to punch my tabs from the same card stock.

The folds did produce white places because it is white core card stock.  Nothing I could do about that.

I could have used solid card stock but that is not the look I wanted.

Here's the pink set.

The pink cosmos, the dahlia, rose and poppy in the bottom right hand corner.

It would have been best if I photographed these before I put the celloband and tag but that is the way it goes.  Too late do it otherwise.

The cellophane band ensures that the sticky note pad stays in the holder until it heads home with a customer. 

It also provided a great place to tuck the tag with information and credits to the back.


The blue set features a dandelion (Salisfy), alium, a tree swallow chick, and mooks hood.

The info tag was printed and cut to 2.75 so it fit nicely in the back of the holder.  I strung it through the tab so that it would stay with the not e holder until it headed some with the customer.

By tucking it between the cello band and the holder it stays nicely out of the way.


Tuesday, May 18, 2021

Seniors Week - June 7-13 2021 - Card Donations

This is the reusing of a nature printing I made many years ago.  

Nature Printing is a process that involves using real leaves, acrylic paint and white card stock.  I spattered the prints with watercolor after they were dry.

I trimmed the green leave nature print to leave a small border.  I adhered it to the front of a medium green card base.

I added a sentiment made with a Stampin Up Modern Label punch from the same green card stock as the card base and a color printed SU Word Window punchie.  This layer was adhered with 3D foam tape.


This card was made with an old card kit prepared for a class at a women's residence. 

The grey card base was punched with a circle border punch.  The sentiment is held in place with a metal circle pronged through the card front.   I added 3 daisy confetti held in place with tiny black brads. The insert is the full half sheet so it will show through the punched border.

I am using up old card kits which did not get used in class.  There was a time when I prepared more kits because I was not sure how many participants would show up. Later, I got smart and made participants pay in advance so I only prepared the number of kits which were paid for.

This card has a lavender card base with coordinating designer paper in the diamond pattern.  Trimmed to leave a small border.

The gold border was wrapped around and the ends were taped to the back.  The purple Lattice die cut was adhered to the designer paper too. Then this layer was adhered to the card front.

I added a flower accent and a Stampin Up Modern label sentiment where the purple punchie was offset from the white one. This was adhered with 3D foam tape.

Another old kit.  

This card has a black card base with a piece of striped warm blue green designer paper trimmed to leave a small border.  I wrapped the ivory grosgrain ribbon and taped the ends to the back. This was adhere to the front of the card.

The three hexagon shapes in the same color scheme as background were cut from designer scrap book paper with Spellbinder Hexagon Nestabilities set. These were adhered aligned along the ivory ribbon. 

I added a ivory tag sentiment with navy cording.  It was adhered with 3D foam tape.

The stack of card is growing!  I delivered them on Friday, May 21st.  They were gratefully accepted.

Seniors Week - June 7-13 2021 - Card Donations

I worked on more cards for the Seniors Week Project.

I started with the yellow and blue layer which I made last summer.  It involves making a marking tool with old toilet paper rolls to create dandelion flowers.  

That layer was trimmed to 4.00 x 5.25 inches. 

I placed a piece of blue rick rack across the bottom third and taped the ends to the back. This layer was then adhered to the front of a medium blue card base.

I added a color printed greeting punched with the Stampin Up Decorative Label adhered with 3D foam tape.

This card was created with a 4x4 photo reused from one of my photography calendars. 

I trimmed the 4x4 down a bit to leave a bit more of a border. 

I added the vellum sentiment which I adhered to the photograph with gold flower sequins held in place with orange tiny brads.  This full layer was then adhered to the front of a yellow card base.


These cards are reusing a small card I made for a Stampin up party I held years ago.  I had leftovers and they just sat. 

The accent layer has a Tango Tangerine base with Tempting Turquoise designer paper.  I added an accent strip in orange punched with the Stampin Up Dotted Scallop Ribbon border punch. 

The tag was stamped with the Too Terrific Tags set in Tempting Turquoise on Whisper White. Layer onto Tango Tangerine with a Tempting Turquoise grosgrian ribbon held in place with an orange tiny brad. 

The Whisper White layer was embossed with the Swiss Dots folder and trimmed to leave a small border. It was adhered to the turquoise card base.

The stack is growing!

Wednesday, April 21, 2021

Birthday Tag

I made a tag for a joint gift for my niece who has a birthday in April.

I started with the QuicKutz Sewing Machine 4x4 thinlit.  The die cuts all the pieces which needed to be assembled.  It meant cutting once for each of the 4 colors - the body of the machine from olive green, feed dog plate, pressure foot and buttons in black, the other adjustment buttons in taupe, the spool of thread in black and red.  

I placed a piece of packing tape on a hard surface and slowly placed the pieces in place sticking them to the tape.  Once all the pieces were in place I used an exacto knife to trim the excess tape from around the outside edges of the die cut.

I then cut the tag with the Tim Holtz Cabinet die one kraft embossed with the SwissDots folder and one ivory.  I used the Crop a dile to make a hole in the top.  I adhered the sewing machine die cut to the tag with 3D foam tape.

I ran a length of red twine through the hole and it's ready to be attached.

The HB diecut was received in a swap so I have no credits.

It is very cute but a lot of work which explains this is the first time I have used it.

Monday, November 27, 2017

Card Club - November - Kraft Tag

I started with the kraft and red glitter tag.  I added a red satin ribbon.

I chose a dark brown card base and added an embossed layer.  The white card stock layer was created with the Stampin Up Petals a Plenty folder and leaves a small border of the card showing.  The embossed layer is adhered to the card front.

The tag was adhered to the embossed layer then a tiny red brad was placed through a hole made with a push pin. The prongs were spread apart on the inside of the card.

I created the greeting by printing it on white card stock and punching them out with the SU Modern Label punch.  I added a red glitter label which was cut in half crosswise and adhered behind the greeting offset on the left and right.  The greeting is adhered to the card front with 3D foam tape.

Monday, October 23, 2017

Card Club - October - Gold Handmade Paper

I started with the handmade paper which was painted and highlighted with gold. I cut it into 3" squares.  I then cut 4" squares from gold card stock.
I chose a rust card onto which I glued the gold square on the left side of a landscape card.  I then wrapped a piece of gold metallic ribbon across the front and taped the ends to the inside of the card.
I adhered the gold handmade paper on top of the ribbon.


I chose the grey in the paper for the greeting.  I printed small tags which I trimmed along the edge by hand with scissors.  I repeated the gold one more by choosing a gold paper clip to hold the greeting to the card.

I chose terra cotta, rust and burgundy card bases for these kits.  The greeting can be excluded with no detriment to the final card.

Monday, November 7, 2016

Be Present for Christmas - Lesson 5 - Watch & Wait

Today's activity is preparing a Grateful Jar.  I started with 500 ml Jam Jar.  I created a tag and printed it on kraft card stock.  I made the corners round with a punch.  I put a 1/8" hole in the top left hand corner.  I cut a length of white cotton thread and ran the fold through the hole and pulled the ends back through the loop and pulled it taut.  I placed the cotton onto the red ribbon and added a knot and trimmed the ends.
The red ribbon was then tied onto the neck of the jar and knotted twice and the ends were trimmed.
I adhered a small glassine sleeve on the back of the tag and placed my grateful notes inside.  These notes are small pieces of paper.
Regularly, write down things you are grateful for and place the note in the jar.  When you are having a bad day, open the jar, read about the gifts and blessings you have received and surely your spirits will be uplifted.

I'm selecting my lessons from The Greatest Gift by Ann Voskamp.  The book provides 24 lessons for each day of Advent of which I have chosen 6 for this class.  We will have readings, questions, discussion, and an activity each week.

In this weeks lesson we read Habakkuk 2:1, 3:16-19 which talks about how the people are going astray and the prophet beseeches God to help.  Despite the sad state of affairs he decides to go to the top of the watch tower and shout "I will trust You, God, and I will watch, and I will wait.  I will find joy, make joy, take joy, see joy!  Rejoice and re-joys again!"

Saturday, April 23, 2016

Sympathy - Canvas Butterfly

This is a sympathy card for a friend who lost her husband Ray this week.  I'm attending his funeral today and we will celebrate his full life of 93 years.

I spread some Tim Holtz Faded Jeans Distress Stain onto my acrylic plate then just pressed the kraft card front onto it to create a mono print.
I created the tag by cutting a strip of navy card stock to 2" wide and punched the end with the Stampin Up Banner Triple Punch.  The kraft layer was cut to 1.5" and punched the same way.  These were adhered together. I stamped the sentiment from the SU Simply Sketched stamp set in SU Night of Navy ink.  I adhered the canvas butterfly above the sentiment with Zots. I punched a hole in the upper left hand corner and added a cotton string matching the butterfly.  The tag is adhered to the card front with 3D foam tape.

Submitting to the following challenge:
Tag You're It Challenge #45

Monday, October 26, 2015

Card Club - October - Oval Tag

It's time for Card Club again.  For this card I started with a turquoise card and added a Stampin Up  Pretty Print embossing folder.  This was adhered to the card front.  I then aligned the largest flower and the tag to the card front and made a hole through to the card front with a push pin. Then I placed the small, medium and large flowers onto the brad and put it through the hole I made and pressed the prongs apart on the inside of the card.  I then aligned the 3 small flowers on the right hand side and again made holes with the push pin. I place the flower sequin and the flower onto the brad and push them through the card front and pressed the prongs apart on the inside of the card.  And repeated the process for the remaining flowers. 

Monday, September 28, 2015

Vertical Greeting Tag

I had made this card as a sample for card club and when it came time to make up the kits I decided to not go ahead for these reasons: the die cut alignment, the banner alignment and the juvenile color scheme of the card.  I could have worked with the different papers to improve the scheme but decided to just replace it. 

This card is white with a purple gingham designer paper layer on the front.  I created the tag with the new Stampin Up Triple Banner punch.  I chose a piece of solid card stock in purple which coordinated with the designer paper.  I placed my Tattered Lace Vertical Greeting dies on my magnetic cutting pad.  Placed my card stock and ran it through the Big Shot.  I adhered the greeting layer to the back white banner.  Then I put a hole in the top and ran a piece of white fiber through.  I adhered the banner greeting to the card front with 3D foam tape. I then placed a trio of buttons to the left.  They are held in place with Zots.

Friday, June 12, 2015

Christmas Wreath

I started with a light green card fold in the tall orientation.  I cut the frame from deep red card stock with the Die-namics Stitched Square Frames.  It's 4" square.  I backed it with a piece of painted brown paper which repeats the brown in the pine cones.  I stamped the greeting on white with brown ink and a clear stamp.  I layered that onto the same red card stock as the frame. These were layered together then I punched a 1/8" hole in the corner and added an olive thread to it.  I then tied the tag onto the frame with the thread.  The frame accent was then adhered to the top of the card front.  I added some double sided tape to the back of the tag to keep it in place on the card front below the frame.  I then adhered the wreath accent (brand unknown) over the frame with 3D foam tape.

Submitting to the following challenges:
Holly Jolly Christmas Challenges - Frame It.
City Crafter Challenge - tic TAG toe

Friday, May 1, 2015

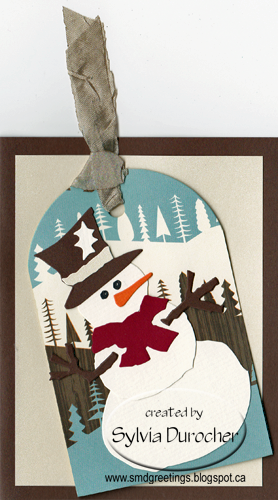
Christmas Card Challenge - May - Snowman - Paper Piecing - Tag

Here's my card for the Christmas Card Challenge for May which is Snowman, Paper Piecing and Tag.  

I chose the Tim Holtz Assembly Snowman Bigz die which made the paper piecing very easy.  I selected the background designer paper first.  It's American Crafts - Campy Trails.  I got a real winter feel from this paper so thought it went well with the snowman.  As a background to the tag I placed a piece of cream pearl card stock, cut to leave a large border all the way around. I decided to use the Jumbo Crescent Tag from Sizzix and cut it from the designer paper.  The paper has a warm white in it so I chose a warm white card stock to cut my snowman. The band on the hat is the same cream pearl card stock. Brown for his arms, a deep red for his scarf and orange for his carrot nose. I drew the eyes in with a black marker. I was tempted to put something on his belly but resisted.   I used quick dry glue from Scotch to assemble the pieces of my snowman.  I glued him to the large tag.  I added a soft seam binding in a complimentary color.  The tag was adhered to the card front with 3D foam tape.

Have you started your Christmas Card stash?  Today may be a good day.  I hope this card provides some inspiration for you to start or continue.  Leave me a comment if you have started!

Tuesday, March 31, 2015

R2G Card Kit - Gold Tags

I started with the gold ornament tags.  I found blue cards that coordinated well.  I chose a pale yellow layer which I embossed with the Cuttlebug Victoria folder.  It was cut to leave a small border.  I wrapped a seam binding in warm dark blue from top to bottom and taped the ends to the back.  The embossed layer was then adhered to the card front.  The large gold ornament tag was then adhered to the card front with 3D foam tape.  A quick card in soft warm colors. 

Sunday, January 18, 2015

R2G Card Kit - Valentines - Owl Heart Circle

Do all Valentine's card need to be pink or red?
I don't think so.  I found this blue and green round tag freebie at Poppies at Play.  I sized it to 2" and cut it with one of the smooth circle Spellbinders nestabilities.  Then I cut a heart circle frame with SB - Heart Circles nestabilities which was perfect for the 2" circle.  I added a 2" strip of black card stock layered onto a wider strip of white card stock.  This was placed onto a blue card.  Once the owl greeting was adhered to the green heart circle it was adhered to the card front with 3D foam tape.  I thought the sentiment was great!

Monday, November 24, 2014

Card - SU Thanks

I made this card for a friend who lent me a stamp stamp for a couple of weeks.

The card is Very Vanilla and the designer paper is from Everyday Enchantment pack.   I printed the greeting from the So Happy for You Stamp set on to VV card stock and trimmed it.  I added stitching with Red Riding Hood marker. I dyed the string with the same marker.  I added a length of 3/8"taffeta same colored ribbon around the designer paper then adhered it to the card front.  I tied the tag to the the ribbon with a small string.  I held the tag in place with a piece of 3D foam tape.

Sunday, September 14, 2014

R2G Card Kit - Nutcracker Ballerina

I found this paper and just had to make cards with it.  It's the Graphics 45 - Nutcracker Sweet Collection - Snowflake Waltz. I matched it with the Bazzill Great Lakes textured card stock.

I cut the DSP to leave a small border. The paper is so nice that I did not add much so I would not hide the paper. I wrapped and tied a piece of iridescent blue fiber around the DSP layer and adhered it to the card front.  I added a vellum tag punched with the Stampin Up small tag punch. I added a Martha Stewart Arctic Snowflake punch from pearl paper, punched a small hole at the top and and tied it onto the card. Gorgeous!

Is the Nutcracker part of your Christmas traditions?  These would make great cards for you to give.

Monday, January 27, 2014

Card Club - My Thank You Card


I used this washi tape on my thank you card.  I bought it at a wedding supply store which provided a different selection of tape than our regular craft store.  I like the variety of color in this one.  Here's the turquoise envelope I wrapped their cards in.  I added a tag with turquoise bakers twine and stapled the it to the envelope and tied a bow.

Tuesday, January 21, 2014

Challenge - Dress Up a Die Cut

I made this card for a Dress Up a Die Cut challenge.  I started with an ivory card. I then cut a tea cup with the Cricut and the Folk Art Festival cartridge.  I used a bold graphic designer paper.   I added a row of daisies, punched with a Martha Stewart border punch.  I adhered it to the tea cup then trimmed it to the edges. I added a piece of black grosgrain ribbon across the centre and taped the ends to the back.  I added a oval shape below the cup to represent a saucer.  The tea cup was added over this piece.  I added a hand written tag with a flag end which is held in place with 3D foam tape.  I used a black ink pad to smudge the edges of the card.